2020 PEUGEOT 3008 jack
[x] Cancel search: jackPage 194 of 308
192
In the event of a breakdown
To access it:
► Open the boot.
►
Fold the concertina panels.
►
Install the third row seats.
►
Unclip the required tools from the boot sill
trim.
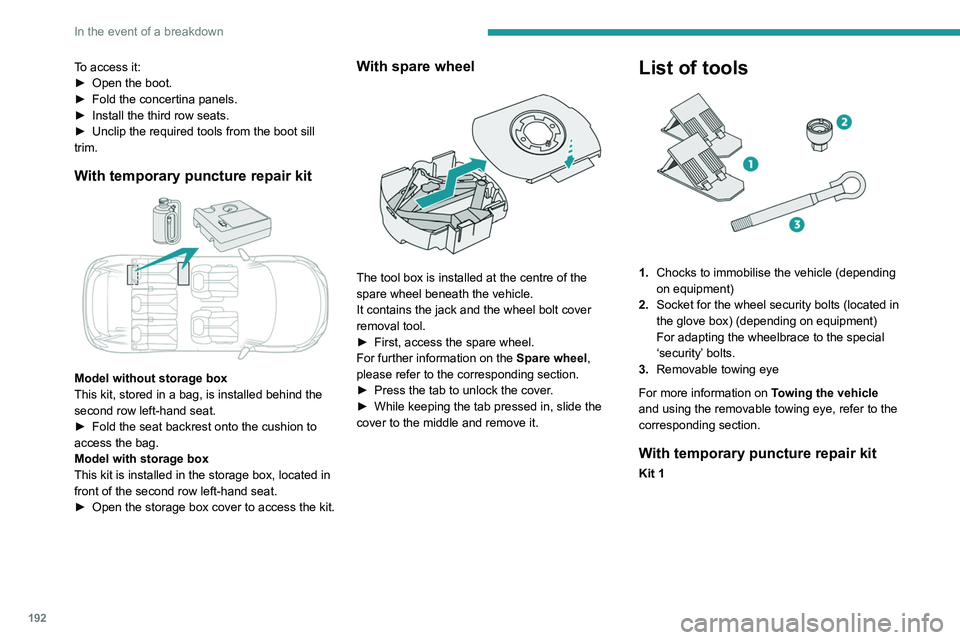
With temporary puncture repair kit
Model without storage box
This kit, stored in a bag, is installed behind the
second row left-hand seat.
►
Fold the seat backrest onto the cushion to
access the bag.
Model with storage box
This kit is installed in the storage box, located in
front of the second row left-hand seat.
►
Open the storage box cover to access the kit.
With spare wheel
The tool box is installed at the centre of the
spare wheel beneath the vehicle.
It contains the jack and the wheel bolt cover
removal tool.
►
First, access the spare wheel.
For further information on the
Spare wheel,
please refer to the corresponding section.
►
Press the tab to unlock the cover
.
►
While keeping the tab pressed in, slide the
cover to the middle and remove it.
List of tools
1. Chocks to immobilise the vehicle (depending
on equipment)
2. Socket for the wheel security bolts (located in
the glove box) (depending on equipment)
For adapting the wheelbrace to the special
‘security’ bolts.
3. Removable towing eye
For more information on Towing the vehicle
and using the removable towing eye, refer to the
corresponding section.
With temporary puncture repair kit
Kit 1
Page 195 of 308
193
In the event of a breakdown
8
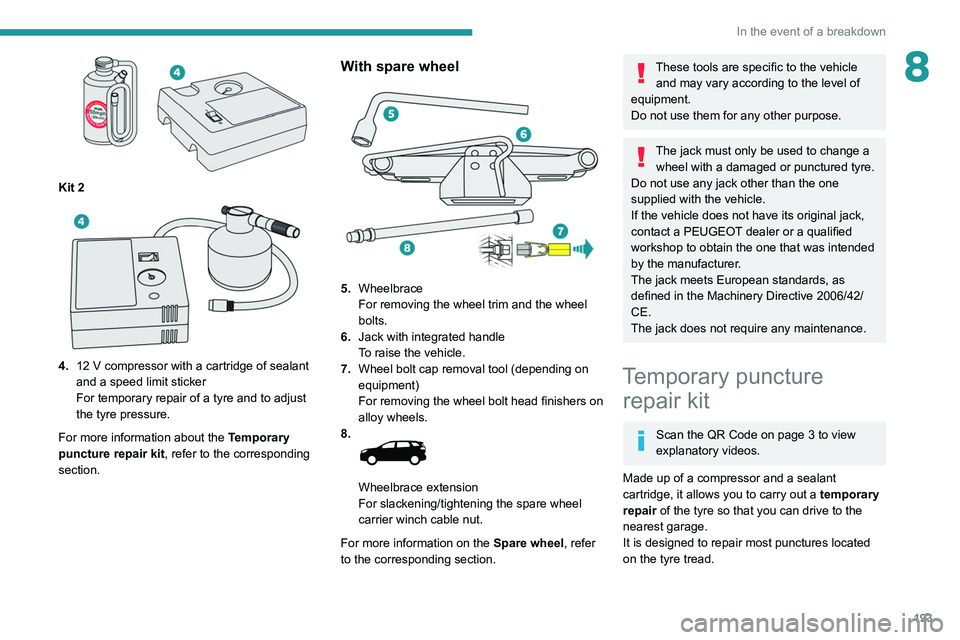
Kit 2
4.12 V compressor with a cartridge of sealant
and a speed limit sticker
For temporary repair of a tyre and to adjust
the tyre pressure.
For more information about the Temporary
puncture repair kit, refer to the corresponding
section.
With spare wheel
5. Wheelbrace
For removing the wheel trim and the wheel
bolts.
6. Jack with integrated handle
To raise the vehicle.
7. Wheel bolt cap removal tool (depending on
equipment)
For removing the wheel bolt head finishers on
alloy wheels.
8.
Wheelbrace extension
For slackening/tightening the spare wheel
carrier winch cable nut.
For more information on the Spare wheel, refer
to the corresponding section.
These tools are specific to the vehicle and may vary according to the level of
equipment.
Do not use them for any other purpose.
The jack must only be used to change a wheel with a damaged or punctured tyre.
Do not use any jack other than the one
supplied with the vehicle.
If the vehicle does not have its original jack,
contact a PEUGEOT dealer or a qualified
workshop to obtain the one that was intended
by the manufacturer.
The jack meets European standards, as
defined in the Machinery Directive 2006/42/
CE.
The jack does not require any maintenance.
Temporary puncture repair kit
Scan the QR Code on page 3 to view
explanatory videos.
Made up of a compressor and a sealant
cartridge,
it allows you to carry out a temporary
repair of the tyre so that you can drive to the
nearest garage.
It is designed to repair most punctures located
on the tyre tread.
Page 196 of 308
194
In the event of a breakdown
Repair procedure
Do not remove any foreign bodies (e.g.
nail, screw) which have penetrated into
the tyre.
►
Park the vehicle without obstructing traffic
and apply the parking brake.
►
Follow the safety instructions (hazard
warning lamps, warning triangle, high visibility
jacket, etc.) according to the legislation in force
in the country in which you are driving.
►
Switch the ignition off.
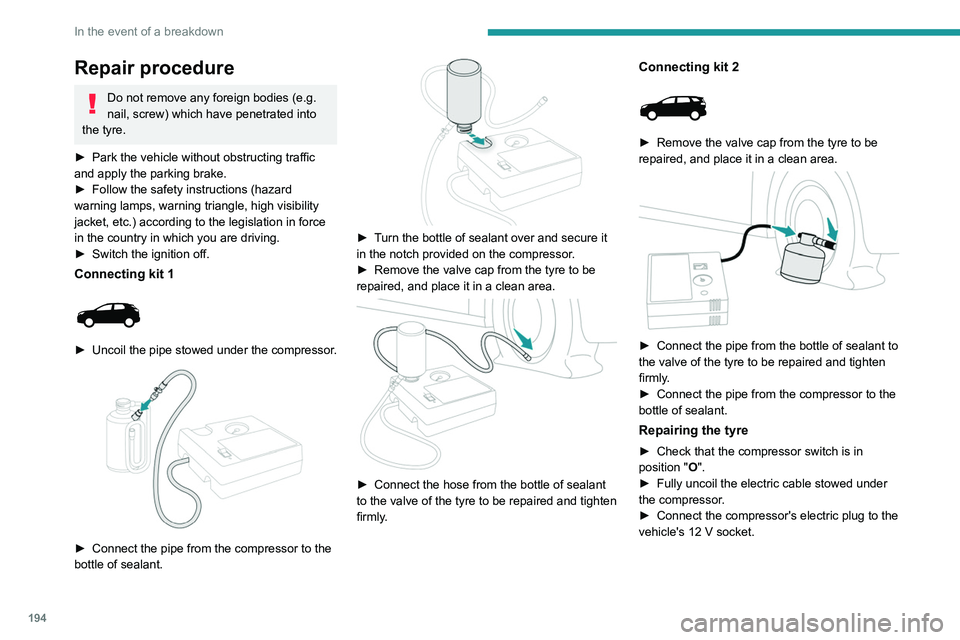
Connecting kit 1
► Uncoil the pipe stowed under the compressor.
► Connect the pipe from the compressor to the
bottle of sealant.
► Turn the bottle of sealant over and secure it
in the notch provided on the compressor.
►
Remove the valve cap from the tyre to be
repaired, and place it in a clean area.
► Connect the hose from the bottle of sealant
to the valve of the tyre to be repaired and tighten
firmly
.
Connecting kit 2
► Remove the valve cap from the tyre to be
repaired, and place it in a clean area.
► Connect the pipe from the bottle of sealant to
the valve of the tyre to be repaired and tighten
firmly
.
►
Connect the pipe from the compressor to the
bottle of sealant.
Repairing the tyre
► Check that the compressor switch is in
position "O".
►
Fully uncoil the electric cable stowed under
the compressor
.
►
Connect the compressor's electric plug to the
vehicle's 12
V socket.
Page 201 of 308
199
In the event of a breakdown
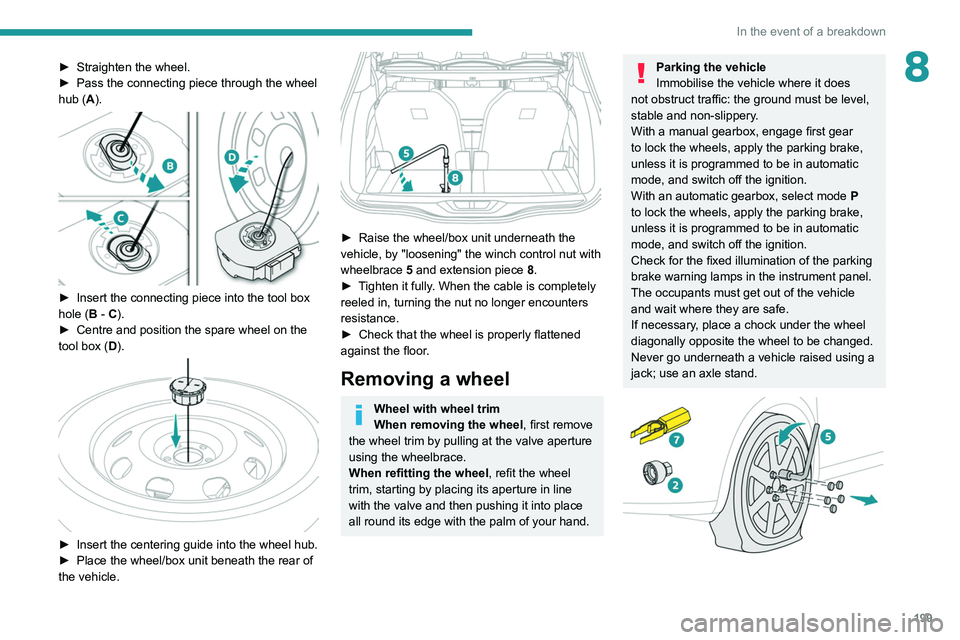
8► Straighten the wheel.
► Pass the connecting piece through the wheel
hub (
A).
► Insert the connecting piece into the tool box
hole ( B - C).
►
Centre and position the spare wheel on the
tool box (
D).
► Insert the centering guide into the wheel hub.
► Place the wheel/box unit beneath the rear of
the vehicle.
► Raise the wheel/box unit underneath the
vehicle, by "loosening" the winch control nut with
wheelbrace 5
and extension piece 8.
►
T
ighten it fully. When the cable is completely
reeled in, turning the nut no longer encounters
resistance.
►
Check that the wheel is properly flattened
against the floor
.
Removing a wheel
Wheel with wheel trim
When removing the wheel , first remove
the wheel trim by pulling at the valve aperture
using the wheelbrace.
When refitting the wheel , refit the wheel
trim, starting by placing its aperture in line
with the valve and then pushing it into place
all round its edge with the palm of your hand.
Parking the vehicle
Immobilise the vehicle where it does
not obstruct traffic: the ground must be level,
stable and non-slippery.
With a manual gearbox, engage first gear
to lock the wheels, apply the parking brake,
unless it is programmed to be in automatic
mode, and switch off the ignition.
With an automatic gearbox, select mode
P
to lock the wheels, apply the parking brake,
unless it is programmed to be in automatic
mode, and switch off the ignition.
Check for the fixed illumination of the parking
brake warning lamps in the instrument panel.
The occupants must get out of the vehicle
and wait where they are safe.
If necessary, place a chock under the wheel
diagonally opposite the wheel to be changed.
Never go underneath a vehicle raised using a
jack; use an axle stand.
Page 202 of 308

200
In the event of a breakdown
► To remove the wheel bolt cover on each of
the bolts, use tool 7 (alloy wheels).
►
Fit security socket
2 on wheelbrace
5
to
slacken the security bolt.
►
Slacken the other bolts using the
wheelbrace
5
only.
► Place the foot of jack 6 on the ground and
ensure that it is directly below the front A or
rear
B jacking point on the underbody, whichever
is closest to the wheel to be changed.
► Extend jack 6 until its head comes into
contact with jacking point A or B; contact area A
or B on the vehicle must be properly inserted
into the central part of the head of the jack.
►
Raise the vehicle until there is sufficient
space between the wheel and the ground to
admit the spare (not punctured) wheel easily
.
Ensure that the jack is stable. If the
ground is slippery or loose, the jack may
slip or collapse - risk of injury!
Take care to position the jack strictly at
one of the jacking points
A
or B under the
vehicle, ensuring that the head of the jack is
centred under the contact area of the vehicle.
Otherwise, there is a risk of damage to the
vehicle and/or of the jack collapsing - risk of
injury!
► Remove the bolts and store them in a clean
place.
►
Remove the wheel.
Fitting a wheel
Fitting a steel or ‘space-saver’ type
spare wheel
If the vehicle is equipped with alloy wheels,
the washers do not make contact with the
steel or ‘space-saver’ type spare wheel. The
wheel is secured by the conical surface of
each bolt.
► Fit the wheel on the hub.
► Screw in the bolts by hand as far as possible.
►
Pre-tighten the security bolt using the
wheelbrace
5
equipped with a security socket
2
.
►
Pre-tighten the other bolts using the
wheelbrace
5
only.
Page 203 of 308

201
In the event of a breakdown
8
► Lower the vehicle again fully.
► Fold jack 6 and remove it.
► Tighten the security bolt using the
wheelbrace 5 equipped with a security socket 2 .
►
T
ighten the other bolts using the
wheelbrace
5
only.
►
Refit the bolt covers to each of the bolts
(depending on equipment).
►
Store the tools.
After changing a wheel
Store the punctured wheel in the boot or,
depending on version, remove the central cover
first to store it beneath the floor in place of the
spare wheel.
With a "space-saver" type spare wheel
Deactivate certain driving aid functions
(Active Safety Brake, Adaptive cruise control,
etc.).
Do not exceed the maximum authorised
speed of 50 mph (80
km/h).
Driving with more than one “space-saver”
type spare wheel is prohibited.
Visit a PEUGEOT dealer or a qualified
workshop as soon as possible to have
the tightness of the bolts and the pressure of
the spare wheel checked.
Have the punctured tyre examined. After
inspection, the technician will advise you on
whether the tyre can be repaired or if it must
be replaced.
Changing a bulb
In some weather conditions (e.g. low
temperature or humidity), misting on the
internal surface of the glass of the headlamps
and rear lamps is normal, and will disappear
after the lamps have been on for a few
minutes.
The headlamps have polycarbonate lenses with a protective coating:
–
Do not clean them with a dry or abrasive
cloth, nor with detergent or solvent
products.
–
Use a sponge and soapy water or a pH
neutral product.
–
When using a high-pressure washer on
persistent marks, do not keep the lance
directed towards the headlamps, lamps or
their edges for too long, so as not to damage
their protective coating and seals.
Changing a bulb must only be done with
the ignition off and after the headlamp /
lamp has been switched off for several
minutes - risk of serious burns!
Do not touch the bulb directly with your
fingers; use a lint-free cloth.
It is essential only to use anti-ultraviolet
(UV) type bulbs, so as not to damage the
headlamp.
Page 234 of 308

232
Bluetooth® audio system
When the radio station is displayed in the
screen , press "OK" to display the
contextual menu.
(Frequency search (RDS), DAB
/ FM auto
tracking, RadioText (TXT) display, Information
on the station, etc.)
DAB / FM station tracking
"DAB" does not have 100% coverage of
the country.
When the digital signal is weak, "DAB
/ FM
auto tracking" allows you to continue
listening to the same station, by automatically
switching to the corresponding analogue FM
station (if it exists).
When the "DAB
/ FM auto tracking" is active,
the DAB station will be selected automatically.
Press the MENU button.
Select "Multimedia" and confirm.
Select "DAB / FM auto tracking" and
confirm.
If "DAB / FM auto tracking" tracking is
enabled, there is a lag of a few seconds
when the system switches to the analogue
FM station sometimes with a change in
volume.
If the "DAB" station you are listening to is
not available on FM (" DAB/FM" option
struck out), or if "DAB
/ FM auto tracking" is
not on, the sound will be cut when the digital
signal is too weak.
Media
USB port
Insert the USB memory stick into the USB
port or connect the USB device to the
USB port using a suitable cable (not supplied).
The system changes automatically to "USB"
source.
To protect the system, do not use a USB hub.
Any additional devices connected to the system must comply with the standard
applicable to the product and/or the standard
IEC 60950-1.
The system builds playlists (in temporary
memory); this operation can take from a
few seconds to several minutes at the first
connection.
Reduce the number of non-music files and the
number of folders to reduce the waiting time.
Playlists are updated every time a new USB
memory stick is connected.
When the USB port is used, the portable
device charges automatically.
Play mode
The play modes available are:
– Normal : the tracks are played in order,
depending on the classification of the selected
files.
–
Random
: the tracks in an album or folder are
played in a random order.
–
Random on all media : all of the tracks saved
in the media are played in random order
.
–
Repeat
: the tracks played are only those from
the current album or folder.
Press this button to display the contextual
menu for the Media function.
Press this button to select the chosen
play mode.
Press this button to confirm.
The choice made is displayed at the top of the
screen.
Choosing a track to play
Press one of these buttons to go to the
previous / next track.
Press one of these buttons to go to the
previous / next folder.
File classification
Make a long press on this button to
display the different classifications.
Select by "Folder" / " Artist" / "Genre" /
"Playlist".
Depending on availability and type of device
used.
Press OK to select the desired
classification, then press OK again to
confirm.
Playing files
Make a short press on this button to
display the chosen classification.
Navigate in the list using the left / right
and up / down buttons.
Confirm the selection by pressing OK.
Press one of these buttons to go to the
previous / next track in the list.
Press and hold one of these buttons for fast
forward or rewind.
Press one of these buttons to go to the
previous / next "Folder" / " Artist" /
"Genre" / "Playlist"* in the list.
Input AUX socket (AUX)
Depending on equipmentConnect a portable device (MP3 player,
etc.) to the auxiliary jack socket using an
audio cable (not supplied).
Any additional devices connected to the system must comply with the standard
* Depending on availability and the type of device used.
Page 235 of 308

233
Bluetooth® audio system
10Select by "Folder" / "Artist" / "Genre" /
"Playlist".
Depending on availability and type of device
used.
Press OK to select the desired
classification, then press OK again to
confirm.
Playing files
Make a short press on this button to
display the chosen classification.
Navigate in the list using the left / right
and up / down buttons.
Confirm the selection by pressing OK.
Press one of these buttons to go to the
previous / next track in the list.
Press and hold one of these buttons for fast
forward or rewind.
Press one of these buttons to go to the
previous / next "Folder" / " Artist" /
"Genre" / "Playlist"* in the list.
Input AUX socket (AUX)
Depending on equipmentConnect a portable device (MP3 player,
etc.) to the auxiliary jack socket using an
audio cable (not supplied).
Any additional devices connected to the system must comply with the standard
* Depending on availability and the type of device used.
applicable to the product and/or the standard
IEC 60950-1.
Press the SOURCE button several times
in succession and select " AUX".
First adjust the volume on your portable device
(to a high level). Then adjust the volume on your
audio system. Controls are managed via the
portable device.
Do not connect the same device to both
the auxiliary jack socket and the USB
port at the same time.
CD player
Insert circular compact discs only.
Some anti-pirating systems, on original discs
or CDs copied using a personal recorder, may
cause faults which are no reflection on the
quality of the original player.
Insert a CD in the player, play begins
automatically.
External CD players connected via the
USB port are not recognised by the
system.
To play a disc which has already been inserted, press the SOURCE button
several times in succession and select " CD".
Press one of the buttons to select a track
on the CD.
Press the LIST button to display the list of
tracks on the CD.
Press and hold one of these buttons for
fast forward or rewind.
Playing an MP3 compilation
Insert an MP3 compilation in the CD player.
The audio equipment searches for all of the
music tracks, which may take anything between
a few seconds and several tens of seconds,
before play begins.
On a single disc, the CD player can read
up to 255 MP3 files spread over 8
directory levels.
However, it is advisable to keep to a limit of
two levels to reduce the access time before
the CD is played.
The folder structure is not observed during
playback.
All of the files are displayed on a single level.
To play a disc which has already been inserted, press the SOURCE button
several times in succession and select " CD".
Press one of the buttons to select a folder
on the CD.
Press one of the buttons to select a track
on the CD.
Press the LIST button to display the list of
directories of the MP3 compilation.