Page 92 of 229

90Climate controlDemisting and defrosting
● Press $: the air distribution is
directed towards the windscreen.
● Set temperature controller :
to warmest level.
● Set fan speed E to highest level.
● Switch on heated rear window f.
● Open side air vents as required and direct them towards the doorwindows.
Air conditioning system
Controls for: ● temperature :
● air distribution w, x and y
● fan speed E
● demisting and defrosting $
● cooling A/C
● air recirculation n
● heated rear window and exterior mirrors f
● heated seats "
Heated rear window f3 25.
Heated exterior mirrors f3 22.
Heated seats " 3 31.
Some setting changes are indicated briefly in the Info Display. Activated
functions are indicated by the LED in
the respective button.
Temperature
Adjust the temperature by
turning : to the desired
temperature.red area:warmerblue area:colderHeating will not be fully effective until
the engine has reached normal
operating temperature.
Air distributionw:to windscreen and front door
windowsx:to head area via adjustable air
ventsy:to foot well and windscreen
All combinations are possible.
Fan speed
Adjust the air flow by turning E to the
desired speed.
clockwise:increaseanticlockwise:decrease
Page 94 of 229

92Climate control● Set temperature control : to
coldest level.
● Set fan speed E to highest level.
● Open all vents.
Heated rear window, windscreen and exterior mirrors f 3 25.
Heated seats q 3 31.
Demisting and defrosting the
windows
● Press $: the air distribution is
directed towards the windscreen.
● Set temperature controller :
to warmest level.
● Switch on cooling A/C, if
required.
● Set fan speed E to highest level.
● Switch on heated rear window
f.
● Open side air vents as required and direct them towards the doorwindows.
Note
If à is pressed while the engine is
running, an Autostop will be inhibited until à is pressed again.
If à is pressed while the engine is in
an Autostop, the engine will restart
automatically.
Stop-start system 3 103.
Electronic climate control system
Controls for: ● temperature :
● MENU enters the Climate setting
menu in the Info Display
● fan speed E
● automatic mode AUTO
● cooling A/C
● manual air recirculation n
● demisting and defrosting $
● heated rear window and exterior mirrors f
● heated seats "
Heated rear window f 3 25.
Heated exterior mirrors f 3 22.
Heated seats " 3 31.
In automatic mode, temperature, fan
speed and air distribution are
regulated automatically.
Activated functions are indicated by
the LED in the respective control.
The electronic climate control system
is only fully operational when the
engine is running.
Page 97 of 229

Climate control95Manual air recirculation n
Press n to activate the air
recirculation mode. The LED in the
button illuminates to indicate
activation.
Press n again to deactivate
recirculation mode.
9 Warning
The exchange of fresh air is
reduced in air recirculation mode.
In operation without cooling, the
air humidity increases, so the
windows may mist up from inside.
The quality of the passenger
compartment air deteriorates,
which may cause the occupants to
feel drowsy.
In warm and very humid ambient air
conditions, the windscreen may mist
up from outside, when cold air is
directed towards it. If windscreen
mists up from outside, activate
windscreen wiper and deactivate w.
Demisting and defrosting the
windows $
● Press $. The LED in the button
illuminates to indicate activation.
● Temperature and air distribution are set automatically and the fan
runs at high speed.
● Switch on air conditioning by pressing A/C, if required.
● Switch on heated rear window
f.
● To return to previous mode, press $ again. To return to
automatic mode, press AUTO.
Note
If à is pressed while the engine is
running, an Autostop will be inhibited until à is pressed again.
If à is pressed while the engine is in
an Autostop, the engine will restart
automatically.
Stop-start system 3 103.
Deactivation of electronic climate control system
Cooling, fan and automatic mode can
be switched off by turning one of the rotary rings anticlockwise.
Activation by switching on the fan or
pressing AUTO.
Heated rear window, windscreen and
exterior mirrors f 3 25.
Heated seats " 3 31.
Page 148 of 229

146Driving and operatingSide blind spot alertSide blind zone alert assist helps to
avoid crashes due to unintentional
lane departures when an object is
detected within a specified blind spot zone.
The system displays a visual alert in
each exterior mirror, when detecting
objects that may not be visible in the
interior and exterior mirrors.
Side blind spot alert uses some of the
advanced parking assist sensors
which are located in the front and rear bumper on both sides of the vehicle.9 Warning
Side blind zone assistant system
is only a lane changing aid and does not replace driver vision.
Side blind zone assistant does not detect:
● Vehicles outside the side blind zones which may be rapidly
approaching.
● Pedestrians or animals.
● Non-moving objects, e.g. stationary vehicles, street
lights, road signs, etc.
Failure to use proper care when changing lanes may result in
damage to the vehicle, injury, or
death. Always check the outside
and rearview mirrors, glance over
your shoulder, and use the turn
signal before changing lanes.
Activation
The system can be activated via the
vehicle settings menu in the Info
Display.
Info Display 3 75.
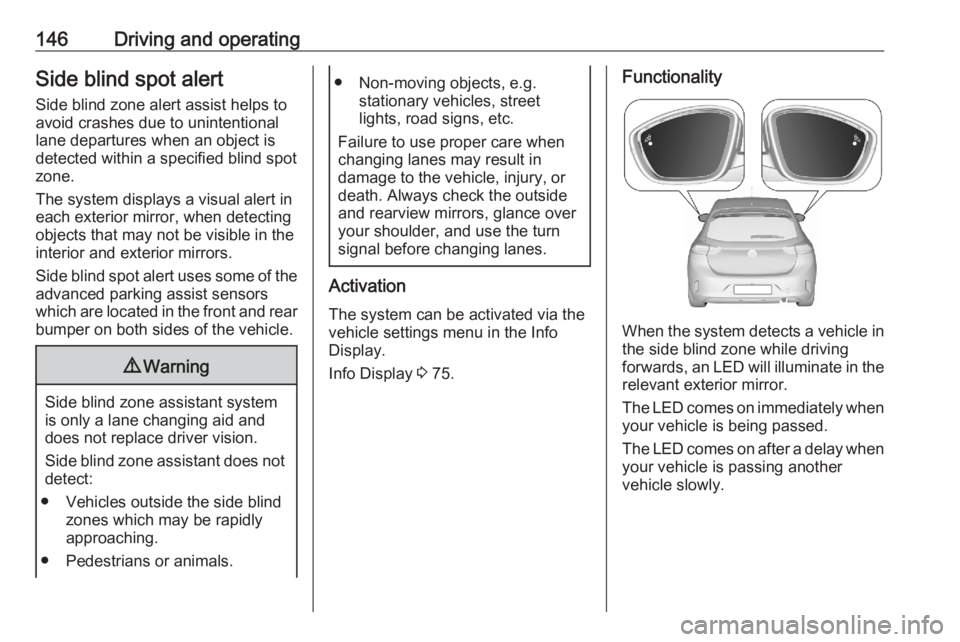
Functionality
When the system detects a vehicle in
the side blind zone while driving
forwards, an LED will illuminate in the
relevant exterior mirror.
The LED comes on immediately when your vehicle is being passed.
The LED comes on after a delay when
your vehicle is passing another
vehicle slowly.
Page 149 of 229

Driving and operating147Operation conditions
The following conditions must be
fulfilled for proper operation:
● all vehicles are moving in the same direction and in adjacent
lanes
● depending on the configuration of
the vehicle, the speed of your
vehicle is between 12 or 33 and
140 km/h
● passing a vehicle with a speed difference of less than 10 km/h
● another vehicle is passing with a speed difference of less than
25 km/h
● the traffic flow is normal
● driving on a straight or slightly curved road
● the vehicle is not pulling a trailer
● the sensors are not covered by mud, ice or snow
● the warning zones in the door mirrors or the detection zones on
front and rear bumper ar not
covered with adhesive labels or
other objectsNo alert will be given in the following
situations:
● in the presence of non-moving objects, e.g. parked vehicles,
barriers, street lamps, road signs
● with vehicles moving in the opposite direction
● driving on a winding road or a sharp corner
● when passing or being passed by
a very long vehicle, e.g. lorry,
coach, which is at the same time
detected at the rear in the blind
spot angle and present in the
driver's forward field of vision
● in very heavy traffic, vehicles detected in front and behind are
confused with a lorry or a
stationary object
● when passing too quickly
Deactivation The system can be activated via the
vehicle settings menu in the Info
Display.
Info Display 3 75.The state of the system is memorised
when switching off the ignition.
The system is automatically
deactivated when towing an
electrically connected trailer.
Due to adverse weather conditions,
such as heavy rain, false detections
may occur.
Fault
In the event of a fault, C illuminates
in the instrument panel, accompanied a display message. Contact a dealer
or a qualified workshop to have the
system checked.
Active side blind spot detection In addition to the regular side blind
spot alert, the active side blind spot
detection corrects the vehicle's
trajectory by turning the steering
wheel gently back into lane when an
object is detected within a specified
blind spot zone. The system is only
active when side blind spot alert and
lane keep assist are activated as well.
Lane keep assist 3 152.
Page 151 of 229

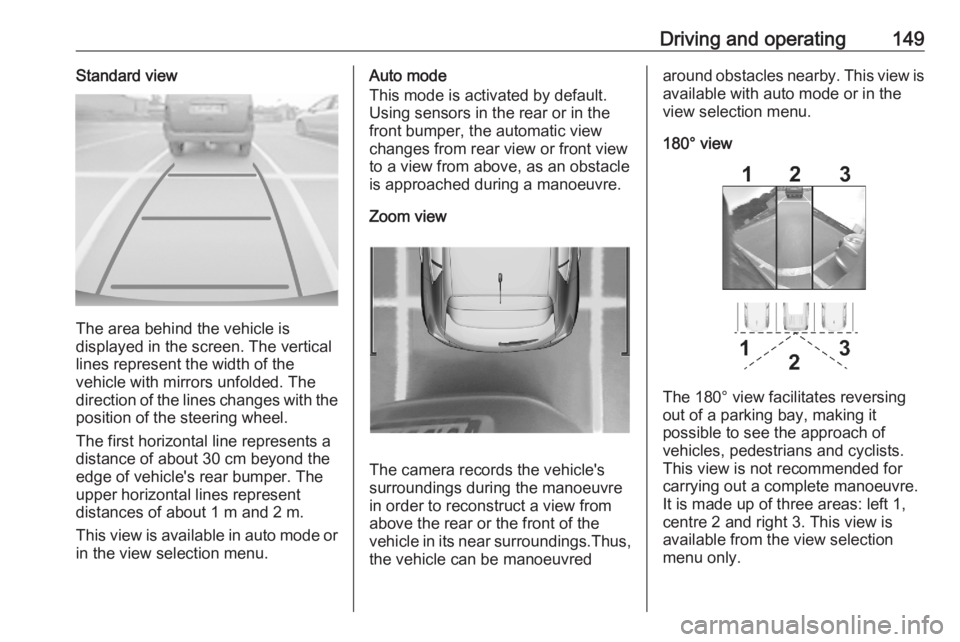
Driving and operating149Standard view
The area behind the vehicle is
displayed in the screen. The vertical
lines represent the width of the
vehicle with mirrors unfolded. The
direction of the lines changes with the position of the steering wheel.
The first horizontal line represents a
distance of about 30 cm beyond the
edge of vehicle's rear bumper. The
upper horizontal lines represent
distances of about 1 m and 2 m.
This view is available in auto mode or
in the view selection menu.
Auto mode
This mode is activated by default.
Using sensors in the rear or in the
front bumper, the automatic view
changes from rear view or front view
to a view from above, as an obstacle is approached during a manoeuvre.
Zoom view
The camera records the vehicle's
surroundings during the manoeuvre
in order to reconstruct a view fromabove the rear or the front of the
vehicle in its near surroundings.Thus,
the vehicle can be manoeuvred
around obstacles nearby. This view is available with auto mode or in the
view selection menu.
180° view
The 180° view facilitates reversing
out of a parking bay, making it
possible to see the approach of
vehicles, pedestrians and cyclists.
This view is not recommended for
carrying out a complete manoeuvre.
It is made up of three areas: left 1,
centre 2 and right 3. This view is
available from the view selection menu only.
Page 178 of 229
176Vehicle careInstrument panel fuse boxFuse box on the left side of the
instrument panel
In left-hand drive vehicles, the fuse
box is behind a cover in the
instrument panel. Disengage cover at
the bottom side and remove.
In right-hand drive vehicles, the fuse
box is located behind a cover in the
glovebox. Open the glovebox and
remove the cover.
No.Circuit1Radar / Interior mirror3Inductive charging4Horn5Windscreen washer6Windscreen washer7USB8Rear wiper10Central locking system11Central locking system12Diagnostic connector module13Climate control system14Alarm / Opel Connect17Instrument cluster21Power button / Anti-theft locking system22Rain sensor / Light sensor /
Camera23Seatbelt reminder
Page 179 of 229
Vehicle care177No.Circuit247" Touchscreen / Parking
assist / Rear view camera25Airbag27Anti-theft alarm system297" Touchscreen / Infotainment31Cigarette lighter / 12 V power
outlet32Heated steering wheel33Climate control system / Auto‐
matic transmission34Parking assist / Exterior mirror
adjustmentFuse box on the right side of the
instrument panel
In left-hand drive vehicles, the fuse
box is located behind a cover in the
glovebox. Open the glovebox and
remove the cover. Remove the
bracket.
In right-hand drive vehicles, the fuse
box is located behind a cover in the
instrument panel. Disengage cover at
the bottom side and remove. Remove
the bracket.