2020 OPEL CORSA F ECO mode
[x] Cancel search: ECO modePage 5 of 229

Introduction3Vehicle specific dataPlease enter your vehicle's data on
the previous page to keep it easily
accessible.
Please refer to the sections "Service
and maintenance", "Technical data",
the vehicle’s identification plate and
national registration documents.
Introduction
Your vehicle is a designed
combination of advanced technology, safety, environmental friendliness
and economy.
This Owner's Manual provides you
with all the necessary information to
enable you to drive your vehicle
safely and efficiently.
Make sure your passengers are
aware of the possible risk of accident
and injury which may result from
improper use of the vehicle.
You must always comply with the
specific laws and regulations of the
country that you are in. These laws
may differ from the information in this Owner's Manual.Disregarding the description given in
this manual may affect your warranty.
When this Owner's Manual refers to a
workshop visit, we recommend your Opel Service Partner.
All Opel Service Partners provide
first-class service at reasonable
prices. Experienced mechanics
trained by Opel work according to
specific Opel instructions.
The customer literature pack should
always be kept ready to hand in the
vehicle.
Using this manual ● This manual describes all options
and features available for this
model. Certain descriptions,
including those for display and
menu functions, may not apply to
your vehicle due to model
variant, country specifications,
special equipment or
accessories.
● The table of contents at the beginning of this manual and
within each section shows where the information is located.● The index will enable you to search for specific information.
● This Owner's Manual depicts left-
hand drive vehicles. Operation is
similar for right-hand drive
vehicles.
● The Owner's Manual uses the engine identifier code. The
corresponding sales designation
and engineering code can be
found in the section "Technical
data".
● Directional data, e.g. left or right, or front or back, always relate to
the direction of travel.
● Displays may not support your specific language.
● Display messages and interior labelling are written in bold
letters.
Page 15 of 229

Keys, doors and windows13Remote control operationUnlocking
Press a.
Note
A short time after unlocking with the
remote control the doors are locked
automatically if no door has been
opened. A precondition is that the
setting is activated in the vehicle
personalisation 3 77.
Unlocking mode can be set in the
vehicle personalisation menu in the
Info Display. Two settings are
selectable:
● All doors, load compartment and fuel filler flap will be unlocked by
pressing a once.
● Only the driver's door and fuel filler flap will be unlocked by
pressing a once. To unlock all
doors, load compartment and
fuel filler flap, press a twice.
Select the relevant setting in the
Vehicle personalisation.
Vehicle personalisation 3 77.
Unlocking the tailgate
Press ? to unlock the tailgate
only.
Unlocking and opening the tailgate
3 18.
Locking
Close doors, load compartment and
fuel filler flap.
Press b.
If the vehicle is not closed properly,
the central locking system will not
work.
Confirmation
Operation of the central locking
system is confirmed by the hazard
warning flashers. A precondition is
that the setting is activated in the
vehicle personalisation 3 77.
Page 58 of 229

56Instruments and controlsThe recommended grip areas of the
steering wheel are heated quicker
and to a higher temperature than the
other areas.
Heating is operational when the
engine is running and during an
Autostop.
Stop-start system 3 103.
Horn
Press d.
Windscreen wiper and
washer
Windscreen wiper with adjustablewiper intervalHI:fastLO:slowINT:interval wipingOFF:off
For a single wipe when the
windscreen wiper is off, press the
lever down to position 1x.
Do not use if the windscreen is frozen.
Switch off in car washes.
To activate interval wiping mode the
next time ignition is switched on,
press the lever downwards to position
OFF and back to INT.
Adjustable wiper interval
Wiper lever in position INT.
Turn the adjuster wheel to adjust the
desired wipe interval.
Page 72 of 229

70Instruments and controlsGear shiftingY with the number of a higher gear
is indicated, when upshifting is
recommended for fuel saving
reasons.
On vehicles with automatic
transmission, the system is only
active in manual mode.
Manual mode 3 112.
Lane keep assist L illuminates or flashes yellow.
Illuminates yellow The system is deactivated or a fault
has been detected.
Flashes yellow The system is correcting the
unintended lane change.
Lane keep assist 3 152.
Electronic Stability Control
and Traction Control system
J illuminates or flashes yellow.Illuminates
A fault in the system is present.
Continued driving is possible. Driving stability, however, may deteriorate
depending on road surface
conditions.
Have the cause of the fault remedied
by a workshop.
After reconnecting the vehicle
battery, (e.g. after maintenance
work), J is illuminated for several
seconds. After this time period, J
extinguishes. This is a normal
procedure, the vehicle does not need
any assistance.
Flashes
The system is actively engaged.
Engine output may be reduced and
the vehicle may be braked
automatically to a small degree.
Electronic Stability Control and
Traction Control system 3 118.
Engine coolant temperature 2 illuminates red.Illuminates when the engine is
running
Stop, switch off engine.Caution
Coolant temperature too high.
Check coolant level immediately
3 165.
If there is sufficient coolant, consult a workshop.
Preheating
z illuminates yellow.
Preheating of diesel engine is
activated. Only activates when
outside temperature is low. Start the
engine when control indicator
extinguishes.
Starting the engine 3 101.
Exhaust filter t illuminates yellow.
The exhaust filter requires cleaning.
Page 95 of 229

Climate control93Climate control settings menu
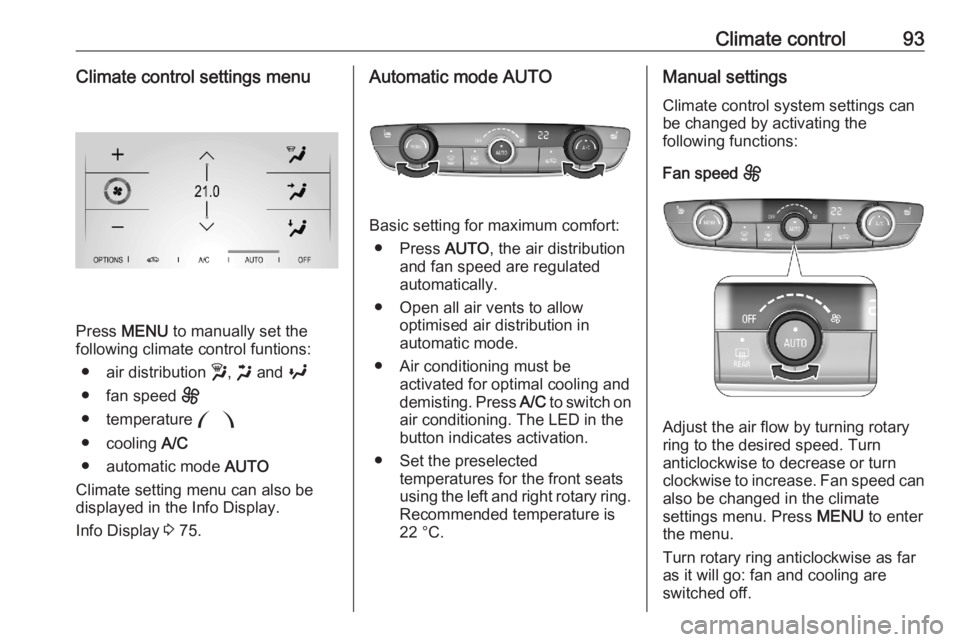
Press MENU to manually set the
following climate control funtions:
● air distribution w, x and y
● fan speed E
● temperature :
● cooling A/C
● automatic mode AUTO
Climate setting menu can also be displayed in the Info Display.
Info Display 3 75.
Automatic mode AUTO
Basic setting for maximum comfort:
● Press AUTO, the air distribution
and fan speed are regulated
automatically.
● Open all air vents to allow optimised air distribution in
automatic mode.
● Air conditioning must be activated for optimal cooling and
demisting. Press A/C to switch on
air conditioning. The LED in the
button indicates activation.
● Set the preselected temperatures for the front seats
using the left and right rotary ring. Recommended temperature is
22 °C.
Manual settings
Climate control system settings can
be changed by activating the
following functions:
Fan speed E
Adjust the air flow by turning rotary
ring to the desired speed. Turn
anticlockwise to decrease or turn
clockwise to increase. Fan speed can also be changed in the climate
settings menu. Press MENU to enter
the menu.
Turn rotary ring anticlockwise as far
as it will go: fan and cooling are
switched off.
Page 96 of 229

94Climate controlTo return to automatic mode, press
AUTO .
Air distribution w, x , y
Press MENU to enter the menu.
Touch in the Info Display:
w:to windscreen and front door
windowsx:to head area and rear seats via
adjustable air ventsy:to front and rear foot well and
windscreen
To return to automatic air distribution,
press AUTO .
Temperature preselection :
Set the preselected temperatures to
the desired value using the left or the
right rotary ring.
Recommended temperature is 22 °C .
The temperature is indicated in the
display and in the climate settings
menu.
If the minimum temperature Lo is set,
the climate control system runs at
maximum cooling, if cooling A/C is
switched on.
If the maximum temperature Hi is set,
the climate control system runs at
maximum heating.
Note
If A/C is switched on, reducing the
set cabin temperature can cause the
engine to restart from an Autostop or inhibit an Autostop.
Stop-start system 3 103.
Air conditioning A/C
Press A/C to switch on cooling. The
LED in the button illuminates to
indicate activation. Cooling is only
functional when the engine is running and climate control fan is switched on.
Press A/C again to switch off cooling.
The air conditioning system cools and
dehumidifies (dries) when outside
temperature is above a specific level. Therefore, condensation may form
and drip from under the vehicle.
If no cooling or drying is required,
switch off the cooling system for fuel
saving reasons.
Page 102 of 229

100Driving and operating0:ignition off: some functions
remain active until key is
removed or driver's door is
opened, provided the ignition was
on previously1:ignition on power mode: ignition
is on, diesel engine is preheating, control indicators illuminate and
most electrical functions are
operable2:engine start: release key after
engine has been started
Steering wheel lock
Remove key from ignition switch and
turn steering wheel until it engages.
9 Danger
Never remove the key from
ignition switch during driving as
this will cause steering wheel lock.
Power button
The electronic key or smart access
device must be inside the vehicle.
Engine start
Operate the clutch pedal (manual
transmission), the brake pedal and
press Start/Stop .Ignition on power mode without
starting the engine
Press Start/Stop without operating
clutch or brake pedal. Control
indicators illuminate and most
electrical functions are operable.Engine and ignition off
Press Start/Stop briefly in each mode
or when engine is running and vehicle
is stationary. Some functions remain
active until driver's door is opened,
provided the ignition was on
previously.Emergency shut off during driving
Press Start/Stop for 5 seconds
3 101. Steering wheel locks as soon
as vehicle is stationary.
Steering wheel lock
The steering wheel lock activates
automatically when:
● The vehicle is stationary.
● The ignition has been switched off.
To release steering wheel lock, open
and close driver's door and switch the ignition on power mode or start the
engine directly.
Page 112 of 229

110Driving and operating
4. Unscrew protective cap from thefiller neck.
5. Open AdBlue canister.
6. Mount one end of the hose on the
canister and screw the other end
on the filler neck.
7. Lift the canister until it is empty, or
until the flow from the canister has stopped.
8. Place the canister on the ground to empty the hose, wait
15 seconds.
9. Unscrew the hose from the filler neck.
10. Mount the protective cap and turn
clockwise until it engages.
Note
Dispose of AdBlue canister
according to environmental
requirements. Hose can be reused
after flushing with clear water before
AdBlue dries out.Automatic transmission
The automatic transmission permits
automatic gearshifting (automatic
mode) or manual gearshifting
(manual mode).
Manual shifting is possible in manual
mode by pressing M on the selector
wheel and shifting with the paddles
+ and - on the steering wheel.
Manual mode 3 112.
Transmission display
The mode or selected gear is shown
in the Driver Information Centre.