2020 NISSAN MURANO instrument panel
[x] Cancel search: instrument panelPage 198 of 518

To deactivate:
Press and hold theandbut-
tons for at least 2 seconds. The hazard
indicator lights will flash three times to con-
firm that the answer back horn feature has
been deactivated.
To activate:
Press and hold the
andbut-
tons for at least 2 seconds once more.
The hazard indicator lights will flash once
and the horn will sound once to confirm
that the horn beep feature has been reac-
tivated.
Deactivating the horn beep feature does
not silence the horn if the alarm is trig-
gered.
Intelligent Key button operation
light
The light blinks only when you press any
button on the Intelligent Key. The light illu-
mination only signifies that the key fob has
transmitted a signal. You may look and/or
listen to verif y that the vehicle has per-
formed the intended operation. The num-
ber of blinks identifies each registered key
(i.e. 1 blink = 1st key,...,4 blinks = 4th key) for
your own identification purposes.
If the light does not blink, your battery may
be too weak to communicate to the ve- hicle. If this occurs, the battery may need to
be replaced. For additional information re-
garding the replacement of a battery, refer
to “Battery replacement” in the “Do-it-
yourself ” section of this manual.
WARNING SIGNALS
To help prevent the vehicle from moving
unexpectedly by erroneous operation of
the Intelligent Key or to help prevent the
vehicle from being stolen, a chime or
buzzer sounds from inside and outside the
vehicle and a warning is displayed in the
instrument panel.
When a chime or beep sounds or a warning
is displayed, be sure to check the vehicle
and the Intelligent Key.
For additional information, refer to the
“Troubleshooting guide” in this section and
“Vehicle information display” in the “Instru-
ments and controls” section of this manual.
TROUBLESHOOTING GUIDE
Verif y the location of all Intelligent Keys that
are programmed for the vehicle. If another
Intelligent Key is in range or inside the ve-
hicle, the vehicle system may respond dif-
ferently than expected.
LPD2836
3-16Pre-driving checks and adjustments
Page 204 of 518

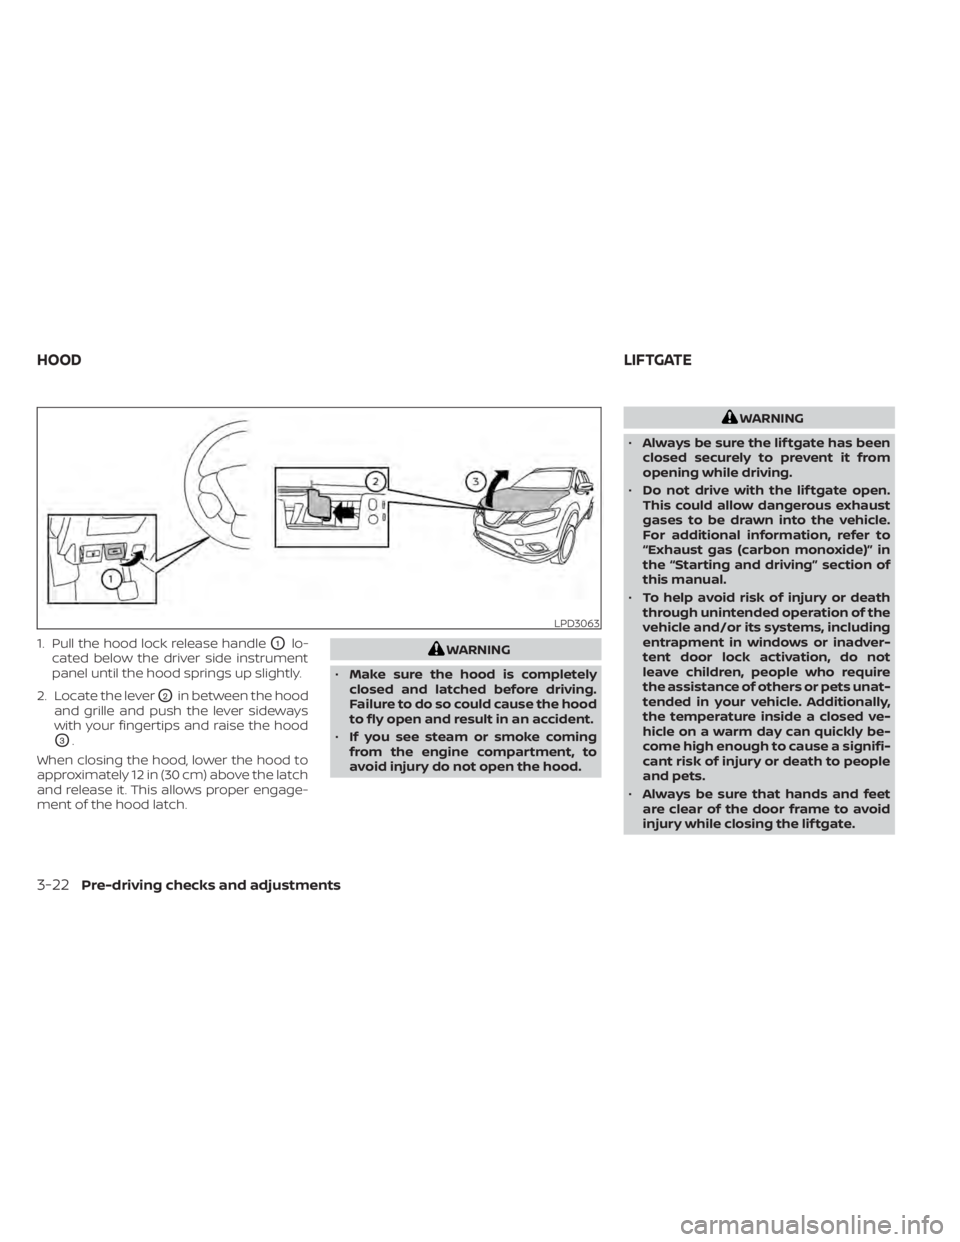
1. Pull the hood lock release handleO1lo-
cated below the driver side instrument
panel until the hood springs up slightly.
2. Locate the lever
O2in between the hood
and grille and push the lever sideways
with your fingertips and raise the hood
O3.
When closing the hood, lower the hood to
approximately 12 in (30 cm) above the latch
and release it. This allows proper engage-
ment of the hood latch.
WARNING
• Make sure the hood is completely
closed and latched before driving.
Failure to do so could cause the hood
to fly open and result in an accident.
• If you see steam or smoke coming
from the engine compartment, to
avoid injury do not open the hood.
WARNING
• Always be sure the lif tgate has been
closed securely to prevent it from
opening while driving.
• Do not drive with the lif tgate open.
This could allow dangerous exhaust
gases to be drawn into the vehicle.
For additional information, refer to
“Exhaust gas (carbon monoxide)” in
the “Starting and driving” section of
this manual.
• To help avoid risk of injury or death
through unintended operation of the
vehicle and/or its systems, including
entrapment in windows or inadver-
tent door lock activation, do not
leave children, people who require
the assistance of others or pets unat-
tended in your vehicle. Additionally,
the temperature inside a closed ve-
hicle on a warm day can quickly be-
come high enough to cause a signifi-
cant risk of injury or death to people
and pets.
• Always be sure that hands and feet
are clear of the door frame to avoid
injury while closing the lif tgate.
LPD3063
HOOD LIFTGATE
3-22Pre-driving checks and adjustments
Page 205 of 518

CAUTION
Do not use accessory carriers that at-
tach to the lif tgate. Doing so will cause
damage to the vehicle.
OPERATING THE MANUAL
LIFTGATE (if so equipped)
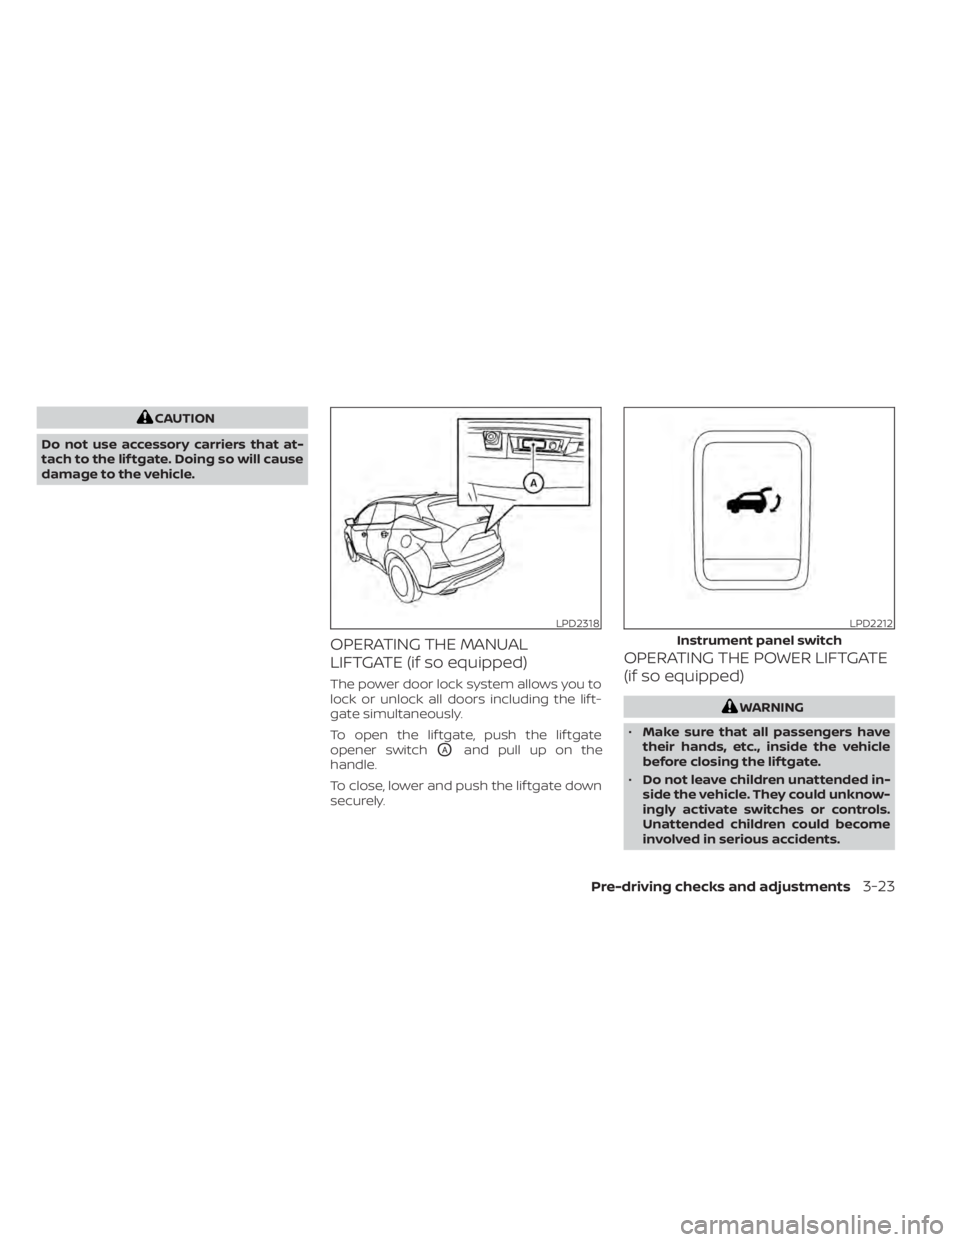
The power door lock system allows you to
lock or unlock all doors including the lif t-
gate simultaneously.
To open the lif tgate, push the lif tgate
opener switch
OAand pull up on the
handle.
To close, lower and push the lif tgate down
securely.
OPERATING THE POWER LIFTGATE
(if so equipped)
WARNING
• Make sure that all passengers have
their hands, etc., inside the vehicle
before closing the lif tgate.
• Do not leave children unattended in-
side the vehicle. They could unknow-
ingly activate switches or controls.
Unattended children could become
involved in serious accidents.
LPD2318LPD2212
Instrument panel switch
Pre-driving checks and adjustments3-23
Page 206 of 518

NOTE:
To open, close or reverse the power lif t-
gate, the shif t lever must be in P (Park).
Also, the power lif tgate will not operate if
battery voltage is low.
Power Open:
The power lif tgate automatically moves
from the fully closed position to the fully
open position in approximately5–8sec-
onds. The power open feature can be acti-
vated by the switch on the Intelligent Key,
the instrument panel switch, the lif tgate
opener switch
OA. A chime sounds to indi-
cate the power open sequence has been
started.
• The lif tgate can be opened by the instru-ment panel switch, lif tgate opener switch
OAwith the Intelligent Key in operating
range and lif tgate button on the key fob
(if so equipped), even if the vehicle is
locked. The lif tgate will individually unlock
and open. Once the lif tgate is closed, the
vehicle will remain in the unlock status.
• The Intelligent Key button must be held for 1 second before the lif tgate opens.
• The lif tgate must be unlocked to open it with the lif tgate opener switch
OAif the
Intelligent Key is not in operating range. Power Close:
The power lif tgate automatically moves
from the fully open position to the second-
ary position. When the lif tgate reaches the
secondary position, the cinching motor en-
gages and pulls the lif tgate to its primary
latch position. Power close takes approxi-
matel
y7–10sec onds. The power close
feature can be activated by the switch on
the Intelligent Key, the instrument panel
and the lif tgate close switch
OB. A chime
sounds to indicate the power close se-
quence has been started.
LPD2295
Lif tgate opener switch
LPD2407
Lif tgate close switch
3-24Pre-driving checks and adjustments
Page 207 of 518

• If the lif tgate close switchOBis activated
while the cinching motor is engaged, the
cinching motor will disengage and re-
lease the latch.
• The Intelligent Key button must be held for 1 second before the lif tgate closes.
Reverse:
The power lif tgate will stop immediately
during power open or power close if the
Intelligent Key switch, instrument panel
switch, lif tgate opener switch
OAor lif tgate
close switch
OBis pushed. The power lif t-
gate will reverse direction if the Intelligent
Key switch, instrument panel switch, lif t-
gate opener switch
OAor lif tgate close
switch
OBis pushed a second time. A
chime will sound to announce the reversal.
Auto Reverse:
If an obstacle is detected during power
open or power close, a warning chime will
sound and the lif tgate will reverse direction
and return to the full open or full close po-
sition. If a second obstacle is detected, the
lif tgate motion will stop and the lif tgate will
enter manual mode.
A pinch strip is mounted on each side of
the lif tgate. If an obstacle is detected by a
pinch strip during power close, the lif tgate
will reverse direction and return to the full
open position.
NOTE:
If the pinch strip is damaged or removed,
the power close function will not
operate.
WARNING
There are some small distances imme-
diately before the closed position
which cannot be detected. Make sure
that all passengers have their hands,
etc., inside the vehicle before closing
the lif tgate.
Manual Mode:
If power operation is not available, the lif t-
gate may be operated manually. Power op-
eration may not be available if multiple ob-
stacles have been detected in a single
power cycle or if battery voltage is low.
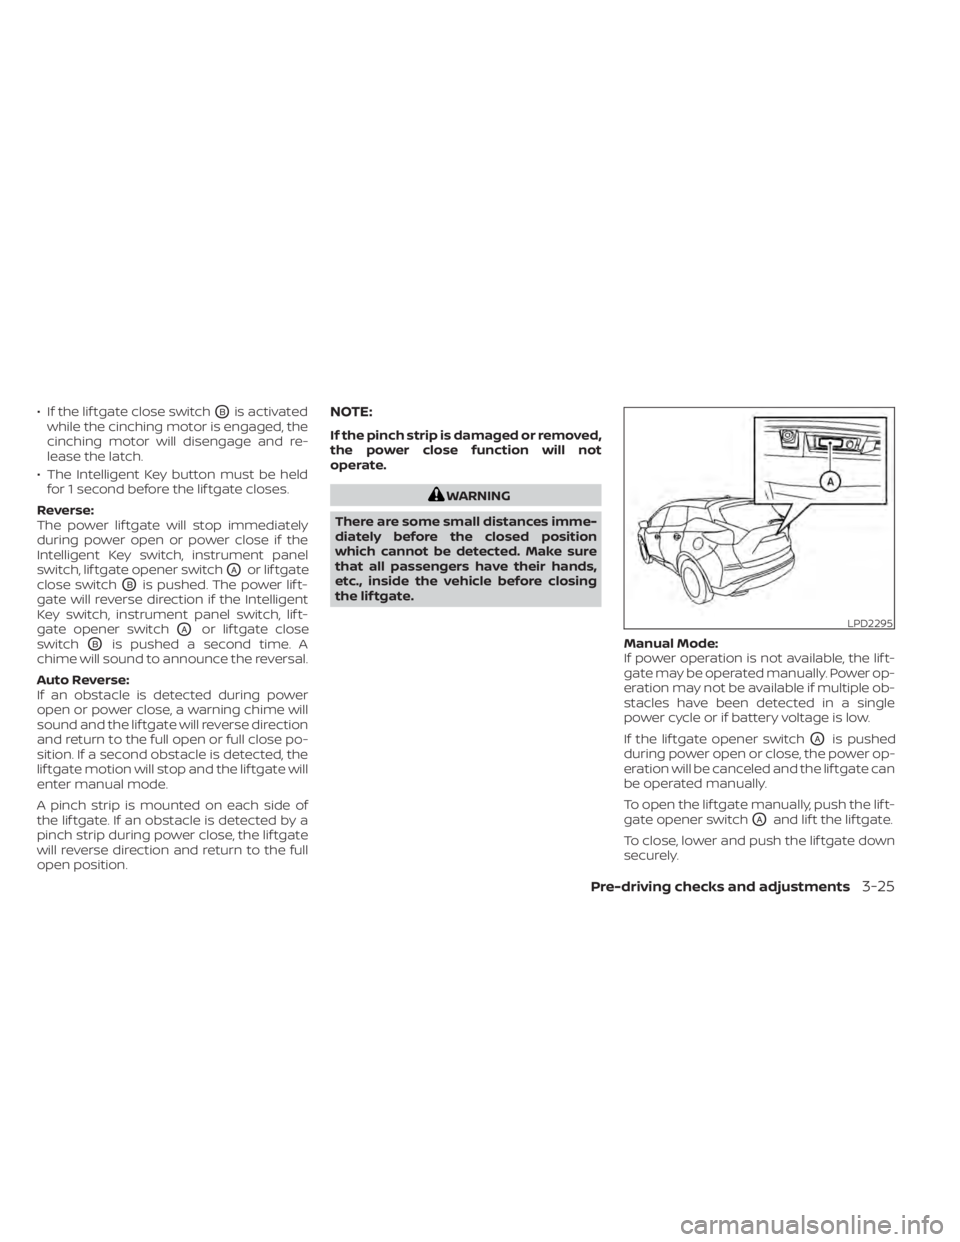
If the lif tgate opener switch
OAis pushed
during power open or close, the power op-
eration will be canceled and the lif tgate can
be operated manually.
To open the lif tgate manually, push the lif t-
gate opener switch
OAand lif t the lif tgate.
To close, lower and push the lif tgate down
securely.
LPD2295
Pre-driving checks and adjustments3-25
Page 211 of 518

LIFTGATE POSITION SETTING (if so
equipped)
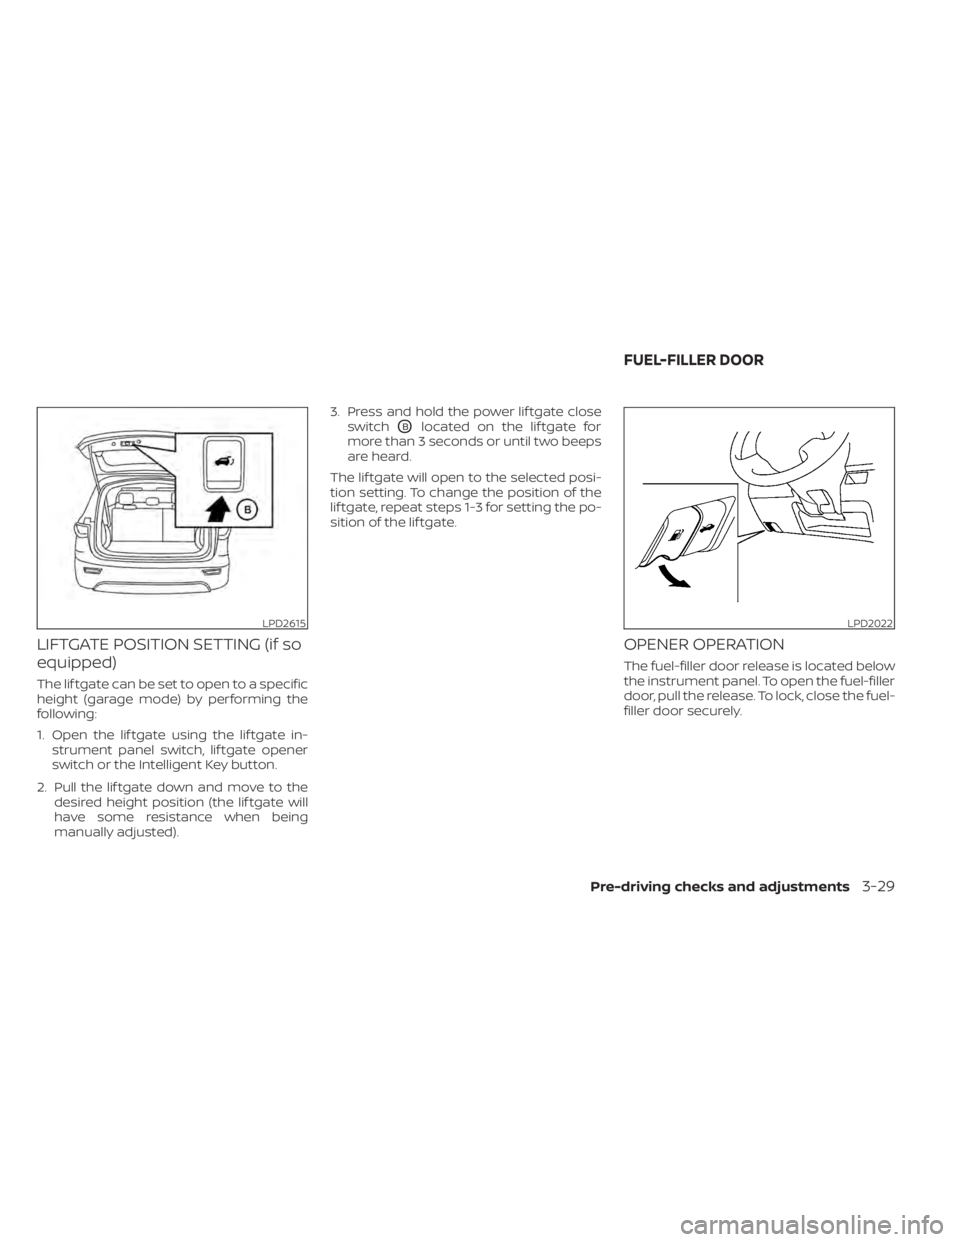
The lif tgate can be set to open to a specific
height (garage mode) by performing the
following:
1. Open the lif tgate using the lif tgate in-strument panel switch, lif tgate opener
switch or the Intelligent Key button.
2. Pull the lif tgate down and move to the desired height position (the lif tgate will
have some resistance when being
manually adjusted). 3. Press and hold the power lif tgate close
switch
OBlocated on the lif tgate for
more than 3 seconds or until two beeps
are heard.
The lif tgate will open to the selected posi-
tion setting. To change the position of the
lif tgate, repeat steps 1-3 for setting the po-
sition of the lif tgate.
OPENER OPERATION
The fuel-filler door release is located below
the instrument panel. To open the fuel-filler
door, pull the release. To lock, close the fuel-
filler door securely.
LPD2615LPD2022
FUEL-FILLER DOOR
Pre-driving checks and adjustments3-29
Page 253 of 518

OPERATING TIPS
Sensors,OAandOBon the instrument
panel, help the system maintain a constant
temperature. Do not put anything on or
around these sensors.
• When the climate system is in automatic operation and the engine coolant tem-
perature and outside air temperature are
low, the air flow outlet may default to de-
froster mode for a maximum of 2 min-
utes and 30 seconds. This is not a mal-
function. Af ter the engine coolant
temperature warms up, the air flow outlet
will return to foot mode and operation will
continue normally. • When the outside and interior cabin tem-
peratures are moderate to high, the in-
take setting may default to turn off air
recirculation to allow fresh air into the
passenger compartment. You may no-
tice air flow from the foot mode, bi-level
mode, or side demist vent outlets for a
maximum of 15 seconds. This may occur
when the previous climate setting was
turned off. This is not a malfunction. Af ter
the initial warm air is expelled, the intake
will return to automatic control, air flow
outlet will return to previous settings, and
operation may continue normally. To exit,
press any climate control button.
• Keep the moonroof (if so equipped) closed while the air conditioner is in op-
eration.
• If you feel that the air flow mode you have selected and the outlets the air is coming
out do not match, select the
mode.
• When you change the air flow mode, you may feel air flow from the foot outlets for
just a moment. This is not a malfunction. The air conditioner system in your NISSAN
vehicle is charged with a refrigerant de-
signed with the environment in mind.
This refrigerant does not harm the
earth's ozone layer.
Special charging equipment and lubricant
is required when servicing your NISSAN air
conditioner. Using improper refrigerants or
lubricants will cause severe damage to
your air conditioner system. For additional
information, refer to “Air conditioner sys-
tem refrigerant and oil recommendations”
in the “Technical and consumer informa-
tion” section of this manual.
It is recommended that you visit a NISSAN
dealer to service your “environmentally
friendly ” air conditioner system.
WARNING
The air conditioner system contains re-
frigerant under high pressure. To avoid
personal injury, any air conditioner ser-
vice should be done only by an experi-
enced technician with proper equip-
ment.
LHA5046
SERVICING AIR CONDITIONER
Monitor, climate, audio, phone and voice recognition systems4-31
Page 254 of 518

There are USB/iPod® charging ports lo-
cated in the 2nd row on the back of the
center console. These ports will charge
compatible devices.
NOTE:
Only the USB connection port(s) located
below the instrument panel will allow
operation of USB/iPod® devices through
the audio system.The vehicle is equipped with a shark fin
antenna and an antenna pattern is printed
inside the rear window.
CAUTION
• Do not place metalized film near the
rear window glass or attach any
metal parts to it. This may cause poor
reception or noise.
• When cleaning the inside of the rear
window, be careful not to scratch or
damage the rear window antenna.
Lightly wipe along the antenna with a
dampened sof t cloth. When installing a CB, ham radio or car
phone in your vehicle, be sure to observe
the following precautions; otherwise, the
new equipment may adversely affect the
engine control system and other electronic
parts.
WARNING
• A cellular phone should not be used
for any purpose while driving so full
attention may be given to vehicle op-
eration. Some jurisdictions prohibit
the use of cellular phones while
driving.
• If you must make a call while your
vehicle is in motion, the hands free
cellular phone operational mode is
highly recommended. Exercise ex-
treme caution at all times so full at-
tention may be given to vehicle
operation.
• If you are unable to devote full atten-
tion to vehicle operation while talk-
ing on the phone, pull off the road to
a safe location and stop your vehicle.
LHA5039
2nd row
USB/iPod® CHARGING PORT ANTENNACAR PHONE OR CB RADIO
4-32Monitor, climate, audio, phone and voice recognition systems