2020 NISSAN MURANO ECO mode
[x] Cancel search: ECO modePage 207 of 518
• If the lif tgate close switchOBis activated
while the cinching motor is engaged, the
cinching motor will disengage and re-
lease the latch.
• The Intelligent Key button must be held for 1 second before the lif tgate closes.
Reverse:
The power lif tgate will stop immediately
during power open or power close if the
Intelligent Key switch, instrument panel
switch, lif tgate opener switch
OAor lif tgate
close switch
OBis pushed. The power lif t-
gate will reverse direction if the Intelligent
Key switch, instrument panel switch, lif t-
gate opener switch
OAor lif tgate close
switch
OBis pushed a second time. A
chime will sound to announce the reversal.
Auto Reverse:
If an obstacle is detected during power
open or power close, a warning chime will
sound and the lif tgate will reverse direction
and return to the full open or full close po-
sition. If a second obstacle is detected, the
lif tgate motion will stop and the lif tgate will
enter manual mode.
A pinch strip is mounted on each side of
the lif tgate. If an obstacle is detected by a
pinch strip during power close, the lif tgate
will reverse direction and return to the full
open position.
NOTE:
If the pinch strip is damaged or removed,
the power close function will not
operate.
WARNING
There are some small distances imme-
diately before the closed position
which cannot be detected. Make sure
that all passengers have their hands,
etc., inside the vehicle before closing
the lif tgate.
Manual Mode:
If power operation is not available, the lif t-
gate may be operated manually. Power op-
eration may not be available if multiple ob-
stacles have been detected in a single
power cycle or if battery voltage is low.
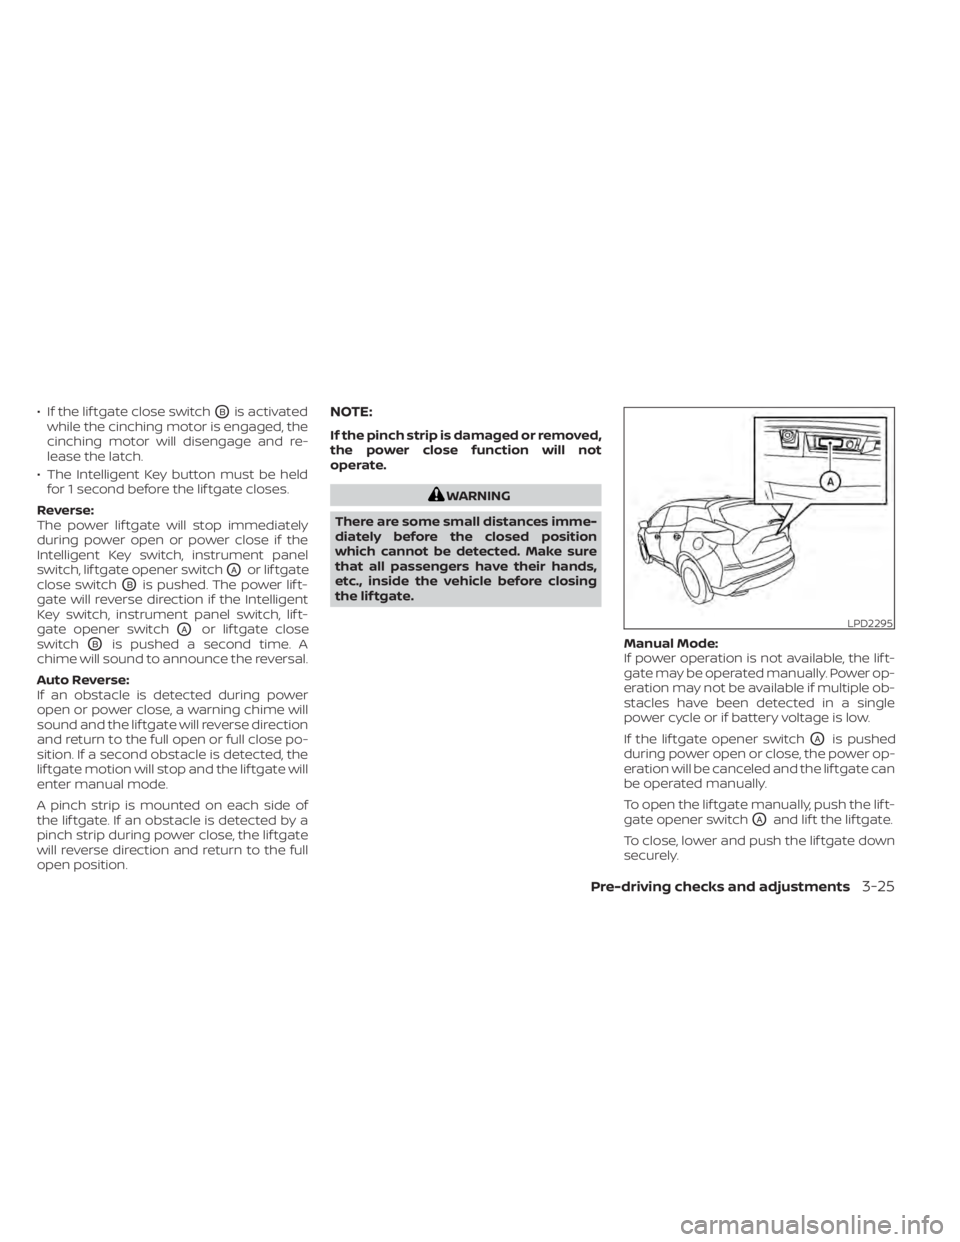
If the lif tgate opener switch
OAis pushed
during power open or close, the power op-
eration will be canceled and the lif tgate can
be operated manually.
To open the lif tgate manually, push the lif t-
gate opener switch
OAand lif t the lif tgate.
To close, lower and push the lif tgate down
securely.
LPD2295
Pre-driving checks and adjustments3-25
Page 208 of 518
Auto Power Lif tgate System Battery
Power Saving Mode:
The vehicle goes into power saving mode
when the lif tgate is open for a long time
(approximately 12 hours). This is to prevent
deterioration of the battery. The power
saving mode automatically cuts the power
supply of the power lif tgate door.
When the power to the lif tgate is cut off, the
manual mode must be performed. Af ter
the manual mode is performed, the power
lif tgate function is restored.
NOTE:
When a battery voltage is lower than ap-
proximately 11V, the power lif tgate may
not operate af ter automatic return.
MOTION-ACTIVATED LIFTGATE (if
so equipped)
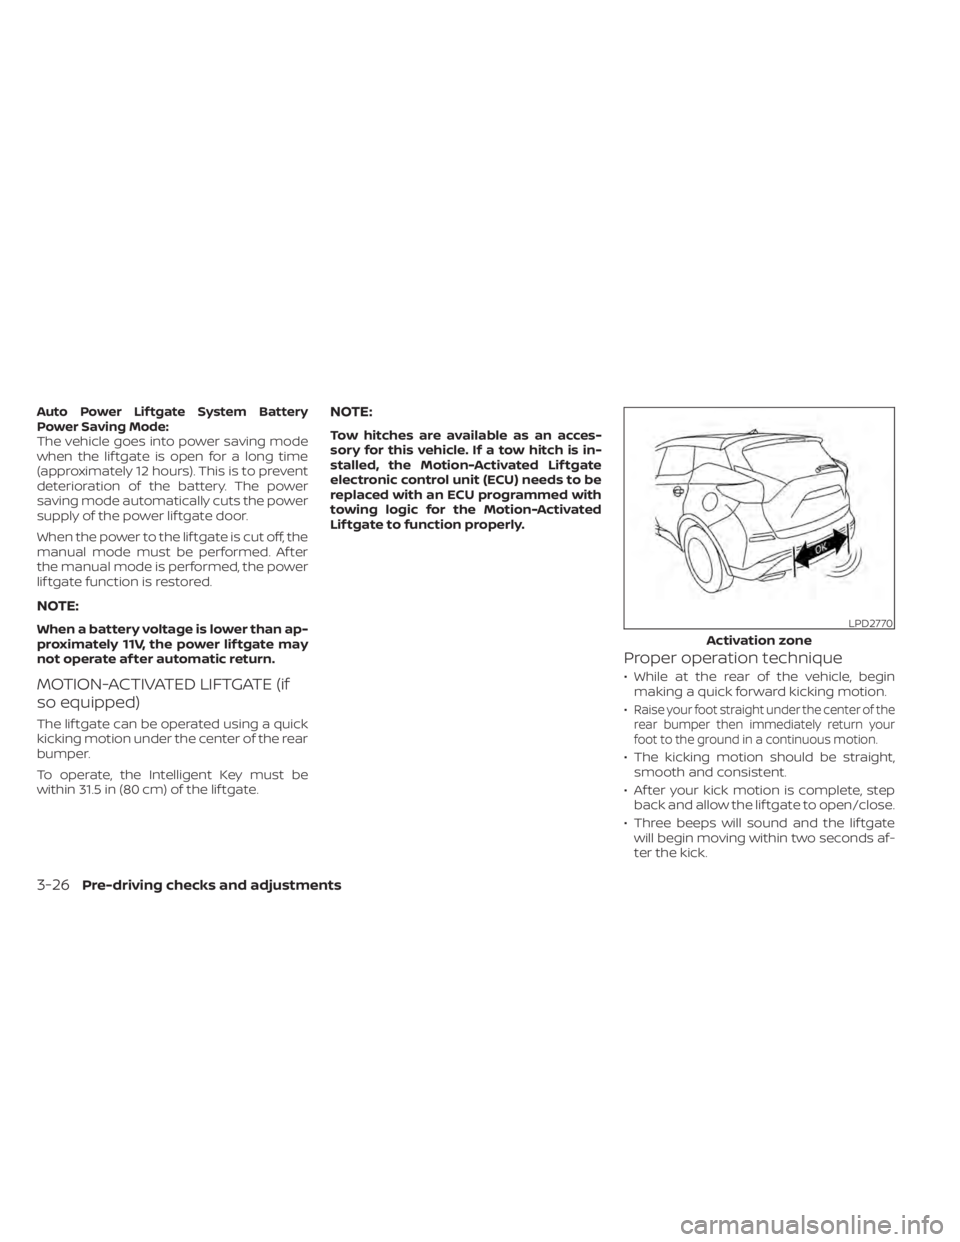
The lif tgate can be operated using a quick
kicking motion under the center of the rear
bumper.
To operate, the Intelligent Key must be
within 31.5 in (80 cm) of the lif tgate.
NOTE:
Tow hitches are available as an acces-
sory for this vehicle. If a tow hitch is in-
stalled, the Motion-Activated Lif tgate
electronic control unit (ECU) needs to be
replaced with an ECU programmed with
towing logic for the Motion-Activated
Lif tgate to function properly.
Proper operation technique
• While at the rear of the vehicle, beginmaking a quick forward kicking motion.
•
Raise your foot straight under the center of the
rear bumper then immediately return your
foot to the ground in a continuous motion.
• The kicking motion should be straight, smooth and consistent.
• Af ter your kick motion is complete, step back and allow the lif tgate to open/close.
• Three beeps will sound and the lif tgate will begin moving within two seconds af-
ter the kick.
LPD2770
Activation zone
3-26Pre-driving checks and adjustments
Page 211 of 518
LIFTGATE POSITION SETTING (if so
equipped)
The lif tgate can be set to open to a specific
height (garage mode) by performing the
following:
1. Open the lif tgate using the lif tgate in-strument panel switch, lif tgate opener
switch or the Intelligent Key button.
2. Pull the lif tgate down and move to the desired height position (the lif tgate will
have some resistance when being
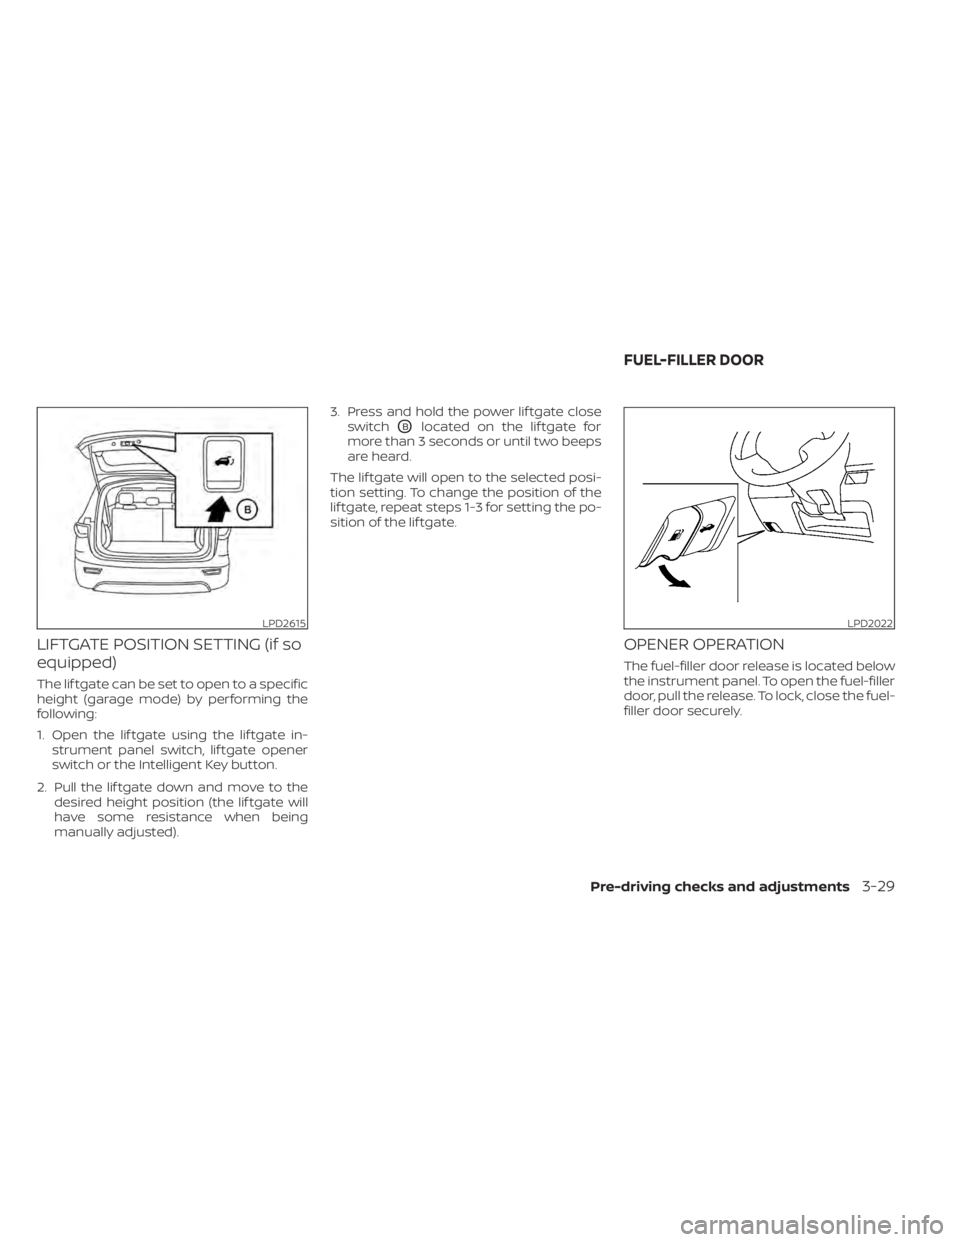
manually adjusted). 3. Press and hold the power lif tgate close
switch
OBlocated on the lif tgate for
more than 3 seconds or until two beeps
are heard.
The lif tgate will open to the selected posi-
tion setting. To change the position of the
lif tgate, repeat steps 1-3 for setting the po-
sition of the lif tgate.
OPENER OPERATION
The fuel-filler door release is located below
the instrument panel. To open the fuel-filler
door, pull the release. To lock, close the fuel-
filler door securely.
LPD2615LPD2022
FUEL-FILLER DOOR
Pre-driving checks and adjustments3-29
Page 246 of 518
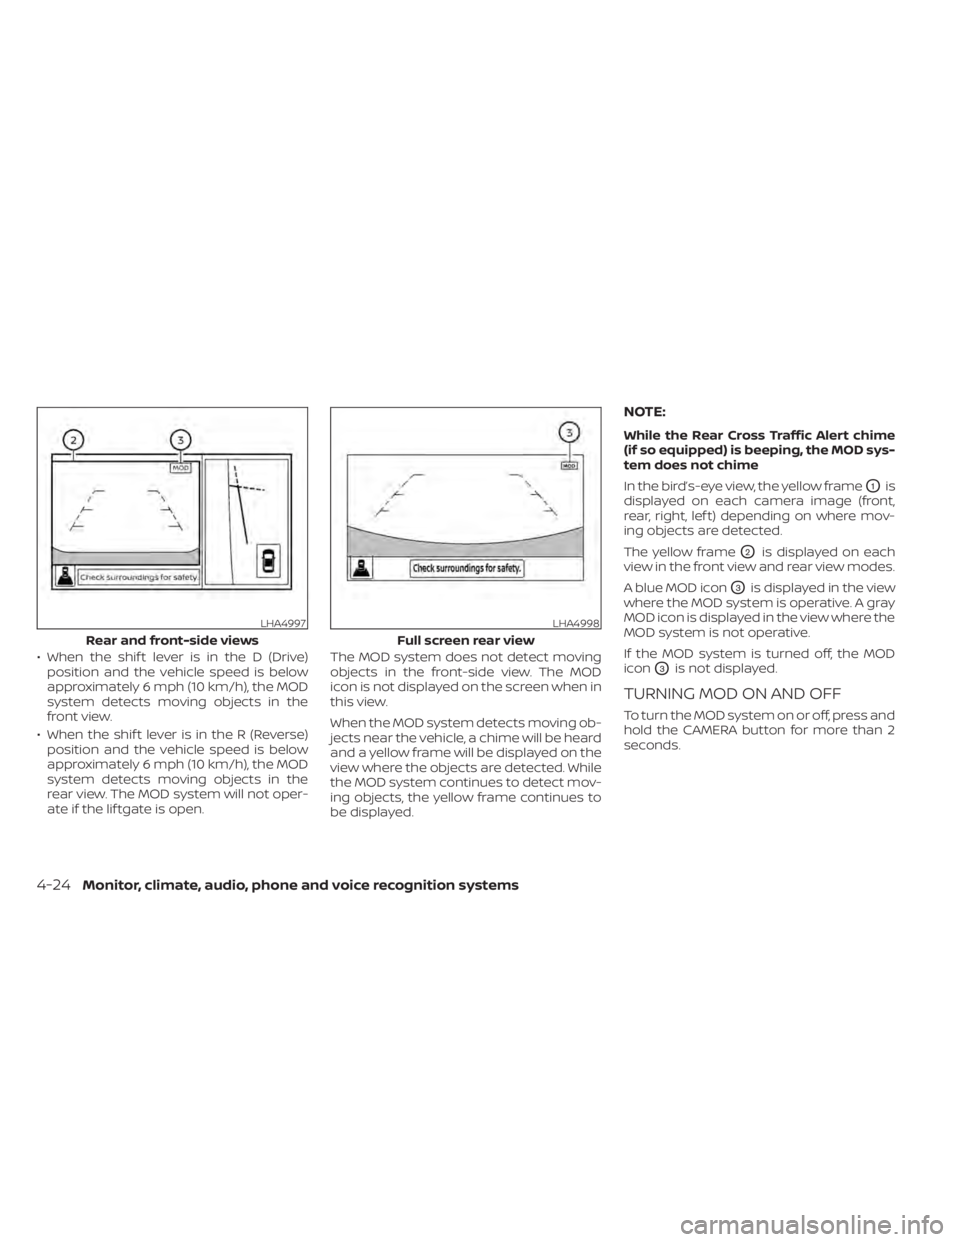
• When the shif t lever is in the D (Drive)position and the vehicle speed is below
approximately 6 mph (10 km/h), the MOD
system detects moving objects in the
front view.
• When the shif t lever is in the R (Reverse) position and the vehicle speed is below
approximately 6 mph (10 km/h), the MOD
system detects moving objects in the
rear view. The MOD system will not oper-
ate if the lif tgate is open. The MOD system does not detect moving
objects in the front-side view. The MOD
icon is not displayed on the screen when in
this view.
When the MOD system detects moving ob-
jects near the vehicle, a chime will be heard
and a yellow frame will be displayed on the
view where the objects are detected. While
the MOD system continues to detect mov-
ing objects, the yellow frame continues to
be displayed.
NOTE:
While the Rear Cross Traffic Alert chime
(if so equipped) is beeping, the MOD sys-
tem does not chime
In the bird’s-eye view, the yellow frame
O1is
displayed on each camera image (front,
rear, right, lef t) depending on where mov-
ing objects are detected.
The yellow frame
O2is displayed on each
view in the front view and rear view modes.
A blue MOD icon
O3is displayed in the view
where the MOD system is operative. A gray
MOD icon is displayed in the view where the
MOD system is not operative.
If the MOD system is turned off, the MOD
icon
O3is not displayed.
TURNING MOD ON AND OFF
To turn the MOD system on or off, press and
hold the CAMERA button for more than 2
seconds.
LHA4997
Rear and front-side views
LHA4998
Full screen rear view
4-24Monitor, climate, audio, phone and voice recognition systems
Page 250 of 518

1. Temperature control dial (driver’s side)/AUTO button
2. ON-OFF button
3. Display screen
4. MODE (manual air flow control) button
5. Temperature control dial (passenger’s
side)/DUAL button
6.
Fresh air intake button 7.
Air recirculation button
8. A/C (air conditioner) button
9.
fan speed control buttons
10.REAR window and outside mirror
(if so equipped) defroster switch
11.
FRONT (defroster) button
WARNING
• The air conditioner cooling function
operates only when the engine is
running.
• Do not leave children or adults who
would normally require the assis-
tance of others alone in your vehicle.
Pets should also not be lef t alone.
They could accidentally injure them-
selves or others through inadvertent
operation of the vehicle. Also, on hot,
sunny days, temperatures in a closed
vehicle could quickly become high
enough to cause severe or possibly
fatal injuries to people or animals.
• Do not use the recirculation mode for
long periods as it may cause the inte-
rior air to become stale and the win-
dows to fog up.
NOTE:
• Odors from inside and outside the ve- hicle can build up in the air conditioner
unit. Odor can enter the passenger
compartment through the vents.
• When parking, set the heater and air conditioner controls to turn off air re-
circulation to allow fresh air into the
passenger compartment. This should
help reduce odors inside the vehicle.LHA3200
HEATER AND AIR CONDITIONER
(automatic)
4-28Monitor, climate, audio, phone and voice recognition systems
Page 251 of 518
AUTOMATIC OPERATION
Cooling and/or dehumidified
heating (AUTO)
This mode may be used all year round as
the system automatically works to keep a
constant temperature. Air flow distribution
and fan speed are also controlled auto-
matically.
1. Press the AUTO button on. The indicatoron the button will illuminate.
2. Turn the temperature control dial to the lef t or right to set the desired
temperature.
• The temperature of the passenger com- partment will be maintained automati-
cally. Air flow distribution and fan speed
are also controlled automatically.
• A visible mist may be seen coming from the vents in hot, humid conditions as the
air is cooled rapidly. This does not indicate
a malfunction. 3. You can individually set driver's and front
passenger's side temperature using
each temperature control dial. When the
DUAL button is pressed or passenger's
side temperature dial is turned, the
DUAL indicator will come on. To turn off
the passenger's side temperature con-
trol, press the DUAL button.
Heating (A/C OFF)
The air conditioner does not activate. When
you need to heat only, use this mode.
1. Press the AUTO button.
2. Turn the temperature control dial to set the desired temperature.
• The temperature of the passenger com- partment will be maintained automati-
cally. Air flow distribution and fan speed
are also controlled automatically.
• Do not set the temperature lower than the outside air temperature. Otherwise,
the system may not work properly.
• Not recommended if windows fog up.
Dehumidified defrosting or
defogging
1. Press thefront defroster button on.
The indicator light on the button will
come on.
2. Turn the temperature control dial to set the maximum temperature to aid in de-
frosting or defogging.
• To quickly remove ice from the outside of the windows, use the
fan speed con-
trol buttons to set the fan speed to maxi-
mum.
• As soon as possible af ter the windshield is clean, press the AUTO button to return
to the automatic mode.
• When the
front defroster button is
pressed, the air conditioner will automati-
cally be turned on at outside tempera-
tures above 36°F (2°C). The air recirculate
mode automatically turns off, allowing
outside air to be drawn into the passen-
ger compartment to further improve the
defogging performance. When the air re-
circulate mode automatically turns off,
the air fresh mode will automatically turn
on.
Monitor, climate, audio, phone and voice recognition systems4-29
Page 252 of 518

Remote Engine Start with
Intelligent Climate Control (if so
equipped)
Vehicles equipped with automatic climate
controls and Remote Engine Start function
may go into automatic heating or cooling
mode when Remote Engine Start is activated
depending on outside and cabin tempera-
tures. During this period, the climate control
display and buttons will be inoperable until the
ignition switch is turned on. In Remote Engine
Start defrosting mode, the rear window de-
froster and heated steering wheel (if so
equipped) may be activated automatically.
MANUAL OPERATION
Fan speed control
Press thefan speed control buttons
to manually control the fan speed.
Press the AUTO button to return to auto-
matic control of the fan speed.
Temperature control dial
The temperature control dial allows you to
adjust the temperature of the outlet air. To
lower the temperature, turn the dial to the
lef t. To increase the temperature, turn the dial to the right. Temperature can be ad-
justed on the driver’s and passenger’s side.
Air recirculation
Press theair recirculation button to
recirculate interior air inside the vehicle.
The
indicator light on the button will
come on.
The air recirculation cannot be activated
when the air conditioner is in the
front
defrosting mode.
When the outside temperature exceeds 70°F
(21°C), the air conditioning system may de-
fault to air recirculation mode automatically
to reduce overall power consumption. To exit
air recirculation mode, select the fresh air
intake button to enter fresh air mode.
Fresh air intake
Press thefresh air intake button to
draw outside air into the passenger com-
partment.
A/C (air conditioner) button
Start the engine, press thefan speed
control buttons to the desired position and
press the
button to turn on the air
conditioner. To turn off the air conditioner,
press the
button again. The air conditioner cooling function op-
erates only when the engine is running.
Air flow control
Pressing the MODE button manually con-
trols air flow and selects the air outlet:
— Air flows mainly from center and
side vents.
— Air flows mainly from center andside vents and foot outlets.
— Air flows mainly from foot outletsand partly from defroster.
— Air flows mainly from defrosterand foot outlets.
To turn system off
Press the ON-OFF button.
Rear window and outside mirror
(if so equipped) defroster switch
For additional information, refer to “Rear
window and outside mirror (if so equipped)
defroster switch” in the “Instruments and
controls” section of this manual.
4-30Monitor, climate, audio, phone and voice recognition systems
Page 253 of 518

OPERATING TIPS
Sensors,OAandOBon the instrument
panel, help the system maintain a constant
temperature. Do not put anything on or
around these sensors.
• When the climate system is in automatic operation and the engine coolant tem-
perature and outside air temperature are
low, the air flow outlet may default to de-
froster mode for a maximum of 2 min-
utes and 30 seconds. This is not a mal-
function. Af ter the engine coolant
temperature warms up, the air flow outlet
will return to foot mode and operation will
continue normally. • When the outside and interior cabin tem-
peratures are moderate to high, the in-
take setting may default to turn off air
recirculation to allow fresh air into the
passenger compartment. You may no-
tice air flow from the foot mode, bi-level
mode, or side demist vent outlets for a
maximum of 15 seconds. This may occur
when the previous climate setting was
turned off. This is not a malfunction. Af ter
the initial warm air is expelled, the intake
will return to automatic control, air flow
outlet will return to previous settings, and
operation may continue normally. To exit,
press any climate control button.
• Keep the moonroof (if so equipped) closed while the air conditioner is in op-
eration.
• If you feel that the air flow mode you have selected and the outlets the air is coming
out do not match, select the
mode.
• When you change the air flow mode, you may feel air flow from the foot outlets for
just a moment. This is not a malfunction. The air conditioner system in your NISSAN
vehicle is charged with a refrigerant de-
signed with the environment in mind.
This refrigerant does not harm the
earth's ozone layer.
Special charging equipment and lubricant
is required when servicing your NISSAN air
conditioner. Using improper refrigerants or
lubricants will cause severe damage to
your air conditioner system. For additional
information, refer to “Air conditioner sys-
tem refrigerant and oil recommendations”
in the “Technical and consumer informa-
tion” section of this manual.
It is recommended that you visit a NISSAN
dealer to service your “environmentally
friendly ” air conditioner system.
WARNING
The air conditioner system contains re-
frigerant under high pressure. To avoid
personal injury, any air conditioner ser-
vice should be done only by an experi-
enced technician with proper equip-
ment.
LHA5046
SERVICING AIR CONDITIONER
Monitor, climate, audio, phone and voice recognition systems4-31