2020 NISSAN MURANO ECO mode
[x] Cancel search: ECO modePage 254 of 518

There are USB/iPod® charging ports lo-
cated in the 2nd row on the back of the
center console. These ports will charge
compatible devices.
NOTE:
Only the USB connection port(s) located
below the instrument panel will allow
operation of USB/iPod® devices through
the audio system.The vehicle is equipped with a shark fin
antenna and an antenna pattern is printed
inside the rear window.
CAUTION
• Do not place metalized film near the
rear window glass or attach any
metal parts to it. This may cause poor
reception or noise.
• When cleaning the inside of the rear
window, be careful not to scratch or
damage the rear window antenna.
Lightly wipe along the antenna with a
dampened sof t cloth. When installing a CB, ham radio or car
phone in your vehicle, be sure to observe
the following precautions; otherwise, the
new equipment may adversely affect the
engine control system and other electronic
parts.
WARNING
• A cellular phone should not be used
for any purpose while driving so full
attention may be given to vehicle op-
eration. Some jurisdictions prohibit
the use of cellular phones while
driving.
• If you must make a call while your
vehicle is in motion, the hands free
cellular phone operational mode is
highly recommended. Exercise ex-
treme caution at all times so full at-
tention may be given to vehicle
operation.
• If you are unable to devote full atten-
tion to vehicle operation while talk-
ing on the phone, pull off the road to
a safe location and stop your vehicle.
LHA5039
2nd row
USB/iPod® CHARGING PORT ANTENNACAR PHONE OR CB RADIO
4-32Monitor, climate, audio, phone and voice recognition systems
Page 273 of 518

1. Apply the parking brake.
2. Move the shif t lever to P (Park) or N (Neu-tral). P (Park) is recommended.
The starter is designed not to operate
unless the shif t lever is in either P
(Park) or N (Neutral).
3. Push the ignition switch to the ON posi- tion. Depress the brake pedal and push
the ignition switch to start the engine.
To start the engine immediately, push
and release the ignition switch while de-
pressing the brake pedal with the igni-
tion switch in any position.
• If the engine is very hard to start in extremely cold weather or when re-
starting, depress the accelerator
pedal a little (approximately 1/3 to the
floor) and while holding, crank the en-
gine. Release the accelerator pedal
when the engine starts.
• If the engine is very hard to start be- cause it is flooded, depress the accel-
erator pedal all the way to the floor
and hold it. Push the ignition switch to
the ON position to start cranking the
engine. Af ter 5 or 6 seconds, stop
cranking by pushing the ignition
switch to the LOCK position. Af ter
cranking the engine, release the accel- erator pedal. Crank the engine with
your foot off the accelerator pedal by
depressing the brake pedal and push-
ing the ignition switch to start the en-
gine. If the engine starts, but fails to
run, repeat the above procedure.
CAUTION
Do not operate the starter for more
than 15 seconds at a time. If the engine
does not start, push the ignition switch
to the OFF position and wait 10 seconds
before cranking again, otherwise the
starter could be damaged.
4. Warm-up:
Allow the engine to idle for at least 30
seconds af ter starting. Do not race the
engine while warming it up. Drive at a
moderate speed for a short distance
first, especially in cold weather. In cold
weather, keep the engine running for a
minimum of 2 to 3 minutes before shut-
ting it off. Starting and stopping the en-
gine over a short period of time may
make the vehicle more difficult to start.
5. To stop the engine, move the shif t lever into the P (Park) position and push the
ignition switch to the OFF position.
NOTE:
Care should be taken to avoid situa-
tions that can lead to potential bat-
tery discharge and potential no-start
conditions such as:
1. Installation or extended use of elec- tronic accessories that consume bat-
tery power when the engine is not
running (phone chargers, GPS, DVD
players, etc.).
2. The vehicle is not driven regularly and/or only driven short distances
In these cases, the battery may need to
be charged to maintain battery health.
REMOTE ENGINE START (if so
equipped)
Vehicles started with the Remote Engine
Start require the ignition switch to be
placed in the ON position before the shif t
lever can be moved from the P (Park) posi-
tion. To place the ignition switch in the ON
position, follow these steps:
1. Make sure that the Intelligent Key is on you.
2. Apply the brake.
3. Push the ignition switch once to the ON position.
STARTING THE ENGINE
Starting and driving5-17
Page 274 of 518

For additional information, refer to “NISSAN
Intelligent Key®” in the “Pre-driving checks
and adjustments” section of this manual.CONTINUOUSLY VARIABLE
TRANSMISSION (CVT)
WARNING
• Do not depress the accelerator pedal
while shif ting from P (Park) or N (Neu-
tral) to R (Reverse), D (Drive), or M
(Manual shif t mode). Always depress
the brake pedal until shif ting is com-
pleted. Failure to do so could cause
you to lose control and have an
accident.
• Cold engine idle speed is high, so use
caution when shif ting into a forward
or reverse gear before the engine has
warmed up.
• Do not downshif t abruptly on slip-
pery roads. This may cause a loss of
control.
• Never shif t to either the P (Park) or R
(Reverse) position while the vehicle is
moving forward and P (Park) or D
(Drive) position while the vehicle is
reversing. This could cause an acci-
dent or damage the transmission.
CAUTION
• To avoid possible damage to your ve-
hicle, when stopping the vehicle on
an uphill grade, do not hold the ve-
hicle by depressing the accelerator
pedal. The foot brake should be used
for this purpose.
• Except in an emergency, do not shif t
to the N (Neutral) position while driv-
ing. Coasting with the transmission
in the N (Neutral) position may cause
serious damage to the transmission.
The CVT in your vehicle is electronically
controlled to produce maximum power
and smooth operation.
The recommended operating procedures
for this transmission are shown on the fol-
lowing pages. Follow these procedures for
maximum vehicle performance and driv-
ing enjoyment.
Engine power may be automatically re-
duced to protect the CVT if the engine
speed increases quickly when driving on
slippery roads or while being tested on
some dynamometers.
DRIVING THE VEHICLE
5-18Starting and driving
Page 277 of 518

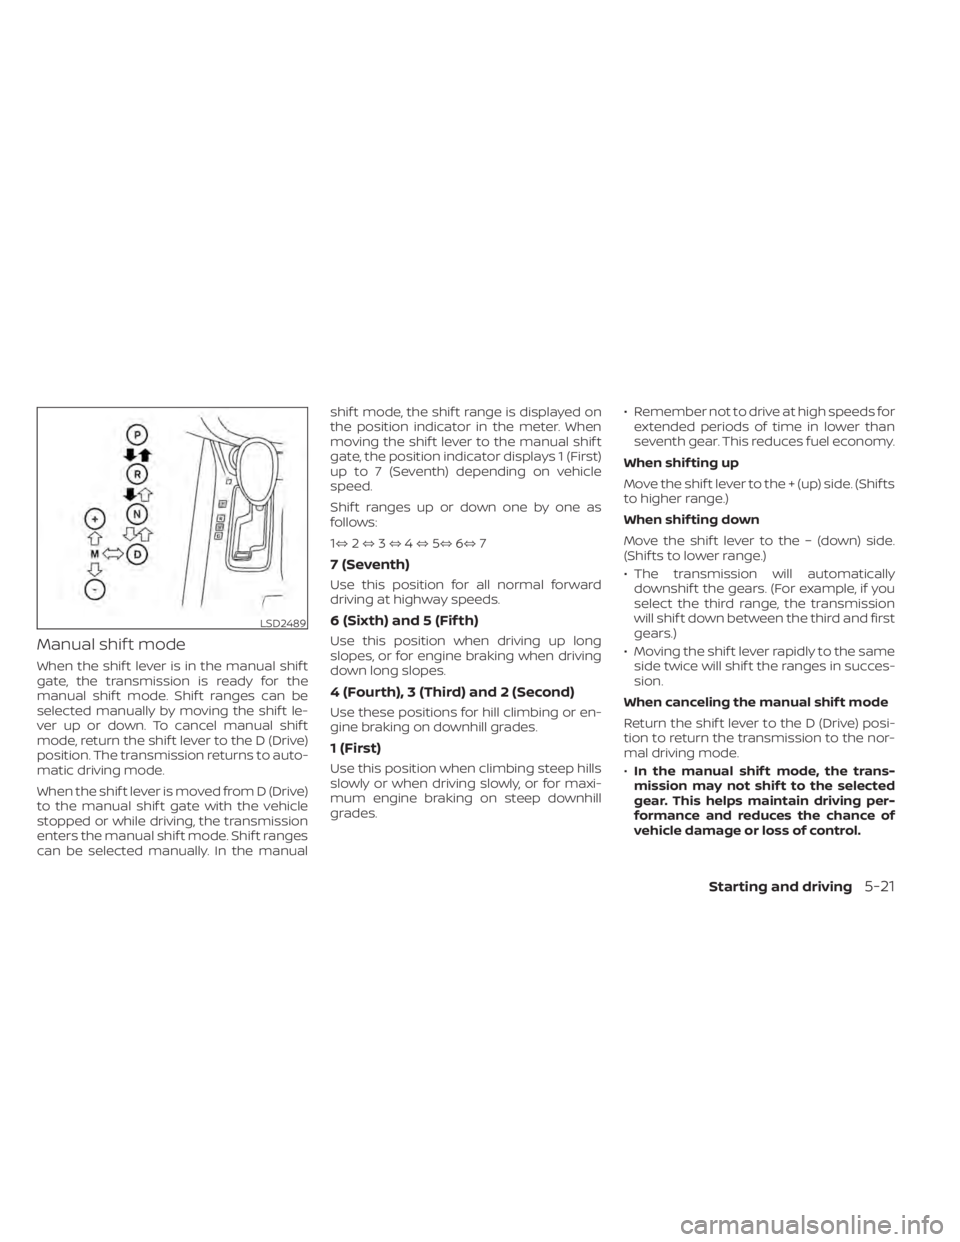
Manual shif t mode
When the shif t lever is in the manual shif t
gate, the transmission is ready for the
manual shif t mode. Shif t ranges can be
selected manually by moving the shif t le-
ver up or down. To cancel manual shif t
mode, return the shif t lever to the D (Drive)
position. The transmission returns to auto-
matic driving mode.
When the shif t lever is moved from D (Drive)
to the manual shif t gate with the vehicle
stopped or while driving, the transmission
enters the manual shif t mode. Shif t ranges
can be selected manually. In the manualshif t mode, the shif t range is displayed on
the position indicator in the meter. When
moving the shif t lever to the manual shif t
gate, the position indicator displays 1 (First)
up to 7 (Seventh) depending on vehicle
speed.
Shif t ranges up or down one by one as
follows:
1⇔
2⇔ 3⇔ 4⇔ 5⇔ 6⇔ 7
7 (Seventh)
Use this position for all normal forward
driving at highway speeds.
6 (Sixth) and 5 (Fif th)
Use this position when driving up long
slopes, or for engine braking when driving
down long slopes.
4 (Fourth), 3 (Third) and 2 (Second)
Use these positions for hill climbing or en-
gine braking on downhill grades.
1 (First)
Use this position when climbing steep hills
slowly or when driving slowly, or for maxi-
mum engine braking on steep downhill
grades. • Remember not to drive at high speeds for
extended periods of time in lower than
seventh gear. This reduces fuel economy.
When shif ting up
Move the shif t lever to the + (up) side. (Shif ts
to higher range.)
When shif ting down
Move the shif t lever to the − (down) side.
(Shif ts to lower range.)
• The transmission will automatically downshif t the gears. (For example, if you
select the third range, the transmission
will shif t down between the third and first
gears.)
• Moving the shif t lever rapidly to the same side twice will shif t the ranges in succes-
sion.
When canceling the manual shif t mode
Return the shif t lever to the D (Drive) posi-
tion to return the transmission to the nor-
mal driving mode.
• In the manual shif t mode, the trans-
mission may not shif t to the selected
gear. This helps maintain driving per-
formance and reduces the chance of
vehicle damage or loss of control.
LSD2489
Starting and driving5-21
Page 278 of 518

•When this situation occurs, the Con-
tinuously Variable Transmission (CVT)
position indicator light will blink and
the chime will sound.
• In the manual shif t mode, the trans-
mission may shif t up automatically to a
higher range than selected if the en-
gine speed is too high. When the ve-
hicle speed decreases, the transmis-
sion automatically shif ts down and
shif ts to first gear before the vehicle
comes to a stop.
• CVT operation is limited to automatic drive mode when CVT fluid temperature
is extremely low even if manual shif t
mode is selected. This is not a malfunc-
tion. When CVT fluid warms up, manual
mode can be selected.
• When the CVT fluid temperature is high, the shif t range may upshif t in lower rpm
than usual. This is not a malfunction.
Shif t lock release
If the battery charge is low or discharged,
the shif t lever may not be moved from the
P (Park) position even with the brake pedal
depressed and the shif t lever button
pressed. To move the shif t lever, perform
the following procedure:
1. Place the ignition switch in the OFF or LOCK position.
2. Apply the parking brake.
3. Remove the shif t lock release cover us- ing a suitable tool. 4. Push down the shif t lock release using a
suitable tool.
5. Press the shif t lever button and move the shif t lever to the N (Neutral) position
while holding down the shif t lock
release. The vehicle may be moved to
the desired location. Replace the re-
moved shif t lock release cover af ter the
operation. If the shif t lever cannot be
moved out of the P (Park) position, have
the Continuously Variable Transmission
system checked as soon as possible. It is
recommended that you visit a NISSAN
dealer for this service.
WARNING
If the shif t lever cannot be moved from
the P (Park) position while the engine is
running and the brake pedal is de-
pressed, the stop lights may not work.
Malfunctioning stop lights could cause
an accident injuring yourself and others.
LSD3163
5-22Starting and driving
Page 279 of 518

Accelerator downshif t
— in D (Drive) position —
For passing or hill climbing, depress the
accelerator pedal to the floor. This shif ts
the transmission down into a lower gear,
depending on the vehicle speed.
High fluid temperature protection
mode
This transmission has a high fluid tem-
perature protection mode. If the fluid tem-
perature becomes too high (for example,
when climbing steep grades in high tem-
peratures with heavy loads, such as when
towing a trailer), engine power and, under
some conditions, vehicle speed will be de-
creased automatically to reduce the
chance of transmission damage. Vehicle
speed can be controlled with the accelera-
tor pedal, but the engine and vehicle speed
may be limited.
Fail-safe
If the vehicle is driven under extreme
conditions, such as excessive wheel
spinning and subsequent hard braking,
the fail-safe system may be activated.
The Malfunction Indicator Light (MIL)
may come on to indicate the fail-safemode is activated. For additional infor-
mation, refer to “Malfunction Indicator
Light (MIL)” in the “Instruments and con-
trols” section of this manual. This will oc-
cur even if all electrical circuits are func-
tioning properly. In this case, place the
ignition switch in the OFF position and
wait for 10 seconds. Then push the
switch back to the ON position. The ve-
hicle should return to its normal operat-
ing condition. If it does not return to its
normal operating condition, have the
transmission checked and repaired, if
necessary. It is recommended that you
visit a NISSAN dealer for this service.
WARNING
When the high fluid temperature pro-
tection mode or fail-safe operation oc-
curs, vehicle speed may be gradually
reduced. The reduced speed may be
lower than other traffic, which could in-
crease the chance of a collision. Be es-
pecially careful when driving. If neces-
sary, pull to the side of the road at a safe
place and allow the transmission to re-
turn to normal operation, or have it re-
paired if necessary.WARNING
• Be sure the parking brake is fully re-
leased before driving. Failure to do so
can cause brake failure and lead to
an accident.
• Do not release the parking brake
from outside the vehicle.
• Do not use the shif t lever in place of
the parking brake. When parking, be
sure the parking brake is fully
engaged.
LSD0158
PARKING BRAKE
Starting and driving5-23
Page 317 of 518

HOW TO SELECT THE CRUISE
CONTROL MODE
Selecting the vehicle-to-vehicle dis-
tance control mode:To choose the
vehicle-to-vehicle distance control mode
O1, quickly push and release the CRUISE
ON/OFF switch
OA. Selecting the conventional (fixed speed)
cruise control mode:
To choose the con-
ventional (fixed speed) cruise control mode
O2, push and hold the CRUISE ON/OFF
switch
OAfor longer than approximately 1.5
seconds. For additional information, refer
to “Conventional (fixed speed) cruise con-
trol mode” in this section.
VEHICLE-TO-VEHICLE DISTANCE
CONTROL MODE
In the vehicle-to-vehicle distance control
mode, the ICC system automatically main-
tains a selected distance from the vehicle
traveling in front of you according to that
vehicle’s speed (up to the set speed), or at
the set speed when the road ahead is clear.
The ICC system is intended to enhance the
operation of the vehicle when following a
vehicle traveling in the same lane and di-
rection.
LSD3444LSD3441
Starting and driving5-61
Page 322 of 518

Operating vehicle-to-vehicle
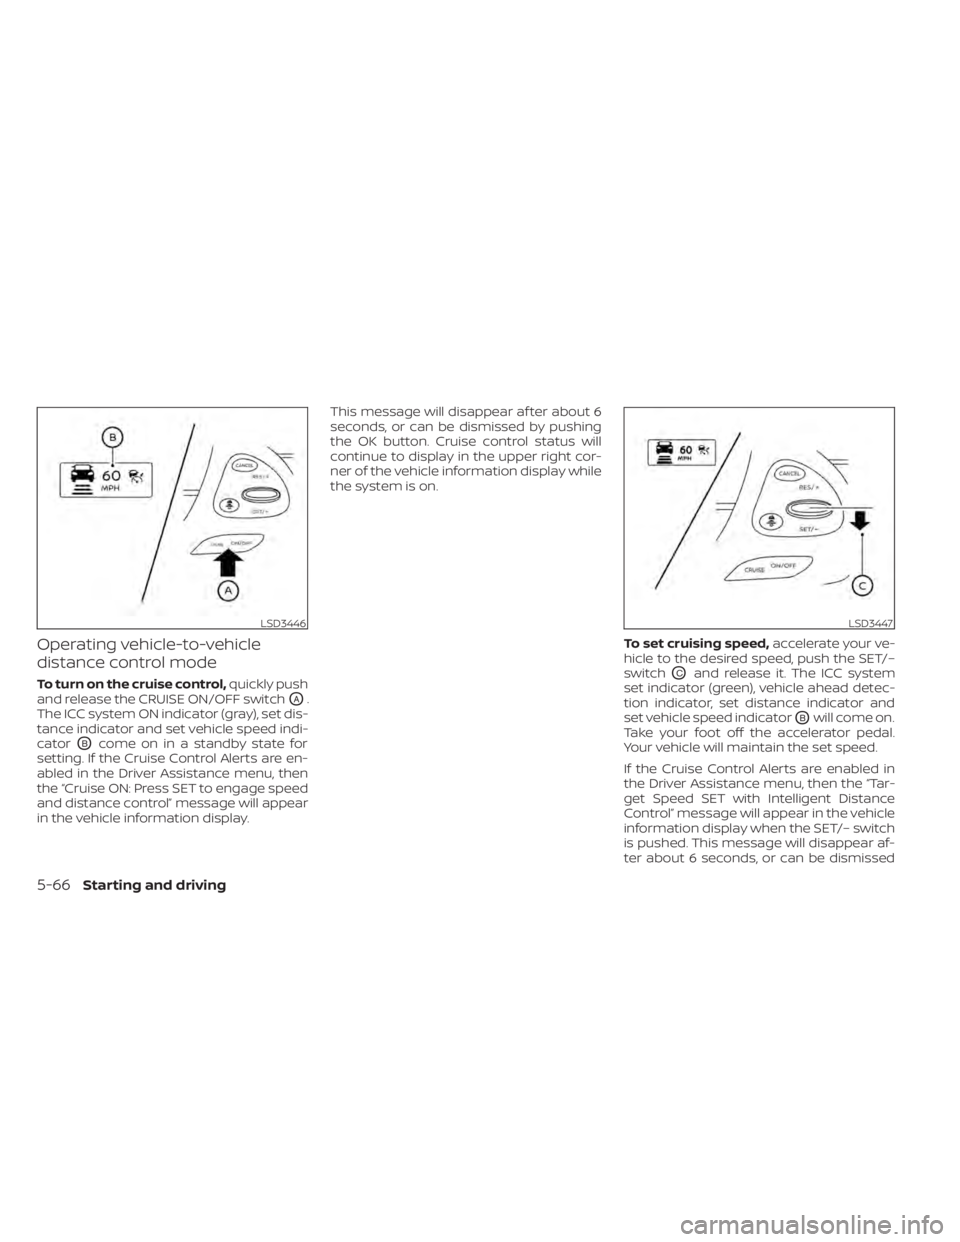
distance control mode
To turn on the cruise control,quickly push
and release the CRUISE ON/OFF switch
OA.
The ICC system ON indicator (gray), set dis-
tance indicator and set vehicle speed indi-
cator
OBcome on in a standby state for
setting. If the Cruise Control Alerts are en-
abled in the Driver Assistance menu, then
the “Cruise ON: Press SET to engage speed
and distance control” message will appear
in the vehicle information display. This message will disappear af ter about 6
seconds, or can be dismissed by pushing
the OK button. Cruise control status will
continue to display in the upper right cor-
ner of the vehicle information display while
the system is on.
To set cruising speed,accelerate your ve-
hicle to the desired speed, push the SET/–
switch
OCand release it. The ICC system
set indicator (green), vehicle ahead detec-
tion indicator, set distance indicator and
set vehicle speed indicator
OBwill come on.
Take your foot off the accelerator pedal.
Your vehicle will maintain the set speed.
If the Cruise Control Alerts are enabled in
the Driver Assistance menu, then the “Tar-
get Speed SET with Intelligent Distance
Control” message will appear in the vehicle
information display when the SET/– switch
is pushed. This message will disappear af-
ter about 6 seconds, or can be dismissed
LSD3446LSD3447
5-66Starting and driving