2020 NISSAN KICKS oil dipstick
[x] Cancel search: oil dipstickPage 16 of 500

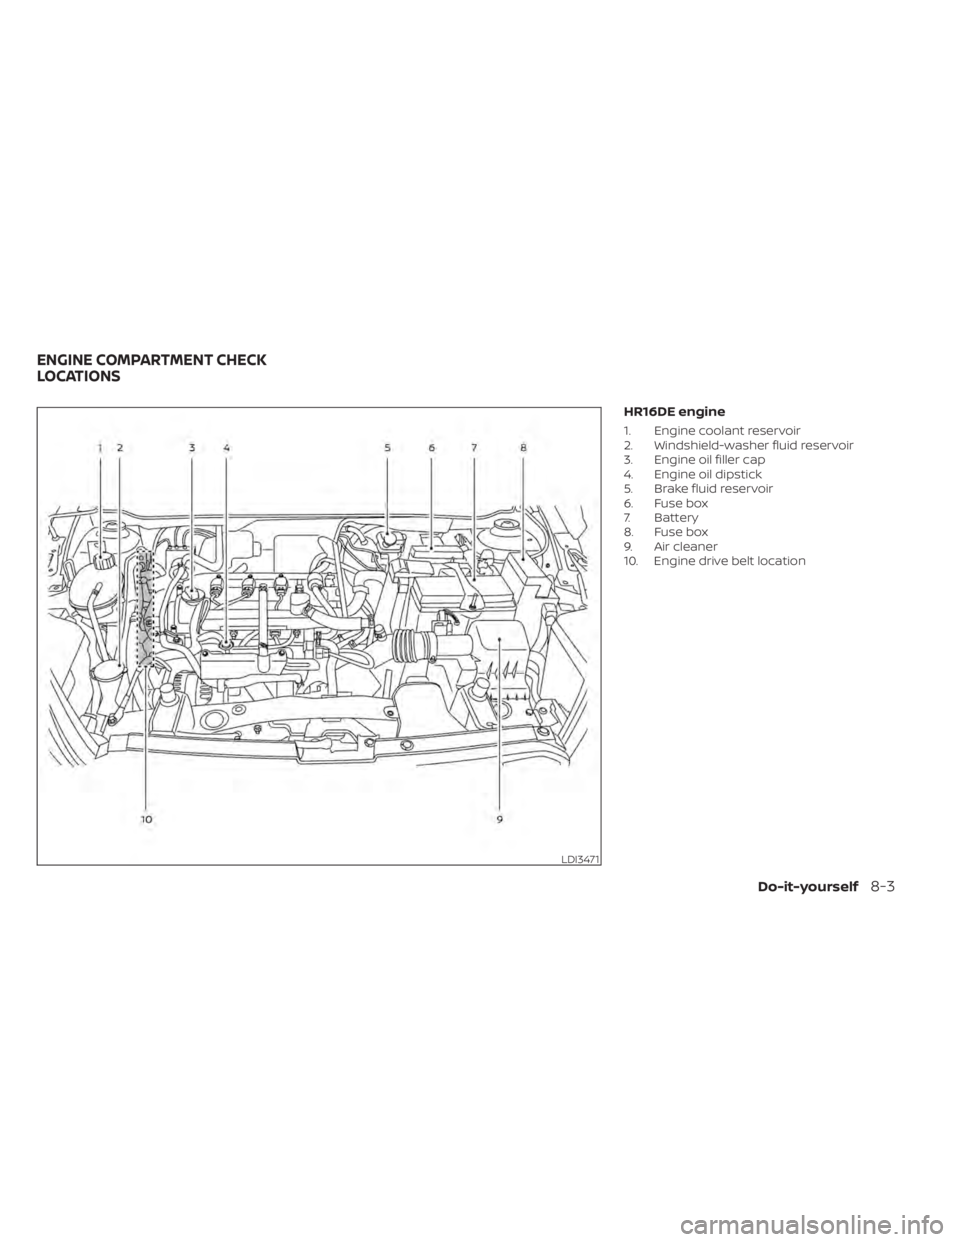
HR16DE engine
1. Engine coolant reservoir (P. 8-4)
2. Windshield-washer fluid reservoir(P. 8-10)
3. Engine oil filler cap (P. 8-5)
4. Engine oil dipstick (P. 8-5)
5. Brake fluid reservoir (P. 8-9)
6. Fuse box (P. 8-19)
7. Battery (P. 8-12)
8. Air cleaner (P. 8-16)
9. Engine drive belt location (P. 8-14)
LDI3467
ENGINE COMPARTMENT CHECK
LOCATIONS
0-8Illustrated table of contents
Page 98 of 500

light remains on, have the system checked.
It is recommended that you visit a NISSAN
dealer for this service.
CAUTION
• Do not ground electrical accessories
directly to the battery terminal. Do-
ing so will bypass the variable volt-
age control system and the vehicle
battery may not charge completely.
For additional information, refer to
“Variable voltage control system” in
the “Do-it-yourself ” section of this
manual.
• Do not continue driving if the genera-
tor belt is loose, broken or missing.
Door open warning light (if
so equipped)
This light comes on when any of the doors
are not closed securely while the ignition
switch is in the ON position.
Engine oil pressure
warning light
This light warns of low engine oil pressure. If
the light flickers or comes on during nor-
mal driving, pull off the road in a safe area, stop the engine
immediatelyand call a
NISSAN dealer or other authorized repair
shop.
The engine oil pressure warning light is
not designed to indicate a low oil level.
Use the dipstick to check the oil level. For
additional information, refer to “Engine oil”
in the “Do-it-yourself ” section of this
manual.
CAUTION
Running the engine with the engine oil
pressure warning light on could cause
serious damage to the engine almost
immediately. Such damage is not cov-
ered by the NISSAN New Vehicle Limited
Warranty. Turn off the engine as soon
as it is safe to do so.
High temperature warning
light (red) (if so equipped)
When the ignition switch is placed in the ON
position, the high temperature warning
light illuminates and then turns off. This in-
dicates that the high temperature sensor
in the engine coolant system is opera-
tional. When driving, the high temperature warn-
ing light may turn off. This indicates that the
engine coolant temperature is within the
normal range.
CAUTION
If the high temperature warning light
illuminates while the engine is running,
it may indicate the engine temperature
is extremely high. Stop the vehicle
safely as soon as possible. If the vehicle
is overheated, continuing vehicle op-
eration may seriously damage the en-
gine. For additional information, refer
to “If your vehicle overheats” in the “In
case of emergency ” section of this
manual.
LED Headlight system
warning light (if so equipped)
This light illuminates when there is an error
with the system.
For additional information, refer to “Head-
light and turn signal switch” in this section.
2-14Instruments and controls
Page 411 of 500

HR16DE engine
1. Engine coolant reservoir
2. Windshield-washer fluid reservoir
3. Engine oil filler cap
4. Engine oil dipstick
5. Brake fluid reservoir
6. Fuse box
7. Battery
8. Fuse box
9. Air cleaner
10. Engine drive belt location
LDI3471
ENGINE COMPARTMENT CHECK
LOCATIONS
Do-it-yourself8-3
Page 413 of 500

CHECKING ENGINE COOLANT
LEVEL
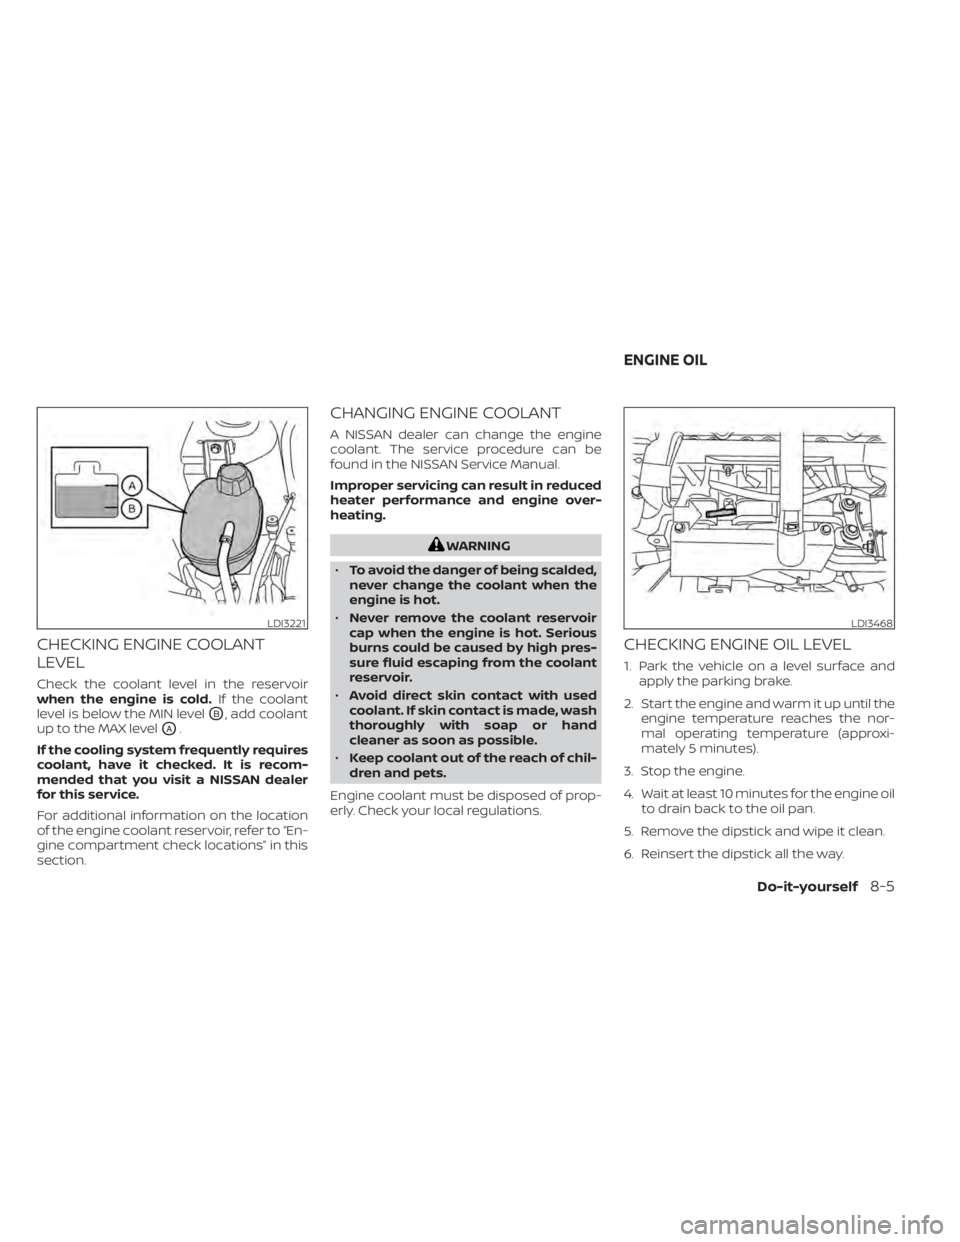
Check the coolant level in the reservoir
when the engine is cold.If the coolant
level is below the MIN level
OB, add coolant
up to the MAX level
OA.
If the cooling system frequently requires
coolant, have it checked. It is recom-
mended that you visit a NISSAN dealer
for this service.
For additional information on the location
of the engine coolant reservoir, refer to “En-
gine compartment check locations” in this
section.
CHANGING ENGINE COOLANT
A NISSAN dealer can change the engine
coolant. The service procedure can be
found in the NISSAN Service Manual.
Improper servicing can result in reduced
heater performance and engine over-
heating.
WARNING
• To avoid the danger of being scalded,
never change the coolant when the
engine is hot.
• Never remove the coolant reservoir
cap when the engine is hot. Serious
burns could be caused by high pres-
sure fluid escaping from the coolant
reservoir.
• Avoid direct skin contact with used
coolant. If skin contact is made, wash
thoroughly with soap or hand
cleaner as soon as possible.
• Keep coolant out of the reach of chil-
dren and pets.
Engine coolant must be disposed of prop-
erly. Check your local regulations.
CHECKING ENGINE OIL LEVEL
1. Park the vehicle on a level surface and apply the parking brake.
2. Start the engine and warm it up until the engine temperature reaches the nor-
mal operating temperature (approxi-
mately 5 minutes).
3. Stop the engine.
4. Wait at least 10 minutes for the engine oil to drain back to the oil pan.
5. Remove the dipstick and wipe it clean.
6. Reinsert the dipstick all the way.
LDI3221LDI3468
ENGINE OIL
Do-it-yourself8-5
Page 414 of 500

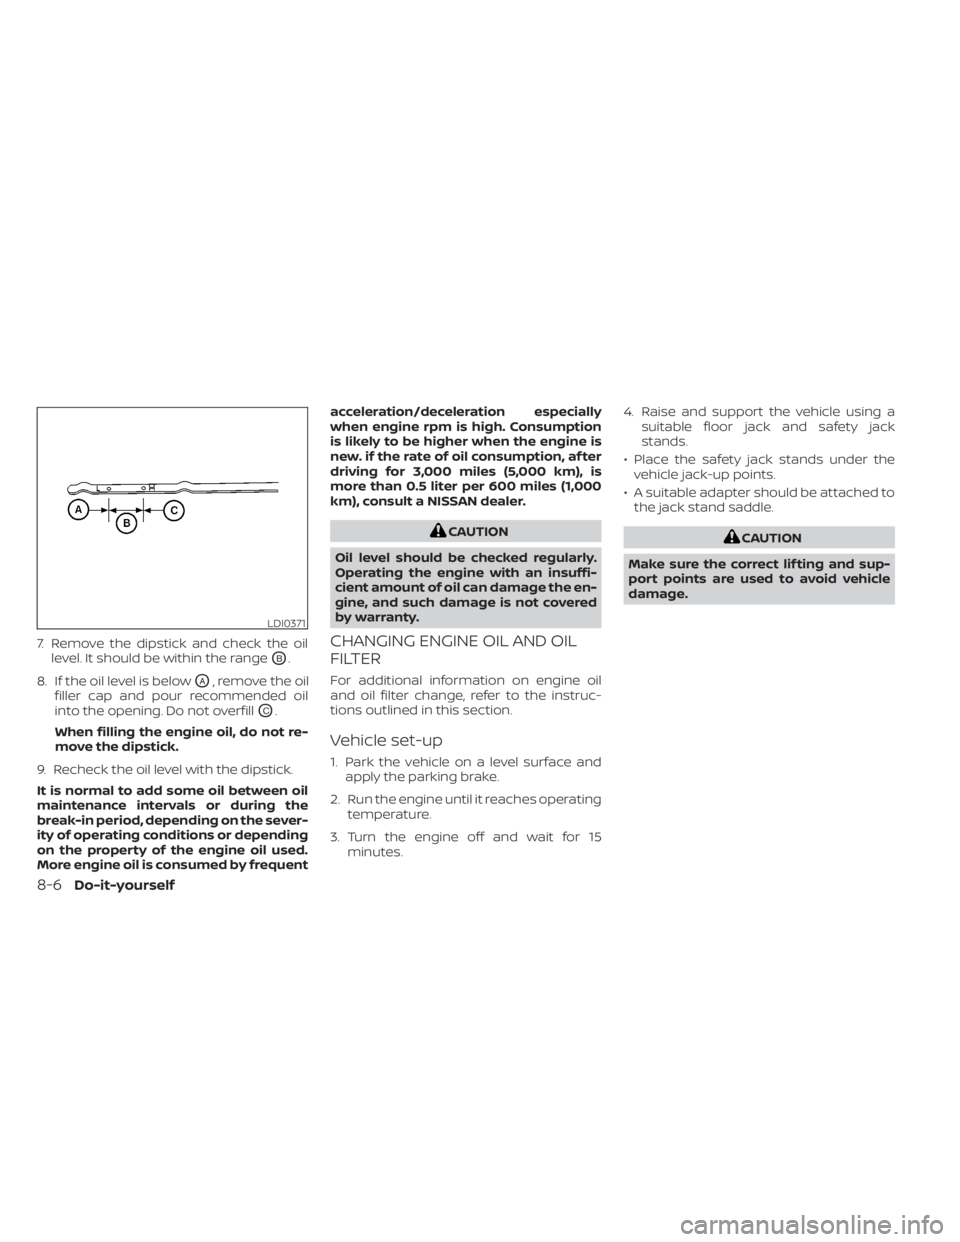
7. Remove the dipstick and check the oillevel. It should be within the range
OB.
8. If the oil level is below
OA, remove the oil
filler cap and pour recommended oil
into the opening. Do not overfill
OC.
When filling the engine oil, do not re-
move the dipstick.
9. Recheck the oil level with the dipstick.
It is normal to add some oil between oil
maintenance intervals or during the
break-in period, depending on the sever-
ity of operating conditions or depending
on the property of the engine oil used.
More engine oil is consumed by frequent acceleration/deceleration especially
when engine rpm is high. Consumption
is likely to be higher when the engine is
new. if the rate of oil consumption, af ter
driving for 3,000 miles (5,000 km), is
more than 0.5 liter per 600 miles (1,000
km), consult a NISSAN dealer.
CAUTION
Oil level should be checked regularly.
Operating the engine with an insuffi-
cient amount of oil can damage the en-
gine, and such damage is not covered
by warranty.
CHANGING ENGINE OIL AND OIL
FILTER
For additional information on engine oil
and oil filter change, refer to the instruc-
tions outlined in this section.
Vehicle set-up
1. Park the vehicle on a level surface and apply the parking brake.
2. Run the engine until it reaches operating temperature.
3. Turn the engine off and wait for 15 minutes. 4. Raise and support the vehicle using a
suitable floor jack and safety jack
stands.
• Place the safety jack stands under the vehicle jack-up points.
• A suitable adapter should be attached to the jack stand saddle.
CAUTION
Make sure the correct lif ting and sup-
port points are used to avoid vehicle
damage.
LDI0371
8-6Do-it-yourself
Page 416 of 500

Engine oil and filter
1. Place a large drain pan under the drainplug and oil filter.
2. Remove the oil filler cap.
3. Remove the drain plug with a wrench by turning it counterclockwise and com-
pletely drain the oil.
CAUTION
Be careful not to burn yourself, as the
engine oil is hot.
WARNING
• Prolonged and repeated contact
with used engine oil may cause skin
cancer.
• Try to avoid direct skin contact with
used oil. If skin contact is made, wash
thoroughly with soap or hand
cleaner as soon as possible.
• Keep used engine oil out of reach of
children. 4. Loosen the oil filter with an oil filter
wrench by turning it counterclockwise.
Remove the oil filter by turning it by
hand.
5. Wipe the engine oil filter mounting sur- face with a clean rag.
CAUTION
Be sure to remove any old gasket ma-
terial remaining on the sealing surface
of the engine. Failure to do so could
lead to an oil leak and engine damage.
• The dipstick must be inserted in
place to prevent oil spillage from the
dipstick hole when filling the engine
with oil.
6. Coat the gasket on the new filter with clean engine oil.
7. Screw in the oil filter clockwise until a slight resistance is felt, then tighten addi-
tionally more than 2/3 turn.
Oil filter tightening torque: 11 to 15 f t-lb (14.7 to 20.6 N·m)
8. Clean and re-install the drain plug with a new washer. Securely tighten the drain
plug with a wrench. Do not use exces-
sive force.
Drain plug tightening torque: 22 to 29 f t-lb (29.4 to 39.2 N·m)
9. Refill the engine with the recommended oil through the oil filler opening, and in-
stall the oil filler cap securely.
8-8Do-it-yourself
Page 417 of 500

For additional information about drain and
refill capacity, refer to “Recommended
fluids/lubricants and capacities” in the
“Technical and consumer information” sec-
tion of this manual. The drain and refill ca-
pacity depends on the oil temperature and
drain time. Use these specifications for ref-
erence only. Always use the dipstick to de-
termine the proper amount of oil in the
engine.
10. Start the engine and check for leakagearound the drain plug and the oil filter.
Correct as required. Turn the engine off
and wait more than 15 minutes. Check
the oil level with the dipstick. Add en-
gine oil if necessary.
Af ter the operation
1. Lower the vehicle carefully to the ground.
2. Reset oil and oil filter maintenance re-minder (if so equipped). For additional
information, refer to “Vehicle information
display” in the “Instruments and con-
trols” section of this manual.
• Dispose of waste oil and filter properly.
• Check your local regulations.
CAUTION
• NISSAN recommends using Genuine
NISSAN CVT Fluid NS-3 (or equiva-
lent) ONLY in NISSAN CVTs. Do not mix
with other fluids.
• Do not use Automatic Transmission
Fluid (ATF) or manual transmission
fluid in a NISSAN CVT, as it may dam-
age the CVT. Damage caused by the
use of fluids other than as recom-
mended is not covered under
NISSAN's New Vehicle Limited
Warranty.
• Using fluids that are not equivalent
to Genuine NISSAN CVT Fluid NS-3
may also damage the CVT. Damage
caused by the use of fluids other than
as recommended is not covered un-
der NISSAN's New Vehicle Limited
Warranty.
When checking or replacement of CVT fluid
is required, it is recommended that you visit
a NISSAN dealer for this service. For additional information on brake fluid
specification, refer to “Recommended
fluids/lubricants and capacities” in the
“Technical and consumer information” sec-
tion of this manual.
LDI3459
CONTINUOUSLY VARIABLE
TRANSMISSION (CVT) FLUID
BRAKE FLUID
Do-it-yourself8-9