2020 NISSAN KICKS manual radio set
[x] Cancel search: manual radio setPage 100 of 500
WARNING
• Radio waves could adversely affect
electric medical equipment. Those
who use a pacemaker should contact
the electric medical equipment
manufacturer for the possible influ-
ences before use.
• If the light does not illuminate with
the ignition switch placed in the ON
position, have the vehicle checked as
soon as possible. It is recommended
that you visit a NISSAN dealer for this
service.
• If the light illuminates while driving,
avoid sudden steering maneuvers or
abrupt braking, reduce vehicle
speed, pull off the road to a safe loca-
tion and stop the vehicle as soon as
possible. Driving with under-inflated
tires may permanently damage the
tires and increase the likelihood of
tire failure. Serious vehicle damage
could occur and may lead to an acci-
dent and could result in serious per-
sonal injury or death. Check the tire
pressure for all four tires. Adjust the
tire pressure to the recommended COLD tire pressure show on the Tire
and Loading Information label lo-
cated in the driver’s door opening to
turn the low tire pressure warning
light off. If the light still illuminates
while driving af ter adjusting the tire
pressure, a tire may be flat or the
TPMS may be malfunctioning. If you
have a flat tire, replace it with a spare
tire as soon as possible. If no tire is
flat and all tires are properly inflated,
have the vehicle checked. It is recom-
mended that you visit a NISSAN
dealer for this service.
• When replacing a wheel without the
TPMS such as the spare tire, the TPMS
will not function and the low tire
pressure warning light will flash for
approximately 1 minute. The light will
remain on af ter 1 minute. Have your
tires replaced and/or TPMS system
reset as soon as possible. It is recom-
mended that you visit a NISSAN
dealer for these services.
• Replacing tires with those not origi-
nally specified by NISSAN could af-
fect the proper operation of the
TPMS.CAUTION
• The TPMS is not a substitute for the
regular tire pressure check. Be sure
to check the tire pressure regularly.
• If the vehicle is being driven at
speeds of less than 16 mph (25 km/h),
the TPMS may not operate correctly.
• Be sure to install the specified size of
tires to the four wheels correctly.
Low windshield-washer
fluid warning light (if so
equipped)
This light comes on when the windshield-
washer fluid is at a low level. Add windshield-
washer fluid as necessary. For additional in-
formation, refer to “Windshield-washer fluid”
in the “Do-it-yourself ” section of this manual.
Master warning light (if so
equipped)
This light illuminates when various vehicle
information display warnings appear.
•Nokey
• I-Key system warning
• Low washer fluid
• Door open
• Parking brake release
2-16Instruments and controls
Page 177 of 500
• The Remote Engine Start function hasbeen switched to the OFF position in “Ve-
hicle Settings” of the vehicle information
display (if so equipped). For additional in-
formation, refer to “Vehicle information
display” in the “Instruments and controls”
section of this manual.
The Remote Engine Start may display a
warning or indicator in the vehicle informa-
tion display (if so equipped). For additional
information, refer to “Vehicle information
display” in the “Instruments and controls”
section of this manual.
REMOTE ENGINE START
OPERATING RANGE
WARNING
To help avoid risk of injury or death
through unintended operation of the
vehicle and/or its systems, including
entrapment in windows or inadvertent
door lock activation, do not leave chil-
dren, people who require the assis-
tance of others or pets unattended in
your vehicle. Additionally, the tempera-
ture inside a closed vehicle on a warm
day can quickly become high enough
to cause a significant risk of injury or
death to people and pets.
CAUTION
When the Intelligent Key battery is dis-
charged or other strong radio wave
sources are present near the operating
location, the Intelligent Key operating
range becomes narrower, and the Intel-
ligent Key may not function properly.
The Remote Engine Start function can only
be used when the Intelligent Key is within
the specified operating range from the ve-
hicle.
The Remote Engine Start operating range
is approximately 197 f t (60 m) from the ve-
hicle.
REMOTE STARTING THE VEHICLE
To use the Remote Engine Start feature
perform the following:
1. Aim the Intelligent Key at the vehicle.
2. Press the
button to lock all doors.
3. Within 5 seconds press and hold the
button until the turn signal lights
flash and the tail lamps turn on. If the
vehicle is not within view press and hold
the
button for at least 2 seconds. The following events will occur when the
engine starts:
• The parking lights will turn on and remain
on as long as the engine is running.
• The doors will be locked and the climate control system may come on.
• The engine will continue to run for 10 min- utes. Repeat the steps to extend the time
for an additional 10 minutes. For addi-
tional information, refer to “Extending en-
gine run time” in this section.
Press and hold the brake pedal while
switching the ignition to the ON position
before driving. For additional information,
refer to “Driving the vehicle” in the “Starting
and driving” section of this manual.
EXTENDING ENGINE RUN TIME
The Remote Engine Start feature can be
extended one time by performing the
steps listed in “Remote starting the vehicle”
in this section. Run time will be calculated
as follows:
• The first 10 minute run time will start when the Remote Engine Start function is
performed.
Pre-driving checks and adjustments3-19
Page 239 of 500
BACK button
Press theBACK button to return to the
previous menu screen.
AUDIO button
Press to display the audio screen. When
this button is pressed while the audio
screen is not displayed, the last audio
source played will play.
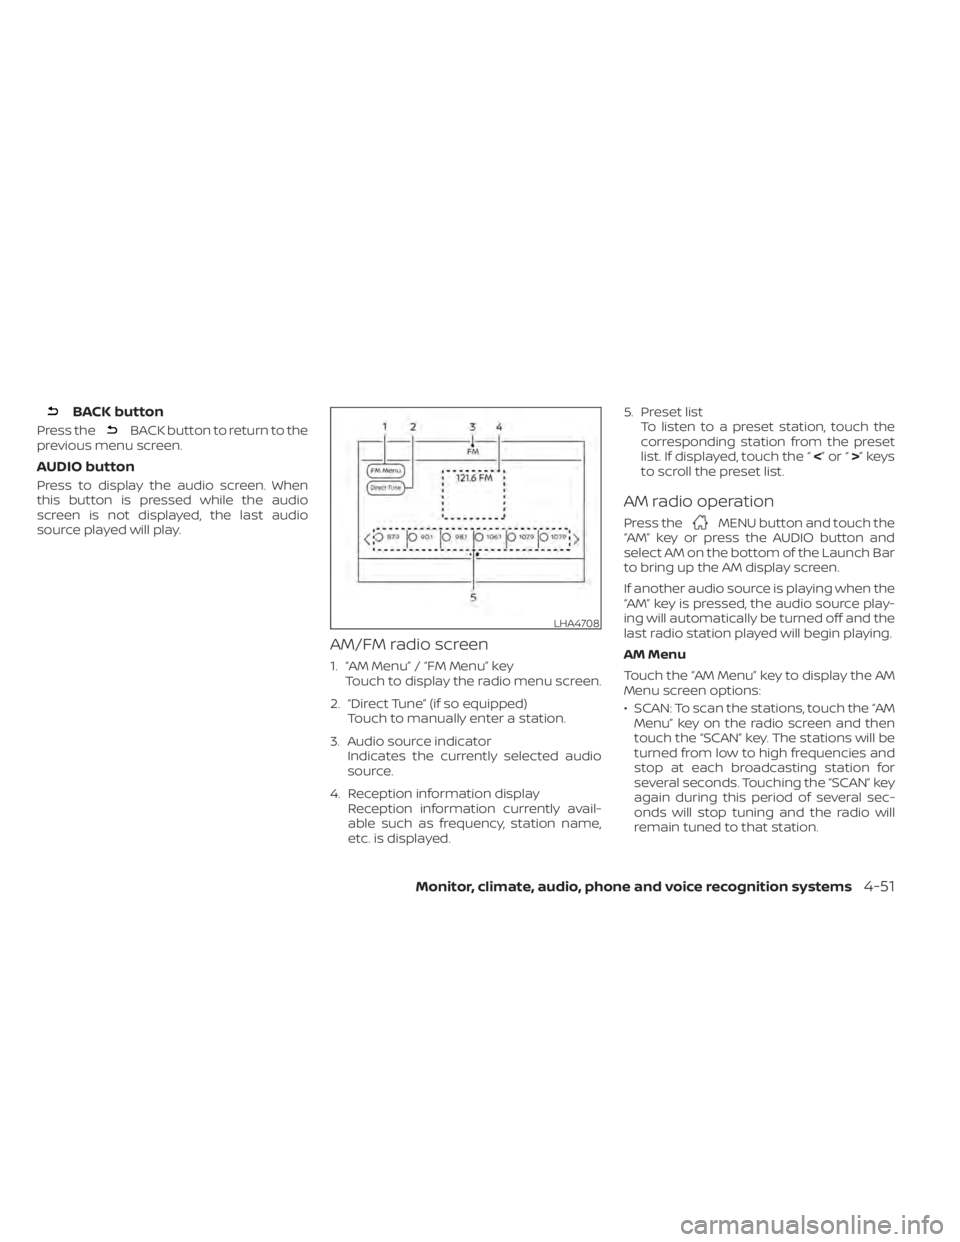
AM/FM radio screen
1. “AM Menu” / “FM Menu” key Touch to display the radio menu screen.
2. “Direct Tune” (if so equipped) Touch to manually enter a station.
3. Audio source indicator Indicates the currently selected audio
source.
4. Reception information display Reception information currently avail-
able such as frequency, station name,
etc. is displayed. 5. Preset list
To listen to a preset station, touch the
corresponding station from the preset
list. If displayed, touch the “ <”or“>”keys
to scroll the preset list.
AM radio operation
Press theMENU button and touch the
“AM” key or press the AUDIO button and
select AM on the bottom of the Launch Bar
to bring up the AM display screen.
If another audio source is playing when the
“AM” key is pressed, the audio source play-
ing will automatically be turned off and the
last radio station played will begin playing.
AM Menu
Touch the “AM Menu” key to display the AM
Menu screen options:
• SCAN: To scan the stations, touch the “AM Menu” key on the radio screen and then
touch the “SCAN” key. The stations will be
turned from low to high frequencies and
stop at each broadcasting station for
several seconds. Touching the “SCAN” key
again during this period of several sec-
onds will stop tuning and the radio will
remain tuned to that station.
LHA4708
Monitor, climate, audio, phone and voice recognition systems4-51
Page 240 of 500
• Refresh: Touch the “Refresh” key to up-date the station list displayed on the right
side of the AM Menu screen.
(SEEK/TRACK) buttons
Press the
orbuttons to tune
from low to high or high to low frequencies
and to stop at the next broadcasting sta-
tion.
Direct Tune
Touch the “Direct Tune” key to display the
Direct Tune menu and manually enter a
station.
1 to 6 station memory operations
Up to six stations can be registered in the
preset list.
1. Select the AM radio band.
2. Tune to the station you wish to store.
3. Touch and hold one of the preset num- bers in the preset list.
The information such as frequency will be
displayed on the preset list.
To select and listen to the preset stations,
press
oron the steering wheel
briefly or touch a preferred station on the
preset list on the radio screen.
FM radio operation
Press theMENU button and touch the
“FM” key or press the AUDIO button and
select FM on the bottom of the Launch Bar
to bring up the FM display screen.
If another audio source is playing when the
“FM” key is pressed, the audio source play-
ing will automatically be turned off and the
last radio station played will begin playing.
The FM stereo indicator (STEREO) is shown
on the screen during FM stereo reception.
When the stereo broadcast signal is weak,
the radio automatically changes from ste-
reo to monaural reception.
FM Menu
Touch the “FM Menu” key to display the FM
Menu screen options:
• SCAN: To scan the stations, touch the “FM Menu” key on the radio screen and then
touch the “SCAN” key. The stations will be
tuned from low to high frequencies and
stop at each broadcasting stations for
several seconds. Touching the “SCAN” key
again during this period of several sec-
onds will stop tuning and the radio will
remain tuned to that station. • Refresh: Touch the “Refresh” key to up-
date the station list displayed on the right
side of the FM Menu screen.
• RDS Info: Radio station and song informa- tion can be displayed on the FM display
screen.
(SEEK/TRACK) buttons
Press the
orbuttons to tune
from low to high or high to low frequencies
and to stop at the next broadcasting sta-
tion.
1 to 12 station memory operations
Up to 12 stations can be registered in the
preset list.
1. Select the FM radio band.
2. Tune to the station you wish to store.
3. Touch and hold one of the preset num- bers in the preset list.
The information such as frequency will be
displayed on the preset list.
To select and listen to the preset stations,
press
oron the steering wheel
briefly or touch a preferred station on the
preset list on the radio screen.
4-52Monitor, climate, audio, phone and voice recognition systems
Page 248 of 500

BLUETOOTH® STREAMING AUDIO
If you have a compatible Bluetooth® audio
device that is capable of playing audio files,
the device can be connected to the vehi-
cle's audio system so that the audio files on
the device play through the vehicle's
speakers. For additional information, refer
to “FM/AM radio” in this section.
NOTE:
For additional information regarding
Bluetooth® Streaming Audio, refer to the
cellular phone owner’s manual.
Connecting procedure
NOTE:
The connecting procedure must be per-
formed when the vehicle is stationary. If
the vehicle starts moving during the pro-
cedure, the procedure will be canceled.To connect a phone to the Bluetooth®
Hands-Free Phone System:
Manual Connecting Procedure
1. Press the
MENU button on the con-
trol panel.
2. Touch the “Connections” key on the screen.
3. In the Bluetooth tab, touch the “Add New” key to connect a phone.
4. When a compatible phone is found a message with a PIN appears on the
screen.
5. Verif y the PIN is correct and accept the connection.
6. To access the Bluetooth® settings menu touch the “
” key on the Connections
screen. The following options are
available:
Menu Item Result
Bluetooth Allows user to switch Bluetooth® on and off. Bluetooth® must be turned on in order to connect a device.
ON Turns Bluetooth® functionality on. To turn off, touch the “ON” key again. The indicator light will go off.
Favorite (Connection first) Allows user to toggle “Phone” and “Audio” favorite settings on and off.
PIN Allows user to customize the PIN to a four digit number.
LHA4726
4-60Monitor, climate, audio, phone and voice recognition systems
Page 340 of 500
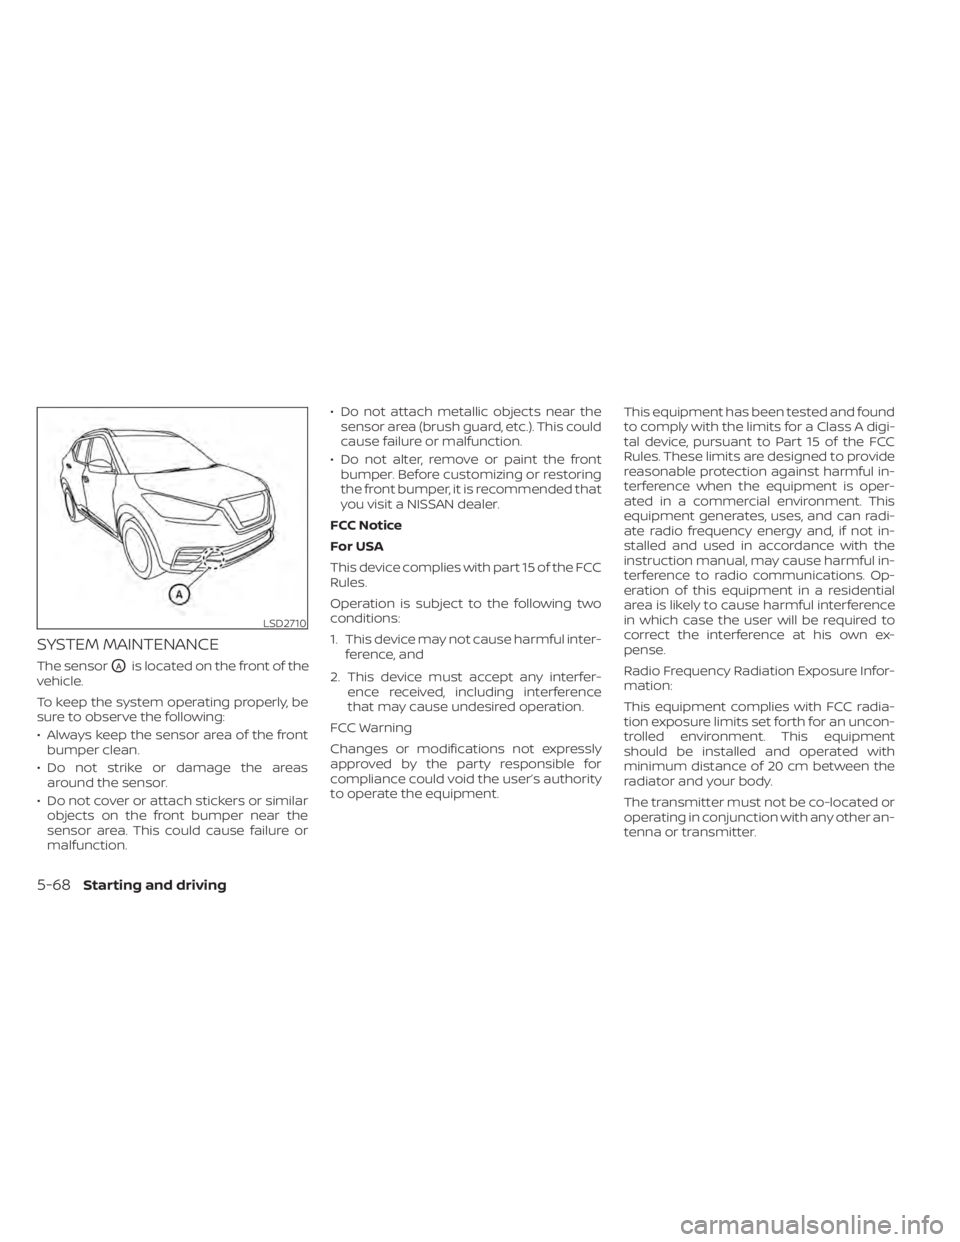
SYSTEM MAINTENANCE
The sensorOAis located on the front of the
vehicle.
To keep the system operating properly, be
sure to observe the following:
• Always keep the sensor area of the front bumper clean.
• Do not strike or damage the areas around the sensor.
• Do not cover or attach stickers or similar objects on the front bumper near the
sensor area. This could cause failure or
malfunction. • Do not attach metallic objects near the
sensor area (brush guard, etc.). This could
cause failure or malfunction.
• Do not alter, remove or paint the front bumper. Before customizing or restoring
the front bumper, it is recommended that
you visit a NISSAN dealer.
FCC Notice
For USA
This device complies with part 15 of the FCC
Rules.
Operation is subject to the following two
conditions:
1. This device may not cause harmful inter- ference, and
2. This device must accept any interfer- ence received, including interference
that may cause undesired operation.
FCC Warning
Changes or modifications not expressly
approved by the party responsible for
compliance could void the user’s authority
to operate the equipment. This equipment has been tested and found
to comply with the limits for a Class A digi-
tal device, pursuant to Part 15 of the FCC
Rules. These limits are designed to provide
reasonable protection against harmful in-
terference when the equipment is oper-
ated in a commercial environment. This
equipment generates, uses, and can radi-
ate radio frequency energy and, if not in-
stalled and used in accordance with the
instruction manual, may cause harmful in-
terference to radio communications. Op-
eration of this equipment in a residential
area is likely to cause harmful interference
in which case the user will be required to
correct the interference at his own ex-
pense.
Radio Frequency Radiation Exposure Infor-
mation:
This equipment complies with FCC radia-
tion exposure limits set forth for an uncon-
trolled environment. This equipment
should be installed and operated with
minimum distance of 20 cm between the
radiator and your body.
The transmitter must not be co-located or
operating in conjunction with any other an-
tenna or transmitter.
LSD2710
5-68Starting and driving
Page 363 of 500
This equipment has been tested and
found to comply with the limits for a
Class A digital device, pursuant to Part 15
of the FCC Rules. These limits are de-
signed to provide reasonable protection
against harmful interference when the
equipment is operated in a commercial
environment. This equipment generates,
uses, and can radiate radio frequency
energy and, if not installed and used in
accordance with the instruction manual,
may cause harmful interference to radio
communications. Operation of this
equipment in a residential area is likely
to cause harmful interference in which
case the user will be required to correct
the interference at his own expense.
Radio frequency radiation exposure in-
formation:
This equipment complies with FCC radia-
tion exposure limits set forth for an un-
controlled environment.
This equipment should be installed and
operated with minimum distance of 20
cm between the radiator and your body.
The transmitter must not be co-located
or operating in conjunction with any
other antenna or transmitter.For Canada
Model: ARS4–B
IC: 4135A-ARS4B
FCC ID: OAYARS4B
This device complies with Industry
Canada licence-exempt RSS standard(s).
Operation is subject to the following two
conditions:
1.
This device may not cause interfer-
ence, and
2. This device must accept any interfer-
ence received, including interference
that may cause undesired operation
of the device.
Le présent appareil est conforme aux
CNR d'Industrie Canada applicables aux
appareils radio exempts de licence.
L'exploitation est autorisée aux deux
conditions suivantes:
1. L'appareil ne doit pas produire de
brouillage, et
2. L'utilisateur de l'appareil doit ac-
cepter tout brouillage radioélectrique
subi, même si le brouillage est suscep-
tible d'en compromettre le
fonctionnement. Radio frequency radiation exposure in-
formation:
This equipment complies with FCC and IC
radiation exposure limits set forth for an
uncontrolled environment.
This equipment should be installed and
operated with minimum distance of 30
cm between the radiator and your body.
This transmitter must not be co-located
or operating in conjunction with any
other antenna or transmitter.
Cet équipement est conforme aux lim-
ites d'exposition aux rayonnements IC
établies pour un environnement non
contrôlé.
Cet équipement doit être installé et
utilisé avec un minimum de 30 cm de
distance entre la source de rayonnement
et votre corps.
FCC Notice
Changes or modifications not expressly
approved by the party responsible for
compliance could void the user’s author-
ity to operate the equipment.
Starting and driving5-91
Page 389 of 500
TIRE PRESSURE MONITORING
SYSTEM (TPMS)
This vehicle is equipped with the TPMS. It
monitors tire pressure of all tires except the
spare. When the low tire pressure warning
light is lit and the “Tire Pressure Low — Add
Air” warning appears in the vehicle infor-
mation display, one or more of your tires is
significantly under-inflated. If the vehicle is
being driven with low tire pressure, the
TPMS will activate and warn you of it by the
low tire pressure warning light. This system
will activate only when the vehicle is driven
at speeds above 16 mph (25 km/h). For ad-
ditional information, refer to “Warning
lights, indicator lights and audible remind-
ers” in the “Instruments and controls” sec-
tion, and “Tire Pressure Monitoring System
(TPMS)” in the “Starting and driving” section
of this manual.
WARNING
• Radio waves could adversely affect
electric medical equipment. Those
who use a pacemaker should contact
the electric medical equipment
manufacturer for the possible influ-
ences before use. •
If the low tire pressure warning light
illuminates while driving, avoid sud-
den steering maneuvers or abrupt
braking, reduce vehicle speed, pull
off the road to a safe location and
stop the vehicle as soon as possible.
Driving with underinflated tires may
permanently damage the tires and
increase the likelihood of tire failure.
Serious vehicle damage could occur
and may lead to an accident and
could result in serious personal in-
jury. Check the tire pressure for all
four tires. Adjust the tire pressure to
the recommended COLD tire pres-
sure shown on the Tire and Loading
Information label to turn the low tire
pressure warning light OFF. If the
light still illuminates while driving af-
ter adjusting the tire pressure, a tire
may be flat or the TPMS may be mal-
functioning. If you have a flat tire, re-
place it with a spare tire as soon as
possible. If no tire is flat and all tires
are properly inflated, have the ve-
hicle checked. It is recommended
that you visit a NISSAN dealer for this
service. •
When replacing a wheel without the
TPMS such as the spare tire, the TPMS
will not function and the low tire
pressure warning light will flash for
approximately 1 minute. The light will
remain on af ter 1 minute. Have your
tires replaced and/or TPMS system
reset as soon as possible. It is recom-
mended that you visit a NISSAN
dealer for these services.
• Replacing tires with those not origi-
nally specified by NISSAN could af-
fect the proper operation of the
TPMS.
• Do not inject any tire liquid or aerosol
tire sealant into the tires, as this may
cause a malfunction of the tire pres-
sure sensors.
• If the light still comes on while driving
af ter adjusting the tire pressure, a
tire may be flat or the TPMS may be
malfunctioning. If you have a flat tire,
replace it with a spare tire as soon as
possible. If no tire is flat and all tires
are properly inflated, it is recom-
mended that you visit a NISSAN
dealer for this service.
FLAT TIRE
In case of emergency6-3