Page 265 of 334

garage
dooropener, contactanauthorized
Mercedes-B enzCenter.
Altern atively, youcan callthefollowing tele-
phone assistance services:
R USA: Mercedes-B enzCustomer Assistance
Center at1-80 0-FOR-MERCedes
R Canada: Customer Serviceat
1-80 0-38 7-0100
R HomeLink ®
hotline 1-800-355-3515(free of
charge)
More informat iononHomeLink ®
and/or com-
patible products isalso availa bleonline at
htt p:// www.homelink.c om.
Notes onthe declaration ofconf ormity
(Y page 28).
USA: FCCID:CB2HMIH L4
Canada: IC:279B -HMIH L4
Import antsafety notes G
WARNING
When youoperate orprogram thedoor with
the integrat edgarage dooropener, persons
in the range ofmovement ofthe door may
become trappedorbe struck bythe door.
There isarisk ofinjury.
When usingtheintegrat edgarage door
opener, alwaysmake surethatnobody is
within therange ofmovement ofthe door. G
DANGER
Combustion enginesemitpoisonous
exhaust gasessuchascarbon monoxide.
Inhaling theseexhaust gasesishazardous to
health andcanresult inpoisoning. Thereisa
risk offatal injury. Therefore, neverleavethe
engine runningan enclosed spacewithout
adequa tevent ilation.
Program ming Program
mingthebutt ons
Pay atten tiontothe "Important safetynotes"
(Y page 263). Garage
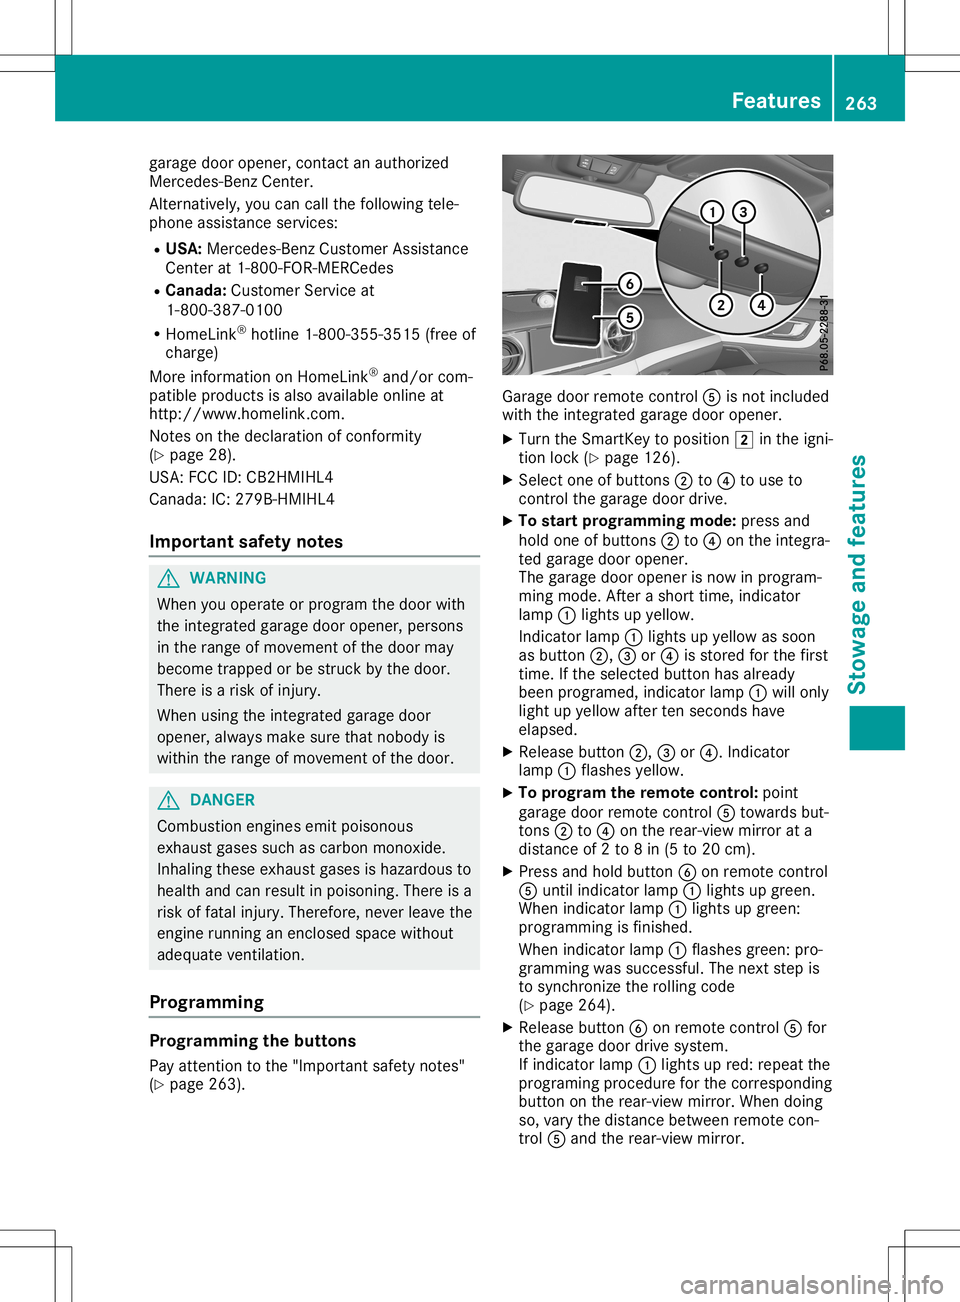
doorremote control0083 isnot included
with theintegrat edgarage dooropener.
X Turn theSmart Keytoposition 0048inthe igni-
tion lock (Ypage 126).
X Select oneofbutton s0044 to0085 touse to
cont rolthe garage doordrive.
X To star tprogr ammingmode: pressand
hold oneofbutton s0044 to0085 onthe integra-
ted garage dooropener.
The garage dooropener isnow inprogram-
ming mode. Afterashort time,indicator
lamp 0043lights upyellow .
Indicator lamp0043lights upyellow assoon
as button 0044,0087or0085 isstored forthe first
time. Ifthe selected buttonhasalready
been programed, indicatorlamp0043will only
light upyellow aftertenseconds have
elapsed.
X Release button0044,0087or0085. Indicator
lamp 0043flashes yellow.
X To progr amthe remote control: point
garage doorremote control0083 towards but-
tons 0044to0085 onthe rear-view mirrorata
distance of2to 8in (5 to 20 cm).
X Press andhold button 0084onremote control
0083 until indicator lamp0043lights upgreen.
When indicator lamp0043lights upgreen:
programming isfinished.
When indicator lamp0043flashes green:pro-
gramming wassuccessful. Thenext step is
to synchron izethe rolling code
(Y page 264).
X Release button0084onremote control0083 for
the garage doordrive system.
If indicator lamp0043lights upred: repeat the
programing procedureforthe correspon ding
button onthe rear-view mirror.Whendoing
so, vary thedistance between remotecon-
trol 0083and therear-view mirror. Featur
es
263Stowage andfeatu res Z
Page 266 of 334

The
required distance between remotecon-
trol 0083and theintegr atedgarage door
opener depends onthe garage doordrive
system. Severalattemptsmight beneces-
sary. Youshould testevery position forat
least 25seconds beforetryinganother posi-
tion.
Synchronizing therolling code
Pay atten tiontothe "Importan tsafety notes"
(Y page 263).
If the garage doorsystem usesarolling code,
you willalso have tosynchron izethe garage
door system withtheintegr atedgarage door
opener inthe rear-view mirror.Todo this you
will need touse theprogramming buttonon
the door drive controlpanel. Theprogramming
button maybelocated indifferent places
depending onthe manufact urer.Itis usuall y
located onthe door drive unitonthe garage
ceiling.
Familiarize yourselfwiththegarage doordrive
operating instructions ,e.g. under "Program-
ming additional remotecontrols", before carry-
ing out thefollowing steps.
Your vehicle mustbewithin reachofthe
garage doororgate opener drive.Makesure
that neither yourvehicle norany persons/
object sare present withinthesweep ofthe
door orgate.
X Turn theSmart Keytoposition 0048inthe igni-
tion lock (Ypage 126).
X Get outofthe vehicle.
X Press theprogramming buttononthe door
drive unit.
Usually ,you now have 30seconds toinitiate
the next step.
X Get into thevehicle.
X Press previously programed button0044,0087
or 0085 onthe integr atedgarage dooropener
repeatedly untilthedoor closes.
The rolling codesynchron izationisthen
complete.
Notes onprogr ammingthe remot econ-
tr ol
Canadian radiofrequency lawsrequire a
"break" (orinter ruption) ofthe trans mission
signals afterbroadcasting forafew seconds.
Therefore, thesesignals maynotlast long
enough forthe integr atedgarage dooropener.
The signal isnot recogn izedduring program-
ming. Comparable withCanadian law,some U.S.
garage dooropeners alsofeature a
"break".
Proceed asfollows:
R ifyou liveinCanada.
R ifyou have difficulties programming the
garage dooropener (regardless ofwhere
you live) when following theprogramming
steps.
X Press andhold oneofbutton s0044 to0085 on
the integr atedgarage dooropener.
Aft erashort time,indicator lamp0043lights
up yellow.
X Release thebutton .
Indicat orlamp 0043flashes yellow.
X Press button 0084ofgarage doorremote con-
trol 0083for two seconds, thenrelease itfor
two seconds.
X Press button 0084again fortwo seconds.
X Repeat thissequence onbutton 0084of
remote control0083 until indicator lamp0043
lights upgreen.
When indicator lamp0043lights upgreen:
programming isfinished.
When indicator lamp0043flashes green:pro-
gramming wassuccessful. Thenext step is
to synchron izethe rolling code.
X Release button0084ofremote control0083 of
the garage doordrive.
When indicator lamp0043lights upred:
repeat theprogramming processforthe cor-
responding buttononthe rear-view mirror.
When doingso,vary thedistance between
remote control0083 and therear-view mirror.
The required distance between remotecon-
trol 0083and theintegr atedgarage door
opener depends onthe garage doordrive
system. Severalattemptsmight beneces-
sary. Youshould testevery position forat
least 25seconds beforetryinganother posi-
tion.
Problems whenprogramming
If you areexperienc ingproblems programming
the integr atedgarage dooropener onthe rear-
view mirror, takenoteof the following instruc-
tions:
R Check thetrans mitterfrequency usedby
garage doordrive remote control0083 and
whether itis supported. Thetrans mitterfre-
quency canusuall ybe found onthe back of
remote control0083 for the garage doordrive. 264
Featur
esStowage andfeatu res
Page 267 of 334

The
integr atedgarage dooropener iscom-
patible withdevices thathave units which
operate inthe frequency rangeof280 to
433 MHz.
R Replace thebatteries ingarage doorremote
cont rol0083. This increases thelikelihood that
garage doorremote control0083 will trans mit
a stron gand precise signaltothe integr ated
garage dooropener.
R When programming, holdremote control0083
at varying distances andangles frombut-
ton s0044 to0085 which youareprogramming.
Try various anglesatadistance between
2and 8inches (5to20cm) oratthe same
angle butatvarying distances .
R Ifafurther remote control0083 isavailabl efor
the same garage doordrive, repeat the
same programming stepswiththisremote
cont rol0083. Before performin gthese steps,
make surethatnew batteries havebeen
installed ingarage doordrive remote control
0083.
R Note thatsome remote controlsonly trans -
mit foralimited amount oftime (theindica-
tor lamp onthe remote controlgoes out).
Press button 0084onremote control0083 again
before transmission ends.
R Align theanten nacable ofthe garage door
opener unit.Thiscanimprove signalrecep-
tion/ transmission.
Opening/clo singthegara gedoor Aft
erithas been programmed, theintegr ated
garage dooropener performs thefunct ionof
the garage doorsystem remote control.Please
also read theoperating instructions forthe
garage doorsystem.
X Turn theSmart Keytoposition 0048inthe igni-
tion lock (Ypage 126).
X Press either button 0044,0087or0085 which you
have programmed tooperate thegarage
door.
Garage doorsystem withafixed code: indi-
cator lamp0043lights upgreen.
Garage doorsystem witharolling code:indi-
cator lamp0043flashes green.
The trans mitterwill trans mitasignal aslong
as the button ispressed. Thetrans mission
is halted afteramaximum often seconds
and indicator lamp0043lights upyellow.
X Press button 0044,0087or0085 again ifneces-
sary. Clearing
thememor y Make
surethatyouclear thememory ofthe
integr atedgarage dooropener beforeselling
the vehicle.
X Turn theSmart Keytoposition 0048inthe igni-
tion lock (Ypage 126).
X Press andhold button s0044 and 0085.
The indicator lampinitially lightsupyellow
and then green.
X Release buttons0044 and 0085.
The memory ofthe integr atedgarage door
opener inthe rear-view mirroriscleared. Compass
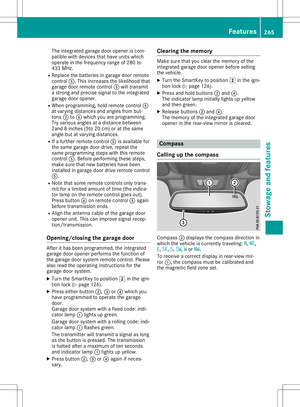
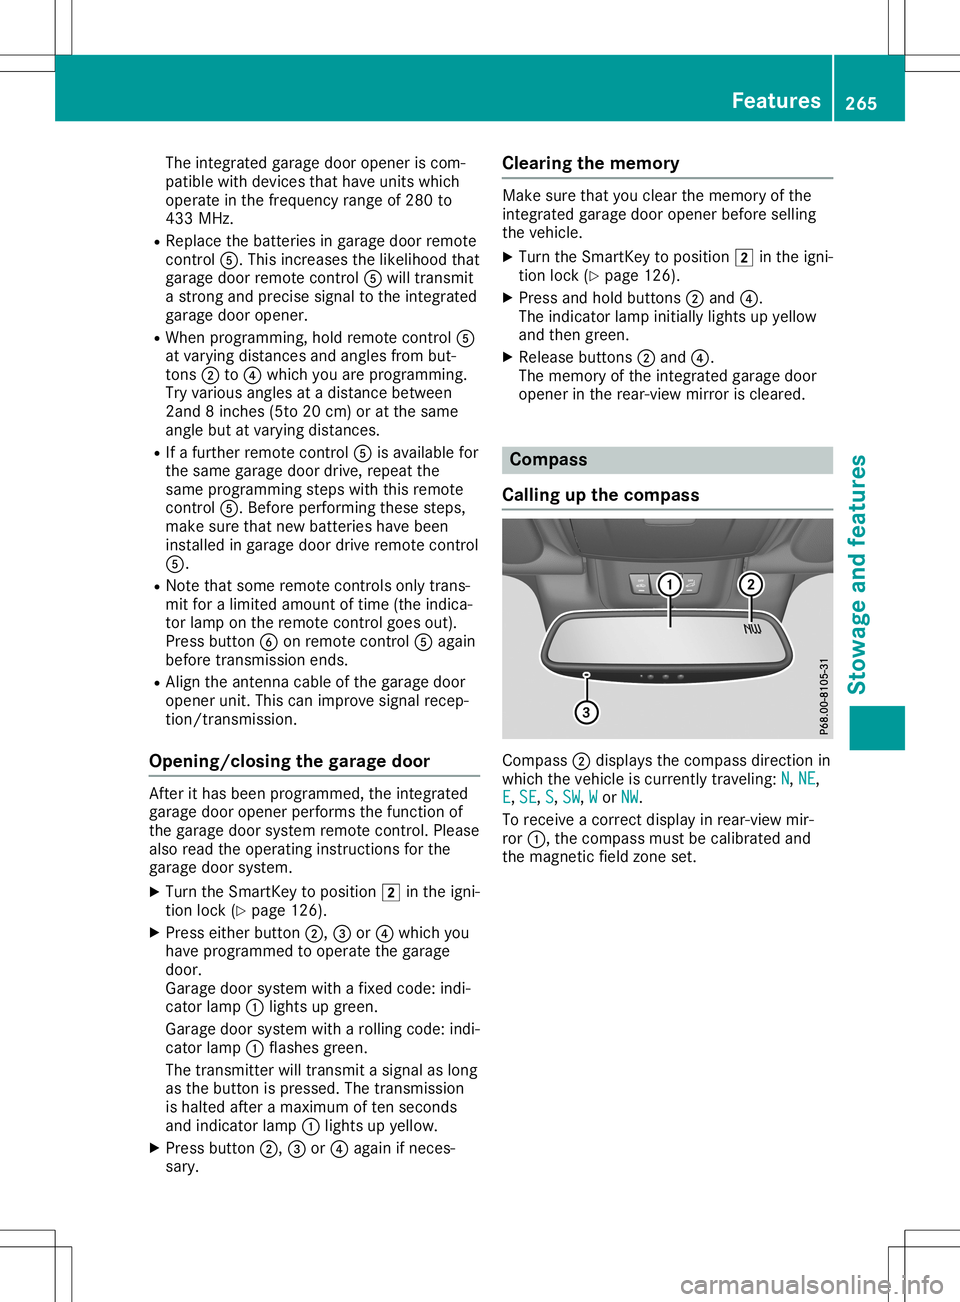
Calling upthe compass Compass
0044display sthe compass directionin
which thevehicle iscurrent lytraveling: N N,
NE NE,
E E,
SE SE,
S S,
SW SW,
W W
or NW NW.
To receive acorrec tdisplay inrear-view mir-
ror 0043, thecompass mustbecalibrated and
the magnetic fieldzone set. Featur
es
265Stowage andfeatu res Z
Page 268 of 334

Setting
thecompass North
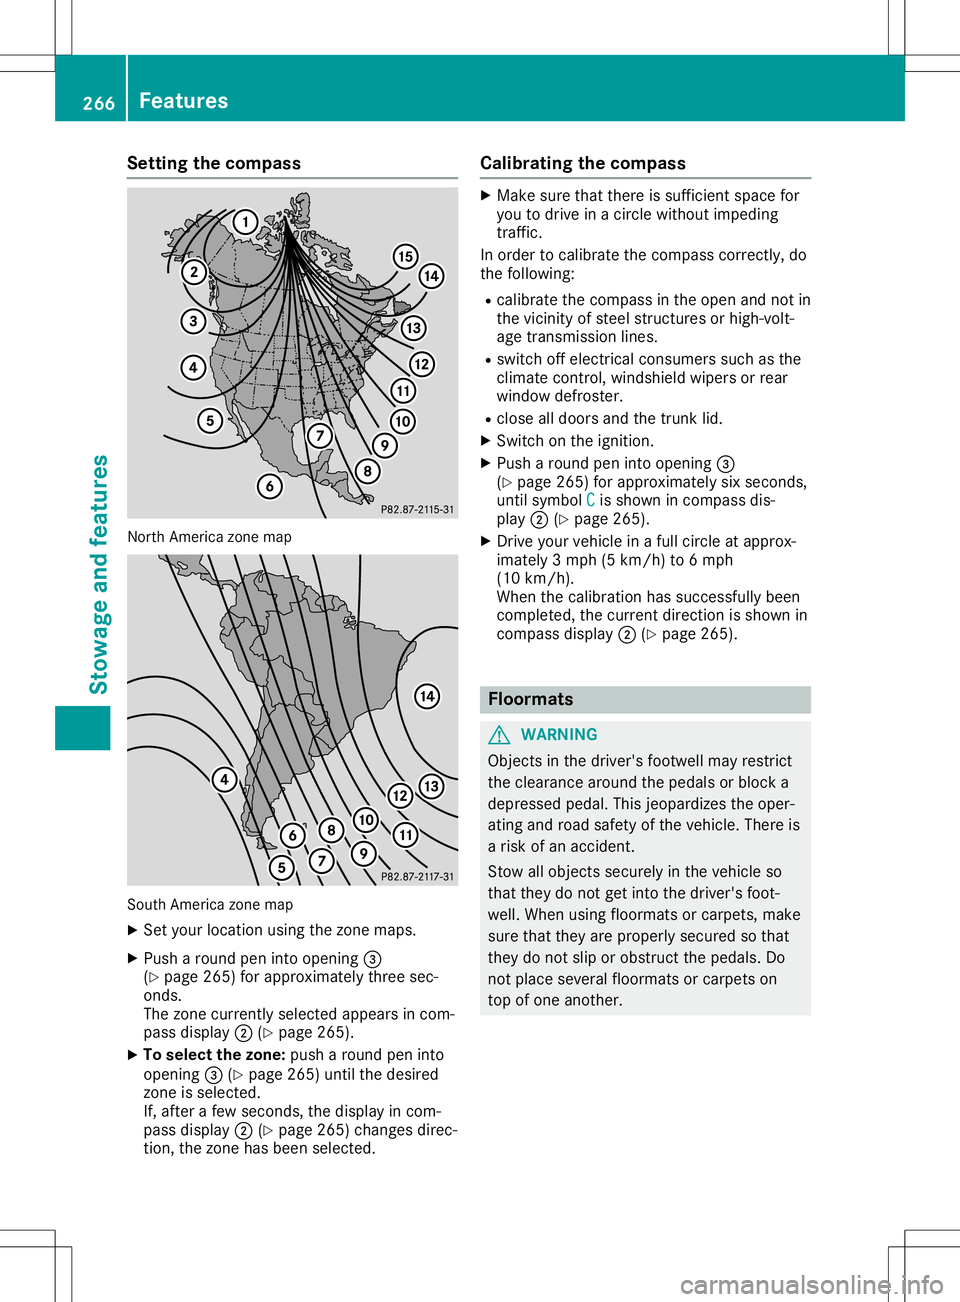
America zonemap South
America zonemap
X Set your location usingthezone maps.
X Push around peninto opening 0087
(Y page 265)forapproximately threesec-
onds.
The zone current lyselected appearsincom-
pass display 0044(Ypage 265).
X To selec tthe zone: pusharound peninto
opening 0087(Ypage 265)untilthedesired
zone isselected.
If, after afew seconds, thedisplay incom-
pass display 0044(Ypage 265)changes direc-
tion, thezone hasbeen selected. Calibrating
thecompass X
Make surethatthere issufficient spacefor
you todrive inacircle without impeding
traffic.
In order tocalibrate thecompass correctly,do
the following:
R calibrate thecompass inthe open andnotin
the vicinity ofsteel struct uresorhigh-volt-
age transm issionlines.
R switch offelectrical consumers suchasthe
climate control,windshield wipersorrear
window defroster.
R close alldoors andthetrunk lid.
X Switch onthe ignition.
X Push around peninto opening 0087
(Y page 265)forapproximately sixseconds,
until symbol C C
is shown incompass dis-
play 0044(Ypage 265).
X Drive yourvehicle inafull circle atapprox-
imately 3mph (5km/h) to6mph
(10 km/h).
When thecalibration hassuccessfully been
completed, thecurrent direction isshown in
compass display0044(Ypage 265). Floo
rmats G
WARNING
Object sin the driver's footwell mayrestrict
the clearance aroundthepedals orblock a
depressed pedal.Thisjeopardizes theoper-
ating androad safety ofthe vehicle. Thereis
a risk ofan accident.
Stow allobject ssecurely inthe vehicle so
that they donot getinto thedriver's foot-
well. When usingfloormats orcarpets, make
sure thatthey areproperly securedsothat
they donot slip orobstruct thepedals. Do
not place several floormats orcarpets on
top ofone another. 266
FeaturesStowage
andfeatu res
Page 269 of 334
X
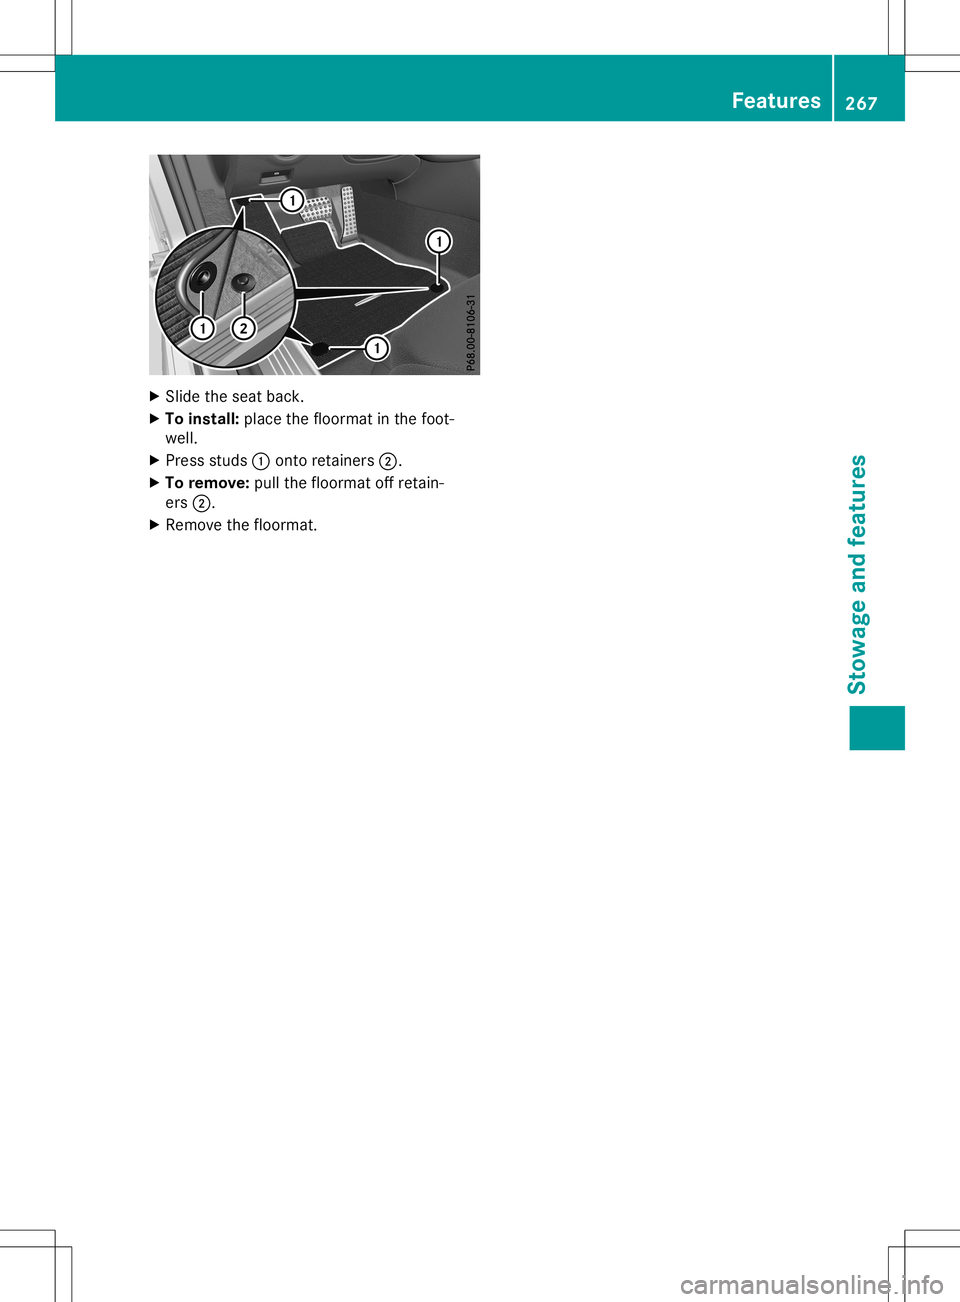
Sli de the seatba ck.
X To instal l:place thefloorma tin the foot-
we ll.
X Pre ssstud s0043 onto retainers0044.
X To remo ve:pullthe floorma toff reta in-
ers 0044.
X Re move thefloorma t. Fe
atures
267Stow ageand features Z
Page 270 of 334

Engine
compartm ent Hood
Imp ortant safety notes G
WAR
NING
If th ehood isunlat ched, itmay open up
when theveh icle isin mot ionand blockyour
view. Thereis arisk ofan acc iden t.
Nev erunlat chthehood while driving.Bef ore
ever ytrip, ens ure that thehood isloc ked. G
WAR
NING
When openingand closingth ehood ,it may
sudde nlyfall intoth eclo sed posit ion.Ther e
is arisk ofinjury topers onswith inran geof
mov emen tof thehood .
Open andclosethehood onlywhen noone
is with inits ran geofmov emen t. G
WAR
NING
Open ingthehood when theeng ineisove r-
heat edorwhen there isafir ein theeng ine
com partmen tcoul dexp ose you tohot gases
or other servicepro duct s.Ther eis arisk of
inj ury.
Let anove rheatedeng inecoo ldown before
open ingthehood .If th ere isafir ein the
eng inecom partmen t,ke ep thehood closed
and contactth efir edepar tment . G
WAR
NING
The enginecom partmen tcon tain smov ing
com ponents.Cert aincom ponents,suc has
th eradiat orfan ,may continue torun orstart
again sudde nlywhen theign ition isoff .
Ther eis arisk ofinjury.
If you needto do any work inside theeng ine
com partmen t:
R swit choff theign ition
R nev erreac hint oth earea whereth ere isa
risk ofdang erfrom mov ingcom ponents,
suc has thefan rotatio narea R
rem ove jewelry andwatc hes
R ke ep items ofclo thing and hair, forexam -
ple, away from mov ingpart s
To ens ure theflow offresh airthroug hth eair
ven tsint oth eveh icle interio r,please observe
th efoll owin gno tes: (Y page 122)
Open ingthehood G
WAR
NING
Cert aincom ponentsin theeng inecom part-
men t,suc has theeng ine,radiat orand parts
of theexh aust system, canbecome very
hot .Wor kingin theeng inecom partmen t
pose sa risk ofinjury.
Wher eposs ible, lettheeng inecoo ldown
and touch onlythecom ponentsdesc ribedin
th efoll owin g. G
WAR
NING
When thehood isopen andthewind shield
wiper sare setinmot ion,you can beinjured
by thewiper linkage. Thereis arisk ofinjury.
Always switchoff thewind shieldwiper sand
th eign ition befo reopen ingthehood .
! Mak
esure that thewind shieldwiper sare
no tfold edaway from thewind shield.You
coul dot her wise damag eth ewind shieldwip-
ers orthehood . X
Mak esure that thewind shieldwiper sare
tur ned off.
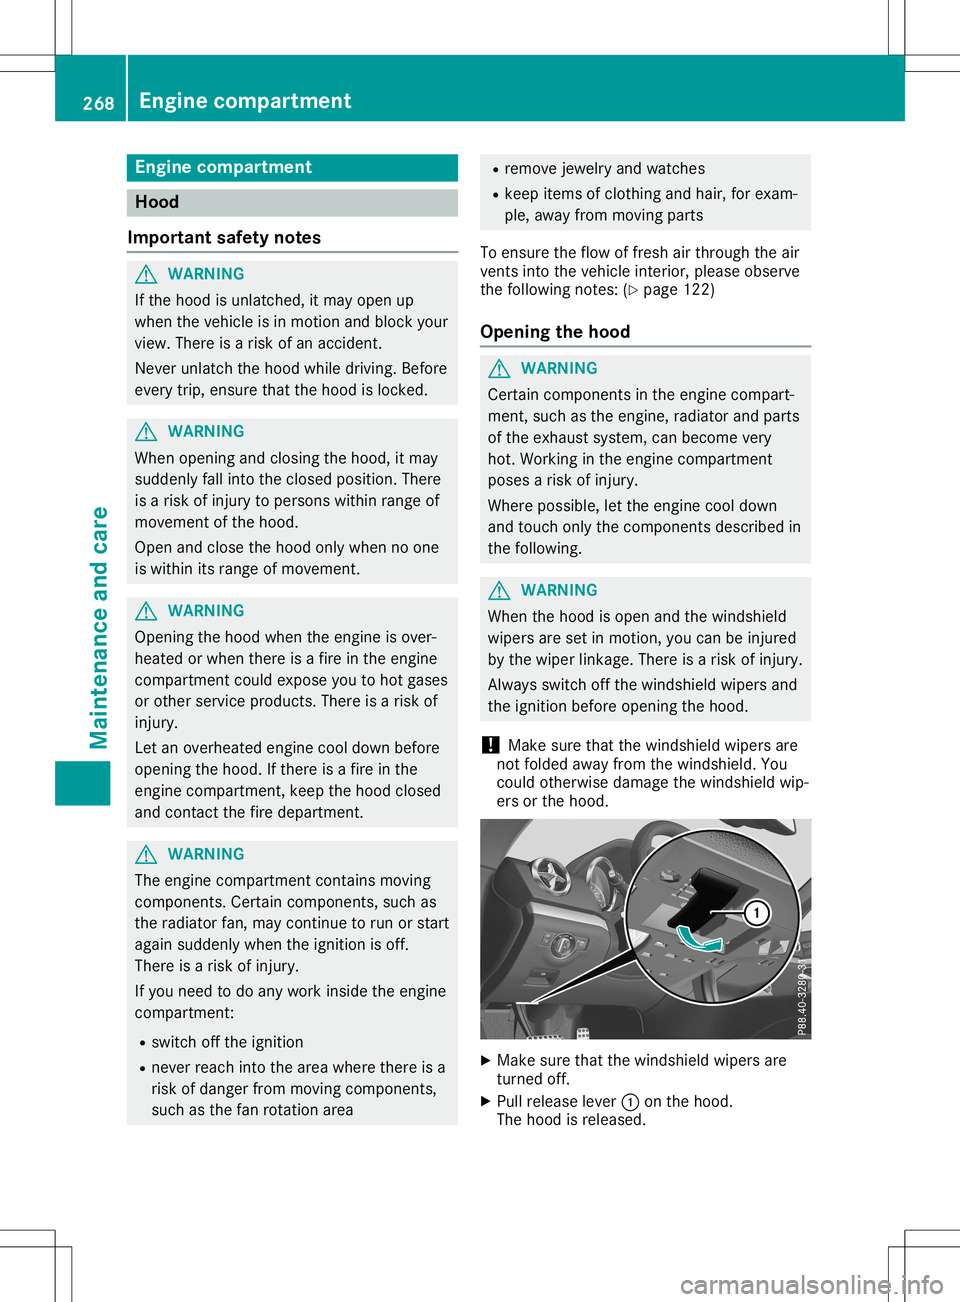
X Pull release lever0043 onthehood .
The hood isrele ased. 268
Engine
compartm entMa intenance andcare
Page 271 of 334

X
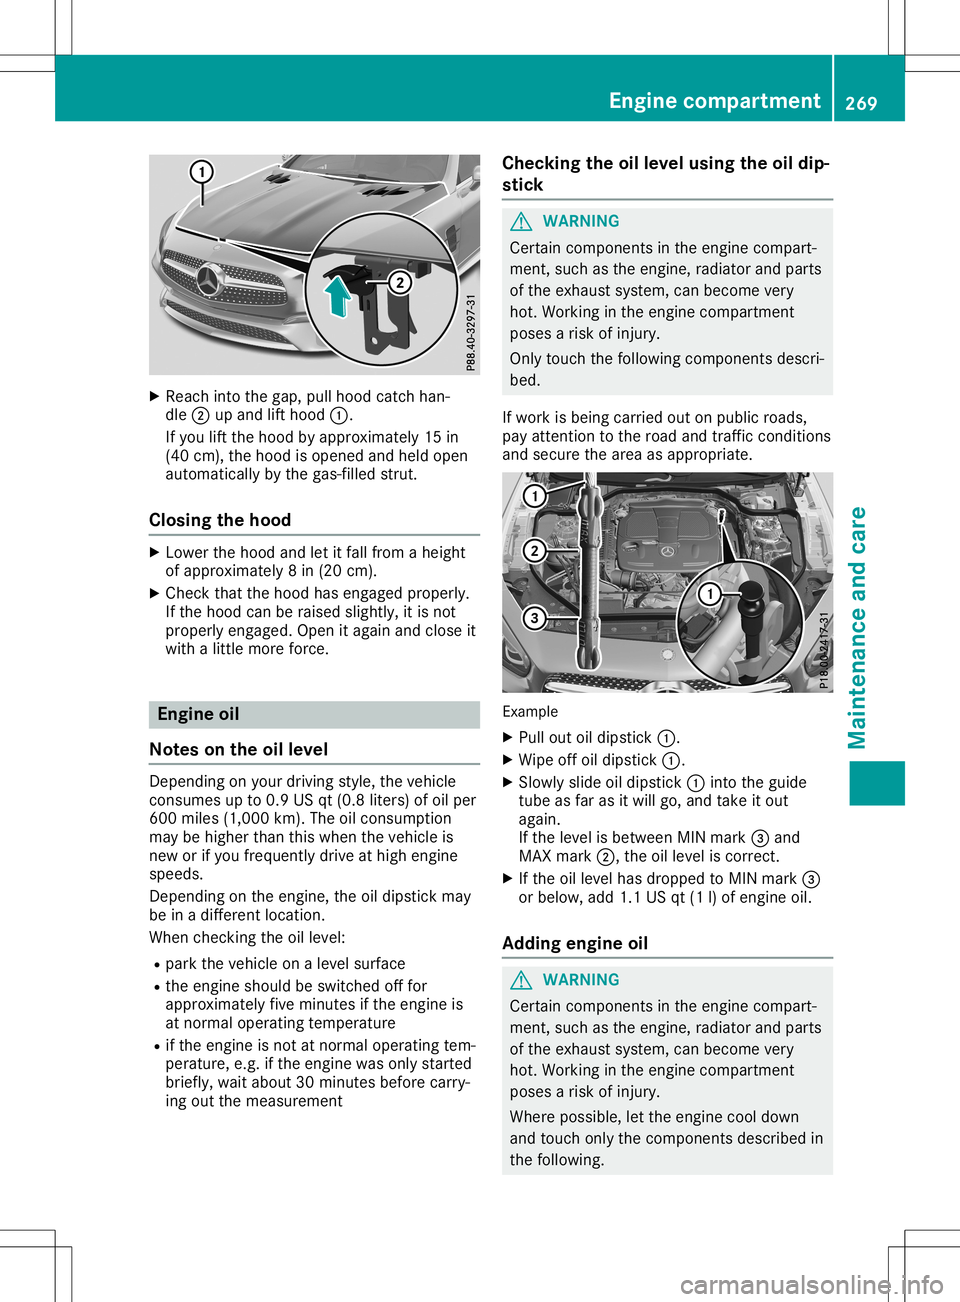
Reac hint oth egap, pullhoodcat chhan -
dle 0044upand lifthoo d0043.
If you liftthehoo dby appr oximat ely15in
(40 cm), thehoo dis open edand held open
auto maticallyby thegas- filled strut .
Closin gth ehood X
Lowe rth ehoo dand letitfall from aheig ht
of appr oximat ely8in (20 cm).
X Chec kth at thehoo dhas engage dpro perly.
If th ehoo dcan berais edslig htly, itis no t
pro perlyen gage d.Open itagain andcloseit
wit halit tle mor efor ce. Engine
oil
Not eson theoil level De
pen dingon your drivingstyle, theveh icle
co nsumes upto0.9US qt(0.8 lite rs)of oilpe r
60 0mi les(1 ,000 km).Th eoilco nsumpt ion
may behigh erthan this when theveh icle is
ne wor ifyou frequen tlydriv eat high engin e
spee ds.
De pen dingon theen gin e,theoil dipst ickmay
be inadiff ere ntloc atio n.
When check ing theoil leve l:
R park theveh icle onaleve lsurf ace
R theen gin esho uld beswit ched off for
appr oximat elyfivemin utesif th een gin eis
at norm aloper atingte mpe rature
R ifth een gin eis no tat norm aloper atingte m-
per atur e,e.g .if th een gin ewas onlystart ed
brie fly,wait about 30min utesbef ore carry-
ing out themeas urement Check
ingtheoil level usingth eoil dip -
st ick G
WAR
NING
Cert aincompo nentsin theen gin eco mpar t-
men t,suc has theen gin e,radiat orand parts
of theex haust system, canbecome very
hot .Wor kingin theen gin eco mpar tment
pose sa ris kof injury.
On lytouch thefoll owin gco mpo nentsdesc ri-
bed.
If work isbein gcar ried outonpublic roads,
pay attentio nto theroad andtraff icco nd ition s
and secure thearea asappr opriate . Ex
ample
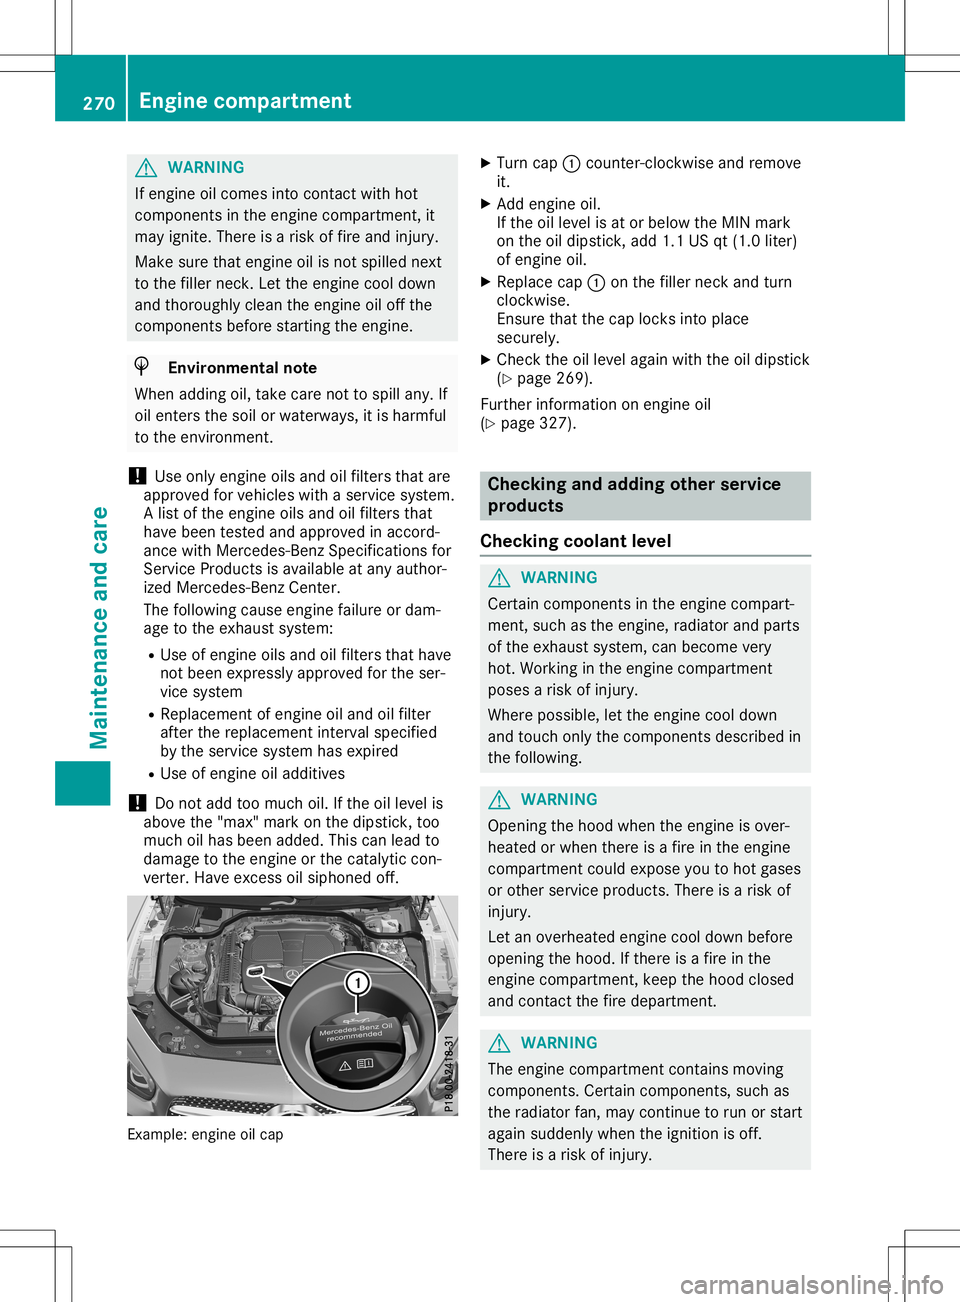
X Pull outoildipst ick0043.
X Wipe offoildipst ick0043.
X Slo wly slide oildipst ick0043intoth eguide
tub eas far asitwill go,and takeit out
again .
If th eleve lis bet ween MINmark0087 and
MA Xmar k0044, theoil leve lis co rrect .
X Ifth eoil leve lhas dropped toMIN mark0087
or below, add1.1US qt(1l)of engin eoil.
Add ingengine oil G
WAR
NING
Cert aincompo nentsin theen gin eco mpar t-
men t,suc has theen gin e,radiat orand parts
of theex haust system, canbecome very
hot .Wor kingin theen gin eco mpar tment
pose sa ris kof injury.
Wher eposs ible, lettheen gin eco ol down
and touch onlytheco mpo nentsdesc ribedin
th efoll owin g. Engine
compartm ent
269Maintenan ceand care Z
Page 272 of 334

G
WARNING
If engine oilcomes intocontact withhot
components inthe engine compartment, it
may ignite. Thereisarisk offire and injury .
Make surethatengine oilisnot spilled next
to the filler neck. Letthe engine cooldown
and thoroug hlyclea nthe engine oiloff the
components beforestarting theengine. H
Envi
ronmental note
When addingoil,take carenottospil lany. If
oil enters thesoil orwate rways,itis harmfu l
to the environment.
! Use
only engine oilsand oilfilters thatare
app roved forvehicl eswith aservice system.
A list ofthe engine oilsand oilfilters that
have been tested andapproved inaccord-
ance withMercede s-BenzSpecifications for
Service Productsisava ilable atany author-
ized Mercede s-BenzCenter.
The followi ngcaus eengine failure ordam-
age tothe exhau stsystem:
R Use ofengine oilsand oilfilters thathave
not been express lyapp roved forthe ser-
vice system
R Rep lace ment ofengine oiland oilfilter
after thereplacement intervalspecified
by the service system hasexpire d
R Use ofengine oiladd itives
! Do
not add toomuch oil.If the oilleve lis
abo vethe "ma x"mark onthe dipstick, too
much oilhas been added. This canleadto
dama getothe engine orthe catal yticcon-
verter. Haveexcess oilsiph oned off. Example
:engine oilcap X
Turn cap0043counter-clockwi seand remove
it.
X Add engine oil.
If the oilleve lis at or bel ow the MIN mark
on the oildip stick, add1.1USqt(1.0 liter)
of engine oil.
X Rep lace cap0043onthe filler neck andturn
clockwis e.
Ensure thatthecap locks intoplace
secure ly.
X Che ckthe oilleve laga inwith theoildip stick
(Y pag e269) .
Further informati ononengine oil
(Y pag e327) . Che
ckin gand adding otherservice
products
Che ckin gco olan tlev el G
WARNING
Certa incomponents inthe engine compart-
ment, suchasthe engine, radiator andparts
of the exhau stsystem, canbecome very
hot. Working inthe engine compartment
poses arisk ofinjury .
Where possible,let the engine cooldown
and touch onlythecomponents describedin
the followi ng. G
WARNING
Opening thehood when theengine isover-
hea ted orwhen thereisafire inthe engine
compartment couldexpose youtohot gase s
or other service products.There isarisk of
injury .
Let anoverhe atedengine cooldownbefore
openi ngthe hood. Ifthere isafire inthe
engine compartment, keepthehood closed
and contact thefire depa rtment. G
WARNING
The engine compartment containsmoving
components. Certaincomponents, suchas
the radiator fan,may continue torun orstart
aga insud denly whentheignitio nis off.
There isarisk ofinjury . 270
Eng
inecompar tmentMainten anceandcare