2020 MERCEDES-BENZ METRIS trip computer
[x] Cancel search: trip computerPage 18 of 320

Important safety notes .................... 46
Introduction to the restraint sys-
tem ..................................................
46
Occupant Classification System
(OCS) ............................................... 54
PASSENGER AIR BAG OFF indica-
tor lamp ........................................... 47
Pets in the vehicle ........................... 66
Restraint system warning lamp ........ 46
Seat belt .......................................... 47
OCS
Faults ............................................... 57
Operation ......................................... 54
Self-test ........................................... 56
Odometer
Displaying (vehicle with steering
wheel buttons) ............................... 183
Displaying (vehicle without steer-
ing wheel buttons) ......................... 177
Setting the display unit (vehicle
with steering wheel buttons) ......... 192
Setting the display unit (vehicle
without steering wheel buttons) .... 180
Off-road driving
Checklist after driving off-road ...... 146
Important safety notes .................. 144
Rules for driving off-road ............... 145
Oil
see Engine oil
On-board computer (vehicle with
steering wheel buttons)
Assistance menu ........................... 189
Audio menu ................................... 187
Date menu ..................................... 192
Display messages .......................... 209
Factory settings ............................. 194
Important safety notes .................. 174
Instrument cluster menu ............... 192
Lights menu ................................... 193
Menu overview .............................. 183
Message memory .......................... 209
Navigation menu ............................ 185
Operating ....................................... 181
Permanent display ......................... 192
Service menu ................................. 191
Setting the date ............................. 192
Setting the display ......................... 192
Setting the display language .......... 192 Setting the language ...................... 192
Setting the time ............................. 192
Settings menu ............................... 191
Standard display ............................ 183
Telephone menu ............................ 188
Time menu ..................................... 192
Trip menu ...................................... 183
Vehicle menu ................................. 193
On-board computer (vehicle with-
out steering wheel buttons)
Coolant temperature display
menu ............................................. 178
Current fuel consumption menu .... 178
Date menu ..................................... 181
Digital speedometer menu ............. 178
Display messages .......................... 194
Distance menu ............................... 177
Factory settings ............................. 179
Important safety notes .................. 174
Menu overview .............................. 177
Message memory .......................... 195
Operating ....................................... 176
Permanent display ......................... 180
Range menu ................................... 178
Setting the date ............................. 181
Setting the display ......................... 180
Setting the display language .......... 179
Setting the language ...................... 179
Setting the time ............................. 181
Settings menu ............................... 179
Standard display menu .................. 177
Time menu ..................................... 181
Trip computer menu ...................... 177
On-board computer (vehicles
with steering wheel buttons)
Displaying the service message ..... 258
On-board computer (vehicles
without steering wheel buttons)
Displaying the service message ..... 258
On-board diagnostic interface
see Diagnostics connection
Operating Instructions
Before the first journey .................... 27
Limited Warranty ............................. 27
Operating safety
Limited Warranty ............................. 2716
Index
Page 25 of 320

Summer tires in winter .................. 280
TIN (Tire Identification Number)
(definition) .....................................
297
Tire bead (definition) ...................... 297
Tire pressure (definition) ................ 296
Tire pressures (recommended) ...... 295
Tire size designation, load-bear-
ing capacity, speed rating .............. 293
Tire tread ....................................... 279
Tire tread (definition) ..................... 297
Total load limit (definition) ............. 297
Traction (definition) ....................... 297
TWR (permissible trailer drawbar
noseweight) (definition) ................. 297
Uniform Tire Quality Grading
Standards (definition) .................... 295
Wear indicator (definition) ............. 297
Wheel and tire combination ........... 302
Wheel rim (definition) .................... 296
Wheel/tire combinations ............... 301
Tool
see Vehicle tool kit
Top Tether ............................................ 63
Tow-starting
Emergency engine starting ............ 277
Important safety notes .................. 274
Towing
If the vehicle is stuck ..................... 276
Installing/removing the towing
eye ................................................. 275
Towing a trailer
Active Parking Assist ..................... 159
Axle load, permissible .................... 315
Cleaning the trailer tow hitch ......... 268
Coupling up a trailer ...................... 170
Decoupling a trailer ....................... 171
Driving tips .................................... 168
Notes on retrofitting ...................... 315
Power supply ................................. 173
Trailer loads ................................... 315
Towing away
Important safety guidelines ........... 274
With both axles on the ground ....... 276
With the rear axle raised ................ 276
Towing eye
Storage location ............................ 270
Trailer coupling
see Towing a trailer Trailer loads and drawbar nose-
weights
...............................................
172
Trailer operation
Lights display messages (vehicle
with steering wheel buttons) ......... 216
Lights display messages (vehicle
without steering wheel buttons) .... 202
Trailer towing
Blind Spot Assist ............................ 153
ESP ®
................................................ 69
PARKTRONIC ................................. 159
Permissible trailer loads and
drawbar noseweights ..................... 172
Transmission
see Automatic transmission
Transmission oil ................................ 310
Transmission positions
Automatic transmission ................. 132
Display (DIRECT SELECT lever) ...... 132
Transport
Lashing straps ............................... 246
Loading guidelines ......................... 242
Stickers ......................................... 246
Vehicle ........................................... 276
Transport by rail ................................ 142
Transportation
Rail ................................................ 142
Transportation aids
Load protection net ....................... 248
Transporting
Cargo compartment variations ...... 244
Load distribution ............................ 243
Securing a load .............................. 244
Trim pieces (cleaning instruc-
tions) .................................................. 269
Trip computer
Displaying (vehicle with steering
wheel buttons) ............................... 184
Displaying (vehicle without steer-
ing wheel buttons) ......................... 177
Resetting (vehicle with steering
wheel buttons) ............................... 185
Resetting (vehicle without steer-
ing wheel buttons) ......................... 177
Selecting the display units (vehi-
cle with steering wheel buttons) .... 192 Index
23
Page 178 of 320
On-board computer (vehicles with-
out steering wheel buttons)
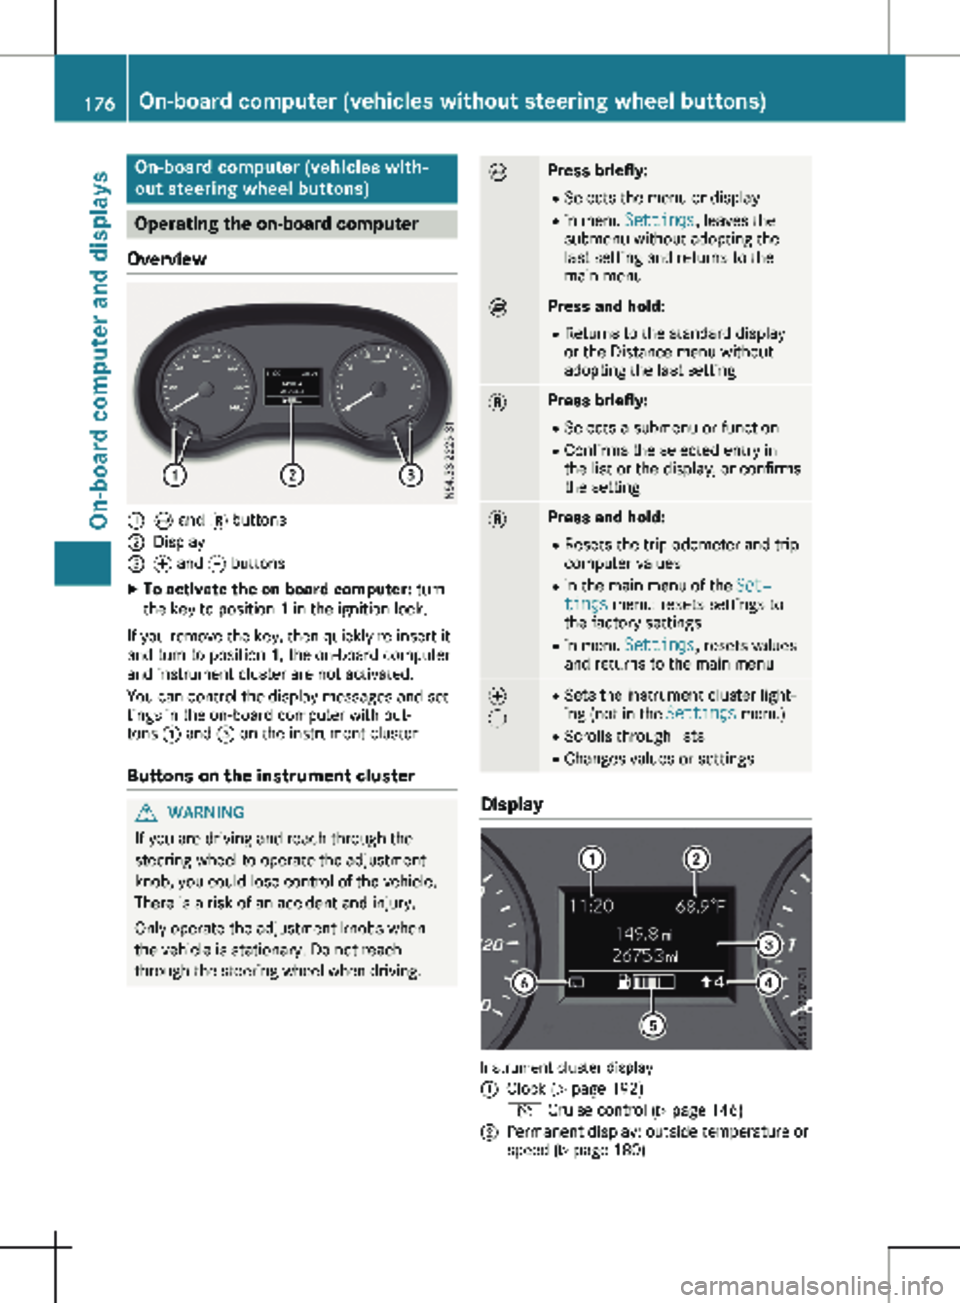
Operating the on-board computer
Overview :
È and 3 buttons
; Display
= f and g buttons
X To activate the on-board computer: turn
the key to position 1 in the ignition lock.
If you remove the key, then quickly re-insert it
and turn to position 1, the on-board computer
and instrument cluster are not activated.
You can control the display messages and set-
tings in the on-board computer with but-
tons : and = on the instrument cluster.
Buttons on the instrument cluster G
WARNING
If you are driving and reach through the
steering wheel to operate the adjustment
knob, you could lose control of the vehicle.
There is a risk of an accident and injury.
Only operate the adjustment knobs when
the vehicle is stationary. Do not reach
through the steering wheel when driving. È Press briefly:
R Selects the menu or display
R in menu Settings, leaves the
submenu without adopting the
last setting and returns to the
main menu È Press and hold:
R
Returns to the standard display
or the Distance menu without
adopting the last setting 3 Press briefly:
R Selects a submenu or function
R Confirms the selected entry in
the list or the display, or confirms
the setting 3 Press and hold:
R
Resets the trip odometer and trip
computer values
R in the main menu of the Set‐
tings menu: resets settings to
the factory settings
R in menu Settings, resets values
and returns to the main menu f
g R
Sets the instrument cluster light-
ing (not in the Settings menu)
R Scrolls through lists
R Changes values or settings Display
Instrument cluster display
:
Clock (Y page 192)
V Cruise control (Y page
146)
; Permanent display: outside temperature or
speed
(Y page 180)176
On-board computer (vehicles without steering wheel buttons)
On-board computer and displays
Page 179 of 320
120 km/h! (only for certain countries)
maximum permissible speed exceeded
= Display panel for display messages, menus
and menu bar
? Transmission position (Y page 132)
A Fuel level
Fuel filler flap location indicator t: the
fuel filler cap is on the left-hand side
B è Rear window wiper
(Y page 110)
Display panel = shows the selected menu or
submenu and display messages. Menu overview
The Settings menu is only displayed when
the vehicle is stationary. You can think of the
order of the menus and functions as a circle.
Press È on the instrument cluster to scroll
through the menus.
If you scroll forward in the Settings menu
using 3, the setting from the previous sub-
menu or function is adopted.
If you press È in a submenu, the submenu or
function is exited without adopting the setting.
The display then shows the start screen of the
Settings menu.
Operation information can be found under
"Operating the on-board computer"
(Y page
176).
Depending on the vehicle equipment, you can
call up the following menus, displays or func-
tions:
R trip odometer and odometer display
(Y page 177)
R trip computer display (Y page 177)
R current range display (Y page 178)
R current fuel consumption display
(Y page 178)
R digital speedometer ( Y page 178)
R coolant temperature gage (Y page 178)
R display messages in the message memory
(Y page 195)
The following menus, displays and functions
are only displayed when the vehicle is station-
ary:
R next service due date display ( Y page 258)
R tire pressure monitor restart (Y page 285)
R Settings menu for setting or activating/
deactivating driving and driver assistance systems as well as display options
(Y page
179) Distance menu
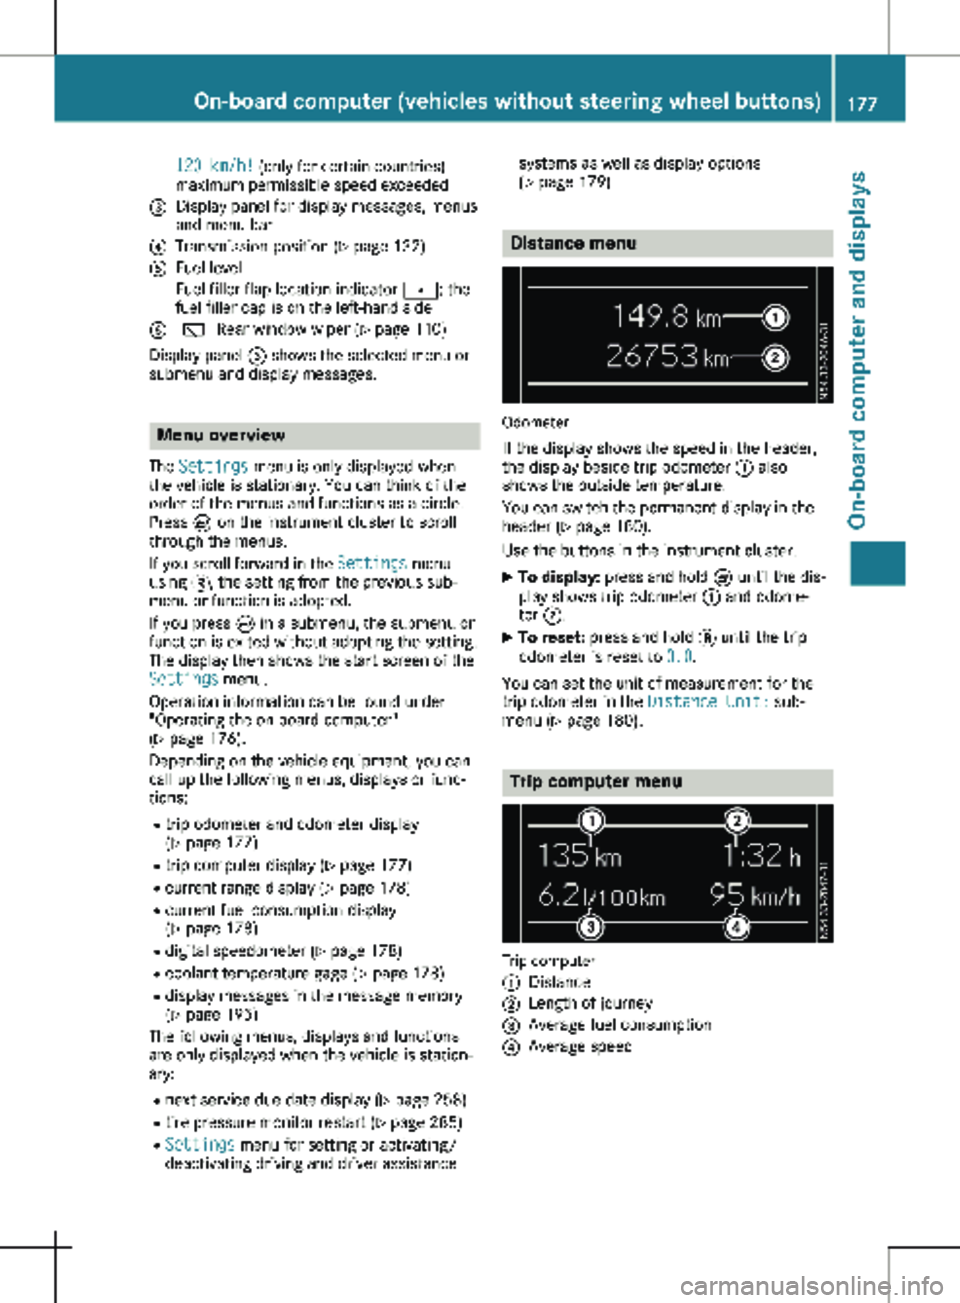
Odometer
If the display shows the speed in the header,
the display beside trip odometer : also
shows the outside temperature.
You can switch the permanent display in the
header
(Y page 180).
Use the buttons in the instrument cluster.
X To display: press and hold È until the dis-
play shows trip odometer : and odome-
ter ;.
X To reset: press and hold 3 until the trip
odometer is reset to 0.0.
You can set the unit of measurement for the
trip odometer in the Distance Unit: sub-
menu (Y page
180). Trip computer menu
Trip computer
:
Distance
; Length of journey
= Average fuel consumption
? Average speed On-board computer (vehicles without steering wheel buttons)
177
On-board computer and displays Z
Page 180 of 320
Use the buttons in the instrument cluster.
X To display: press È to select the trip com-
puter display.
The values displayed relate to those meas-
ured since the trip computer was last reset.
X To reset values: press and hold 3 until all
values are reset.
The trip computer is automatically reset if the
value exceeds 9,999 hours or 99,999 miles.
You can set the unit of measurement for con-
sumption and distance in the Distance
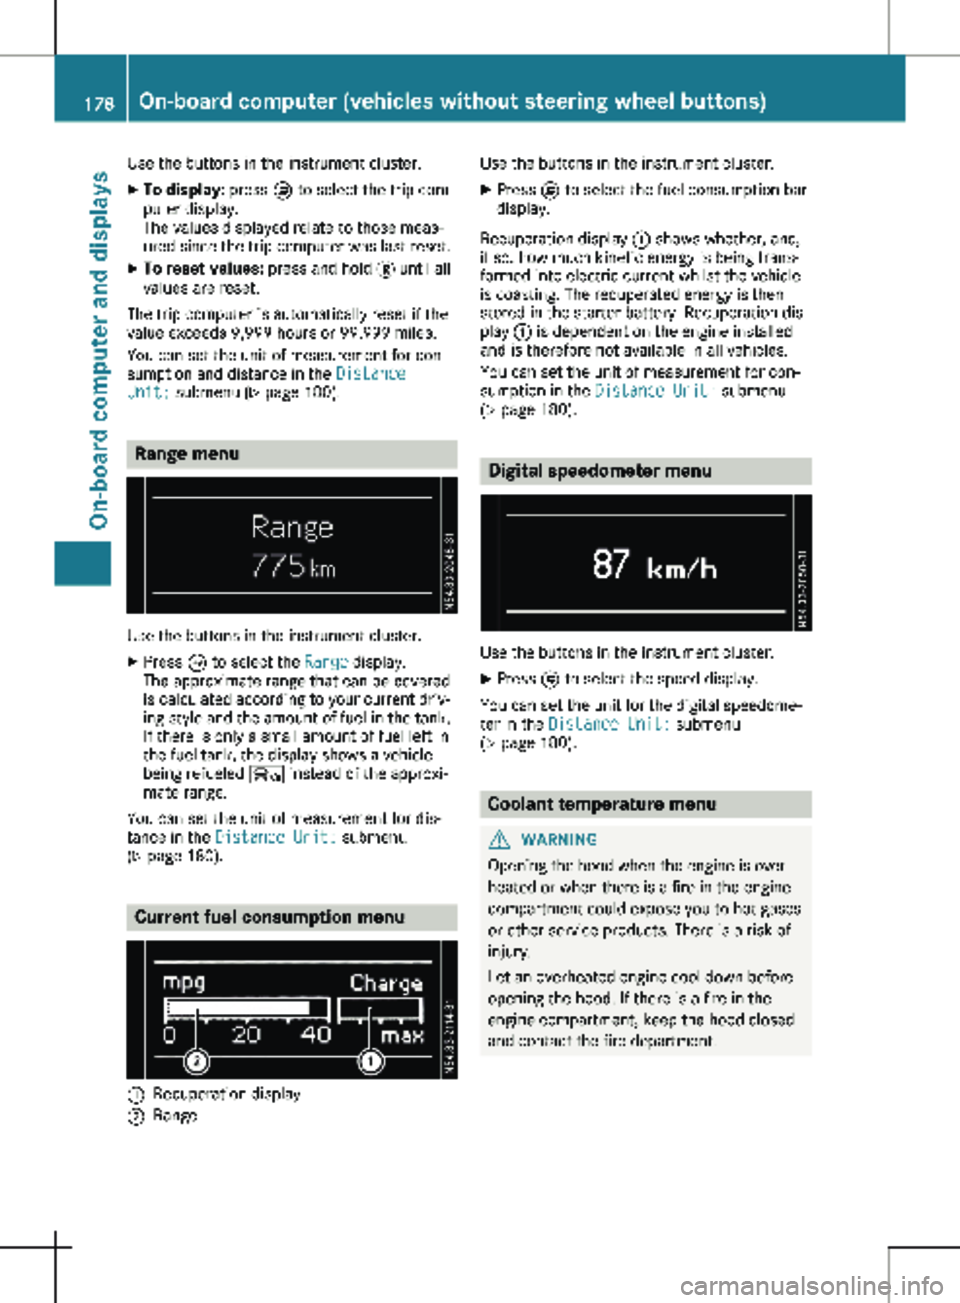
Unit: submenu ( Y page 180).Range menu
Use the buttons in the instrument cluster.
X Press È to select the Range display.
The approximate range that can be covered
is calculated according to your current driv-
ing style and the amount of fuel in the tank.
If there is only a small amount of fuel left in
the fuel tank, the display shows a vehicle
being refueled Ï instead of the approxi-
mate range.
You can set the unit of measurement for dis-
tance in the Distance Unit: submenu
(Y page
180). Current fuel consumption menu
:
Recuperation display
; Range Use the buttons in the instrument cluster.
X Press È to select the fuel consumption bar
display.
Recuperation display : shows whether, and,
if so, how much kinetic energy is being trans-
formed into electric current whilst the vehicle
is coasting. The recuperated energy is then
stored in the starter battery. Recuperation dis-
play : is dependent on the engine installed
and is therefore not available in all vehicles.
You can set the unit of measurement for con-
sumption in the Distance Unit: submenu
(Y page
180). Digital speedometer menu
Use the buttons in the instrument cluster.
X Press È to select the speed display.
You can set the unit for the digital speedome-
ter in the Distance Unit: submenu
(Y page
180). Coolant temperature menu
G
WARNING
Opening the hood when the engine is over-
heated or when there is a fire in the engine
compartment could expose you to hot gases
or other service products. There is a risk of
injury.
Let an overheated engine cool down before
opening the hood. If there is a fire in the
engine compartment, keep the hood closed
and contact the fire department. 178
On-board computer (vehicles without steering wheel buttons)
On-board computer and displays
Page 183 of 320
The vehicle must be stationary. Use the but-
tons in the instrument cluster.
X Press È to select the Settings menu.
X Press 3 to select the Distance Unit:
submenu.
The display indicates the selected setting of
km or Miles.
X Change the setting by pressing f or g.
X Press 3 to confirm.
The display shows the next submenu or the
Settings menu again.
The selected distance units are used for the
displays:
R Digital speedometer
R Odometer and trip odometer
R Trip computer
R Range
R Current consumption
R Cruise control
R Service intervals
Setting the time and date The vehicle must be stationary. Use the but-
tons in the instrument cluster.
X Press È to select the Settings menu.
X Press 3 to select the time and date display.
X Press f or g to set the hours and press
3 to confirm.
X Press f or g to set the minutes and press
3 to confirm.
X Press f or g to set the day and press 3
to confirm.
X Press f or g to set the month and press
3 to confirm.
X Press f or g to set the year and press 3
to confirm.
The display shows the Settings menu
again. On-board computer (vehicles with
steering wheel buttons)
Operating the on-board computer
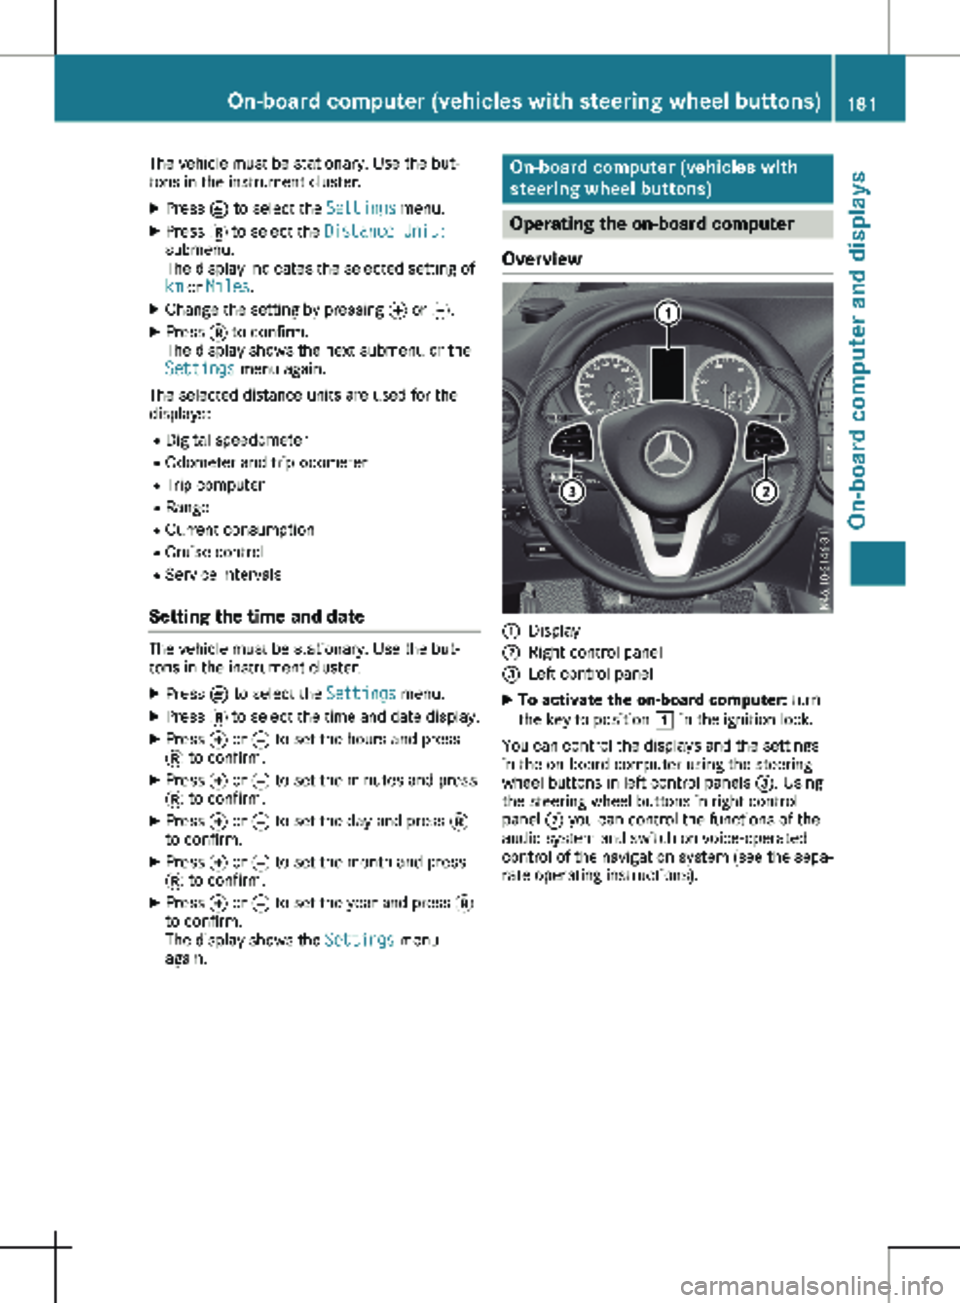
Overview :
Display
; Right control panel
= Left control panel
X To activate the on-board computer: turn
the key to position 1 in the ignition lock.
You can control the displays and the settings
in the on-board computer using the steering
wheel buttons in left control panels =. Using
the steering wheel buttons in right control
panel ; you can control the functions of the
audio system and switch on voice-operated
control of the navigation system (see the sepa-
rate operating instructions). On-board computer (vehicles with steering wheel buttons)
181On-board computer and displays Z
Page 184 of 320
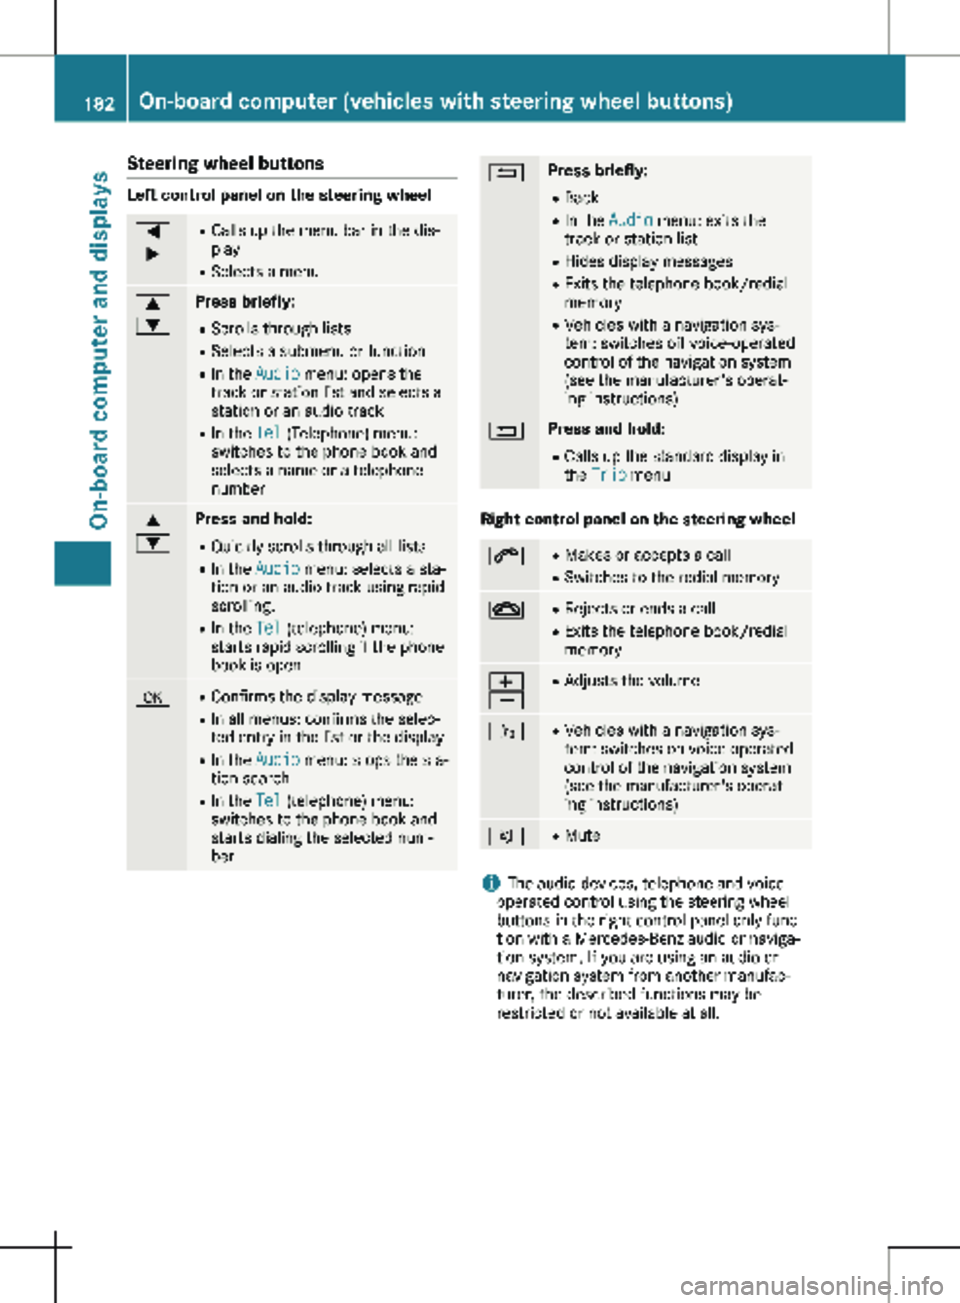
Steering wheel buttons
Left control panel on the steering wheel
=
; R
Calls up the menu bar in the dis-
play
R Selects a menu 9
: Press briefly:
R Scrolls through lists
R Selects a submenu or function
R In the Audio menu: opens the
track or station list and selects a
station or an audio track
R In the Tel (Telephone) menu:
switches to the phone book and
selects a name or a telephone
number 9
: Press and hold:
R
Quickly scrolls through all lists
R In the Audio menu: selects a sta-
tion or an audio track using rapid
scrolling.
R In the Tel (telephone) menu:
starts rapid scrolling if the phone
book is open a R
Confirms the display message
R In all menus: confirms the selec-
ted entry in the list or the display
R In the Audio menu: stops the sta-
tion search
R In the Tel (telephone) menu:
switches to the phone book and
starts dialing the selected num-
ber % Press briefly:
R Back
R In the Audio menu: exits the
track or station list
R Hides display messages
R Exits the telephone book/redial
memory
R Vehicles with a navigation sys-
tem: switches off voice-operated
control of the navigation system
(see the manufacturer's operat-
ing instructions) % Press and hold:
R
Calls up the standard display in
the Trip menu Right control panel on the steering wheel
6 R
Makes or accepts a call
R Switches to the redial memory ~ R
Rejects or ends a call
R Exits the telephone book/redial
memory W
X R
Adjusts the volume ó R
Vehicles with a navigation sys-
tem: switches on voice-operated
control of the navigation system
(see the manufacturer's operat-
ing instructions) 8 R
Mute i
The audio devices, telephone and voice-
operated control using the steering wheel
buttons in the right control panel only func-
tion with a Mercedes-Benz audio or naviga-
tion system. If you are using an audio or
navigation system from another manufac-
turer, the described functions may be
restricted or not available at all. 182
On-board computer (vehicles with steering wheel buttons)On-board computer and displays
Page 185 of 320

Display
Instrument cluster display
:
Clock (Y page 192)
; Ä COLLISION PREVENTION ASSIST dis-
tance warning function
(Y page 149)
j Active Parking Assist
(Y page 159)
= Permanent display: outside temperature or
speed ( Y page
192)
120 km/h! (only for certain countries)
maximum permissible speed exceeded
? Menu bar
Outside temperature (only if header F dis-
plays the additional speedometer)
A Drive program ( Y page 132)
B Transmission position ( Y page
132)
C Gearshift recommendation ( Y page
136)
D Status area
E Display panel for display messages, menus
and menu bar
F Header
X To call up menu bar ? in the display
panel: press the = or ; steering
wheel button.
The menu bar is faded out after a few sec-
onds.
Display panel E shows the selected menu or
submenu and display messages. In status area D, the display can show the
status of the following driving systems:
À ATTENTION ASSIST ( Y page
155)
à Lane Keeping Assist ( Y page
153)
V Cruise control (Y page
146)
è Rear window wiper (Y page
110) Menu overview
You can think of the order of the menus as a
circle. Use the = or ; steering wheel
buttons to show the menu bar and scroll
through the menus. Use the : or 9
steering wheel buttons to scroll through their
submenus and functions.
Operation information can be found under
"Operating the on-board computer"
(Y page
181).
Depending on the vehicle equipment, you can
call up the following menus:
R Trip menu (Y page 183)
R Navi menu (navigation instructions)
(Y page 185)
R Audio menu ( Y page 187)
R Tel (telephone) menu (Y page 188)
R Assist. (assistance) menu ( Y page 189)
R Service menu (Y page 191)
R Settings menu (Y page 191) Trip menu
Standard display Odometer
X Press and hold the % steering wheel but-
ton until the Trip menu with trip odome-
ter : and odometer ; appears. On-board computer (vehicles with steering wheel buttons)
183
On-board computer and displays Z