2020 MERCEDES-BENZ GLS SUV steering
[x] Cancel search: steeringPage 350 of 549
%
If only the11 2 emer gency call sy stem (EU
eCall) is activated in theve hicle, the acci‐
dent data is transmit ted directly tothe pub‐
lic emer gency call centre.
Fo r accident clarification purposes, thefo llowing
measures can be take n up toan hour af terthe
emer gency call has been initia ted:
R The cur rent vehicle position can be de ter‐
mined.
R Avo ice connection totheve hicle occupants
can be es tablished.
R Emer gency call da tacan be called up.
% ForRu ssia: various functions, e.g. receiving
traf fic information, cannot be per form ed for
up totwo hou rsafte r sending an emer gency
call. Self diagnosis function of the eme
rgency call
sy stem Yo
ur car verifies the operability of the emer‐
ge ncy call sy stem each time the ignition is ON.
In case of sy stem failure, you will be informed
with text messa geon the instrument clus ter and with
red indicator SOS NOT READY onthe dis‐
pla y.
Please, make sure, that during 30 seconds af ter
switching ignition ON there d indicator SOS
NOT READY inthe upper right corner of display
is switched OFF, this means the emer gency call
sy stem passed diagnostics successfully. St
arting/ending ERA-GLONASS test mode Re
quirements:
R The star ter battery is suf ficiently charge d.
R The ignition is switched on.
R The vehicle has been stationary for at least
one minute.
% The test mode is cur rently available in the
fo llowing countries, forex ample:
R Russia
R Belarus
R Kazakh stan
R Armenia
R Kyrgyzs tan #
Tostart thete st mode: press and hold the
~ button on the multifunction steering
wheel for at least five seconds.
The test mode is star ted and automatically
ends af terth e language test has been per‐
fo rm ed. #
Toend thete st mode manuall y:switch off
th e ignition.
The test mode is ended. Information on data processing
Processing of personal data via
the
Mercedes-Benz emer gency call sy stem
All processing of personal data via the
Mercedes-Benz emer gency call sy stem cor re‐
sponds with the specifications in the EU Regula‐
tion 20 16/679 "on the pr otection of individuals
with rega rd tothe processing of personal data
(GDPR)".
The data is solely used bythe Mercedes-Benz
emer gency call sy stem forre scue and reco very
in theeve nt of an accident. MBUX multimedia sy
stem 347
Page 360 of 549
ASS
YST PLUS se rvice inter val display Fu
nction of the ASS YST PLUS se rvice inter val
displ ay The ASS
YST PLUS service inter val display on the
instrument display pr ovides information on the
re maining time or dis tance be fore the next
service due date.
Yo u can hide this service display using the back
button on the left-hand side of thesteering
wheel.
Depending on how theve hicle is used, the
ASS YST PLUS service inter val display may
shor tenth e service inter val, e.g. in thefo llowing
cases:
R mainly short-dis tance driving
R when the engine is of ten le ftidling for long
periods
R intheeve nt of frequent cold start phases
R vehicles with a diesel particulate filter: in
th eev ent of frequently inter rupted rege nera‐
tion of the diesel particulate filter Mercedes-Benz
recommends avoiding such
operating conditions.
Yo u can obtain information concerning the serv‐
icing of your vehicle from a qualified specialist
wo rkshop, e.g. a Mercedes-Benz Service Centre. Displaying
the service due da te On-board computer:
4 Service 5
ASSYST PLUS
The next service due date is displa yed. #
Toexitth e displa y:press the back button
on the left-hand side of thesteering wheel.
Bear in mind thefo llowing related topic:
R Operating the on-board computer
(/ page 306). Information on
regular maintenance work *
NO
TEPremature wearthro ugh failure to
obser veservice due dates Maintenance
workwhich is not car ried out at
th eright time or incomple tely can le adto
inc reased wear and damage totheve hicle. #
Adhere tothe prescribed service inter‐
va ls. #
Alw ays ha vethe prescribed mainte‐
nance workcar ried out at a qualified
specialist workshop. Special service
requ irements The prescribed service inter
val is based on nor‐
mal operation of theve hicle. Maintenance work
will need tobe per form ed more of ten if theve hi‐
cle is operated under arduous conditions or
increased loads.
The ASS YST PLUS service inter val display is only
an aid. The driver of theve hicle bears responsi‐
bility as rega rdsto whe ther maintenance work
needs tobe per form ed more of tenth an speci‐ Main
tenance and care 357
Page 377 of 549
Re
moving the fire extinguisher &
WARNING Risk of accident due toan
incor rectly secu redfire extinguisher in
th e driver's foot we ll
A fire extinguisher may impede pedal tr avel
or block a depressed pedal.
This jeopardises the operating and road
saf ety of theve hicle.
The fire extinguisher can be flung around and
injure the driver or other vehicle occupants. #
Alw aysst ore and secure thefire extin‐
guisher in the brac ket. #
Do not remo vethefire extinguisher
while driving. #
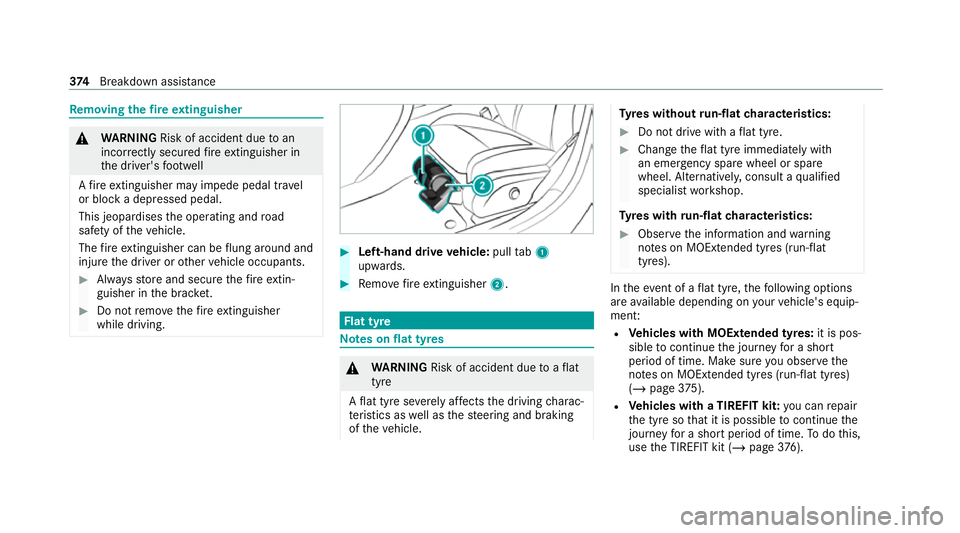
Left-hand drive vehicle: pulltab1
upwards. #
Remo vefire extinguisher 2. Flat tyre
Note
s onflat tyres &
WARNING Risk of accident due toaflat
tyre
A flat tyre se verely affects the driving charac‐
te rist ics as well as thesteering and braking
of theve hicle. Ty
res without run-flat characteristics: #
Do not drive with a flat tyre. #
Chan getheflat tyre immediately with
an emer gency spa rewheel or spare
wheel. Alternativel y,consult a qualified
specialist workshop.
Ty res with run-flat characteristics: #
Obse rveth e information and warning
no tes on MOExtended tyres (run-flat
tyres). In
theeve nt of a flat tyre, thefo llowing options
are available depending on your vehicle's equip‐
ment:
R Vehicles with MOExtended tyres: it is pos‐
sible tocontinue the journey for a short
period of time. Make sure you obse rvethe
no tes on MOExtended tyres (run-flat tyres)
(/ page 375).
R Vehicles with a TIREFIT kit: you can repair
th e tyre so that it is possible tocontinue the
jou rney for a short period of time. Todo this,
use the TIREFIT kit (/ page376). 374
Breakdown assis tance
Page 378 of 549
R
Vehicles with Mercedes me connect: you
can make a call for breakdown assi stance via
th eove rhead control panel in the case of a
breakdown (/ page 335).
R Allvehicles: change the wheel
(/ page 402). Note
s on MOExtended tyres (run-flat tyres) &
WARNING Risk of accident when driving
in li mp-home mode
Driving in emergency mode impairs the han‐
dling characteristics of theve hicle. #
Do not exceed the permissible maxi‐
mum speed of the MOEx tended tyres. #
Avoid any abrupt steering and driving
manoeuvres as well as driving over
obs tacles (kerbs, pot holes, off-road).
This applies, in pa rticular, toa loaded
ve hicle. #
Stop driving in the emer gency mode if
yo u notice: R
banging noise
R vehicle vibration
R smoke which smells like rubber
R continuous ESP ®
inter vention
R crac ksinthe tyre side walls #
After driving in emergency mode, ha ve
th erims checkedby aqu alified special‐
ist workshop with rega rd totheir fur ther
use. #
The defective tyre must be replaced in
eve rycase. Wi
th MOExtended tyres (run-flat tyres), you can
continue todrive your vehicle even if there is a
tot al loss of pressure in one or more tyres. How‐
eve r,th e tyre af fected must not show any clearly
visible damage.
Yo u can recognise MOExtended tyres bythe
MOExtended marking which appears on the side
wa ll of the tyre.
Ve hicles with tyre pressure monitoring sys‐
te m: MOExtended tyres may only be used in conjunction wi
than activated tyre pressure mon‐
itoring sy stem.
If a pressure loss warning message appears in
th e multifunction displa y,proceed as follo ws:
R Check the tyre for dama ge.
R If driving on, obser vethefo llowing no tes.
Driving distance possible in emer gency
mode af ter the pressure loss warning: Load condition Driving distance pos‐
sible in emergency
mode
Pa rtially laden 80 km
Fu lly laden 30 km The driving dis
tance possible in emergency
mode may vary depending on the driving style.
Obser vethe maximum permissible speed of
80 km/h.
If a tyre has gone flat and cannot be replaced
with an MOEx tended tyre, you can use a stand‐
ard tyre as a temp orary measure. Breakdown assis
tance 375
Page 383 of 549
#
Toreduce the tyre pressure: press pres‐
su re re lease button 1next tomanome ter
2 . #
When the tyre pressure is cor rect, unscr ew
th efilling hose from theva lve of the sealed
tyre. #
Screw theva lve cap onto theva lve of the
sealed tyre. #
Pull the tyre sealant bottle out of the tyre
inflation compressor.
The filling hose stay s on the tyre sealant bot‐
tle. #
Drive tothe nearest qualified specialist work‐
shop and ha vethe tyre, tyre sealant bottle
and filling hose replaced there. Batte
ry(vehicle) Note
s onthe12 V battery &
WARNING Risk of an accident due to
wo rkcar ried out incor rectly on the bat‐
te ry
Wo rkcar ried out incor rectly on the battery
can, forex ample, lead toa short circuit. This
can restrict functions releva nt for saf ety sys‐
te ms and impair the operating saf ety of your
ve hicle.
Yo u could lose cont rol of theve hicle in the
fo llowing situations in particular:
R when braking
R intheeve nt of ab rupt steering manoeu‐
vres and/or when theve hicle's speed is
not adap tedto thero ad conditions #
Intheeve nt of a sho rtcircuit or a simi‐
lar incident, contact a qualified special‐
ist workshop immediately. #
Do not drive on. #
Alw ays ha vewo rkon the battery car ried
out at a qualified specialist workshop. R
Further information on ABS (/ page 226)
R Further information on ESP ®
(/ page 227)
Fo r saf etyre asons, Mercedes-Benz recommends
th at you on lyuse bat teries which ha vebeen tes‐
te d and appr ovedfo ryo ur vehicle byMercedes-
Benz.
All vehicles except vehicles with a lithium-
ion battery &
WARNING Risk ofexplosion due toelec‐
tros tatic charge
Electros tatic charge can igni tethe highly
ex plosive gas mixture in the batter y. #
Todischar geany electros tatic charge
th at may ha vebuilt up, touch the me tal
ve hicle body before handling the bat‐
te ry. 380
Breakdown assis tance
Page 391 of 549
#
Make sure that thesteering wheel can
mo vefreely, before towing theve hicle
aw ay. *
NO
TEDama gedue toexcessive tracti ve
po wer If
yo u pull away sharpl y,the tractive po wer
may be too high and theve hicles could be
damaged. #
Pull away slowly and smoo thly. Loading the
vehicle for transport #
Obser vethe no tes on towing away
( / page 386). #
Connect theto w bar totheto wing eye in
order toload theve hicle.
% You can also attach theto w bar tothe trailer
hitch. #
Shift the automatic transmission toposition
i. %
The automatic transmission may be loc ked
in position jintheeve nt of dama getothe
electrics. Toshift toi , pr ovide the on-
board electrical sy stem with po wer
( / page 384). #
Load theve hicle onto the transpor ter. #
Shift the automatic transmission toposition
j. #
Use the electric parking brake tosecure the
ve hicle against rolling away. #
Only secure theve hicle bythe wheels.
Ve hicles with ADS PLUS (Adaptive Damping
Sy stem PLUS) &
WARNING Risk of an accident when
transporting vehicles with Adaptive
Damping Sy stem PLUS
The reduced damping forc es on theve hicle
being transpor ted can cause theve hicle/
trailer combination tostart toswing.
As a result, when transporting vehicles with
th eAd aptive Damping Sy stem PLUS, the ve
hicle/trailer combination may start toskid.
Consequentl y,yo u could lose cont rol of your
ve hicle. #
When transporting, ensure that:
R theve hicle has been loaded onto
th e transpor ter cor rectly
R theve hicle is secured at all four
wheels with suitable tensioning
st ra ps
R the maximum permissible speed of
60 km/h is not exceeded when
transporting *
NO
TEDama getotheve hicle from secur‐
ing it incor rectly #
After loading, theve hicle must be
secured on all four wheels. Otherwise,
th eve hicle could be damaged. #
A minimum dis tance of 20 cm up wards
and 10cm down wards must be kept to
th e transport platform. 388
Breakdown assis tance
Page 400 of 549
ing condition (/
page 395). Observethe
no tes on tyre temp erature (/ page 394).
% The values displa yed in the on-board com‐
puter may deviate from those of the tyre
pressure gauge as they referto sea le vel.At
high ele vations, the tyre pressure values
indicated bya pressure gauge are higher
th an those shown bythe on-board computer.
In this case, do not reduce the tyre pressure.
Re starting the ty repressure moni toring sys‐
tem
Re quirements:
R The recommended tyre pressure is cor rectly
set forth ere spective operating status on all
of the wheels (/ page 394).
Re start the tyre pressure monitoring sy stem in
th efo llowing situations:
R The tyre pressure has changed.
R The wheels or tyres ha vebeen changed or
newly fitted. On-boa
rdcompu ter:
4 Service 5
Tyres #
Swipe down wards on Touch Control on the
left-hand side of thesteering wheel.
The Use current pressures as new reference
values? message is shown in the multifunc‐
tion displa y. #
Torestart, press Touch Control on the left-
hand side of thesteering wheel.
The Tyre press. monitor restarted message is
shown in the multifunction displa y.
Cur rent wa rning messages are dele ted and
th eye llow h warning lamp goes out.
Af teryo u ha vebeen driving for a few
minutes, the sy stem checks whe ther the cur‐
re nt tyre pressures are wi thin the specified
ra nge. The cur rent tyre pressures are then
accep ted as refere nce values and monitored.
Be sure toalso pay attention tothefo llowing
re lated topic:
R Notes on tyre pressure (/ page 394) Wheel
change Note
s on selecting, fitting and replacing
tyres *
NO
TEMercedes-AMG vehicles #
Obser vethe no tes in the Supplement.
Yo u could otherwise failto recognise
dangers. &
WARNING Risk of accident due toincor‐
re ct dimensions of wheels and tyres
If wheels and tyres of the wrong size are
used, the wheel brakes or wheel suspension
components may become damaged. #
Alw aysre place wheels and tyres with
th ose that fulfil the specifications of the
original part.
When replacing wheels, make sure tofit the
cor rect:
R Designation
R Type Wheels and tyres
397
Page 449 of 549
Display messages
Possible causes/consequences and M
MSolutions
Ù Steering malfunction
Increased physical effort
See Owner's Manual *T
he po werst eering assis tance is malfunctioning. &
WARNING Risk of an accident due toaltered steering characteristics
If th e po wer assi stance of thesteering fails partially or comple tely, you will need touse more forc eto steer. #
If safe steering is possible, drive on carefully. #
Visit or consult a qualified specialist workshop immediatel y.Ù
Steering malfunction Stop
immediately See Owner's
Manual *T
hesteering is malfunctioning. Steering capability is significant lyimpaired. &
WARNING Risk of accident if steering capability is impaired
If th esteering does not function as intended, theve hicle's operating saf ety is jeopardised. #
Pull over and stop theve hicle safely as soon as possible, paying attention toroad and traf fic conditions.
Do not continue driving under any circums tances. #
Consult a qualified specialist workshop. C
*A
t least one door is open. #
Close all doors. 446
Displaymessa ges and warning/indicator lamps