2020 MERCEDES-BENZ GLS SUV warning
[x] Cancel search: warningPage 410 of 549
#
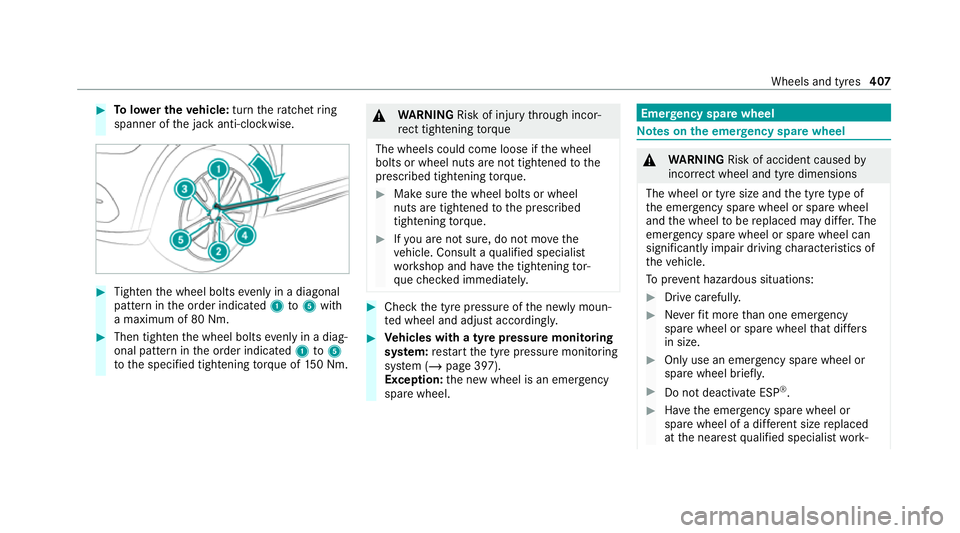
Tolowe r the vehicle: turnthera tchet ring
spanner of the jack anti-clockwise. #
Tighten the wheel bolts evenly in a diagonal
pattern in the order indicated 1to5 with
a maximum of 80 Nm. #
Then tighten the wheel bolts evenly in a diag‐
onal pattern in the order indicated 1to5
to the specified tightening torque of 150 Nm. &
WARNING Risk of inju rythro ugh incor‐
re ct tigh tening torque
The wheels could come loose if the wheel
bolts or wheel nuts are not tightened tothe
prescribed tightening torque. #
Makesure the wheel bolts or wheel
nuts are tightened tothe prescribed
tightening torque. #
Ifyo u are not sure, do not mo vethe
ve hicle. Consult a qualified specialist
wo rkshop and ha vethe tightening tor‐
qu ech ecked immediately. #
Check the tyre pressure of the newly moun‐
te d wheel and adjust according ly. #
Vehicles with a tyre pressure monitoring
sy stem: restart the tyre pressure monitoring
sy stem (/ page 397).
Exception: the new wheel is an emer gency
spa rewheel. Emer
gency spare wheel Note
s onthe emer gency spare wheel &
WARNING Risk of accident caused by
incor rect wheel and tyre dimensions
The wheel or tyre size and the tyre type of
th e emer gency spa rewheel or spare wheel
and the wheel tobe replaced may dif fer. The
emer gency spa rewheel or spare wheel can
significantly impair driving characteristics of
th eve hicle.
To preve nt hazardous situations: #
Drive carefully. #
Neverfit more than one emer gency
spa rewheel or spare wheel that dif fers
in size. #
Only use an emer gency spa rewheel or
spare wheel brief ly. #
Do not deacti vate ESP ®
. #
Have the emer gency spa rewheel or
spare wheel of a dif fere nt size replaced
at the nearest qualified specialist work‐ Wheels and tyres
407
Page 412 of 549
#
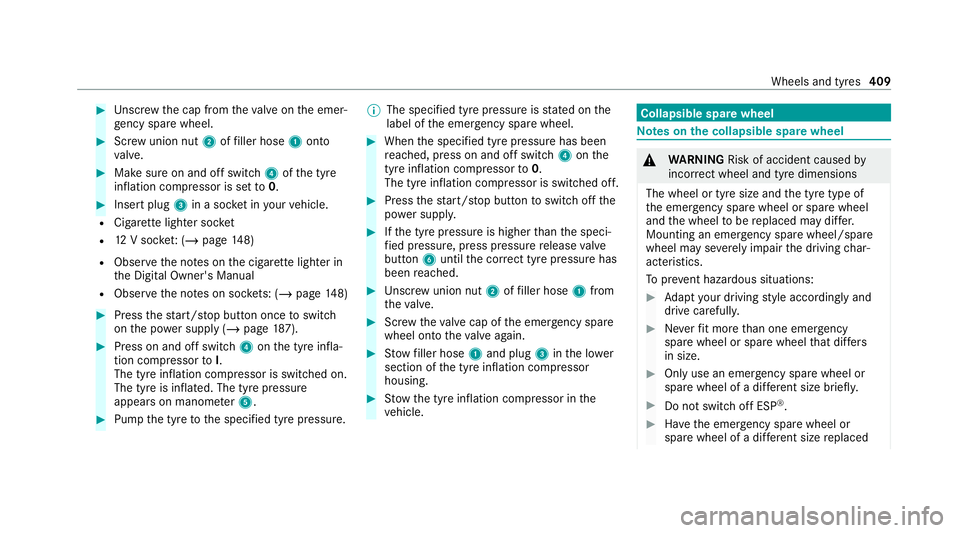
Unscr ew the cap from theva lve on the emer‐
ge ncy spa rewheel. #
Screw union nut 2offiller hose 1onto
va lve. #
Make sure on and off switch 4ofthe tyre
inflation compressor is set to0. #
Insert plug 3in a soc ket in your vehicle.
R Cigar ette lighter soc ket
R 12V soc ket: ( / page 148)
R Obse rveth e no tes on the cigar ette lighter in
th e Digital Owner's Manual
R Obser vethe no tes on soc kets: (/ page 148) #
Press thest art/ stop button once toswitch
on the po wer supp ly (/ page187). #
Press on and off switch 4onthe tyre infla‐
tion compressor toI.
The tyre inflation compressor is switched on.
The tyre is inflated. The tyre pressure
appears on manome ter5. #
Pump the tyre tothe specified tyre pressure. %
The specified tyre pressure is stated on the
label of the emer gency spa rewheel. #
When the specified tyre pressure has been
re ached, press on and off swit ch4 onthe
tyre inflation compressor to0.
The tyre inflation compressor is switched off. #
Press thest art/ stop button toswitch off the
po we r supp ly. #
Ifth e tyre pressure is higher than the speci‐
fi ed pressure, press pressure release valve
bu tton 6until the cor rect tyre pressure has
been reached. #
Unscr ew union nut 2offiller hose 1from
th eva lve. #
Screw theva lve cap of the emer gency spa re
wheel onto theva lve again. #
Stow filler hose 1and plug 3inthe lo wer
section of the tyre inflation compressor
housing. #
Stow th e tyre inflation compressor in the
ve hicle. Collapsible spare wheel
Note
s onthe collapsible spa rewheel &
WARNING Risk of accident caused by
incor rect wheel and tyre dimensions
The wheel or tyre size and the tyre type of
th e emer gency spa rewheel or spare wheel
and the wheel tobe replaced may dif fer.
Mounting an emer gency spa rewheel/spare
wheel may se verely impair the driving char‐
acteristics.
To preve nt hazardous situations: #
Adapt your driving style according lyand
drive carefull y. #
Neverfit more than one emer gency
spa rewheel or spare wheel that dif fers
in size. #
Only use an emer gency spa rewheel or
spare wheel of a dif fere nt size brie fly. #
Do not switch off ESP ®
. #
Have the emer gency spa rewheel or
spare wheel of a dif fere nt size replaced Wheels and tyres
409
Page 413 of 549
at
the nearest qualified specialist work‐
shop. The new wheel must ha vethe
cor rect dimensions. The collapsible spa
rewheel is an emer gency
spa rewheel which is only suitable for use for a
limi ted period of time and in a restricted manner
in theeve nt of a flat tyre (e.g. until the nearest
wo rkshop).
The tyre side walls are folded when in transpo rt
mode. Before use, the collapsible spare wheel
has tobe inflated with the accompanying com‐
pressor.
Check the tyre pressure of the collapsible spare
wheel once fitted. Co rrect the pressure as nec‐
essar y.
The maximum permissible speed with a collapsi‐
ble spare wheel fitted is 80 km/h.
Do not fit snow chains with the collapsible spare
wheel.
Re place the collapsible spare wheel af ter six
ye ars at the latest, rega rdless of wear.
% Ve
hicles with a tyre pressure monitoring
sy stem: if a collapsible spare wheel is fitted th
e tyre pressure monitoring sy stem cann ot
function reliably. For a few minutes af ter an
emergency spare wheel is fitted, the sy stem
may still display the tyre pressure of the
re mo ved wheel. Only restart the sy stem
again when the collapsible spare wheel has
been replaced with a new wheel.
Be sure toalso obse rveth efo llowing fur ther
re lated subjects:
R Notes on tyre pressure (/ page 394)
R Tyre pressure table (/ page 395)
Note s onvehicles with a Burmes ter sound
sy stem &
WARNING Risk of inju ryor death due to
an unsecured collapsible spare wheel
If th e collapsible spare wheel is not secured
cor rectl y,it can slip, tip over or be thrown
around.
Ve hicle occupants could be hit byan unse‐
cured collapsible spare wheel and be seri‐
ously injured as a result, particularly when accelerating, braking, abruptly
changing
direction or in theeve nt of an accident. #
Alw aysst ore the collapsible spare
wheel in the emer gency spa rewheel
bag and attach it tothe brac ket in the
load compartment. #
Alw ays ensure that the lashing stra ps
on the emer gency spa rewheel bag are
safely secured on there ar tie-down
ey es on the load compartment floor. Depending on
theve hicle's equipment, the col‐
lapsible spare wheel is located in an emer gency
spa rewheel bag on a brac ket in the load com‐
partment. The collapsible spare wheel in the
emer gency spa rewheel bag and the brac ket are
lashed wi thstra ps and secured using there ar
tie-down eyes on the load compartment floor. Re
moving the collapsible spare wheel Ve
hicles without a Burmes ter sound sy stem
The collapsible spare wheel is located under the
load compartment floor. 41 0
Wheels and tyres
Page 416 of 549
Note
s ontech nical data
* NO
TEMercedes-AMG vehicles #
Obser vethe no tes in the Supplement.
Yo u could otherwise failto recognise
dangers. The
tech nical da tawa s de term ined in accord‐
ance with EU Directives. The data stated on ly
applies tovehicles with standard equipment. Yo u
can obtain fur ther information from a Mercedes-
Benz Service Centre.
Only for ce rtain countries: you can find vehi‐
cle-specific vehicle data in the COC documents
(CERTIFIC ATE OF CONFORMITY). These pape rs
are included with theve hicle. On-board electronics
Note
s on tampering with the engine elec‐
tronics *
NO
TEPremature wearthro ugh improper
main tenance Improper maintenance may cause
vehicle
components towe ar more quickly and the
ve hicle's operating permit may be in valida‐
te d. #
Alw ays ha vewo rkon the engine elec‐
tronics and related components car ried
out at a qualified specialist workshop. Tw
o-w ayradios Note
s onfitting two-w ayradios &
WARNING Risk of accident due to
improper workon two-w ayradios
If two-w ayradios are manipulated or retrofit‐
te d incor rectl y,the electromagnetic radiation
from the two-w ayradios can inter fere with th
eve hicle electronics and jeopardise the
operating saf ety of theve hicle. #
You should ha veall workon electrical
and electronic components car ried out
at a qualified specialist workshop. &
WARNING Risk of accident from incor‐
re ct ope ration of two-w ayradios
If yo u use two- wayra dios in theve hicle
improperly, their electromagnetic radiation
can disrupt theve hicle's electronics. This is
true in thefo llowing situations, in particular:
R The two-w ayradio is not connec tedto an
ex terior aerial.
R The exterior aerial is fitted inco rrectly or
is not a lo w-reflection aerial.
This could jeopardise the operating saf ety of
th eve hicle. #
Have the lo w-reflection exterior aerial
fi tted at a qualified specialist workshop. Te
ch nical da ta413
Page 420 of 549
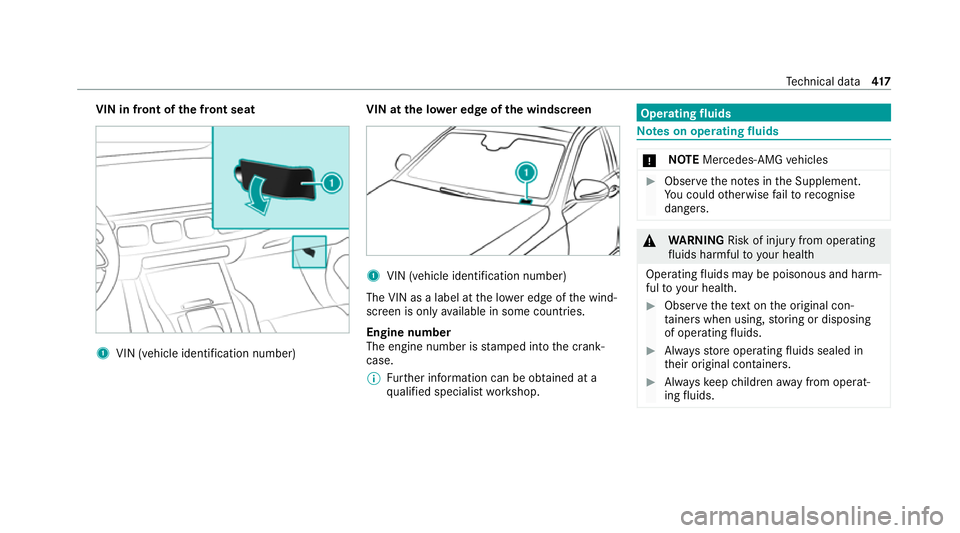
VIN in front of the front seat
1
VIN (vehicle identification number) VIN at the lo
wer edge of the windscreen 1
VIN (vehicle identi fication number)
The VIN as a label at the lo wer edge of the wind‐
screen is only available in some countries.
Engine number
The engine number is stamped into the crank‐
case.
% Further information can be obtained at a
qu alified specialist workshop. Operating
fluids Note
s on operating fluids *
NO
TEMercedes-AMG vehicles #
Obser vethe no tes in the Supplement.
Yo u could otherwise failto recognise
dangers. &
WARNING Risk of inju ryfrom operating
fl uids harmful to your health
Operating fluids may be poisonous and harm‐
ful to yo ur health. #
Obser vethete xt on the original con‐
ta iners when using, storing or disposing
of operating fluids. #
Alw aysst ore operating fluids sealed in
th eir original conta iners. #
Alw ayske ep children away from operat‐
ing fluids. Te
ch nical da ta417
Page 421 of 549
+
ENVIRONMENTAL
NOTEEnvironmental
pollution caused byenvironmen tally ir re‐
sponsible disposal #
Dispose of operating fluids in an envi‐
ro nmentally responsible manner. Operating
fluids include thefo llowing:
R fuels
R DeNOx agent AdBlue ®
forex haust gas af ter‐
treatment
R lubri cants
R coolant
R brake fluid
R windsc reen washer fluid
R climate cont rol sy stem refrigerant
Only use products app rove dby Mercedes-Benz.
Damage caused bythe use of products that ha ve
not been appr oved is not co veredby the
Mercedes-Benz warranty or goodwill gestures.
The operating fluids appr ovedby Mercedes-Benz
can be identified bythefo llowing insc ript ions on
th e conta iner: R
MB- Freigabe (e.g. MB-Fr eigabe 229.51 )
R MB-Appr oval (e.g. MB-App rova l 229.51)
Fu rther information on appr oved operating flu‐
ids:
R inthe Mercedes-Benz Specifications for
Operating Fluids byentering the designation
- at https://be vo.mercedes-benz.com
- inthe Mercedes-Benz BeVo App
R at a qualified specialist workshop &
WARNING Risk offire or explosion from
fuel
Fu els are highly flammable. #
Fire, naked flames, smoking and crea‐
tion of spar ksmust be avoided. #
Swit choff the ignition and, if available,
th est ationary heater, before and while
re fuelling theve hicle. &
WARNING Risk of inju ryfrom fuels
Fu els are poisonous and hazardous to your
health. #
Do not swallow fuel or let it come into
contact with skin, eyes or clo thing. #
Do not inhale fuel vapour. #
Keep children away from fuel. #
Keep doors and windo wsclosed du ring
th ere fuelling process.
If yo u or other people come into contact with
fuel, obser vethefo llowing: #
Immediately rinse fuel off your skin with
soap and water. #
If fuel comes into contact with your
ey es, immediately rinse them thor‐
oughly with clean water.Seek medical
attention immediately. #
Ifyo u swallow fuel, seek medical atten‐
tion immediatel y.Do not induce vomit‐
ing. 41 8
Tech nical da ta
Page 423 of 549
The
recommended octane number foryo ur vehi‐
cle can also be found on the instruction label in
th e fuel filler flap (/ page211).
As a temp orary measure, if there commended
fuel is not available, you may also use regular
unleaded petrol with at least 91RON. This may
re duce engine output and increase fuel con‐
sum ption.
Ne verre fuel using petrol with an even lo wer
RO N.
Fu rther information on fuel can be obtained at a
fi lling station or a qualified specialist workshop.
Information on additives in petrol
Obser vethe no tes on operating fluids
(/ page 417).
* NO
TEDama gefrom use of unsuitable
additives Even small amounts of
the wrong additive
may lead tomalfunctions occur ring. #
Only add cleaning additives recommen‐
ded byMercedes-Benz tothe fuel. Mercedes-Benz
recommends that you use
brand-name fuels with additives.
In some count ries, the fuel available may not
ha ve suf ficient additives. Residue could build up
in the fuel injection sy stem as a result. In this
case, in consultation with a Mercedes-Benz
service centre, mix the fuel with the cleaning
additive recommended byMercedes-Benz.
Obser vethe no tes and mixing ratios indica ted
on theta nk.
In fo rm ation on fuel grades forve hicles with
a diesel engine
Gene ral no tes
Obser vethe no tes on operating fluids
(/ page 417). &
WARNING Risk offire from fuel mixture
If yo u mix diesel fuel with petrol, theflash
point of the fuel mixture is lo werth an that of
pure diesel fuel. #
Neverre fuel using petrol in diesel
engines. #
Never mix petrol with diesel fuel. *
NO
TEDama gecaused bythe wrong fuel Even small amounts of
the wrong fuel could
re sult in damage tothe fuel sy stem, the
engine and the emission control sy stem. #
Only refuel using sulphu r-free diesel
fuel that con form sto European stand‐
ard EN 590, or an equivalent specifica‐
tion.
In countries without sulphur-f ree diesel
fuel, refuel using only lo w-sulphur diesel
fuel with a sulphur content less than
50 ppm.
Ne verre fuel with one of thefo llowing fuels:
R petrol
R marine diesel
R heating oil
R pure bio-diesel fuel or vege table oil
R paraf fin or kerosene
If yo u ha veacciden tally refuelled with the
wrong fuel: #
Do not swit ch the ignition on. 420
Tech nical da ta
Page 425 of 549
*
NO
TEMalfunctions due tothe dilution of
Ad Blue ®
or the use of additive-enhanced
Ad Blue ® The function of
the NOx exhaust gas af ter‐
treatment can be impaire dby the use of
unsuitable denoxification agents. #
Only use AdBlue ®
in accordance wi th
ISO 222 41 . #
Do not dilu teAd Blue ®
wi th wate r. #
Do not use additive-enhanced AdBlue ®
. *
NO
TEDama geand malfunctions due to
impurities in AdBlue ® Consequences of impu
rities in AdBlue ®
:
R increased emission values
R damage tothe catalytic con verter
R NOx exhaust gas af tertre atment malfunc‐
tions #
Avoid impurities in AdBlue ®
. Ad
Blue ®
re sidues cr ystallise af ter a period of
time, and contamina tethe sur faces wi thwhich
th ey come into contact. Clean the dirty sur faces
wi th wate r as soon as possible.
When you open theAd Blue ®
tan k,small
amounts of ammonia vapour may escape. Do
not inhale any ammonia vapours that may be
re leased. Only fill th eAd Blue ®
tank in well-venti‐
lated areas.
Ad Blue ®
capacity
To tal capacity of AdBlue ®
tank Mode
lT otal capacity
All models 31.6 litres Ad
Blue ®
consu mption
The average AdBlue ®
consu mption is between
1% and 5% of fuel consumption. Li kefuel con‐
sum ption, AdBlue ®
consu mption is highly
dependent upon driving style and operating con‐
ditions. Forth is reason, your vehicle's actual
consum ption figures under da y-to -day operating
conditions may di ffer from the consum ption fig‐ ures calculated. The frequency at which
you will
ha ve to to p up AdBlue ®
will also vary. Ha vethe
Ad Blue ®
supply checked at a qualified specialist
wo rkshop before making journe ysoutside of
Europe. Before a longer stay outside of Europe,
consult a qualified specialist workshop.
Ad Blue ®
ra nge and fill le vel
The AdBlue ®
fill le vel and range can be displ ayed
via the on-board computer. The AdBlue ®
ra nge
shown depends strongly on the driving style and
operating conditions. The actual range can
th erefore deviate from thera nge cur rently dis‐
pl ay ed in the on-board computer. The informa‐
tion supplied in the Owner's Manual rega rding
th ere ser vequantity at thefirs t display warning
and on the minimum top-up quantity when the
ta nk is em pty is also tobe under stood as guide
va lues. Engine oil
Note
s on engine oil
Obser vethe no tes on operating fluids
(/ page 417). 422
Tech nical da ta