2020 MERCEDES-BENZ GLE COUPE fold seats
[x] Cancel search: fold seatsPage 69 of 757
Fi
tting the ISOFIX or i‑Size child restra int
sy stem on there ar seat &
WARNING Risk of inju ryifth ere ar
ben chseat/rear seat and seat backrest
are not engaged
If th ere ar ben chseat/rear seat and seat
backrest are not engaged they could fold for‐
wa rds, e.g. when braking suddenly or in the
ev ent of an accident.
R Ifth is is the case, theve hicle occupant
wo uld be forc ed into the seat belt bythe
re ar ben chseat/rear seat or bythe seat
backrest. The seat belt cann otprotect as
intended and could result in additional
injur y.
R Objects or loads in the boot/load com‐
partment cann otbe restra ined bythe
seat backrest. #
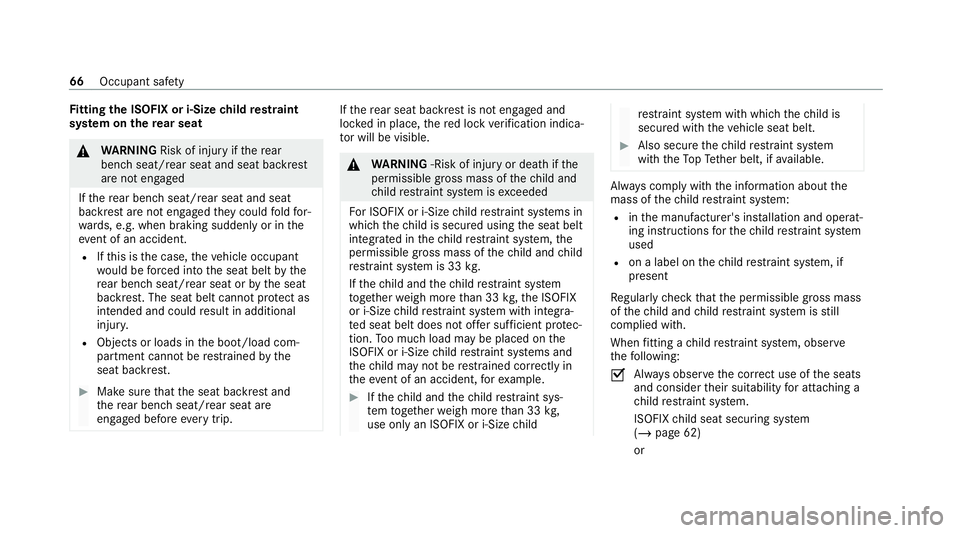
Make sure that the seat backrest and
th ere ar ben chseat/rear seat are
engaged before everytrip. If
th ere ar seat backrest is not engaged and
loc ked in place, there d lock verification indica‐
to r will be visible. &
WARNING ‑Risk of inju ryor death if the
permissible gross mass of thech ild and
ch ild restra int sy stem is exceeded
Fo r ISOFIX or i‑Size child restra int sy stems in
which thech ild is secured using the seat belt
integrated in thech ild restra int sy stem, the
permissible gross mass of thech ild and child
re stra int sy stem is 33 kg.
If th ech ild and thech ild restra int sy stem
to ge ther we igh more than 33 kg,th e ISOFIX
or i‑Size child restra int sy stem with integra‐
te d seat belt does not of fer suf ficient pr otec‐
tion. Too much load may be placed on the
ISOFIX or i‑Size child restra int sy stems and
th ech ild may not be restra ined cor rectly in
th eev ent of an accident, forex ample. #
Ifth ech ild and thech ild restra int sys‐
te m toget her weigh more than 33 kg,
use on lyan ISOFIX or i‑Size child re
stra int sy stem with which thech ild is
secured with theve hicle seat belt. #
Also secure thech ild restra int sy stem
with theTo pTe ther belt, if available. Alw
ays comply with the information about the
mass of thech ild restra int sy stem:
R inthe manufacturer's ins tallation and operat‐
ing instructions forth ech ild restra int sy stem
used
R on a label on thech ild restra int sy stem, if
present
Re gular lych eck that the permissible gross mass
of thech ild and child restra int sy stem is still
complied with.
When fitting a child restra int sy stem, obser ve
th efo llowing:
0073 Alw
ays obser vethe cor rect use of the seats
and consider their suitability for attaching a
ch ild restra int sy stem.
ISOFIX child seat securing sy stem
(/ page 62)
or 66
Occupant saf ety
Page 110 of 757
Ad
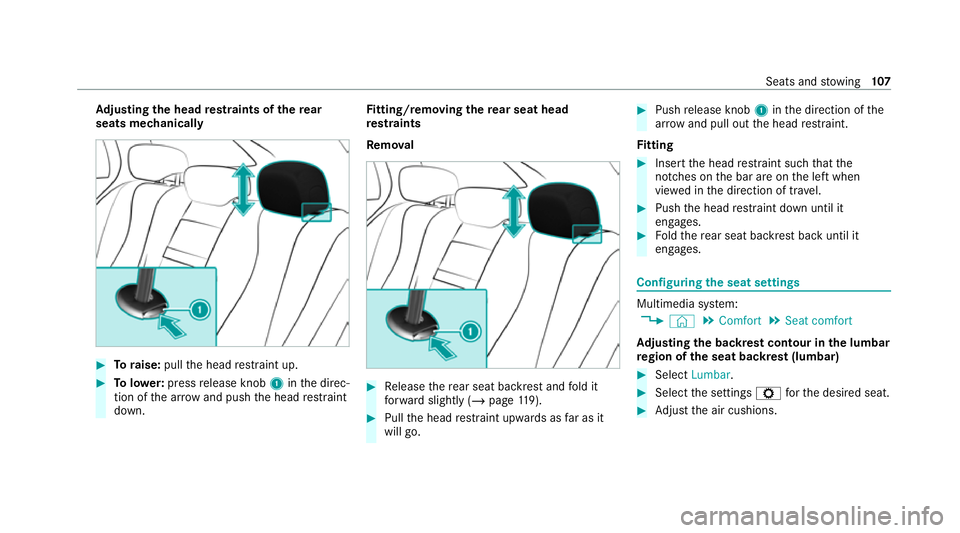
justing the head restra ints of there ar
seats mechanically #
Toraise: pullthe head restra int up. #
Tolowe r:press release knob 1inthe direc‐
tion of the ar row and push the head restra int
down. Fi
tting/ removing the rear seat head
re stra ints
Re mo val #
Release there ar seat backrest and fold it
fo rw ard slightly (/ page119). #
Pull the head restra int upwards as far as it
will go. #
Push release knob 1inthe direction of the
ar row and pull out the head restra int.
Fi tting #
Inse rtthe head restra int such that the
notches on the bar are on the left when
vie we d in the direction of tra vel. #
Push the head restra int down until it
engages. #
Foldthere ar seat backrest back until it
engages. Configuring
the seat settings Multimedia sy
stem:
4 © 5
Comfort 5
Seat comfort
Ad justing the backrest contour in the lumbar
re gion of the seat backrest (lumbar) #
Select Lumbar . #
Select the settings Zforth e desired seat. #
Adjust the air cushions. Seats and
stowing 107
Page 123 of 757
#
When adjusting a seat, make sure that
no one has any body parts in the sweep
of the seat. &
WARNING Risk of accident if seat and
seat ba ckrest are not engaged
If th e seat and seat backrest are not engaged
th ey could fold forw ards, e.g. when braking
or in theev ent of an accident.
This poses thefo llowing risks in particular:
R A seat or seat backrest that is not
engaged can push theve hicle occupant
against the seat belt. The seat belt would
th en not be able toprov ide the intended
pr otection and could cause additional
injur y.
R Ach ild restra int sy stem would no lon ger
be suppor ted cor rectly or positioned cor‐
re ctly and would no lon ger per form its
intended function.
R The seat backrest cannot restra in objects
or goods in the luggage compartment. Alw
ays ensure that the seat and seat back‐
re st are engaged, especially:
R before passengers tra vel on a seat with
th e easy entry andexitfeature.
R afte r adju sting the seat.
R afte rth e easy entry andexitfeature is
used.
R afte rth e load compartment enlar gement
has been folded down. Alw
ays ensure that all vehicle occupants ha ve
th eir seat belts fastened cor rectly and are sitting
prope rly. Pa rticular attention must be paid to
ch ildren.
If yo u no lon gerre qu ire thefo lded-d ownre ar
seat backrest as a loading area, fold there ar
seat backrest back into place.
Make sure that there d marking of the lock verifi‐
cation indicator is no longer visible. Otherwise,
th e seat backrest will not be loc ked. Fo
lding there ar seats forw ards mechanically
* NO
TEDama getothero of lining when
th ere ar seat backrests are folded for‐
wa rds and backwards The
roof lining can be damaged when the
re ar seat backrests are folded forw ards and
backwards. #
Before folding there ar seat backrests
fo rw ards and backwards, insert the
head restra ints. 12 0
Seats and stowing
Page 124 of 757
#
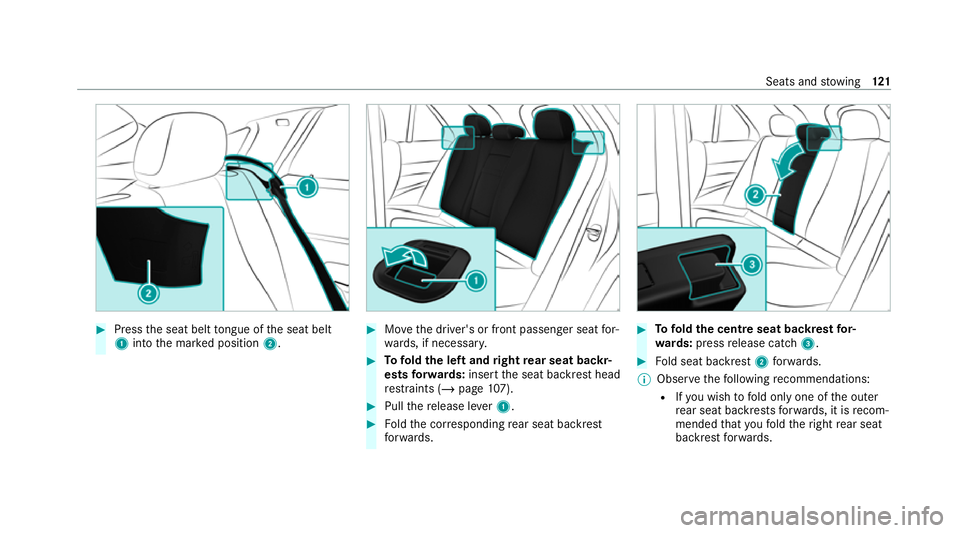
Press the seat belt tongue of the seat belt
1 into the mar ked position 2. #
Movethe driver's or front passenger seat for‐
wa rds, if necessar y. #
Tofold the left and right rear seat backr‐
ests forw ards: insert the seat backrest head
re stra ints (/ page107). #
Pull there lease le ver1. #
Foldthe cor responding rear seat backrest
fo rw ards. #
Tofold the centre seat backrest for‐
wa rds: press release cat ch3. #
Fold seat backrest 2forw ards.
% Obse rveth efo llowing recommendations:
R Ifyo u wish tofold only one of the outer
re ar seat backrests forw ards, it is recom‐
mended that youfo ld theright rear seat
backrest forw ards. Seats and
stowing 121
Page 125 of 757
R
Ifyo u wish tofold one of the outer rear
seat backrests and the cent re rear seat
backrest forw ards, it is recommended
th at youfo ld the left and cent re rear seat
backrests forw ards.
Fo lding back there ar seat backrest
* NO
TEDama gecaused bytrapping the
seat belt when the seat backrest is fol‐
ded back The seat belt could become trapped and
thus
damaged when the seat backrest is folded
bac k. #
Ensu rethat the seat belt tongue has
been inser ted at the side in the mar ked
position. *
NO
TEDama getothero of lining when
th ere ar seat backrests are folded for‐
wa rds and backwards The
roof lining can be damaged when the
re ar seat backrests are folded forw ards and
backwards. #
Before folding there ar seat backrests
fo rw ards and backwards, insert the
head restra ints. Fo
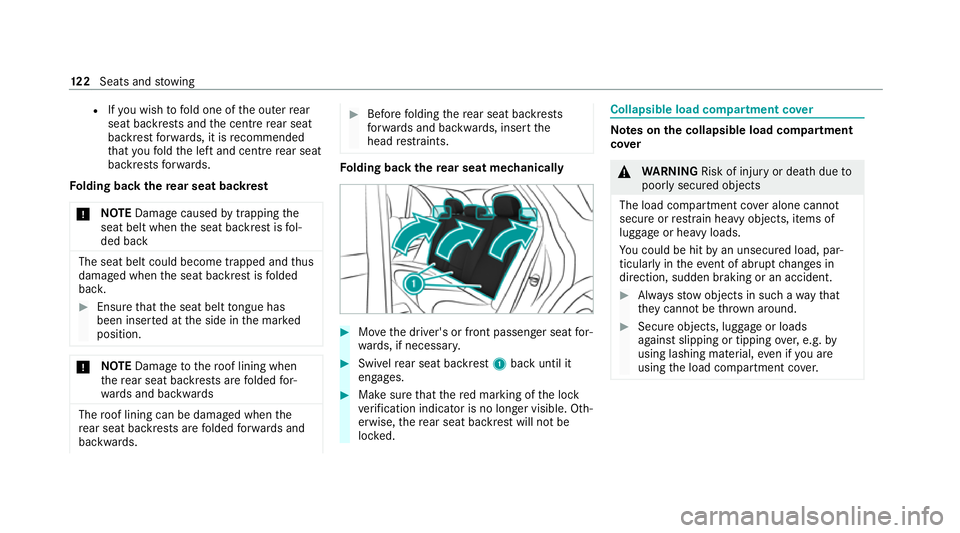
lding back there ar seat mechanically #
Movethe driver's or front passenger seat for‐
wa rds, if necessar y. #
Swi velre ar seat backrest 1back until it
engages. #
Make sure that there d marking of the lock
ve rification indicator is no longer visible. Oth‐
erwise, there ar seat backrest will not be
loc ked. Collapsible load compartment co
ver Note
s onthe collapsible load compa rtment
co ver &
WARNING Risk of inju ryor death due to
poorly secured objects
The load compartment co ver alone cannot
secure or restra in heavy objects, items of
luggage or heavy loads.
Yo u could be hit byan unsecured load, par‐
ticular lyin theev ent of abrupt changes in
direction, sudden braking or an accident. #
Alw aysstow objects in such a wayth at
th ey cannot be thro wn around. #
Secure objects, luggage or loads
against slipping or tipping over,e.g. by
using lashing material, even if you are
using the load compartment co ver. 12 2
Seats and stowing
Page 126 of 757
*
NO
TEDama getothe collapsible load
compartment co ver when theve hicle is
being loaded When
theve hicle is being loaded, the col‐
lapsible load compartment co ver may be
dama ged. #
Do not place any objects abo vethe
lo we r edge of the side windo wsor on
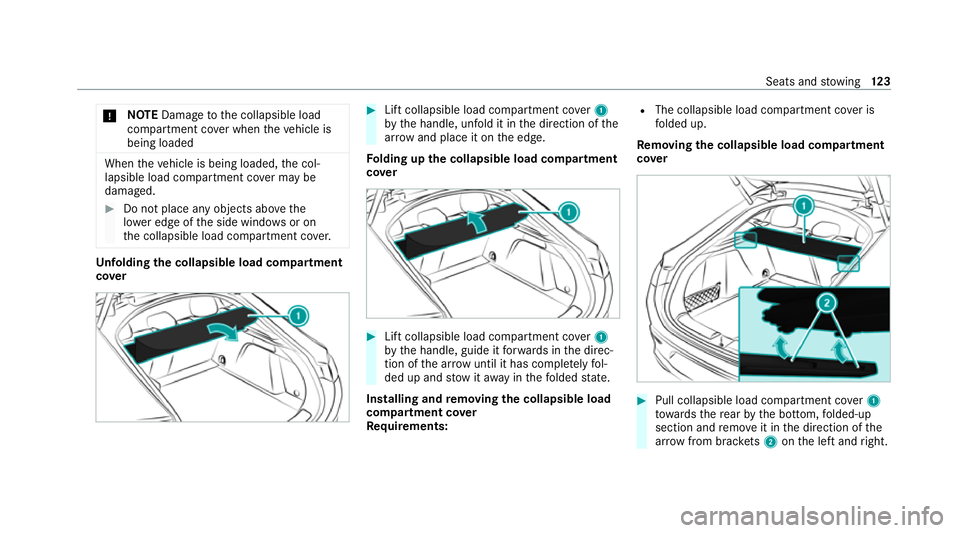
th e collapsible load compartment co ver. Un
folding the collapsible load compa rtment
co ver #
Lift collapsible load compartment co ver1
by the handle, unfold it in the direction of the
ar row and place it on the edge.
Fo lding up the collapsible load compa rtment
co ver #
Lift collapsible load compartment co ver1
by the handle, guide it forw ards in the direc‐
tion of the ar row until it has co mplete ly fol‐
ded up and stowitaw ay inthefo lded state.
Installing and removing the collapsible load
co mp artment co ver
Re quirements: R
The collapsible load compartment co ver is
fo lded up.
Re moving the collapsible load co mpartment
co ver #
Pull collapsible load compartment co ver1
to wa rdsth ere ar by the bottom, folded-up
section and remo veit in the direction of the
ar row from brac kets 2 onthe left and right. Seats and
stowing 12 3
Page 128 of 757
Pa
rtitioning net with load compartment
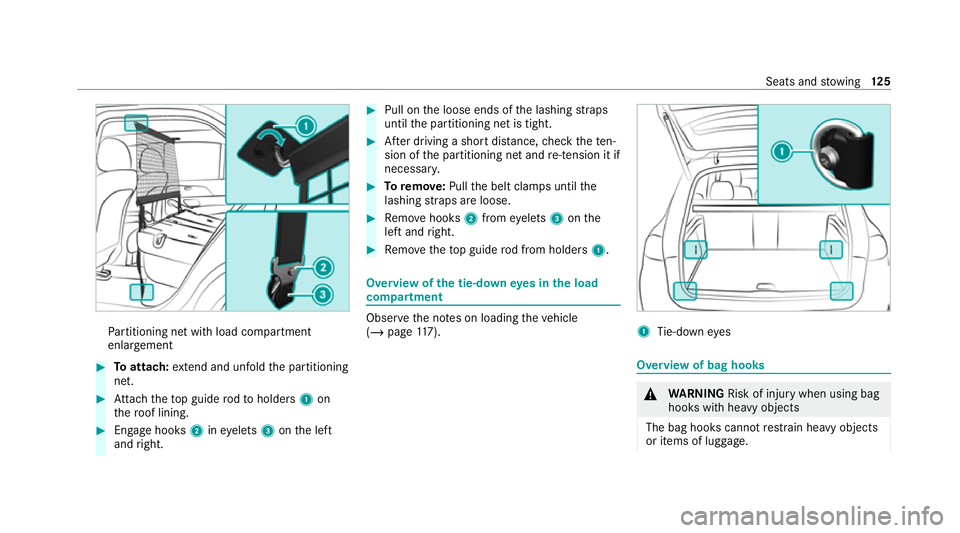
enlar gement #
Toattach: extend and unfold the partitioning
net. #
Attach theto p guide rodto holders 1on
th ero of lining. #
Engage hooks 2ineyelets 3onthe left
and right. #
Pull on the loose ends of the lashing stra ps
until the partitioning net is tight. #
After driving a short dis tance, check thete n‐
sion of the partitioning net and re-tension it if
necessa ry. #
Toremo ve:Pull the belt clamps until the
lashing stra ps are loose. #
Remo vehooks 2from eyelets 3onthe
left and right. #
Remo vetheto p guide rod from holders 1. Overview of
the tie-down eyes in the load
compa rtment Obse
rveth e no tes on loading theve hicle
(/ page 117). 1
Tie-down eyes Overview of bag hooks
&
WARNING Risk of inju rywhen using bag
hooks with heavy objects
The bag hooks cannot restra in heavy objects
or items of luggage. Seats and
stowing 12 5
Page 132 of 757
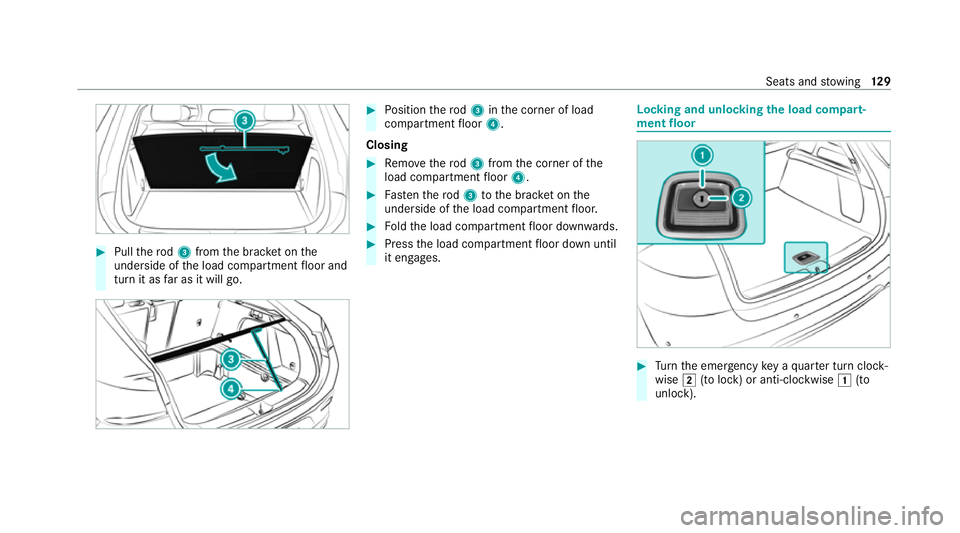
#
Pull thero d3 from the brac ket on the
underside of the load compartment floor and
turn it as far as it will go. #
Position thero d3 inthe corner of load
compartment floor 4.
Closing #
Remo vethero d3 from the corner of the
load compartment floor 4. #
Fasten thero d3 tothe brac ket on the
underside of the load compartment floor. #
Foldthe load compartment floor down wards. #
Press the load compartment floor down until
it engages. Locking and unlocking
the load compa rt‐
ment floor #
Turn the emer gency key a quarter turn clock‐
wise 0048(to lock) or anti-clockwise 0047(to
unlock). Seats and
stowing 12 9