2020 MERCEDES-BENZ GLE COUPE change time
[x] Cancel search: change timePage 4 of 757
Thank
youfo r pur chasing a Mercedes-Benz
Before youfirs t drive off, read this Owner's Man‐
ual carefully and familiarise yourself with your
ve hicle. Foryo ur ow n sa fety and a longer operat‐
ing li fespan of theve hicle, follow the instructions
and warning notices in this Owner's Manual. Dis‐
re ga rding them may lead todamage totheve hi‐
cle or injury topeople.
The standard equipment and product desc ript ion
of your vehicle may vary and depends on thefo l‐
lowing factors:
R model
R order
R national version
R availability
The illustrations in this Owner's Manual show a
left-hand drive vehicle. On right-hand-drive vehi‐
cles, the la yout of car parts and cont rol ele‐
ments dif fers accordin gly.
Mercedes-Benz is cons tantly de veloping its vehi‐
cles fur ther. Mercedes-Benz
therefore reser vesth eright to
int roduce changes in thefo llowing areas:
R design
R equipment
R tech nical features
The equipment in your vehicle may therefore dif‐
fe r from that shown in the descriptions and illus‐
trations.
The following documents are integral parts of
th eve hicle:
R Digital Owner's Manual
R printed Owner's Manual
R service booklet
R equipment-dependent Supplements
Ke ep these documents in theve hicle at all
times. If you sell theve hicle, alw ays pass all of
th e documents on tothe new owner.
1675841411Z102
1675841411Z102
Page 25 of 757
Pr
otection of the environment
Plug-in hybrid: obser vethe no tes in the Supple‐
ment. Otherwise, you may failto recognise dan‐
ge rs.
+ ENVIRONMENTAL
NOTEEnvironmental
dama gedue tooperating conditions and
personal driving style The pollutant emission of
theve hicle is
directly related tothewa yyo u operate the
ve hicle.
Operate your vehicle in an environmentally
re sponsible manner tohelp pr otect the envi‐
ro nment. Please obser vethefo llowing rec‐
ommendations on ope rating conditions and
pe rsonal driving style.
Operating conditions: #
Make sure that the tyre pressure is cor‐
re ct. #
Do not car ryany unnecessary weight
(e.g. roof luggage rack s once you no
lon ger need them). #
Adhere tothe service inter vals.
A regularly serviced vehicle will contri b‐
ute toenvironmen tal pr otection. #
Alw ays ha vemaintenance workcar ried
out at a qualified specialist workshop.
Pe rsonal driving style: #
Do not depress the accelera tor pedal
when starting the engine. #
Do not warm upthe engine while the
ve hicle is stationar y. #
Drive carefully and maintain a suitable
di st ance from theve hicle in front. #
Avoid frequent, sudden acceleration
and braking. #
Change gear in good time and use each
ge ar on lyup to00C3 of its maximum
engine speed. #
Switch off the engine in stationary traf‐
fi c, e.g. byusing the ECO start/ stop
function. #
Drive fuel-ef ficiently. Obser vethe ECO
display for a fuel-ef ficient driving style. +
ENVIRONMEN
TALNO TEEnvironmental
pollution caused byirre sponsible dis‐
posal of the high-voltage battery A high-voltage battery conta
ins materials
which are harmful tothe environment. #
Dispose of faulty high-voltage bat teries
at a qualified specialist workshop. Ta
ke -back of end-of-life vehicles
EU countries onl y:
Mercedes-Benz will take back your end-of-life
ve hicle for environment-friendly disposal in
accordance with the European Union(EU) End-
of-Life Vehicles Directive.
A network of vehicle take -ba ckpoints and dis‐
mantlers has been es tablished foryo uto return
yo ur vehicle. You can lea veit at any of these
points free of charge . This makes an impor tant
contribution toclosing there cycling circle and
conse rving resources.
Fo r fur ther information about there cycling and
disposal of end-of-li fevehicles, and theta ke- 22
General no tes
Page 37 of 757
eration, lateral acceleration, display of
fas‐
te ned seat belts)
R malfunctions or faults in impor tant sy stem
components (e.g. lights, brakes)
R information on events leading tovehicle
damage
R system reactions in special driving situations
(e.g. airbag deployment, inter vention of sta‐
bility control sy stems)
R ambient conditions (e.g. temp erature, rain
sensor)
In addition toprov iding the actual control unit
function, this data assists the manufacturer in
de tecting and rectifying faults and optimising
ve hicle functions. The majority of this data is
te mp orary and is only processed in theve hicle
itself. Only a small portion of the data is stored
in theev ent or fault memor y.
When your vehicle is serviced, tech nical da ta
from theve hicle can be read out byservice net‐
wo rkemplo yees (e.g. workshops, manufactur‐
ers) or third parties (e.g. breakdown services).
Services include repair services, maintenance
processes, warranty claims and quality assur‐ ance measures,
forex ample. The read out is per‐
fo rm ed via the legally prescribed port forthe
diagnostics connection in theve hicle. The
re spective service network locations or third
parties collect, process and use the data. They
document tech nical statuses of theve hicle,
assist in finding faults and impr oving quality and
are transmit tedto the manufacturer, if neces‐
sar y.Fu rthermore, the manufacturer is subject
to product liability. Forth is, the manufacturer
re qu ires tech nical da tafrom vehicles.
Fa ult memories in theve hicle can be reset by a
service outlet as part of repair or maintenance
wo rk.
Depending on the selected equipment, you can
import data into vehicle con venience and info‐
ta inment functions yourself.
This includes, forex ample:
R multimedia data such as music, films or pho‐
to sfo r playback in an integrated multimedia
sy stem
R address book data for use in connection with
an integrated hands-free sy stem or an inte‐
grated navigation sy stem R
entered navigation destinations
R data about the use of internet services
This data can be sa ved locally in theve hicle or it
is located on a device which you ha veconnected
to theve hicle (e.g. a smartphone, USB flash
drive or MP3 pla yer). If this data is stored in the
ve hicle, you can dele teit at any time. This data
is sent tothird parties only at your requ est, par‐
ticular lywhen you use online services in accord‐
ance with the settings that you ha veselected.
Yo u can store or change con venience settings/
individualisations in theve hicle at any time.
Depending on the equipment, this includes, for
ex ample:
R settings forth e seat and steering wheel posi‐
tions
R suspension and climate control settings
R customisations such as interior lighting
If yo ur vehicle is accordingly equipped, you can
connect your smartphone or ano ther mobile end
device totheve hicle. You can cont rolth is by
means of the control elements integrated in the
ve hicle. Images and audio from the smartphone 34
General no tes
Page 111 of 757
Ad
justing the backrest side bols ters #
Select Side bolsters . #
Adjust the air cushion forth e desired seat.
Setting the seat heating balance #
Select Seat heating balance. #
Adjust the heat distribution forth e desired
seat. Setting automatic seat adjustment
&
WARNING Risk of becoming trapped
du ring adjustment of the driver's seat
af te r calling up a driver profile
Selecting a profile may trigger an adju stment
of the driver's seat tothe position sa ved
under the profile. You or other vehicle occu‐
pants could be injured in the process. #
Make sure that when the position of
driver's seat is being adjus ted using the
multimedia sy stem, no people or body
parts are in the seat's range of mo ve‐
ment. If
th ere is a risk of someone becoming trap‐
ped, stop the adjustment process immedi‐
ately: #
a)Tapth ewa rning message on the
media displa y.
or #
b) Press a memory position button or a
seat adjustment switch on the driver's
door.
The adjustment process is stopped. Re
quirements:
R Adapting the driver's seat and steering wheel
position tothe body size: automatic seat
adjustment has been switched on.
Multimedia sy stem:
4 © 5
Settings 5
Vehicle
5 Auto. seat adjustment
Switching automatic seat adjustment on/off
When the active user profile is changed while
th eve hicle is stationar y,the driver's seat, steer‐ ing wheel, outside mir
rors and seat con tour will
automatically be adap tedto the driver. #
Select OnorOff.
% This setting is available on lyfor individual
user profiles. Forth e guest profile, auto‐
matic seat adjustment cann otbe switched
on or off. Further information about user
profiles (/ page 349).
Ad justing driver's seat and steering wheel
position tobody size
The vehicle calculates a suitable driver's seat
and steering wheel position on the basis of the
driver's body size and sets this directly. #
Toset the unit of measurement: selectcm
or ft/in. #
Set the size using the scale. #
Select Start positioning.
The driver's seat and steering wheel position
is adjus tedto the body size that has been
set. 108
Seats and stowing
Page 112 of 757
%
Ifth e driver's seat and steering wheel posi‐
tion calculated bytheve hicle is not practical
or comfor table, it can be manually changed
at any time via the control buttons.
The outside mir rors are not set via this func‐
tion. Ins tead, they have tobe set manually
via the switches.
% You can also make these settings via the
Mercedes me por talfo ryo ur user profile. By
syn chro nising the profiles in theve hicle and
th e Mercedes me connect profiles, you can
car ryove rth ese settings foryo ur vehicle.
Fu rther information about synchronising
user profiles (/ page 352).
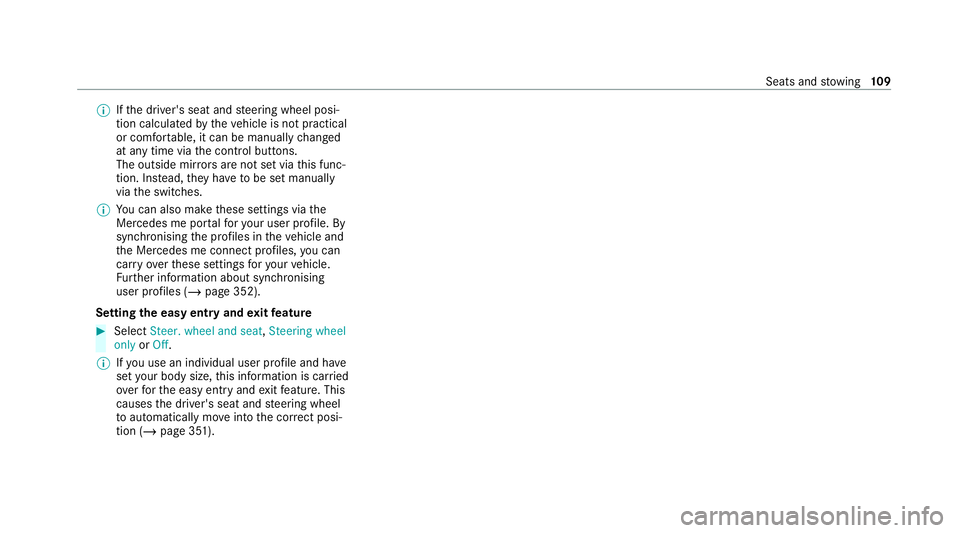
Setting the easy entry and exitfeature #
Select Steer. wheel and seat, Steering wheel
only orOff.
% Ifyo u use an individual user profile and ha ve
set your body size, this information is car ried
ove rfo rth e easy entry andexitfeature. This
causes the driver's seat and steering wheel
to automatically mo veinto the cor rect posi‐
tion (/ page 351). Seats and
stowing 109
Page 145 of 757
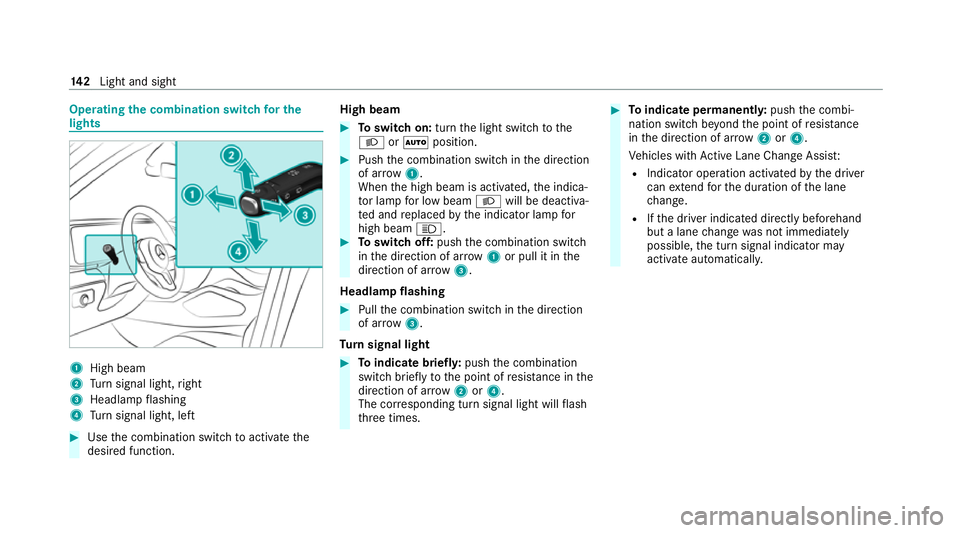
Operating
the combination switch for the
lights 1
High beam
2 Turn signal light, right
3 Headlamp flashing
4 Turn signal light, left #
Use the combination switch toactivate the
desired function. High beam #
Toswitch on: turnthe light switch tothe
0058 or0058 position. #
Push the combination switch in the direction
of ar row1.
When the high beam is activated, the indica‐
to r lamp for low beam 0058will be deactiva‐
te d and replaced bythe indicator lamp for
high beam 0057. #
Toswitch off: pushthe combination switch
in the direction of ar row1or pull it in the
direction of ar row3.
Headlamp flashing #
Pull the combination switch in the direction
of ar row3.
Tu rn signal light #
Toindicate briefl y:push the combination
switch briefly tothe point of resis tance in the
direction of ar row2or4.
The cor responding turn signal light will flash
th re e times. #
Toindicate permanentl y:push the combi‐
nation switch be yond the point of resis tance
in the direction of ar row2or4.
Ve hicles with Active Lane Change Assi st:
R Indicator operation activated bythe driver
can extend forth e duration of the lane
ch ange.
R Ifth e driver indicated directly beforehand
but a lane change was not immediately
possible, the turn signal indicator may
activate automaticall y.14 2
Light and sight
Page 148 of 757
The function is automatically deactivated under
th efo llowing conditions:
R Atspeeds abo ve100 km/h af ter activation.
R When there ar fog light is switched off.
% You can activate the enhanced fog light func‐
tion up toa speed of 100 km/h byswitching
on there ar fog light.
Fu nction of the off-road light
The off- road light impr oves illumination during
off-road driving. The low beam is distributed
symmetrically and across a wide angle, and
brightness is increased slightl y.This makes it
easier tofind your wa y when driving off- road and
to detect obs tacles at an ea rly st age. The active
headlamps function is deactivated during this
time so that steering mo vements do not change
th e illumination.
The function is active when the low beam is
switched on if you are not driving at a speed
greater than 50 km/h and theF (Offroad) or
G (Offroad Plus) drive program has been
selected. Switching
the Intelligent Light Sy stem
on/off
Re quirements:
R the ignition is switched on.
Multimedia sy stem:
4 © 5
Settings 5
Lights
5 Intelligent Light System #
Activate or deacti vate the function. Ad
aptive Highbeam Assist Ad
aptive Highbeam Assist function &
WARNING Risk of accident despi te
Ad aptive Highbeam Assist
Ad aptive Highbeam Assist does not recog‐
nise thefo llowing road users:
R Road users without lights, e.g. pedes‐
trians
R Road users with poor lighting, e.g.
cyclists R
Road users whose lighting is obstructed,
e.g. bya bar rier
On very rare occasions, Adaptive Highbeam
Assist may failto recognise other road users
with their own lighting, or may recognise
th em too late.
In this, or in similar situations, the automatic
main beam will not be deactivated or will be
activated despite the presence of other road
users. #
Alw ays obser vethe tra ffic carefully and
switch off the main beam in good time. Sy
stem limits
Ad aptive Highbeam Assist cannot take into
account road, weather or traf fic conditions.
De tection may be restricted in thefo llowing
cases:
R In poor visibilit y,e.g. fog, heavy rain or snow
R Ifth ere is dirt on the sensors or the sensors
are obscured
Ad aptive Highbeam Assist is on lyan aid. You are
re sponsible for adju sting theve hicle's lighting to Light and sight
14 5
Page 152 of 757
Interior lighting
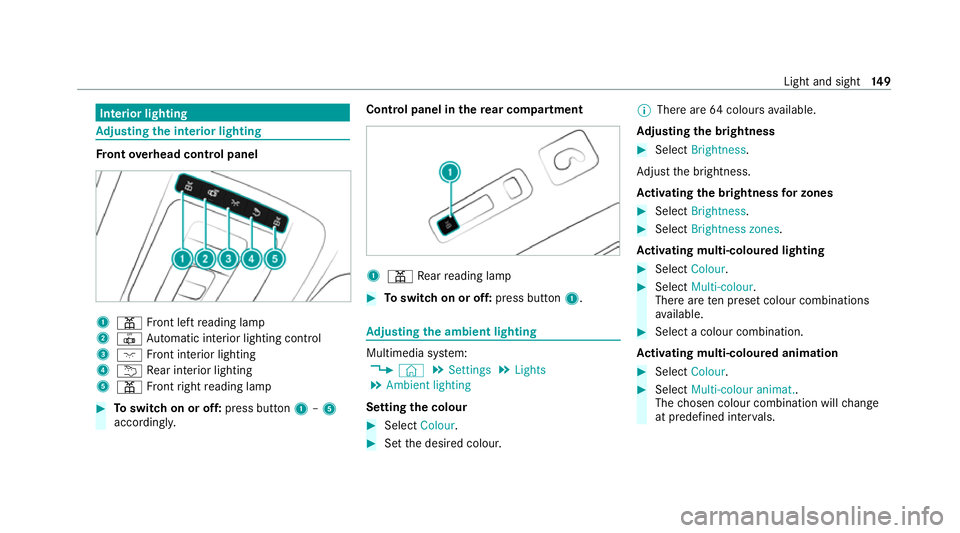
Ad
justing the in terior lighting Fr
ont overhead control panel 1
003D Front left reading lamp
2 0033 Automatic interior lighting control
3 004A Front interior lighting
4 0042 Rear interior lighting
5 003D Front right reading lamp #
Toswitch on or off: press button1–5
accordingly. Control panel in
there ar comp artment 1
003D Rear reading lamp #
Toswitch on or off: press button1. Ad
justing the ambient lighting Multimedia sy
stem:
4 © 5
Settings 5
Lights
5 Ambient lighting
Setting the colour #
Select Colour. #
Set the desired colour. %
There are 64colours available.
Ad justing the brightness #
Select Brightness .
Ad just the brightness.
Ac tivating the brightness for zones #
Select Brightness . #
Select Brightness zones .
Ac tivating multi-coloured lighting #
Select Colour. #
Select Multi-colour.
The reare ten preset colour combinations
av ailable. #
Select a colour combination.
Ac tivating multi-coloured animation #
Select Colour. #
Select Multi-colour animat..
The chosen colour combination will change
at predefined inter vals. Light and sight
14 9