2020 MERCEDES-BENZ GLE COUPE ECO mode
[x] Cancel search: ECO modePage 255 of 757
Ra
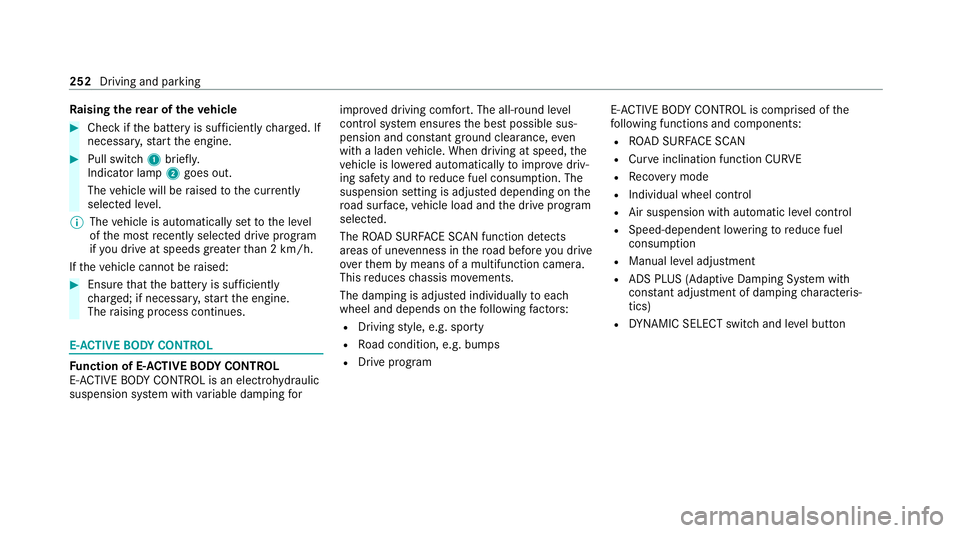
ising there ar of theve hicle #
Che ckifth e battery is suf ficiently charge d. If
necessar y,start the engine. #
Pull switch 1briefly.
Indicator lamp 2goes out.
The vehicle will be raised tothe cur rently
selected le vel.
% The vehicle is automatically set tothe le vel
of the most recently selected drive program
if yo u drive at speeds greater than 2 km/h.
If th eve hicle cannot be raised: #
Ensure that the battery is suf ficiently
ch arge d; if necessar y,start the engine.
The raising process continues. E-
AC TIVE BODY CONT ROL Fu
nction of E- ACTIVE BODY CONT ROL
E- AC TIVE BODY CONTROL is an electrohydraulic
suspension sy stem with variable damping forimpr
oved driving comfort. The all-round le vel
control sy stem ensures the best possible sus‐
pension and const ant ground clearance, even
with a laden vehicle. When driving at speed, the
ve hicle is lo wered automatically toimpr ovedriv‐
ing saf ety and toreduce fuel consum ption. The
suspension setting is adjus ted depending on the
ro ad sur face, vehicle load and the drive program
selected.
The ROAD SUR FACE SCAN function de tects
areas of une venness in thero ad before you drive
ove rth em bymeans of a multifunction camera.
This reduces chassis mo vements.
The damping is adju sted individually toeach
wheel and depends on thefo llowing factors:
R Driving style, e.g. sporty
R Road condition, e.g. bumps
R Drive program E-
AC TIVE BODY CONTROL is comprised of the
fo llowing functions and components:
R ROAD SUR FACE SCAN
R Cur veinclination function CURVE
R Recovery mode
R Individual wheel control
R Air suspension with auto matic level control
R Speed-dependent lo wering toreduce fuel
consum ption
R Manual le vel adjustment
R ADS PLUS (Adaptive Damping Sy stem with
const ant adjustment of damping characteris‐
tics)
R DYNA MIC SELECT switch and le vel button 252
Driving and parking
Page 258 of 757
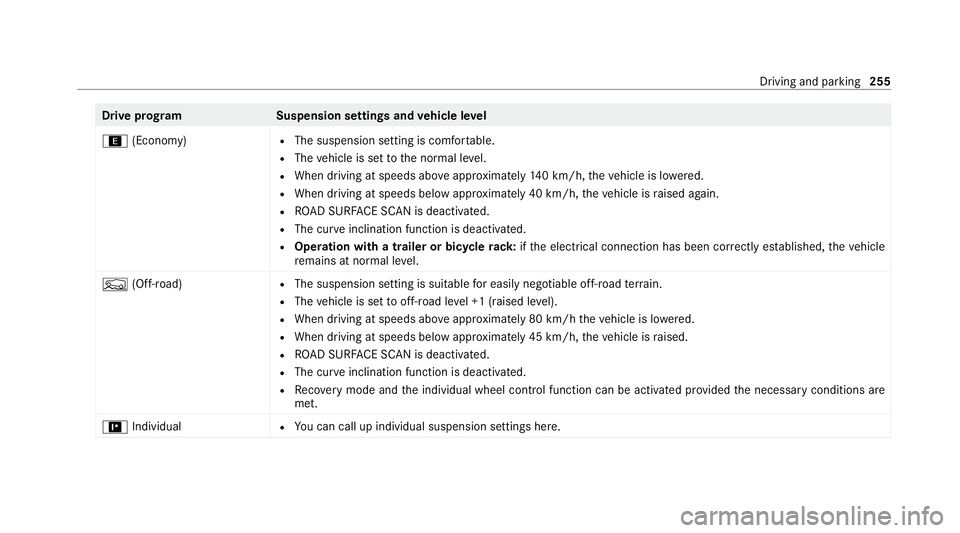
Drive prog
ramS uspension settings and vehicle le vel
; (Economy) R
The suspension setting is comfor table.
R The vehicle is set tothe normal le vel.
R When driving at speeds abo veappr oximately 140 km/h, theve hicle is lo wered.
R When driving at speeds below appr oximately 40 km/h, theve hicle is raised again.
R ROAD SUR FACE SCAN is deactivated.
R The cur veinclination function is deactivated.
R Operation with a trailer or bicycle rack:ifth e electrical connection has been cor rectly es tablished, theve hicle
re mains at normal le vel.
F (Off-road) R
The suspension setting is suitable for easily negotiable off-road terrain.
R The vehicle is set tooff-road le vel +1 (raised le vel).
R When driving at speeds abo veappr oximately 80 km/h theve hicle is lo wered.
R When driving at speeds below appr oximately 45 km/h, theve hicle is raised.
R ROAD SUR FACE SCAN is deactivated.
R The cur veinclination function is deactivated.
R Recovery mode and the individual wheel control function can be activated pr ovided the necessary conditions are
met.
= Individual R
You can call up individual suspension settings here. Driving and parking
255
Page 260 of 757
R
If sections of thero ute ha veave ry small
ra dius of cur vature.
R During ab rupt driving manoeuvres, e.g. heavy
braking or sudden acceleration.
Obser vethe no tes on cleaning the multifunction
camera (/ page 531).
Fu nction of reco very mode &
WARNING Risk of inju rydue totheve hi‐
cle moving up and down
When free driving mode is activated, the
ve hicle bounces up and down. Body parts
could become trapped if they are between
th eve hicle body and the tyres or underneath
th eve hicle. #
Make sure that nobody is under or in
th e immediate vicinity of theve hicle
when free driving mode is activated. *
NO
TERisk of dama gedue totheve hicle
moving up and down When free driving mode is activated,
the
ve hicle mo ves up and down. Vehicle parts
may be damaged if the underbody bottoms
out. #
Make sure that there is suf ficient
ground clearance when rocking free
mode is activated. Ro
cking free mode is a function of the suspen‐
sion which can assist the driver on loose sur fa‐
ces (e.g. sand, snow) when freeing a vehicle
which has become stuc k.
The vehicle body rock s in slo w,vertical motions
when reco very mode has been activated. This
te mp orarily puts the wheels under greater load,
which means they have inc reased traction and
th eve hicle is freed.
Yo u can activate free driving mode via Off- road
Assist (/ page 259). Fu
nction of individual wheel control &
WARNING Risk of becoming trapped
due totheve hicle lo wering
The vehicle can be lo wered when the individ‐
ual wheel control function has been activa‐
te d. Body parts could become trapped if they
are between theve hicle body and the tyres
or underneath theve hicle. #
Make sure that nobody is under the
ve hicle or in the immediate vicinity of
th e wheel ar ches when individual wheel
control is activated. *
NO
TERisk of dama gedue totheve hicle
moving up and down The
vehicle can be lo wered or raised on one
or more wheels when the individual wheel
control function has been activated. Vehicle
parts could be damaged due tocontact wi th
objects. #
Make sure that theve hicle has suf fi‐
cient room tomo vewhen the individual Driving and parking
257
Page 263 of 757
R
theve hicle is outdoors
R the de tected la tera l inclination of theve hicle
must not exceed appr ox.15 °
R the sy stem is within its operating temp era‐
ture
R the on-board voltage is suf ficiently high
Multimedia sy stem:
4 © 5
Settings 5
Assistance
5 Offroad Assist
Re covery mode
Re covery mode assi ststh e driver when pulling
aw ay on rough terrain, such as sand or sn ow.#
Select Free driving mode. #
Select Start.
Re covery mode is activated. #
Select Stoptostop reco very mode.
Re covery mode is auto maticallydeactivated in
th efo llowing situations:
R you are actually tr avelling fasterthan
15 km/h
R afte r a running time of 30 seconds R
it is de tected that an object has hit the
underbody of theve hicle hard
R not all conditions are met
% Further information on reco very mode
(/ page 257).
Individual wheel control
Individual wheel control enables theve hicle le vel
to be set separately for each wheel. #
Select Individual wheel control. #
Set theve hicle le velfo rth e desired wheel.
% You can also use theto uch displ aytoset the
le ve lfo r two or more wheels at the same
time. #
Select Resettoset all wheels tothe default
setting.
Individual wheel control is automatically deacti‐
va ted in thefo llowing situations:
R you are tra velling fasterthan 15 km/h
R it is de tected that an object has hit the
underbody of theve hicle hard
R not all conditions are met %
Further information on individual wheel con‐
trol (/ page 257). Pa
rking Assist PARKTRONIC Fu
nction of Parking Assist PARKTRONIC
Pa rking Assist PARKTRONIC is an electronic
parking assi stance sy stem with ultrasound. It
monitors the area around your vehicle using six
sensors on the front bumper and six sensors on
th ere ar bumper. Parking Assist PARKTRONIC
sho wsyouth e dis tance between your vehicle
and a de tected obs tacle visually and audibly.
Pa rking Assist PARKTRONIC is on lyan aid. It is
not a substitute foryo ur attention tothe sur‐
ro undings. The responsibility for safe manoeu‐
vring and parking remains with you. Make sure
th at there are no persons, animals or objects in
th e manoeuvring area while manoeuvring and
parking in/exiting parking spaces.
In thest andard setting, an intermit tent wa rning
to ne sounds from a di stance of appr oximately
0.3 m toan obs tacle in front and appr oximately
1. 0 m toan obs tacle behind. A continuous warn‐ 260
Driving and parking
Page 410 of 757
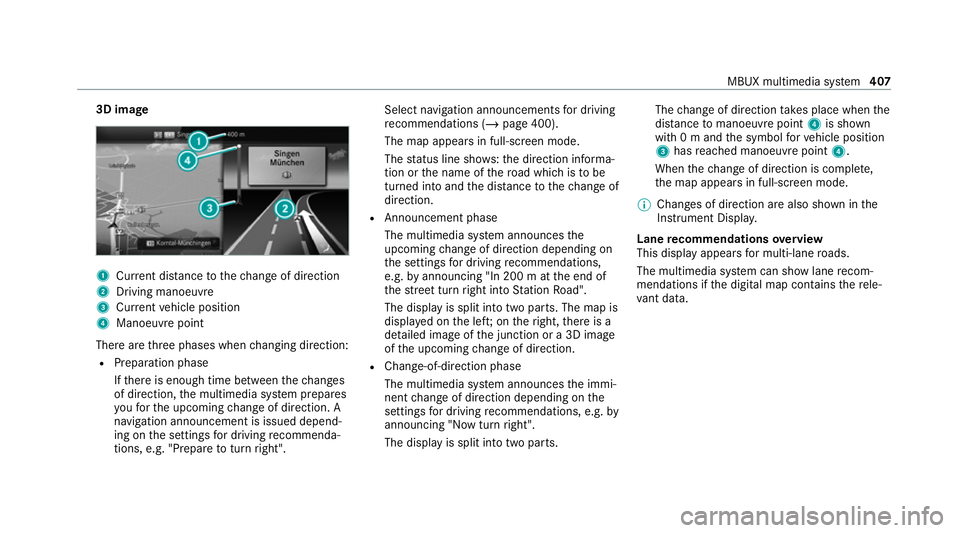
3D image
1
Current di stance tothech ange of direction
2 Driving manoeuv re
3 Current vehicle position
4 Manoeuvre point
There are thre e phases when changing direction:
R Preparation phase
Ifth ere is enough time between thech anges
of direction, the multimedia sy stem prepares
yo ufo rth e upcoming change of direction. A
navigation announcement is issued depend‐
ing on the settings for driving recommenda‐
tions, e.g. "P repare toturn right". Select navigation announcements
for driving
re commendations (/ page 400).
The map appears in full-screen mode.
The status line sho ws:th e direction informa‐
tion or the name of thero ad which is tobe
turned into and the dis tancetothech ange of
direction.
R Announcement phase
The multimedia sy stem announces the
upcoming change of direction depending on
th e settings for driving recommendations,
e.g. byannouncing "In 200 m at the end of
th est re et turn right into Station Road".
The display is split into two parts. The map is
displa yed on the lef t;on theright, there is a
de tailed image of the junction or a 3D image
of the upcoming change of direction.
R Chan ge-of-direction phase
The multimedia sy stem announces the immi‐
nent change of direction depending on the
settings for driving recommendations, e.g. by
announcing "Now turn right".
The display is split into two parts. The
change of direction take s place when the
dis tance tomanoeuvre point 4is shown
with 0 m and the symbol forve hicle position
3 has reached manoeuv repoint 4.
When thech ange of direction is comple te,
th e map appears in full-screen mode.
% Changes of direction are also shown in the
Instrument Displa y.
Lane recommendations overview
This display appears for multi-lane roads.
The multimedia sy stem can show lane recom‐
mendations if the digital map conta insthere le‐
va nt da ta. MBUX multimedia sy
stem 407
Page 433 of 757
Dashcam
Note
s onthe dashcam
* NO
TEBefore using the dashcam Before using any or all functions of
the Dash‐
cam, please read this Disclaimer carefull y.If
yo u do not accept, agree toor under stand
th is Disclaimer, please do not use the Dash‐
cam. By using the Dashcam, you are deemed
to have accep ted and agreed tothe conte nts
of this Disclaimer.
As manufacturer of theve hicle, weprov ide
yo u with the device and associated software
sy stem of the Dashcam toprov ide you with
th e functionalities that we consider you may
wish tohave while using the Dashcam. We
are unable topredict or verify whe ther any
image(s) or geographic information captured
or recorded du ring your use of the Dashcam
is legitimate. As such, weare unable totake
re sponsibility for any adverse consequences
th at may arise from the actual image(s) or
ge ographic information captured or recorded
du ring use of the Dashcam. Wa
rning: please comply with all applicable
la ws and regulations when you use the Dash‐
cam. Forex ample, please do not capture or
re cord ima ge(s) or geographic information
which may be considered as state sec ret
sensitive information (e.g. military areas). In
case of any violations of there leva nt la ws
and regulations, the actual user will be liable
fo rth e cor responding responsibilities and we
will not take responsibility for any misuse of
th e Dashcam. #
Obser vethe count ry-specific regula‐
tions. The dashcam is
available in the navigation sys‐
te m in combination with the augmented reality
function.
Selecting a USB device for a video recording
with the dashcam
Re quirements:
R Atleast one USB device is connec ted with
th e multimedia sy stem (/ page 488). Multimedia sy
stem:
4 © 5
Mercedes me & Apps
5 Dashcam #
Select the USB device.
St arting/ stopping video recording with the
da shcam
Re quirements:
R A USB device is connec ted with the multime‐
dia sy stem (/ page 488).
R The ignition is switched on.
Multimedia sy stem:
4 © 5
Mercedes me & Apps
5 Dashcam #
If se veral USB devices are connec ted with
th e multimedia sy stem, select the USB
device (/ page 430). #
Select theIndividual recording orLoop
recording recording mode.
If Individual recording is selected andthe
memory is full there cording stops. An indi‐
vidual recording is au tomatical lyprotected
against being overwritten. 430
MBUX multimedia sy stem
Page 434 of 757
If
Loop recording has been selected, se veral
short video files are recorded. When the
memory limit is reached, the oldest video file
is dele ted and recording is continued au to‐
matical ly. #
Tostar t:select Start recording.
The length of there cording is shown. The
Please do not remove the storage medium.
message appea rs. The video file is stored on
th e USB device. #
Toend: select End recording .
A report may appear in thefo llowing cases:
R Forth eIndividual recording recording mode:
th e memory is full or there are only a few
minutes recording time available. The video
re cording stops or will be stopped immi‐
nently.
Chan gethe USB device or dele tea video file.
R If a video recording has star ted and a
national border is de tected, theNational bor-
der crossed. Please observe the countryspe-
cific regulations regarding video recording.
message appears. This function is not
available in all countries.
R The camera is not functional, theCamera
unavailable message appears.
Ha ve the camera checked in a Mercedes-
Benz service centre.
Deleting a dashcam video recording
Requ irements:
R A USB device with video recordings is con‐
nected wi th the multimedia sy stem
(/ page 488).
Multimedia sy stem:
4 © 5
Mercedes me & Apps
5 Dashcam #
Select thep symbol.
The RECORDINGS menu appears. #
Select Vfor a video file. #
Select Delete. #
Select Yes. #
Todel ete all video files: select 0062. #
Select Delete all entries. Configuring dashcam settings
Re
quirements:
R A USB device is connec ted with the multime‐
dia sy stem (/ page 488).
Multimedia sy stem:
4 © 5
Mercedes me & Apps
5 Dashcam #
Select Z. #
Toshow messages af ter passing a
national bo rder: swit chon National border
alert.
The display button is activated.
A message appears in thefo llowing situa‐
tions:
R A video is being recorded.
R The vehicle has passed a national border.
% This function is not available in all countries. #
Tostart automatic video recording: select
Automatic video recording . MBUX multimedia sy
stem 431
Page 438 of 757
R
you mo vefrom one transmission/reception
st ation toano ther and no communication
ch annels are free
R the SIM card used is not compatible with the
network available
R a mobile phone with "Twincard" is logged into
th e network with the second SIM card at the
same time
The multimedia sy stem supports calls in HD
Vo ice ®
for impr oved speech qualit y.Arequ ire‐
ment forth is is that the mobile phone and the
mobile phone network pr ovider of the person
yo u are calling suppo rtHD Voice ®
.
Depending on thequ ality of the connection, the
vo ice quality may fluctuate.
Connecting a mobile phone
Requ irements:
R Blue tooth ®
is activated on the mobile phone
(see the manufacturer's operating instruc‐
tions).
R Blue tooth ®
is activated on the multimedia
sy stem (/ page373). Mul
timedia sy stem:
4 © 5
Phone
Sear ching for a mobile phone #
Select í. #
Select Connect new device .
Connecting a mobile phone (authorisation
using Secu reSimple Pairing) #
Select a mobile phone. #
A code is displa yed in the multimedia sy stem
and on the mobile phone. #
Ifth e codes match: confirm the code on
th e mobile phone.
% For older mobile phone models, enter a one
to sixteen-digit number code on the mobile
phone and on the multimedia sy stem for
authorisation.
% Upto15 mobile phones can be auth orised
on the multimedia sy stem.
Auth orised mobile phones are reconnected
au tomatical ly. %
The connected mobile phone can also be
used as Blue tooth®
audio equipment
(/ page 488).
Connecting a second mobile phone (two
phone mode)
Requ irements:
R Atleast one mobile phone is already connec‐
te dto the multimedia sy stem via Blue tooth®
.
Multimedia sy stem:
4 © 5
Phone #
Select í. #
Select Connect new device. #
Select the mobile phone. #
Select Device name 1 + Device name 2 .
The selected mobile phone is connected to
th e multimedia sy stem. MBUX multimedia sy
stem 435