2020 MERCEDES-BENZ GLA tow
[x] Cancel search: towPage 272 of 346
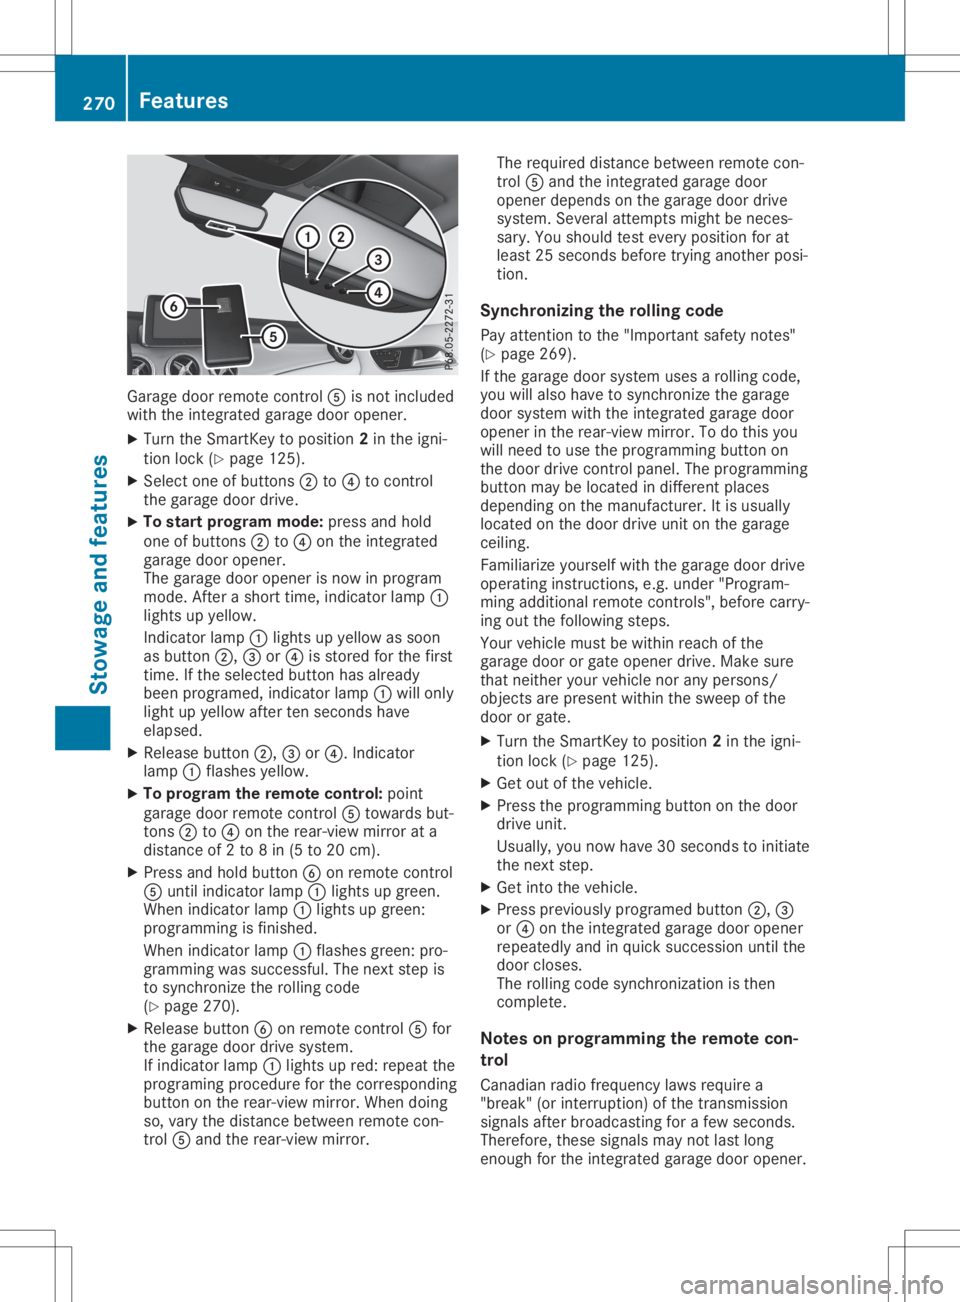
Garage
doorremotecon trol 0083 isno tinc luded
with theint egr atedgarag edoor opener.
X Turn theSm artKey toposit ion2in theign i-
tio nloc k(Y page 125).
X Sel ect oneof butt ons0044 to0085 tocon trol
th egarag edoor drive.
X To star tpr ogr am mod e:pres sand hold
on eof butt ons0044 to0085 ontheint egr ated
garag edoor opener.
The garag edoor openerisno win pro gram
mode .Af tera shor ttim e,ind icat orlamp 0043
light sup yellow.
In dicat orlamp 0043light sup yellow assoon
as butt on0044, 0087or0085 isstore dfor thefir st
tim e.Ifth eselec tedbutt onhas alread y
been program ed,indicat orlamp 0043will only
light upyellow aftertensec onds have
elapse d.
X Release button0044, 0087or0085. Indicat or
lamp 0043flas hes yellow.
X To progr am therem otecont rol:poin t
garag edoor remotecon trol 0083 towards but-
to ns 0044 to0085 ontherear -view mirror ata
dist anceof 2to 8in (5 to 20 cm).
X Pre ssand hold button0084 onrem otecon trol
0083 untilind icat orlamp 0043light sup gre en.
When indicat orlamp 0043light sup gre en:
pro gram mingis fin ishe d.
When indicat orlamp 0043flas hes green: pro-
gram mingwas successful. Thenextst ep is
to syn chron ize theroll ing cod e
(Y page 270).
X Release button0084 onrem otecon trol 0083 for
th egarag edoor drivesyst em.
If ind icat orlamp 0043light sup red: repeatthe
pro gram ingproced ure forthecor respon ding
butt onon therear -view mirror.When doing
so, varyth edist ancebet ween remotecon -
tr ol 0083 and therear -view mirror. The
requi reddistancebet ween remotecon -
tr ol 0083 and theint egr atedgarag edoor
open erdepen dson thegarag edoor drive
syst em. Several attempt smigh tbe nec es-
sary. Youshoul dte st ever yposit ionforat
least 25sec onds befo retrying another posi-
tio n.
Synch ronizin gth eroll ing code
Pay attent ion tothe"Imp ortant safe tyno tes"
(Y page 269).
If th egarag edoor systemuses aroll ing cod e,
you willalso have tosyn chron ize thegarag e
door systemwith theint egr atedgarag edoor
open erintherear -view mirror.To do this you
will needto use thepro gram mingbutt onon
th edoor drivecon trol pane l.The program ming
butt onmay belocate din diff eren tplace s
depen dingon theman ufacturer. Itis usually
loc ate don thedoor driveunit onthegarag e
cei ling .
Fam iliariz eyours elfwith thegarag edoor drive
oper atingins truct ions,e.g .unde r"Pro gram -
min gaddit ionalrem otecon trols", beforecar ry-
ing out thefoll owin gst eps.
Your vehicle must bewith inreac hof the
garag edoor orgat eopen erdriv e.Mak esure
th at nei ther your vehicle norany pers ons/
obj ect sare pres entwith inthesweep ofthe
door orgat e.
X Turn theSm artKey toposit ion2in theign i-
tio nloc k(Y page 125).
X Get outoftheveh icle.
X Pre ssthepro gram mingbutt ononthedoor
driv eunit .
Usually, younowhave 30sec onds toinit iate
th enex tst ep.
X Get intoth eveh icle.
X Pre ssprev iously program edbutt on0044, 0087
or 0085 ontheint egr atedgarag edoor opener
repe atedly and inquick succession untilth e
door closes.
The rolling cod esyn chron izat ion isthen
com plete.
Not eson progr ammin gth erem otecon-
tr ol
Canadi anradio frequen cylaws requirea
"break "(or interr upti on)of thetrans miss ion
sign alsafterbro adcas tingfor afew seconds.
Ther efore, these signalsmay notlast long
eno ugh fortheint egr atedgarag edoor opener. 270
Feat
uresSt owage andfeatures
Page 273 of 346
The
signal isnot detect edduring program-
ming. Comparable withCanadian law,some
U.S. garage dooropeners alsofeature a
"break".
Proceed asfollows:
R ifyou liveinCanada
R ifyou have difficulties programming the
garage dooropener (regardless ofwhere
you live) asyou follow theprogramming
steps.
X Press andhold oneofbutton s0044 to0085 on
the integr atedgarage dooropener.
Aft erashort time,indicator lamp0043lights
up yellow.
X Release thebutton .
Indicat orlamp 0043flashes yellow.
X Press button 0084ofgarage doorremote con-
trol 0083for two seconds, thenrelease itfor
two seconds.
X Press button 0084again fortwo seconds.
X Repeat thissequence onbutton 0084of
remote control0083 until indicator lamp0043
lights upgreen.
When indicator lamp0043lights upgreen:
programming isfinished.
When indicator lamp0043flashes green:pro-
gramming wassuccessful. Thenext step is
to synchron izethe rolling code.
X Release button0084ofremote control0083 of
the garage doordrive.
If indicator lamp0043lights upred: repeat the
programming processforthe correspon ding
button onthe rear-view mirror.Whendoing
so, vary thedistance between remotecon-
trol 0083and therear-view mirror.
The required distance between remotecon-
trol 0083and theintegr atedgarage door
opener depends onthe garage doordrive
system. Severalattemptsmight beneces-
sary. Youshould testevery position forat
least 25seconds beforetryinganother posi-
tion.
Problems whenprogramming
If you areexperienc ingproblems programming
the integr atedgarage dooropener onthe rear-
view mirror, takenoteof the following instruc-
tions:
R Check thetrans mitterfrequency usedby
garage doordrive remote control0083 and
whether itis supported. Thetrans mitterfre- quency
canusuall ybe found onthe back of
remote control0083 for the garage doordrive.
The integr atedgarage dooropener iscom-
patible withdevices thathave units which
operate inthe frequency rangeof280 to
433 MHz.
R Replace thebatteries ingarage doorremote
cont rol0083. This increases thelikelihood that
garage doorremote control0083 will trans mit
a stron gand precise signaltothe integr ated
garage dooropener.
R When programming, holdremote control0083
at varying distances andangles frombut-
ton s0044 to0085 which youareprogramming.
Try various anglesatadistance between
2and 8inches (5to20cm) oratthe same
angle butatvarying distances .
R Ifanother remotecontrol0083 isavailab lefor
the same garage doordrive, repeat the
same programming stepswiththisremote
cont rol0083. Before performin gthese steps,
make surethatnew batteries havebeen
installed ingarage doordrive remote control
0083.
R Note thatsome remote controlsonly trans -
mit foralimited amount oftime (theindica-
tor lamp onthe remote controlgoes out).
Press button 0084onremote control0083 again
before transmission ends.
R Align theanten nacable ofthe garage door
opener unit.Thiscanimprove signalrecep-
tion/ transmission.
Opening/clo singthegara gedoor Aft
erithas been programmed, theintegr ated
garage dooropener performs thefunct ionof
the garage doorsystem remote control.Please
also read theoperating instructions forthe
garage doorsystem.
X Turn theSmart Keytoposition 2in the igni-
tion lock (Ypage 125).
X Press button 0044,0087or0085 which youhave
programmed tooperate thegarage door.
Garage doorsystem withafixed code: indi-
cator lamp0043lights upgreen.
Garage doorsystem witharolling code:indi-
cator lamp0043flashes green.
The trans mitterwill trans mitasignal aslong
as the button ispressed. Thetrans mission Featur
es
271Stowage andfeatu res Z
Page 274 of 346
is
halted afteramaxim umoften seco nds
and indic atorlamp 0043light sup yellow.
X Press button0044, 0087or0085 again ifnec es-
sary.
Clear ingthemem ory Make
surethatyouclear thememo ryof the
int egrat edgarage dooropenerbefor esellin g
the vehic le.
X Turn theSmar tKey toposit ion2in the igni-
tion lock (Ypage 125).
X Press andhold buttons 0044and 0085.
The indic atorlamp initially lightsup yellow
and thengreen .
X Release buttons 0044and 0085.
The memo ryof the integrat edgarage door
open erinthe rear- view mirroriscleare d. Comp
ass
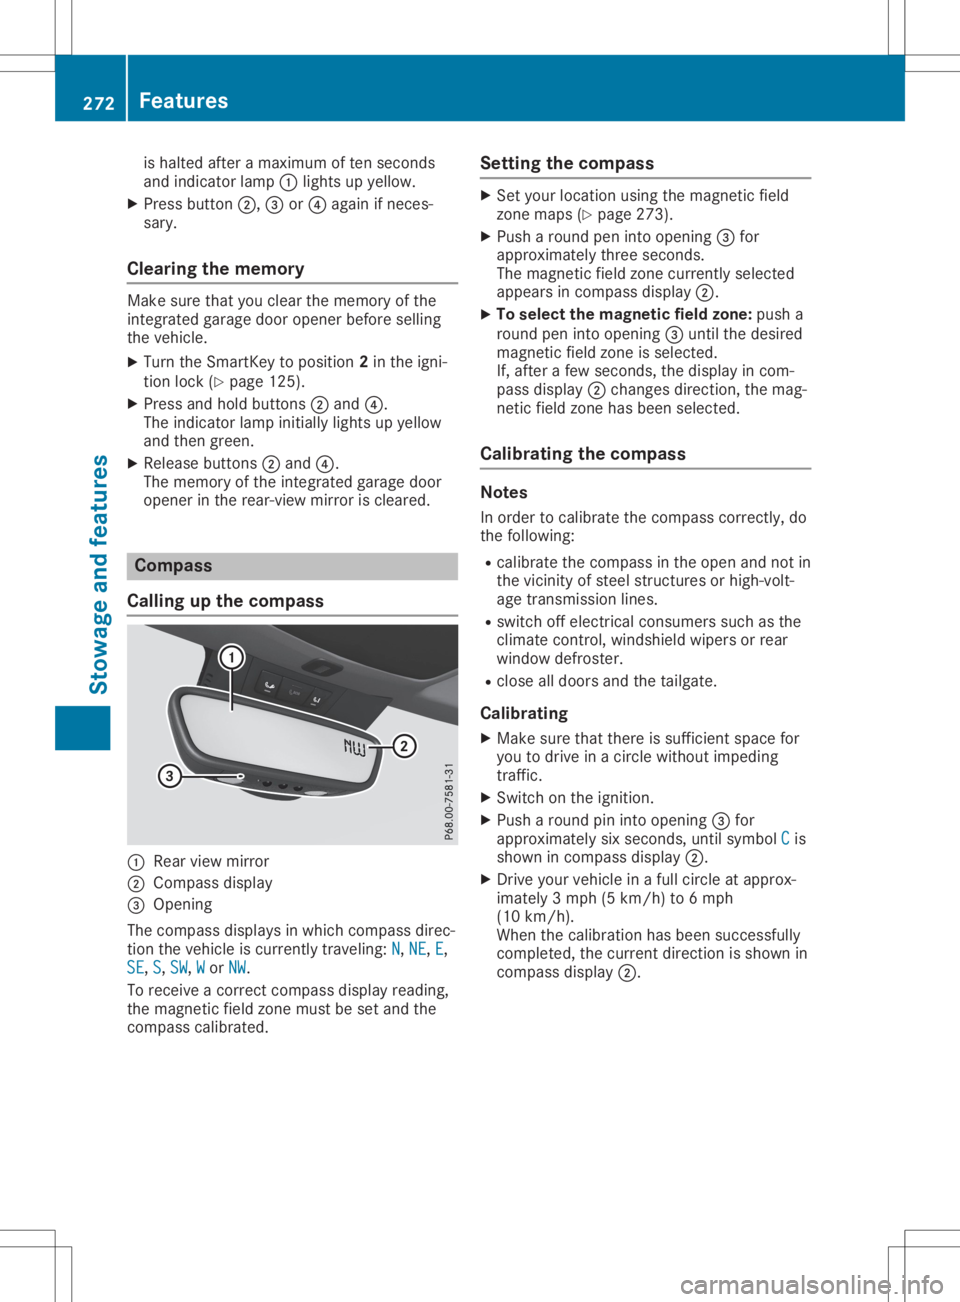
Calling upthecomp ass 0043
Rear viewmirror
0044 Compass display
0087 Open ing
The com pass displays inwhich compass direc-
tion thevehic leiscurr entlytravelin g:N N,
NE NE,
E E,
SE SE,
S S,
SW SW,
W W
or NW NW.
To rec eive acor rectcom pass display reading,
the magn eticfield zonemust beset and the
com pass calibrat ed. Sett
ingthecomp ass X
Set your locationusing themagn eticfield
zon emaps (Ypage 273).
X Push aroun dpen intoopen ing0087for
approx imatelythr ee seco nds.
The magn eticfield zonecurr entlyselec ted
appears incom pass display 0044.
X To select thema gnetic fieldzone: pusha
roun dpen intoopen ing0087untilthe desire d
magn eticfield zoneis selec ted.
If, aft erafew seco nds,the display incom -
pass display 0044chan gesdirec tion,the mag-
net icfield zonehas been selected.
Calibr ating thecomp ass Not
es
In order tocalibrat ethe com pass correctly, do
the followin g:
R calibrat ethe com pass inthe open andnotin
the vicin ityofste elstr uct ures orhigh- volt-
age transm ission lines.
R switc hoff elect ricalconsumer ssuch asthe
climat econ trol, windsh ieldwipers orrear
window defroster.
R clos eall doors andthetailgat e.
Calibr ating
X Make surethatthereissuffic ientspace for
you todrive inacirc lewitho utimpedin g
tr affic .
X Swit chon the ignit ion.
X Push aroun dpin intoopen ing0087for
approx imatelysix seco nds,unt ilsymbol C C
is
shown incom pass display 0044.
X Dr ive your vehic lein afull circ leat approx -
imate ly3mph (5km /h) to6mph
(10 km/h).
When thecalibrat ionhas been successfully
com plete d,the curr entdirec tionisshown in
com pass display 0044. 272
Featu
resStowage andfeatures
Page 275 of 346
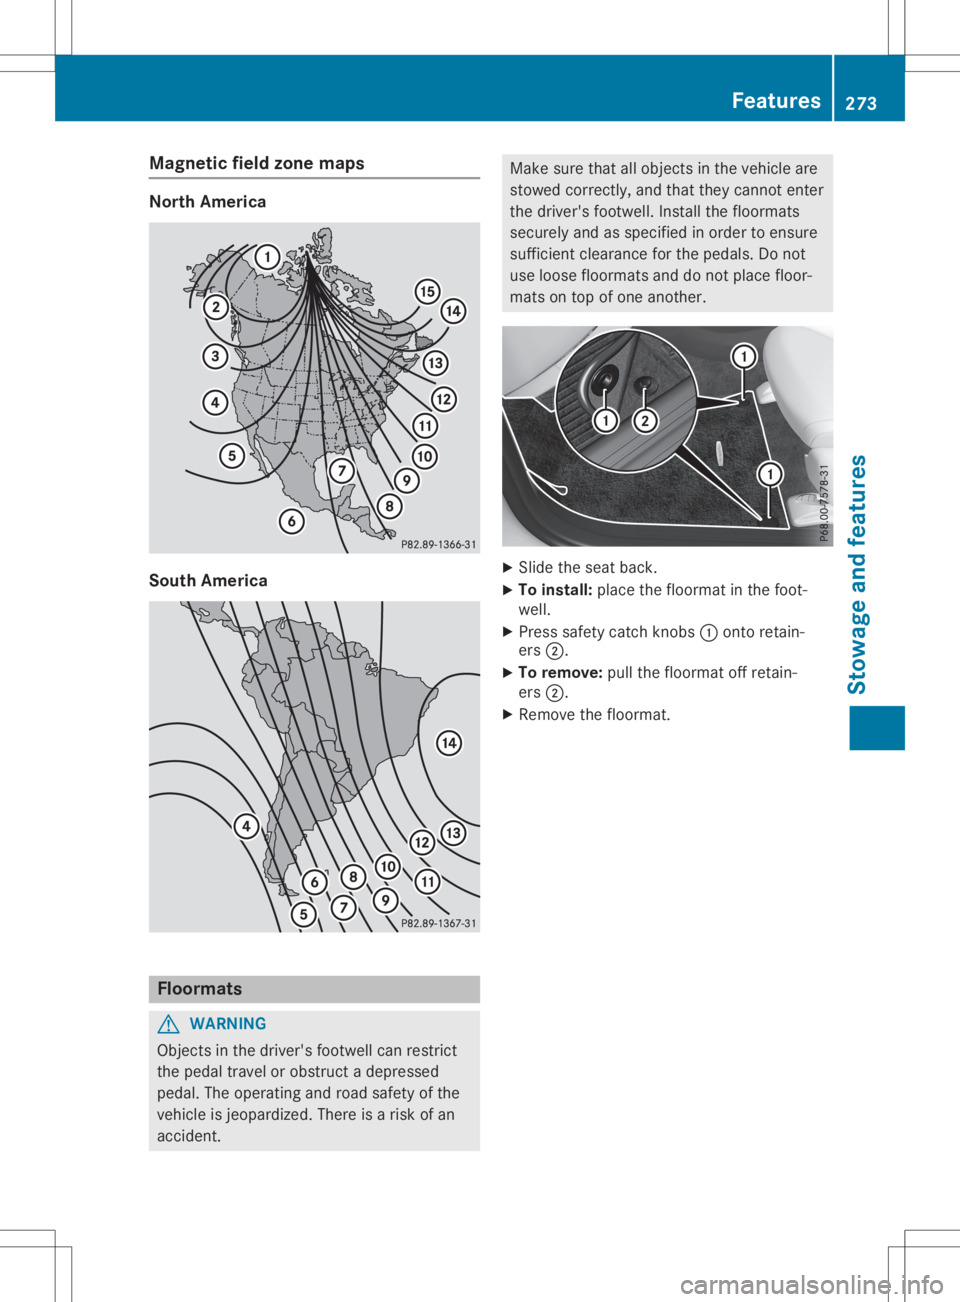
Magne
ticfiel dzone maps North
Americ a South
Americ a Flo
ormats G
WARNING
Objects inthe drive r'sfootwel lcan restrict
the peda ltravel orobstru ctadepre ssed
peda l.The opera tingandroad safety ofthe
vehicl eis jeopa rdized .There isarisk ofan
accide nt. Make
surethatallobjects inthe vehicl eare
stowed correctly ,and that they cannot enter
the drive r'sfootwel l.Install thefloorma ts
secure lyand asspeci fiedinorder toensure
suffi cient clearance forthe peda ls.Do not
use loosefloorma tsand donot placefloor-
mats ontop ofone another. X
Slide theseat back.
X To instal l:pla cethe floorma tin the foot-
wel l.
X Press safety catchknobs 0043onto retain-
ers 0044.
X To remove :pul lthe floorma toff retain-
ers 0044.
X Remo vethe floorma t. Fe
atures
273Stowageand features Z
Page 278 of 346
G
WARNING
Functions relevant tosafety arerestricted or
no longer available if:
R the engine isnot running
R the brake system orthe pow ersteering is
malfu nctioning
R there isamalfu nction inthe pow ersup ply
or the vehicl e'selectrica lsystem
When yourvehicl eis towed awayor towed
started, youmay requireconside rablymore
effort tosteer andbrake. Thereisarisk of
an accide nt.
In such cases, useatow bar. Before being
towed awayor tow started, makesurethe
steering movesfreely. X
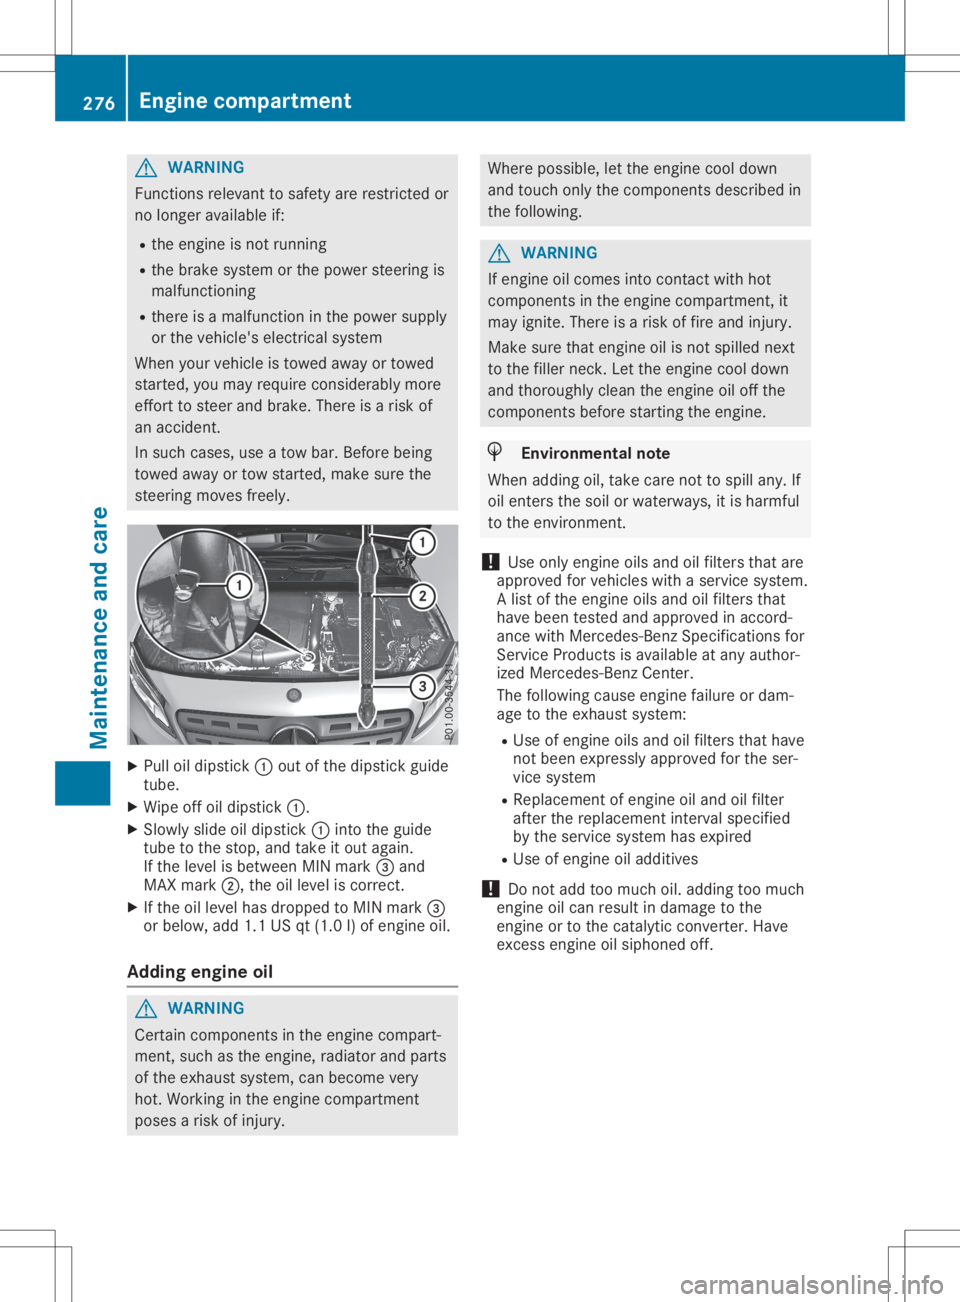
Pul loil dip stick 0043out ofthe dipstick guide
tube.
X Wip eoff oildip stick 0043.
X Slowl yslid eoil dip stick 0043into theguide
tube tothe stop, andtake itout again.
If the leve lis betwe enMIN mark 0087and
MAX mark 0044,theoilleve lis correct.
X Ifthe oilleve lhas dropp edtoMIN mark 0087
or bel ow, add 1.1USqt(1.0 l)of engine oil.
Adding engineoil G
WARNING
Certa incomponents inthe engine compart-
ment, suchasthe engine, radiator andparts
of the exhau stsystem, canbecome very
hot. Working inthe engine compartment
pose sa risk ofinjury . Where
possible,let the engine cooldown
and touch onlythecomponents describedin
the followi ng. G
WARNING
If engine oilcomes intocontact withhot
components inthe engine compartment, it
may ignite. Thereisarisk offire and injury .
Make surethatengine oilisnot spilled next
to the filler neck. Letthe engine cooldown
and thoroug hlyclea nthe engine oiloff the
components beforestarting theengine. H
Envi
ronmental note
When addingoil,take carenottospil lany. If
oil enters thesoil orwater ways,itis harmfu l
to the environment.
! Use
only engine oilsand oilfilters thatare
app roved forvehicl eswith aservice system.
A list ofthe engine oilsand oilfilters that
have been tested andapproved inaccord-
ance withMercede s-BenzSpecifications for
Service Productsisava ilable atany author-
ized Mercede s-BenzCenter.
The followi ngcaus eengine failure ordam-
age tothe exhau stsystem:
R Use ofengine oilsand oilfilters thathave
not been express lyapp roved forthe ser-
vice system
R Rep lace ment ofengine oiland oilfilter
after thereplacement intervalspecified
by the service system hasexpire d
R Use ofengine oiladd itives
! Do
not add toomuch oil.add ingtoo much
engine oilcan resu ltin dama getothe
engine ortothe catal yticconverter. Have
excess engineoilsiph oned off. 276
Eng
inecompar tmentMainten anceandcare
Page 282 of 346
Washing
thevehi cle and cleani ng
the paintwo rk
Automatic carwash G
WARNING
Braking efficiency isredu cedafter washing
the vehicl e.There isarisk ofan accid ent.
After thevehicl ehas been washed ,brake
carefu llywhi lepay ing attention tothe traffic
conditio nsuntil fullbraki ngpow eris
restored .
! When
Active Distance AssistDISTRONIC
or the HOLD function isactiva ted,thevehi-
cle brakes automatica llyincertain situa-
tions.
To avoi ddama getothe vehicl e,dea ctivate
Active Distance AssistDISTRONIC andthe
HOLD function inthe followi ngorsimi larsit-
ua tions:
R when towing thevehicl e
R in the carwash
! Never
cleanyou rvehicl ein aTou chless
Automati cCa rWas has these usespeci al
clea ning agents. These cleaning agents can
dama gethe paintwork orpla stic parts.
! Make
surethattheautomatic transmiss ion
is in transmiss ionposi tion 005Cwhe nwa shing
you rvehicl ein atow-throu ghcar wash. The
vehicl emay bedama gedinanother trans-
missi onposi tion.
! Make
surethat:
R the side windowsandsliding sunroo fare
close dcomple tely
R the blower isswi tched off
R the wind shieldwip erswi tch isin posi tion
0092
R the 360° camera orthe rear view camera
is dea ctivated
The vehicl emay otherw isebedama ged.
You cancleanthe vehicl eat an automatic car
wa sh from thevery start.
Prefera blyclea nthe vehicl eat automatic car
wa shes thatusetextile washing elements
witho utbrus hes. Thiswillpreve ntfine
scratches tothe paintwork ordecora tivefilms .
If the vehicl eis very dirty,pre-wa shitbefore
clea ning itin an automatic carwash. After
using anautomatic carwash, wipeoff
wa xfrom thewind shieldand thewiperbla des.
This willpreve ntsmea rsand redu cewip ing
noises causedbyresid ueon the wind shield.
i Vehi
cles with decora tivefilm: selecta
wa sh progra mwitho uthot waxat the auto-
matic carwash.
Washing byhand In
some countries ,wa shing byhand isonly
all owe dat speci allyequ ipped washing bays.
Obser vethe lega lrequ ireme ntsineach coun-
try.
X Do not use hotwater and donot wash the
vehicl ein dire ctsunli ght.
X Use asoft sponge toclea n.
X Use amild cleaning agent,such asacar
shamp ooapp roved byMerced es-Benz.
X Thoro ughlyhose downthe vehicl ewith a
gentle jetofwa ter.
X Do not pointthe water jetdire ctly towa rds
the airinlet orthe edge sof decora tivefoils.
X Use plenty ofwa ter and rinse outthe
sponge frequently.
X Rinse thevehicl ewith cleanwa ter and dry
thorou ghlywith achamoi s.
X Do not letthe clea ning agentdry onthe
pai ntwork orthe decora tivefoils.
Ca reful lyremove alldepo sitsofroad saltas
soon aspossi blewhe ndrivi nginwinter.
Pow erwashe rs G
WARNING
The water jetfrom acircul arjet nozzle (dirt
bla sters) cancaus einvisi bleexterior dam-
age tothe tires orchassi scomponents.
Comp onents damagedinthis waymay fail
unexpe ctedly.There isarisk ofan accid ent.
Do not use pow erwa shers withcircul arjet
nozzles toclea nthe vehicl e.Have damaged
tires orchassi scomponents replaced imme-
dia tely .
! Vehi
cles with decora tivefilm: parts ofyou r
vehicl eare covered withdecora tivefilm.
Mai ntain adista nceofat lea st27.5 in
(70 cm) betwe enthe film-cove redparts of 280
CareMainten
anceandcare
Page 287 of 346
when
cleaning.This could leadtoirre parable
damage tothedisplay.
X Bef ore clean ingthedisplay, makesure that
it is swit chedoff and hascooleddown .
X Clean thedisplay surface using acom mer-
cially available microfiber clothand
TFT /LCD display cleaner.
X Dr yth edisplay surface using adry micro-
fiber cloth.
Cleaning thepla stic trim G
WAR
NING
Care produc tsand clean ingagen tscon tain -
ing solv entscause surfaces inthecoc kpit to
beco meporo us.Asaresult ,plast icpart s
may comeloose intheeven tof air bag
deploym ent.Ther eis arisk ofinjury.
Do not use anycareproduc tsand clean ing
agen tsto clean thecoc kpit .
! Nev
eratt ach thefollo wing toplast icsurf a-
ces :
R stick ers
R film s
R perf ume oilcon tain eror similar
You could otherwise damage theplast ic.
! Do
not allow cosmet ics, insect repel lentor
suns creen tocom eint ocon tactwith the
plast ictrim. This main tainsth ehigh- quality
look ofthesurf aces .
X Wipe theplast ictrim with adamp, lint-free
clot h,e.g .a mic rofiber cloth.
X Heav ysoiling: usecareand clean ingprod-
uct srec omm endedand approv edby
Merc edes- Benz.
The surface may chan gecolo rtem porar ily.
Wait untilth esurf ace isdry again.
Cleaning thesteer ingwheel andgear
or selector lever X
Thor oughly wipewithadamp clothor use
leath ercar eagen tsthat have been recom-
men dedandapprov edbyMerc edes- Benz. Cleaning
genuinewoodandtrim ele-
ment s !
Do
not use solvent-bas edclean ingagen ts
such astar rem over ,wheel cleaners,pol-
ishes orwaxes .Ther eis oth erwise arisk of
damagin gth esurf ace.
! Do
not use chrome polish ontrim piec es.
The trim piec eshave achr ome lookbutare
most lymade ofanod izedalumin umand can
lose their shin eif chr ome polish isused.
Use adamp, lint-free clothins tead when
clean ingthetrim piec es.
If th echr ome- platedtrim piec esare very
dirt y,you can useachr ome polish .If you
are unsur eas towhet herthetrim piece sare
chr ome- platedor not ,con sult anautho rized
Merc edes- BenzCent er.
X Wipe thewooden trim and trim piec eswith
a damp, lint-free cloth,e.g .a mic rofiber
clot h.
X Heav ysoiling: usecareand clean ingprod-
uct srec omm endedand approv edby
Merc edes- Benz.
Cleaning theseat covers Gener
alnotes
! Do
not use amic rofiber clothto clean cov-
ers made outofreal leath er,artific ialleath er
or DINA MICA .If used often, these can dam-
age thecov er.
Not eth at regular careis essen tialtoens ure
th at theappearan ceand comfortof thecov ers
is ret ained overtime.
Genu ineleat her seat covers
! To
retain thenat ural appearan ceofthe
leath er,obser vethefollo wing clean ing
ins truct ions :
R Clean genuine leath ercov ers carefully
with adamp clothand then wipe thecov -
ers down withadry cloth.
R Make surethat theleath erdoes not
beco mesoak ed.Itmay otherwise become
rough andcrack ed.
R On lyuse leath ercar eagen tsthat have
been tested and approv edbyMerc edes-
Ben z.You canobtain these fromaquali-
fied spec ialist workshop.
Leat herisanat ural produc t. Car
e
285Maintena nceand care Z
Page 289 of 346
Where
willIfind...? Refle
ctive safety jacket
Removi ng/replac ingthe refle ctive
safety jacket The
refle ctive safetyjackets areloca tedin
front doorstowa gecompa rtments 0043.Reflec-
tive safetyjackets canalsobe stored inthe
rear door stowa gecompa rtments.
X To remove :pul lout thesafe tyjacket bag
containing therefle ctive safetyjacket.
X Open thesafe tyjacket bagand pullout the
refle ctive safetyjacket.
X To stow :fold therefle ctive safetyjacket,
roll itup and stow itin the safe tyjacket bag.
X Rep lace thesafe tyjacket baginto stowa ge
compa rtment 0043.
i Remo
veanew reflective safetyjacket
from itspacka gingmateri albefore sliding it
into thestowa gecompa rtment. Thepacka g-
ing materi almay otherw isecaus eit to slip
out ormake removi ngitdiffi cult.
Obser vethe lega lrequ ireme ntsineach coun-
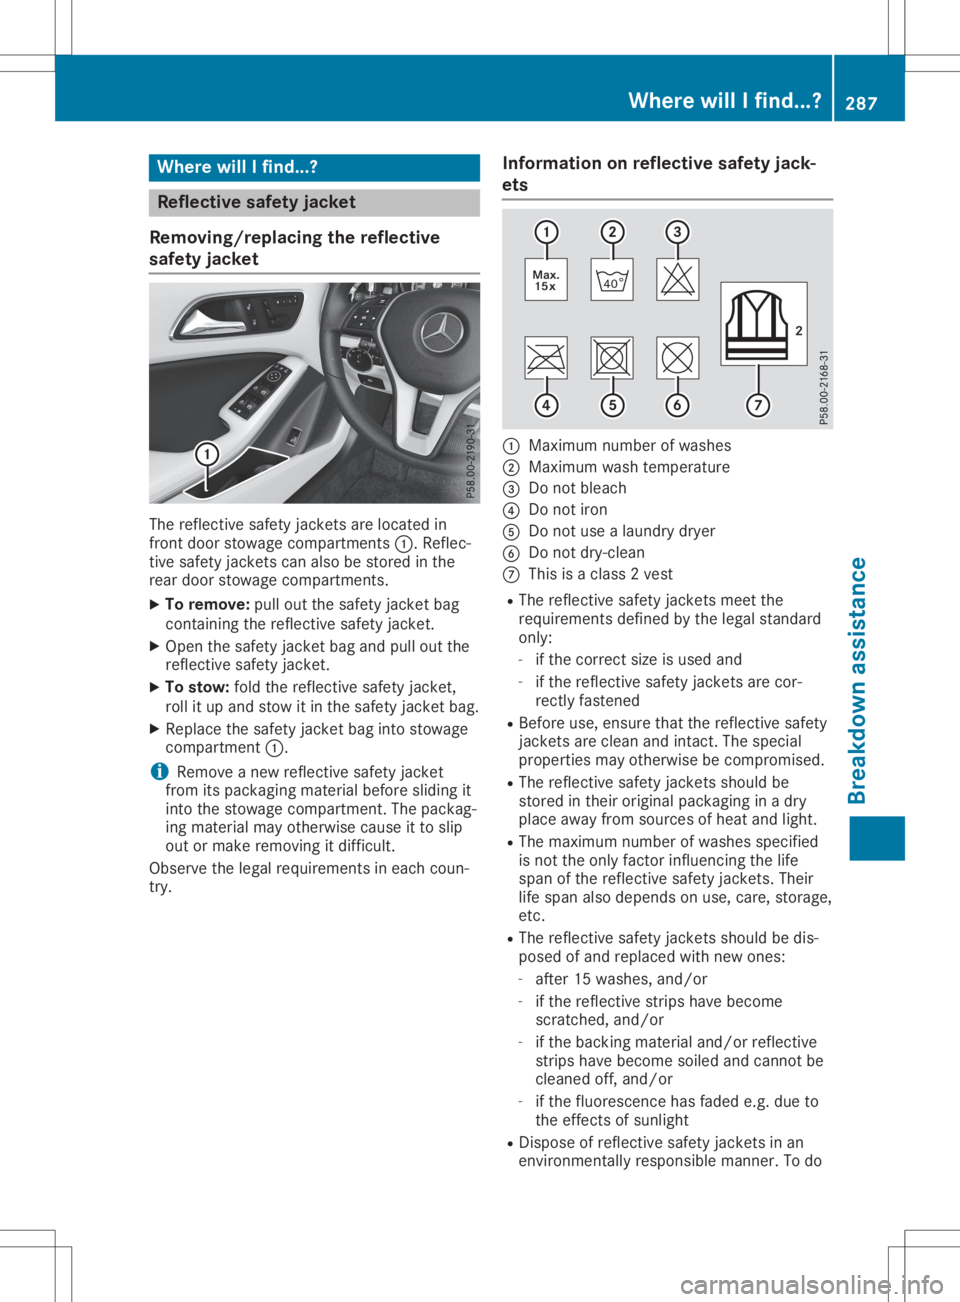
try. Info
rmation onrefle ctive safety jack-
ets 0043
Maxim umnumbe rof wa shes
0044 Maxim umwash tempera ture
0087 Donot bleach
0085 Donot iron
0083 Donot use alau ndry dryer
0084 Donot dry-cl ean
006B This isaclas s2 vest
R The refle ctive safetyjackets meetthe
requ ireme ntsdefined bythe lega lstanda rd
only :
- ifthe correct sizeisuse dand
- ifthe refle ctive safetyjackets arecor-
rectly fastened
R Before use,ensure thattherefle ctive safety
jackets areclea nand intact. Thespeci al
prope rtiesmayotherw isebecompromi sed.
R The refle ctive safetyjackets shouldbe
stored intheir originalpacka ginginadry
pla ceaway from sourcesofhea tand light.
R The maximu mnumbe rof wa shes speci fied
is not theonly factor influencing thelife
spa nof the refle ctive safetyjackets. Their
life spanals odepe ndsonuse ,care, storage ,
etc.
R The refle ctive safetyjackets shouldbe dis-
pose dof and replaced withnewones:
- after 15washes, and/or
- ifthe refle ctive strips havebecome
scratched ,and/or
- ifthe backing materialand/or reflective
strips havebecome soiledand cannot be
clea ned off,and/or
- ifthe fluorescence hasfade de.g. due to
the effects ofsunli ght
R Dispos eof refle ctive safetyjackets inan
environmenta llyrespo nsiblemanner. Todo Where
willIfind...?
287Breakdown assistance