2020 MERCEDES-BENZ GLA tow
[x] Cancel search: towPage 290 of 346
so,
cont actyour local waste disposa lcom-
pany. Vehicle
toolkit
General notes Vehicles
withaTIREFIT kit:the TIREFIT kitis
located inthe stowage wellunder thecargo
compartment floor.
Vehicles withatire-change toolkit:the tire-
change toolkitisin the stowage wellunder
the cargo compartment floor.
Apart fromcertain country-specific variations,
the vehicles arenot equip pedwith atire-
change toolkit.Some toolsforchanging a
wheel arespecific tothe vehicle. Formore
information onwhich tirechanging toolsare
required andapproved toperform awheel
change onyour vehicle, consultaqual ified
speciali stworkshop.
Tools required forchanging awheel may
include, forexample:
R Jack
R Wheel chock
R Lug wrench
R Alignment bolt
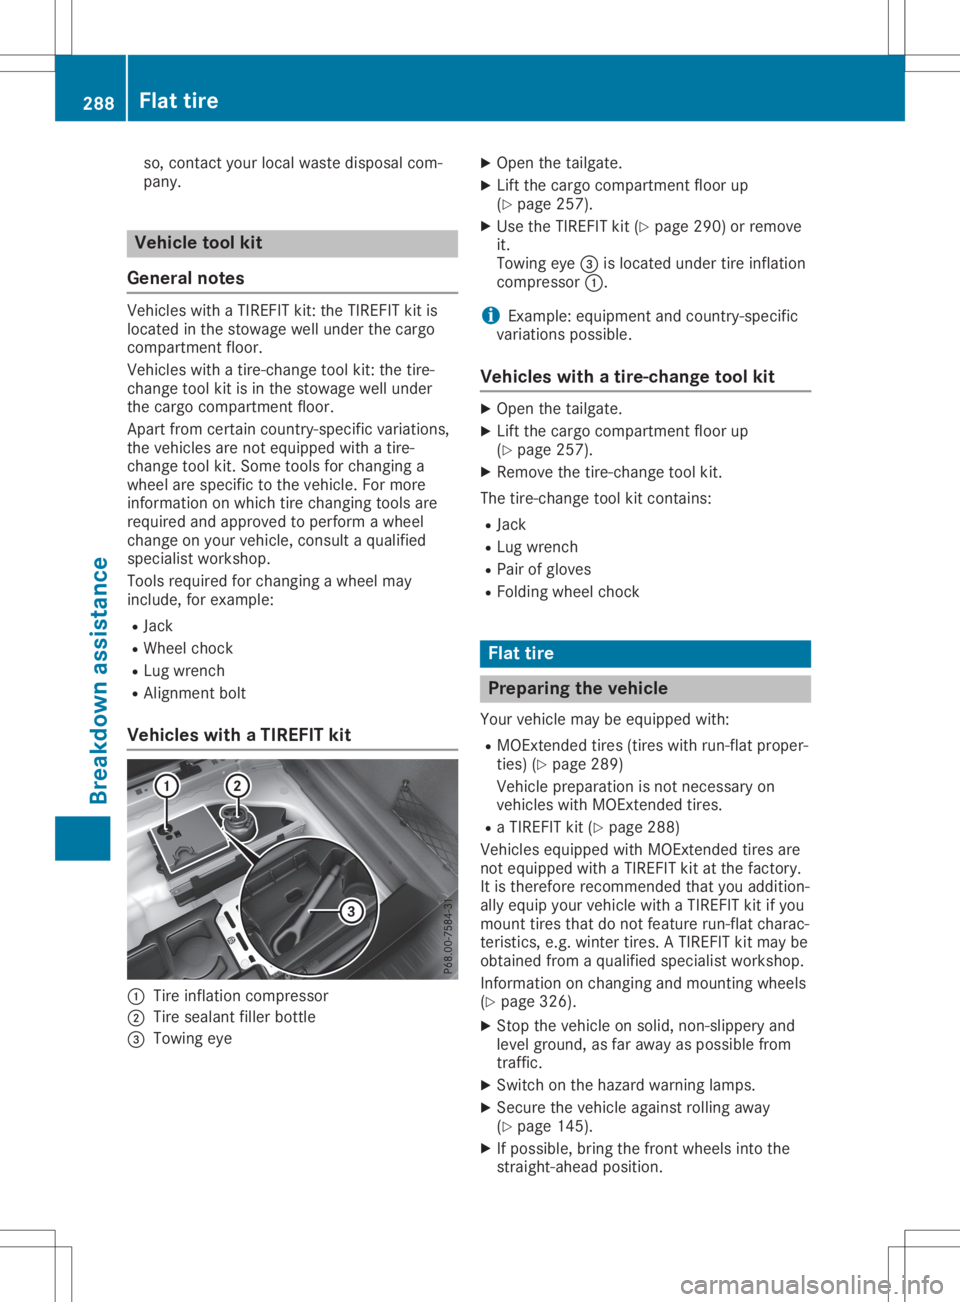
Vehicle swith aTIREFIT kit 0043
Tire inflation compressor
0044 Tire seala ntfiller bottle
0087 Towing eye X
Open thetailgate.
X Lift the cargo compartment floorup
(Y page 257).
X Use theTIREFIT kit(Ypage 290)orremove
it.
Towing eye0087islocated undertireinflation
compressor 0043.
i Example:
equipment andcountry-specific
variations possible.
Vehicle swith atire-change toolkit X
Open thetailgate.
X Lift the cargo compartment floorup
(Y page 257).
X Remove thetire-change toolkit.
The tire-change toolkitcont ains:
R Jack
R Lug wrench
R Pair ofgloves
R Folding wheelchock Flat
tire Prepar
ingthe vehicl e
Your vehicle maybeequip pedwith:
R MOExt ended tires(tires withrun-flat proper-
ties) (Ypage 289)
Vehicle preparation isnot necessary on
vehicles withMOExt ended tires.
R aTIREFIT kit(Ypage 288)
Vehicles equippedwith MOExt ended tiresare
not equip pedwith aTIREFIT kitatthe factory.
It is therefore recommended thatyouaddition-
ally equip yourvehicle withaTIREFIT kitifyou
mount tiresthatdonot feature run-flat charac-
teristics, e.g.winter tires.ATIREFIT kitmay be
obtained fromaqual ified speciali stworkshop.
Information onchanging andmounting wheels
(Y page 326).
X Stop thevehicle onsolid, non-slippery and
level ground, asfar awa yas possible from
traffic.
X Switch onthe hazard warning lamps.
X Secure thevehicle againstrolling away
(Y page 145).
X Ifpossible ,bring thefront wheels intothe
straight-ahead position.288
Flat
tireBreakdown assistance
Page 293 of 346
Using
theTIREFIT kit X
Do not remov eany foreign objectswhich
have penet rated thetire, e.g.screws or
nails.
X Remove thetire sealant bottle,the accom -
panying TIREFITstic ker and thetire inflat ion
compr essorfromthestowage wellunder-
neat hthe cargo compar tmentfloor
(Y page 288).
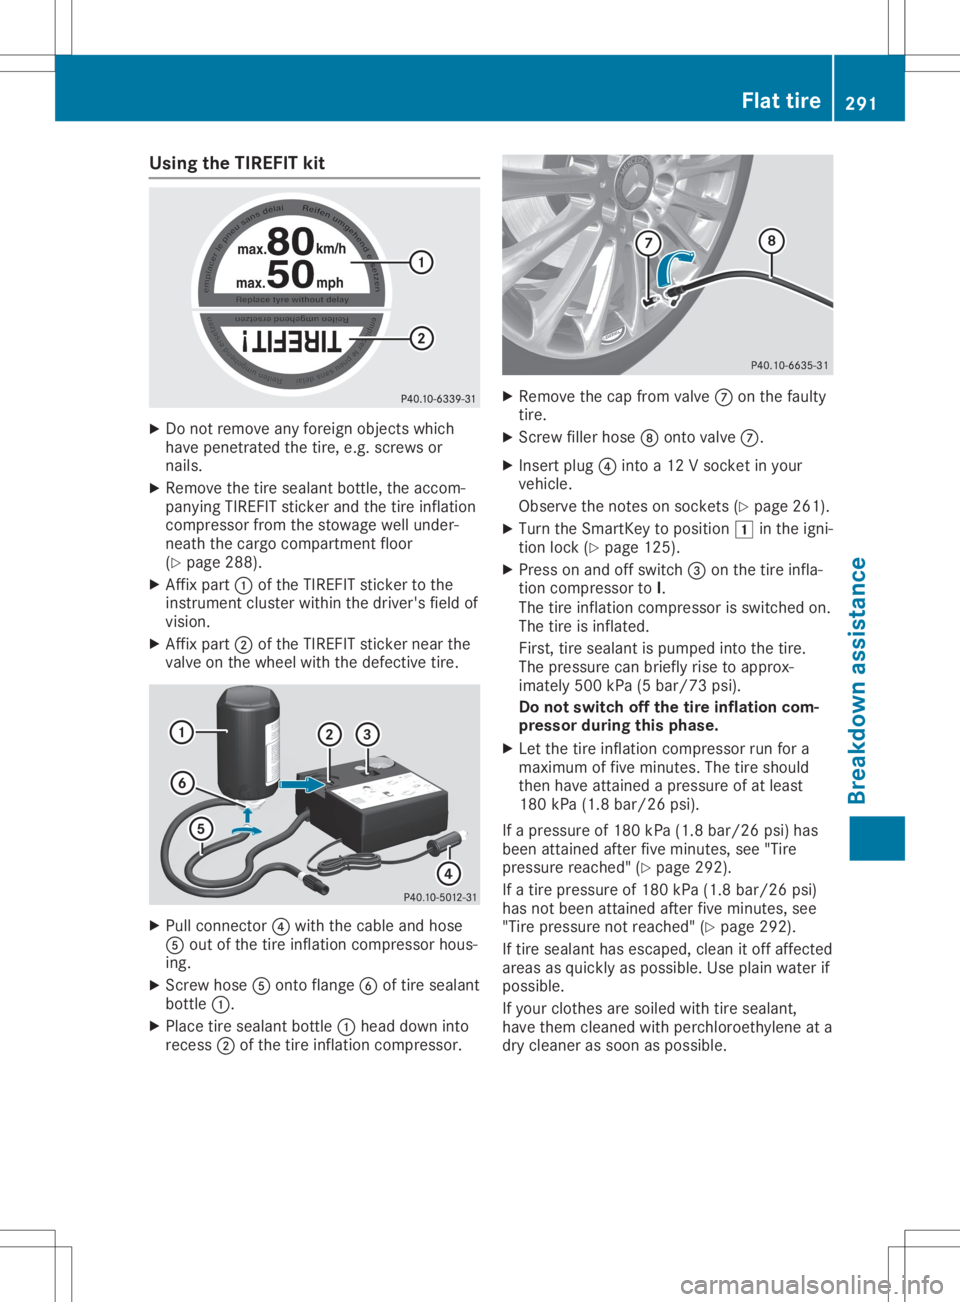
X Aff ixpart 0043ofthe TIREF ITstic ker tothe
inst rumen tclust erwithin thedriver' sfield of
vision .
X Aff ixpart 0044ofthe TIREF ITstic ker near the
valve onthe wheel withthedefect ivetire. X
Pull connector0085with thecable andhose
0083 out ofthe tire inflat ioncompr essorhous-
ing.
X Sc rew hose 0083ontoflange 0084oftire sealant
bott le0043.
X Place tiresealant bottle0043 head down into
reces s0044 ofthe tire inflat ioncompr essor. X
Remove thecap from valve 006Bonthe faulty
tire.
X Sc rew filler hose 006Contovalve 006B.
X Ins ert plug 0085intoa12 Vsock etinyour
vehicle.
Observ ethe noteson sock ets(Ypage 261).
X Turn theSmart Keytoposition 0047inthe igni-
tion lock (Ypage 125).
X Press onand offswitc h0087 onthe tire infla-
tion compr essortoI.
The tireinflat ioncompr essorisswitc hedon.
The tireisinflat ed.
First ,tire sealant ispumped intothe tire.
The pressure canbriefly risetoapprox-
imately 500kPa(5bar/7 3psi).
Do not switch offthe tireinflat ioncom-
pr essor during this phase.
X Let the tire inflat ioncompr essorrunfora
maximum offive minut es.The tireshould
then have attained apressure ofat least
180 kPa(1.8 bar/2 6psi).
If apressure of180 kPa(1.8 bar/26 psi)has
been attained afterfiveminut es,see "Tire
pressure reached" (Ypage 292).
If atire pressure of180 kPa(1.8 bar/26 psi)
has notbeen attained afterfiveminut es,see
"Tire pressure notreached" (Ypage 292).
If tire sealant hasescaped, cleanitoff affec ted
areas asquickly aspossible. Useplain water if
possible.
If your clothes aresoiled withtiresealant ,
have them cleaned withperch loroet hylene ata
dry cleaner assoon aspossible. Flat
tire
291Breakd ownassist ance Z
Page 294 of 346
Tire
pres sure notreac hed If
apre ssu reof180 kPa(1.8 bar/26 psi)ha s
not been atta inedaf ter fivemin utes:
X Swi tch offthe tire inflation comp ressor .
X Unsc rewthefillerhos efro mthe valve ofthe
fa ulty tire .
Note thattire sealant ma yesc apewh en you
uns crew thefillerhos e.
X US Aon ly:ver yslow lydri ve the vehiclefor -
wa rds orrev ers eap pro xim ately30 ft
(10 m).
X Pu mp upthe tire again.
After ama xim um offivemi nute sthe tire
pre ssu remu stbe atleas t180 kPa(1.8 bar/
26 psi). G
WA
RNING
If the required tire pressu reisnot reache d
af ter the speci fiedtim e,the tire istoo badly
da ma ged. The tiresealant cann otrep airthe
tire inthi sins tance .Dam aged tire sand a
tire pressu retha tis too low can signi ficantl y
im pairthe vehicle'sbra king anddrivin g
cha racteri stics. The reisaris kof acc ident.
Do not conti nuedrivin g.Co ntact aqu alifi ed
sp eci alistwo rksh op.
Tire pres sure reached G
WA
RNING
A tire temp orarilyse aled with tire sealant
im pairs the vehicle'sdri vin gcha racteri stics
and isnot suita ble for drivin gat highe r
sp ee ds.The reisaris kof an acc ident.
Ada ptyour drivin gsty leacc ordinglyand
dri ve car efully. Do not exce edthe maxim um
pe rmi ssible sp ee dfor atire sealed with tire
se alant.
US Aon ly:The maxim um permi ssible sp ee d
for atire sealed with tire sealant is50 mph
(80 km/h ).The upperpa rtof the TIREFIT
sti cker mustbe affix ed tothe instrument clus-
ter inthe driver 'sfie ldof vis ion. If
atire pressu reof180 kPa(1.8 bar/26 psi)
ha sbe en atta inedaf ter fivemi nute s:
X Swi tch offthe tire inflatio ncomp ressor .
X Unsc rewthefillerhos efro mthe valve ofthe
fa ulty tire .
Note thattire sealant mayes cap ewh en you
uns crew thefillerhos e.
X US Aon ly:Stow thetire sealant bottle and
the tire inflatio ncomp ressor .
X Pul law ayimme diately.
X Stop after drivin gfor appro xim atelyten
mi nute sand checkthe tire pressu rewith
the tire inflatio ncomp ressor .
The tirepressu remu stnow beatleas t
130 kPa(1.3 bar/19 psi). G
WA
RNING
If the required tire pressu reisnot reached
afte rdri ving forasho rtper iod,the tire istoo
ba dlyda mag ed.The tiresealant cannot
rep airthe tire inthis insta nce. Dama ged
tire sand atire pressu rethat istoo low can
sig nifi cantl yimp airthe vehi cle'sbra king and
dri ving characte ristics. Thereisaris kof
acci dent.
Do not continu edri ving .Co ntact aqu alifi ed
spe cialist wo rksho p.
i USA
only: Incase ssu ch asthe one men-
tione dab ove, contact anauthori zed
Merce des-Benz Center. Orcall
1-800-FOR -MERCedes(in the USA) or
1-800-38 7-0100(in Ca nad a).
X USA only: Corre ctthe tire pressu reifit is
stil lat leas t130 kPa(1.3 bar/19 psi).See
the Tire and Loading Infor mationplaca rdon
the driver' sside B-pi llar or the tire pressu re
tab lein the fuelfil lerfla pfor values.
X To incre ase thetire pres sure :sw itch on
the tire inflation comp ressor . 29
2 Fl
at tireBreakdo wnassis tan ce
Page 301 of 346
Tow
ingand tow-starti ng Impo
rtant safety notes G
WA
RNING
Fun ctio nsreleva ntto safety areres tric ted or
no longe rav ailabl e if:
R the engineisnot running
R the brakesystem orthe powe rstee ringis
ma lfunctio ning
R the reisama lfunctio nin the powe rsu pp ly
or the vehicle's electri calsystem
Wh enyour veh icleis tow edaway ortow ed
sta rted ,yo uma yreq uire cons idera blymor e
eff ort tostee rand brake. Thereisaris kof
an acc ident.
In such cas es, useatow bar.Befo rebeing
tow edaway ortow started ,ma kesure the
stee ringmov esfreely. G
WA
RNING
Yo ucan nolonge rstee rthe vehicleif the
stee ringwh eello ck hasbe en eng aged .
The reisaris kof an acc ident.
Alw ayssw itch offthe igniti onwhen tow ing
the vehiclewi th atow cableor atow bar. G
WA
RNING
Wh entow ingortow -sta rtingano therveh icle
and itsweight isgre atertha nthe permi ssi-
bl e gro sswe ight ofyour veh icle, the :
R the towingeyecou ldde tach itself
R the vehicle/tra iler comb inationcou ldrol l-
ove r.
The reisaris kof an acc ident.
Wh entow ingortow -sta rtingano therveh i-
cle ,its weight sho uld not begre atertha n
the permi ssible gro sswe ight ofyour veh icle.
Deta ils on the permi ssible gro ssveh iclewe ight
of your veh iclecan befou ndonthe vehicle
id enti ficati on plate (Ypage 334 ).
! Wh
enActiv eBra keAssi st,Activ eDis tance
Assi stDISTR ONICor the HOLD functio nis
acti vated ,the vehiclebra kes automa tically
in certa insitua tions. To
avoid da ma getothe vehicle, de acti vate
the sesystem sin the followi ng orsimil arsit-
ua tio ns:
R wh en tow ingthe vehicle
R in the carwash
! Ma
kesure tha tthe electri cpa rkin gbra ke
is rel eased .If the electri cpa rkin gbra keis
fa ulty, visitaqu alifi ed speci alistwo rksh op.
! Onl
ysec urethe tow ropeor tow barat the
tow ingeyes. Othe rwise, the vehiclecou ldbe
da ma ged.
! Do
not usethe towingeyes for reco very
pu rpo ses asthiscou ldda ma gethe vehicle.
If in do ubt,reco verthe vehiclewi th acra ne.
! Wh
entow ing,pu llaw ay slow lyand
smo othly.Ifthe tractiv epo we ris too high,
the vehicles cou ldbe dama ged.
! The
vehiclecan betow edama xim um of
30 miles(50km) .The towingspee dof
30 mph (50km/h) mustnot beexce eded.
If the vehicleha sto be tow edmor etha n
30 miles(50km) ,the frontaxl emu stbe
ra ised orthe entireveh iclera ised and trans-
po rted .
! Do
not tow with sling -typ eeq uipme nt.This
cou ldda ma gethe vehicle.
! Wh
entow ingaway veh icles with KEYL ESS-
GO ,us ethe key instea dof the Star t/Stop
bu tton. Theautoma tictransmi ssion may
othe rwise shi ftto positio n005D when you
op en the driver 'sor fro nt-pa ssenge rdo or,
wh ich cou ldda ma gethe transmi ssion.
! Veh
icles with automa tictransmi ssion mu st
not bestarted bytow -sta rting.Thi scou ld
othe rwise da ma gethe transmi ssion.
It is be tter tohave the vehicletra nsp orte d
tha nto have ittow edaway.
If the vehiclecan nolonge rbe driven becau se
of an acc ident orbre akd own,youha ve the fol-
lo wi ng optio ns:
R Tra nsp ortingthe vehicle.
As aru le,yo usho uld ha ve the vehicletra ns-
po rted .
R To wing the vehiclewi th atow ropeor tow
ba r.
Onl ytow thevehiclein exce ptiona lcas es. Tow
ingand tow-starti ng
299Break downass istanc e Z
Page 302 of 346
The
battery mustbeconn ected andcharged.
Otherwise, you:
R cann otturn theSmart Keytoposition 0048in
the ignition lock.
R cann otrelease theelectric parking brake.
R cann otshift thetrans mission toposition 005C.
The funct ionofthe electric parking brakeand
the parking lockisdependent onthe on-board
voltage.
If the on-board voltageislow orifthere isa
system malfunct ion:
R the electric parking brakemaynotbe
applied incert aincircumst ances,or
R itmay nolonger bepossible toshift the
trans mission toposition 005D
Switch offnon- essent ialconsumer s,e.g. the
radio.
Deact ivatetheautomatic lockingfeature
before thevehicle istowed (Ypage 199). You
could otherwise belocked outwhen pushing
or towing thevehicle. <002C0051005600570044004F004F004C0051004A001200550048005000520059
004C0051004A>
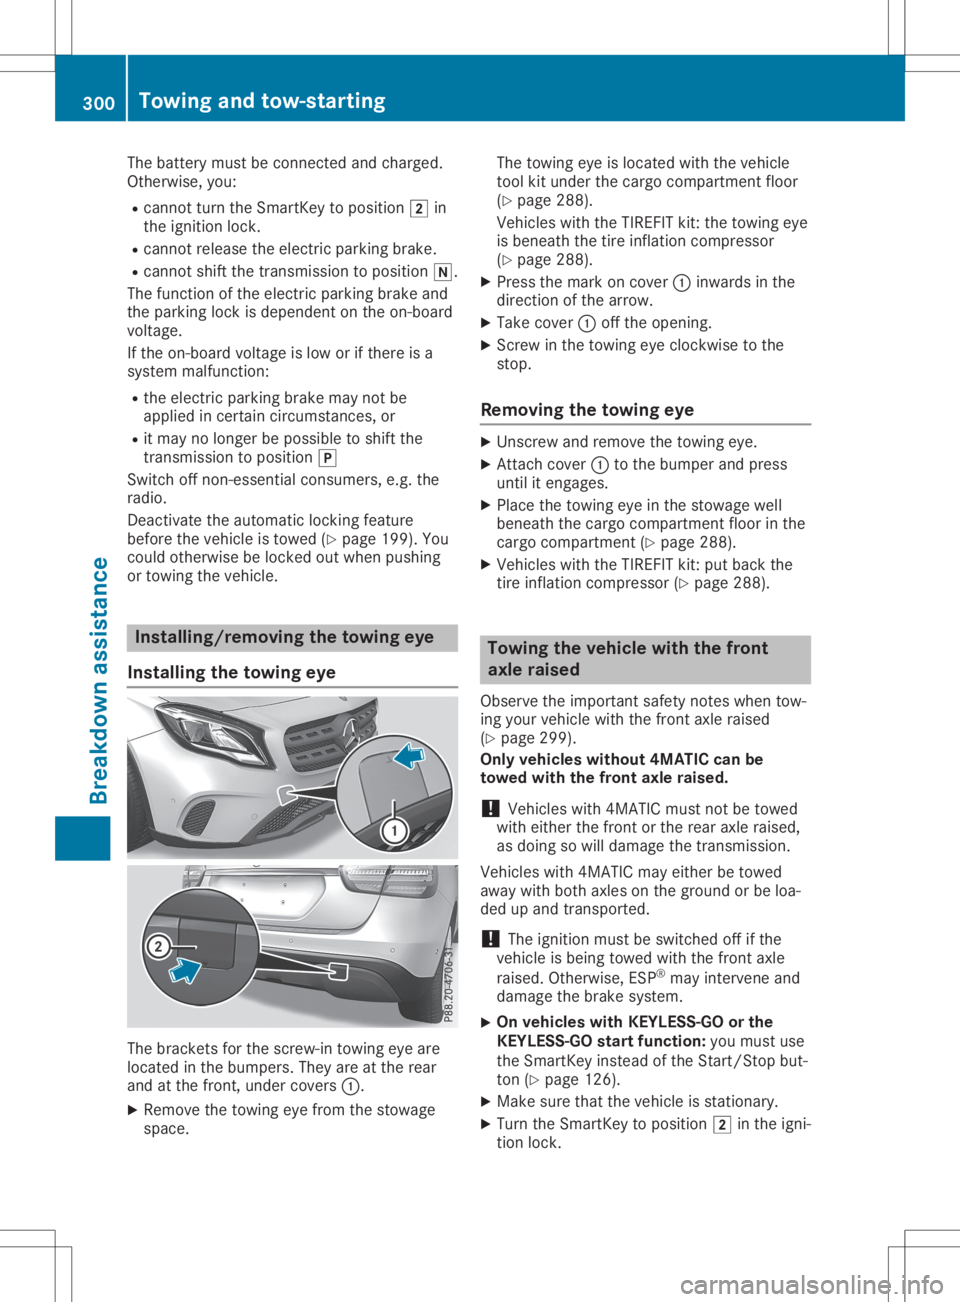
thetowing eye
Installing thetowing eye The
bracket sfor the screw-in towingeyeare
located inthe bumpers. Theyareatthe rear
and atthe front ,under covers 0043.
X Remove thetowing eyefrom thestowage
space. The
towing eyeislocated withthevehicle
tool kitunder thecargo compart mentfloor
(Y page 288).
Vehicles withtheTIREFIT kit:the towing eye
is beneath thetire inflation compressor
(Y page 288).
X Press themark oncover 0043inwards inthe
direction ofthe arrow.
X Take cover 0043offthe opening.
X Scr ew inthe towing eyeclock wisetothe
stop.
Removing thetowing eye X
Unsc rewand remove thetowing eye.
X Attach cover 0043tothe bumper andpress
until itengages.
X Place thetowing eyeinthe stowage well
beneath thecargo compart mentfloorinthe
cargo compart ment(Ypage 288).
X Vehicles withtheTIREFIT kit:put back the
tire inflation compressor (Ypage 288). Towing
thevehicle withthefront
axle raised
Observe theimportant safetynoteswhen tow-
ing your vehicle withthefront axleraised
(Y page 299).
Only vehicles without4MATICcanbe
towed withthefront axleraised.
! Vehicles
with4MATI Cmust notbetowed
with either thefront orthe rear axle raised,
as doing sowill damage thetrans mission.
Vehicles with4MATI Cmay either betowed
away withboth axles onthe ground orbe loa-
ded upand trans ported.
! The
ignition mustbeswitched offifthe
vehicle isbeing towed withthefront axle
raised. Otherwise, ESP®
may intervene and
damage thebrake system.
X On
vehicles withKEYL ESS-GO orthe
KEYL ESS-GO startfunction: youmust use
the Smart Keyinstead ofthe Start /Stopbut-
ton (Ypage 126).
X Make surethatthevehicle isstation ary.
X Turn theSmart Keytoposition 0048inthe igni-
tion lock. 300
Towing
andtow-sta rtingBr eakdown assistance
Page 303 of 346
X
When thevehicle isstation ary,depress the
brake pedalandkeep itdepressed.
X Shift theautomatic transmission toposition
005D.
X Release thebrake pedal.
X Release theelectr icparking brake.
X Switc hoff the automatic locking
(Y page 199).
X Switc hon the hazard warning lamps
(Y page 104).
X Turn theSmart Keyinthe ignition lockto
position 005Aand leave theSmart Keyinthe
ignition lock. Towing
avehicle withboth axles on
the ground
It is importan tthat youobserve thesafety
inst ruction swhen towing awayyourvehicle
(Y page 299).
X On
vehicles withKEYLE SS-GO orthe
KEYLE SS-GO startfunction: youmust use
the Smart Keyinstead ofthe Start/S topbut-
ton (Ypage 126).
The automatic transmission automatically
shifts toposition 005Dwhen youopen thedriv-
er's orfron t-passenger doororwhen you
remove theSmart Keyfrom theignition lock.In
order toensure thattheautomatic transmis-
sion stays inposition 005Cwhen towing away
the vehicle, youmust observe thefollowing
points :
X Make surethatthevehicle isstation ary.
X Turn theSmart Keytoposition 0048inthe igni-
tion lock.
X Depress andhold thebrake pedal.
X Shift theautomatic transmission toposition
005C.
X Leave theSmart Keyinposition 0048inthe
ignition lock.
X Release thebrake pedal.
X Release theelectr icparking brake.
X Switc hon the hazard warning lamps
(Y page 104).
i In
order tosignal achange ofdirect ion
when towing thevehicle withthehazard
warning lampsswitched on,use thecombi-
nation switch asusual. Inthis case, onlythe
indicator lampsforthe direct ionoftravel flash.
Afterresett ingthe combin ation
switch, thehazard warning lampstarts
flashing again. Perm
ittedtowing methods
Mercedes- Benzrecomm endstransportin gyour
vehicle inthe case ofabreakdown, ratherthan
towing itaway.
When towing away,useatowing ropeora
towing barwith both axles onthe ground. Do
not use anytow barsystems. Tr
anspor tingthevehicle
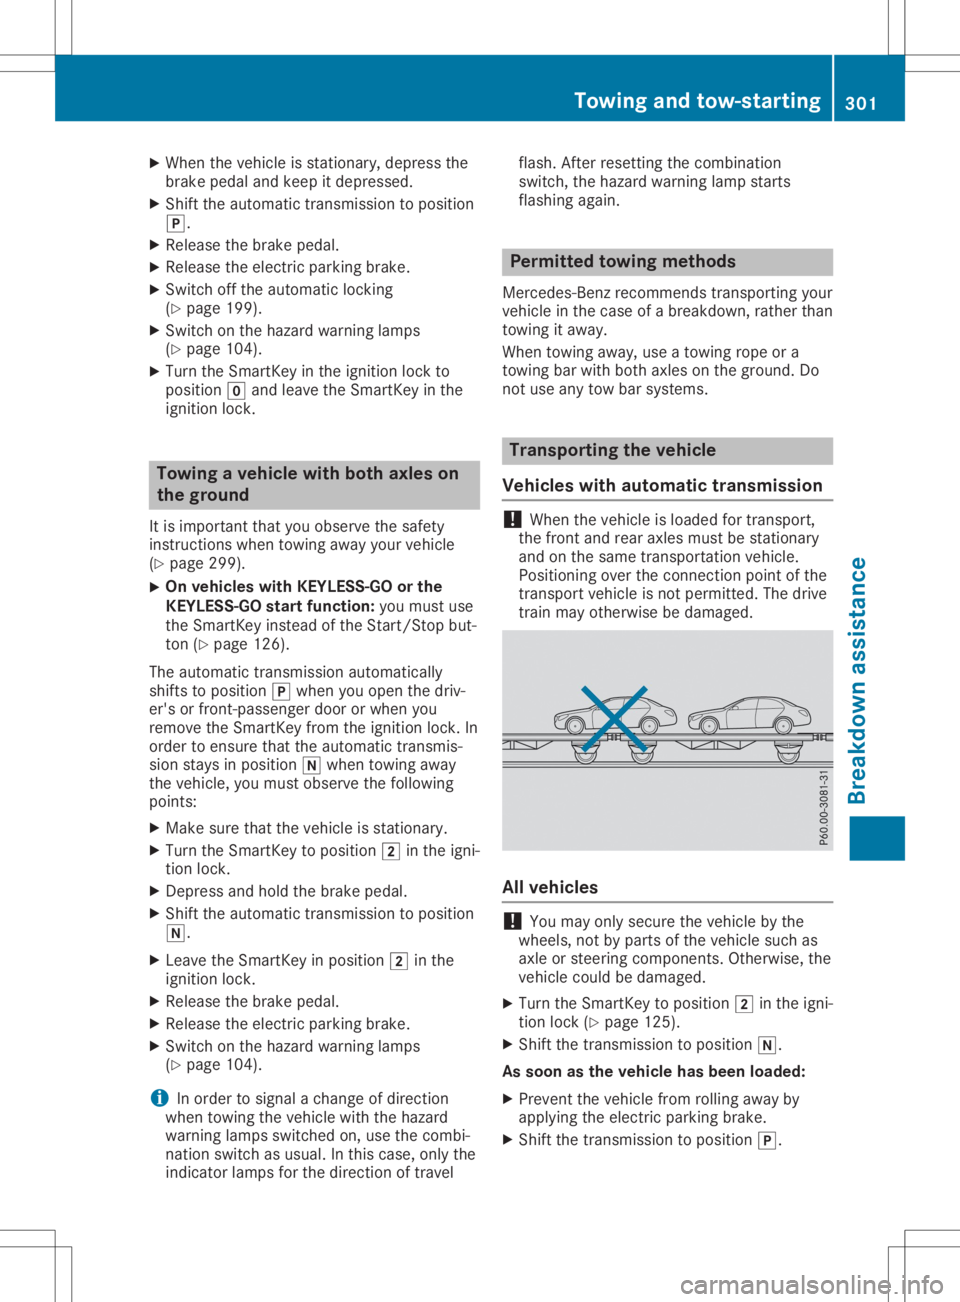
Vehicles withautomat ictransmission !
When
thevehicle isloaded fortran sport,
the fron tand rear axles mustbestation ary
and onthe same transportat ionvehicle.
Position ingover theconn ection pointofthe
tran sport vehicle isnot permitt ed.The drive
train mayotherwise bedamaged. All
vehicles !
You
may onlysecure thevehicle bythe
wheels, notbyparts ofthe vehicle suchas
axle orsteerin gcompon ents.Other wise, the
vehicle couldbedamaged.
X Turn theSmart Keytoposition 0048inthe igni-
tion lock (Ypage 125).
X Shift thetran smission toposition 005C.
As soon asthe vehicle hasbeen loaded:
X Preven tthe vehicle fromrolling awayby
applying theelectr icparking brake.
X Shift thetran smission toposition 005D. Towing
andtow-sta rting
301Breakdown assistance Z
Page 304 of 346

X
Turn theSmart Keytoposition 005Ainthe igni-
tion lock andremove it.
X Secure thevehicle.
The towing eyecan beused topull thevehicle
ont oatrailer ortrans porter fortrans portin g
purposes. Notes
on4MATIC vehicles
! Vehicles
with4MATI Cmust notbetowed
with either thefront orthe rear axle raised,
as doing sowill damage thetrans mission.
Vehicles with4MATI Cmay onlyeither be
towed awaywithboth axles onthe ground or
be loaded upand trans ported.
If the vehicle's transmission, front,or rear axle
is damaged, havethevehicle transported ona
truck ortrailer.
In the event ofdam agetothe electrical
system:
If the battery isdefect ive,theautomatic trans-
mission willbelocked inposition 005D.Toshift
the automatic transmission toposition 005C,you
must provide powertothe vehicle's on-board
electric alsystem inthe same wayaswhen
jump-st arting(Ypage 296).
Have thevehicle transported onatrans porter
or trailer. Tow-star
ting(emergency engine
star ting)
! Vehicles
withautomatic transmission must
not betow-st arted. Youcould otherwise
damage theautomatic transmission.
i You
canfind inform ationon"Jump-start-
ing" under (Ypage 296). Fuses
Import
antsafety notes G
WARNIN
G
If you manipulate orbridge afaulty fuseorif
you replace itwith afuse withahigher
amperage, theelectric cablescouldbeover-
loaded. Thiscould result inafire. There isa
risk ofan accident andinjury. Always
replace faultyfuseswiththespeci-
fied new fuses having thecorrec tamperage.
! Only
usefuses thathave been approved
for Mercedes- Benzvehicles andwhich have
the correc tfuse rating forthe system con-
cern ed.Only usefuses marked withan"S".
Otherwise, componentsorsystems couldbe
damaged.
! Make
surethatnomoisture canenter the
fuse boxwhen thecover isopen.
! When
closing thecover, makesurethatit
is lying correc tlyon the fuse box. Moisture
seeping inor dirt could otherwise impairthe
operation ofthe fuses.
The fuses inyour vehicle servetoclose down
faulty circuits. Ifafuse blows, allthe compo-
nent son the circuit andtheir functionsstop
operating.
Blown fusesmustbereplaced withfuses of
the same rating, whichyoucan recogn izeby
the color andvalue. Thefuse ratings, and
other items ofinform ationtobe complied with
are, listed inthe fuse allocation chart.
The fuse allocation chartisin the fuse boxin
the front -passenger footwell(Ypage 303).
If anewly insertedfuse alsoblows, havethe
cause traced andrectified ataqualified spe-
cialist workshop, e.g.anauthorized Mercedes-
Benz Center. Before
changing afuse
X Secure thevehicle against rollingaway
(Y page 145).
X Switch offallelectric alconsumer s.
X Vehicles withoutKEYLESS-GO: remove
the Smart Keyfrom theignition lock.
X Vehicles
withKEYL ESS-GO start-func-
tion orKEYL ESS-GO: openthedriver's
door.
The vehicle electron icsare now inposition
005A. This isthe same asthe Smart Keybeing
removed fromtheignition.
The fuses arelocated invarious fuseboxes:
R Fuse boxinthe engine compart mentonthe
left- hand sideofthe vehicle, whenviewed in
the direction oftravel
R Fuse boxinthe front -passenger footwell 302
FusesBr
eakdown assistance
Page 316 of 346
The
tirepressure monitordoes notwarn youof
an incorr ectlysettire pressure. Observethe
not eson the recomm endedtirepressure
(Y page 308).
The tirepressure monitorisnot able towarn
you ofasudden lossofpressure, e.g.ifthe
tire ispenetr atedbyaforeign object.In the
event ofasudden lossofpressure, bringthe
vehicle toahalt bybraking carefully. Avoid
abrupt steeringmovemen ts.
The tirepressure monitorhas ayellow warning
lamp inthe instr ument cluster forindicatin g
pressure lossoramalfunct ion.Whether the
warning lampflashes orlights upindicates
whether atire pressure istoo low orthe tire
pressure monitorismalfunct ioning:
R ifthe warning lampislit cont inuously, the
tire pressure onone ormore tiresissignifi-
cant lytoo low. Thetirepressure monitoris
not malfunct ioning.
R ifthe warning lampflashes foraround a
minute andthen remains litconst antly, the
tire pressure monitorismalfunct ioning.
In addition tothe warning lamp,amessage
appears inthe multifunct iondisplay .Observe
the inform ationondisplay messages
(Y page 224).
It may take uptoten minutes foramalfunc-
tion ofthe tire pressure monitortobe indica-
ted. Amalfunct ionwill beindicated bythe tire
pressure warninglampflashing forapprox-
imately oneminute andthen remaining lit.
When themalfunct ionhas been rectified, the
tire pressure warninglampgoesoutafter a
few minutes ofdriving.
The tirepressure valuesindicated bythe on-
board computer maydiffer fromthose meas-
ured atagas station withapressure gauge.
The tirepressures shownbythe on-board
computer refertothose measured atsea level.
At high altitudes, thetire pressure valuesindi-
cated byapressure gaugearehigher than
those shown bythe on-board computer. Inthis
case, donot reduce thetire pressures.
The operation ofthe tire pressure monitorcan
be affect edbyinter ferenc efrom radio trans-
mitt ingequipment (e.g.radio headphones,
two-way radios)thatmay bebeing operated in
or near thevehicle. Checking
thetire pressur eelectroni-
cally X
Make surethattheSmart Keyisin position
0048 inthe ignition lock(Ypage 125).
X Press 0059or0065 onthe steerin gwheel
to select theServ. Serv.
menu.
X Press the0063 or0064 button toselect
Tire Pressure Tire
Pressure.
X Press the0076 button .
The current tirepressure ofeach tireis
shown inthe multifunct iondisplay .
If the vehicle wasparked forlonger than
20 minutes, theTire pressure willbe Tire
pressure willbe
displayed afterdriving afew minutes displayed
afterdriving afew minutes
message isshown.
Aft erateach- inprocess, thetire pressure
monit orautomatically detectsnew wheels or
new sensors. Aslong asaclear allocation of
the tire pressure valuetothe individual wheels
is not possible, theTire Pressure Monitor Tire
Pressure Monitor
Active Active
message isshown instead ofthe tire
pressure display.The tirepressures are
already beingmonitored.
If an emergenc yspare wheel ismounted, the
system maycontinue toshow thetire pressure
of the wheel thathasbeen removed forafew
minutes. Ifthis occurs, notethat thevalue dis-
played forthe position wherethespare wheel
is fitt ed isnot thesame asthe current tire
pressure ofthe emergenc yspare wheel.
Tire pressur emonitor warning mes-
sages If
the tire pressure monitordetect sa pressure
loss inone ormore tires,awarning message is
shown inthe multifunct iondisplay .The yellow
tire pressure warninglampthenlights up.
R Ifthe Please Correct TirePressure Please
Correct TirePressure
message appearsinthe multifunct iondis-
play, thetire pressure inat least onetireis
too low. Thetirepressure mustbecorrec ted
when theopportunit yarises.
R Ifthe Check TirePressure Check
TirePressure message
appears inthe multifunct iondisplay ,the tire
pressure inone ormore tireshasdropped
significant ly.The tires must becheck ed.
R Ifthe Tire Pressure WarningTire Tire
Pressure WarningTire
Failure Failure
message appears,thetire pressure
in one ormore tireshasdropped suddenly.
The tires must becheck ed. 314
Tir
epr essureWheels andtires