2020 MERCEDES-BENZ E-CLASS ESTATE fuel
[x] Cancel search: fuelPage 223 of 489
R
The transmission is shif tedto position j.
R The vehicle is secured with the electric park‐
ing brake.
In thefo llowing situations, theve hicle is held by
transmission position jand/or bythe electric
parking brake:
R The seat belt is unfas tened and the driver's
door is opened.
R The vehicle is switched off.
R There is a malfunction in the sy stem or the
po we r supply is insuf ficient. AIR
BODY CONT ROL AIR
BODY CONT ROL function
* NO
TEMercedes-AMG vehicles #
Obser vethe no tes in the Supplement.
Yo u could otherwise failto recognise
dangers. AIR BODY
CONTROL is an air suspension sy stem
with variable damping for impr oved driving com‐ fo
rt. The all-round le vel control sy stem ensures
th e best possible suspension and const ant
ground clearance, even wi tha laden vehicle.
When driving at speed, theve hicle is lo wered
automatically toimpr ovedriving saf ety and to
re duce fuel consum ption. You also ha vethe
option of manually adjusting theve hicle le vel.
AIR BODY CONTROL includes thefo llowing com‐
ponents and functions:
R Air suspension with variable spring rate
R Automatic le vel control sy stem
R Speed-dependent lo wering toreduce fuel
consum ption
R Manually selec table high-le vel setting for
grea ter ground clea rance
R ADS PLUS (Ada ptive Damping Sy stem with
const ant damping forc e adjustment)
R DYNA MIC SELECT switch and le vel button
Suspension settings and vehicle le vel per
drive prog ram
Drive program A:
R The suspension setting is comfor table. R
The vehicle is set tothe normal le vel.
R When driving at speeds of appr oximately
12 5 km/h or abo ve,th eve hicle is lo wered.
R When driving at speeds below appr oximately
80 km/h, theve hicle is raised again.
Drive program ;:
R The suspension setting is com fortable.
R The vehicle is set tolow le vel -1.
R The vehicle is not lo wered any fur ther if you
are tr avelling at higher speeds.
Drive prog ram C:
R The suspension setting is firm er.
R The vehicle is set tolow le vel -1.
R The vehicle is not lo wered any fur ther if you
are tra velling at higher speeds.
Drive prog ram B:
R The suspension setting is evenfirm er.
R The vehicle is set tolow le vel -1.
R The vehicle is not lo wered any fur ther if you
are tra velling at higher speeds. 220
Driving and parking
Page 261 of 489
Instrument display
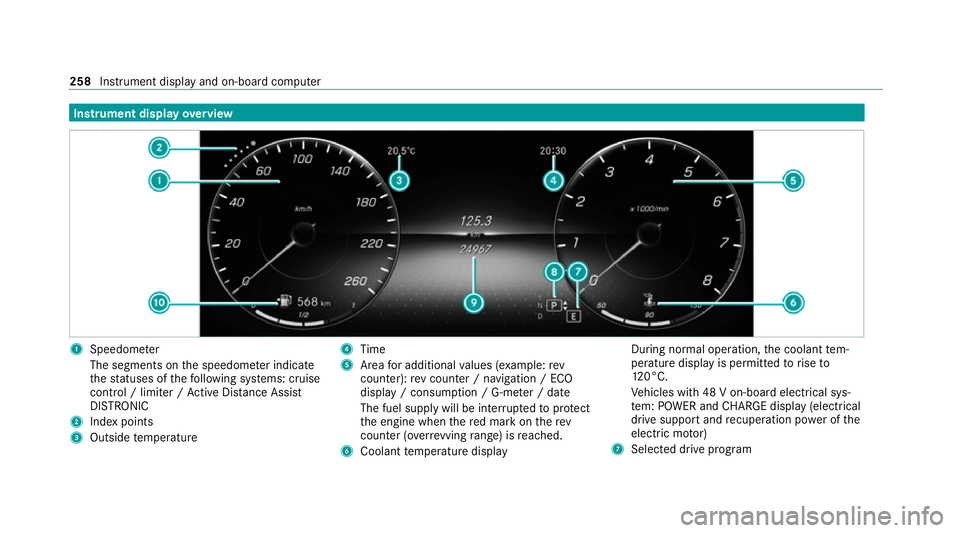
overview 1
Speedome ter
The segments on the speedome ter indica te
th est atuses of thefo llowing sy stems: cruise
control / limiter / Active Dis tance Assi st
DISTRONIC
2 Index points
3 Outside temp erature 4
Time
5 Area for additional values (e xamp le:rev
counter): rev counter / navigation / ECO
display / consum ption / G-me ter / date
The fuel supply will be inter rupted toprotect
th e engine when there d mark on therev
counter (o verrev ving range) is reached.
6 Coolant temp erature display During normal operation,
the coolant tem‐
perature display is permitted torise to
12 0°C.
Ve hicles with 48 V on-board electrical sys‐
te m: POWER and CHARGE displ ay(elect rical
drive suppo rtand recuperation po wer of the
electric mo tor)
7 Selected drive program 258
Instrument display and on-board computer
Page 262 of 489
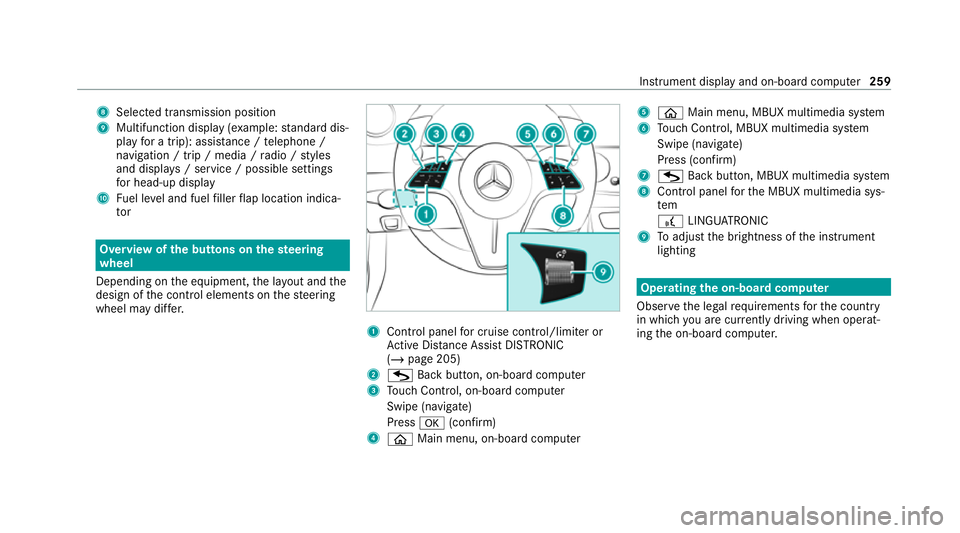
8
Selected transmission position
9 Multifunction displ ay(exa mp le:standard dis‐
play for a trip): assi stance / telephone /
navigation / trip / media / radio / styles
and displa ys/ service / possible settings
fo r head-up display
A Fuel le vel and fuel filler flap location indica‐
tor Overview of
the but tons on thest eering
wheel
Depending on the equipment, the la yout and the
design of the control elements on thesteering
wheel may dif fer. 1
Control panel for cruise control/limiter or
Ac tive Dis tance Assi stDISTRONIC
(/ page 205)
2 G Back button, on-boa rdcompu ter
3 Touch Control, on-board co mputer
Swipe (navigate)
Press a(confirm)
4 ò Main menu, on-board co mputer 5
ò Main menu, MBUX multimedia sy stem
6 Touch Control, MBUX multimedia sy stem
Swipe (navigate)
Press (confirm)
7 G Back button, MBUX multimedia sy stem
8 Control panel forth e MBUX multimedia sys‐
tem
£ LINGU ATRO NIC
9 Toadjust the brightness of the instrument
lighting Operating
the on-boa rdcompu ter
Obser vethe legal requ irements forth e count ry
in which you are cur rently driving when operat‐
ing the on-board computer. Instrument display and on-board computer
259
Page 313 of 489

#
With your hand flat, push down active bonnet
1 inthe area around the hinges on bo th
sides (ar rows).
In doing so, the actuator is depressurised
and you may hear a hissing sound.
The engine bonnet must en gage in position. #
Ifth e active bonn etcan be raised slight lyat
th ere ar in the area of the hinges, repeat the
st ep until it engages cor rectl y. Opening and closing
the bonnet &
WARNING Risk of accident due todriv‐
ing with the bonn etunlo cked
The bonn etmay open and block your vie w. #
Neverre lease the bonn etwhen driving. #
Before every trip, ensure that the
engine bonn etis loc ked. &
WARNING Risk of accident and inju ry
when opening and closing the bonn et
The bonnet may suddenly drop into the end
position.
There is a risk of injury for an yone in the bon‐
net's range of mo vement. #
Open or close the bonn etonly when
th ere is nobody in the bonn et's range of
mo vement. &
WARNING Danger of bu rns when open‐
ing the bonn et
If yo u open the engine bonn etwhen the
engine has overheated or during a fire inthe
engine compartment, you could come into
contact with hot gases or other escaping
operating fluids. #
Before opening the bonn et, allow the
engine tocool down. #
Intheeve nt of a fire inthe engine com‐
partment, keep the engine bonn et
closed and call thefire service. &
WARNING Risk of inju rydue tomoving
parts
Components in the engine compartment may
continue running or start up sudden ly,even if
th e ignition is switched off.
Make sure of thefo llowing before per form ing
ta sks in the engine compartmen t: #
Switch the ignition off. #
Neverre ach into the danger zone sur‐
ro unding moving co mponents, e.g. the
ro tation area of thefa n. #
Remo vejewe llery and watches. #
Keep items of clo thing and hair away
from moving parts. &
WARNING Risk of inju ryfrom touching
co mp onents under voltage
The ignition sy stem and the fuel injection
sy stem workunder high voltage. You could
re cei vean electric shoc k.310
Maintenance and care
Page 314 of 489

#
Neverto uch co mponents of the ignition
sy stem or the fuel injection sy stem
when the ignition is switched on. &
WARNING Risk of bu rns from hot com‐
ponent parts in the engine compartment
Cer tain component parts in the engine com‐
partment can be very hot, e.g. the engine,
th e cooler and parts of theex haust sy stem. #
Allow the engine tocool down and only
to uch co mponent parts described in
th efo llowing. &
WARNING Risk of inju ryfrom using the
windscreen wipers while the engine bon‐
net is open
When the engine bonn etis open, and the
windscreen wipers are set in motion, you can
be trapped bythe wiper linkage. #
Alw ays switch off the windscreen wip‐
ers and ignition before opening the
engine bonn et. *
NO
TEPlug-in hybrid #
Obser vethe no tes in the Supplement.
Yo u could otherwise failto recognise
dangers. Opening the bonnet
#
Torelease the bonn et, pull on handle 1. #
Push handle 1ofthe bonn etcatch up wards
and lift the bonn etby appr oximately 40 cm.
Closing the bonnet #
Lowe rth e bonn etto a height of around
20 cm and then allow it tofall, applying a lit‐
tle forc e as you let it go. Main
tenance and care 311
Page 321 of 489

Wa
shing theve hicle byhand *
NO
TEEngine dama gedue towater
ing ress #
Take care not topoint thewate r jet
directly towa rdsth e air inlet grille below
th e bonn et. obser
vethe legal requ irements, e.g. in a number
of countries, washing byhand is only permitted
in specially designated wash ba ys. #
Use a mild cleaning agent, e.g. car shampoo. #
Washtheve hicle with luk ewarmwate r using
a soft car sponge. When doing so, do not
ex pose theve hicle todirect sunlight. #
Carefully hose theve hicle off with water and
dry using a chamois.
% Obse rveth e no tes on the care of car parts
(/ page 319). Note
s on paint work/matt finish paint work
care Obse
rveth e no tes on cleaning and care toavo id
damaging the paintwor k.
Pa int
R Insect remains: soak with insect remo ver and
ri nse off the treated areas af terw ards.
R Bird droppings: soak with water and rinse off
af te rw ards.
R Tree resin, oils, fuels and greases: remo veby
ru bbing gently wi tha clo thsoaked in petro‐
leum ether or lighter fluid.
R Coolant and brake fluid: remo vewith a damp
clo thand clean water.
R Tarst ains: use tar remo ver.
R Wax: use silicone remo ver.
R Do not attach sticke rs,fi lms or similar mate‐
ri als.
R Remo vedirt immediately, where possible.
Matt finish
R Only use care products appr ovedfor
Mercedes-Benz. R
Do not polish theve hicle and light-alloy
wheels.
R Only use car washes that cor respond tothe
latest engineering standards.
R Do not use car wash programmes with a final
hot wax treatment.
R Do not use paint cleane rs, buf fing or polish‐
ing products, gloss preser vers, e.g. wax.
R Alw ays ha vepaintwork repairs car ried out at
a qu alified specialist workshop. Note
s on cleaning decorative foils Obser
vethe no tes on matt finish care in the
ch ap ter "No tes on paintwork/matt finish paint‐
wo rkcare" (/ page 318). They also app lyto
matt decorative foils.
Obser vethe no tes on cleaning decorative foils to
av oid vehicle damage.
Cleaning
R For cleaning, use plenty of water and a mild
cleaning agent without additives or abrasive
subs tances, e.g. a car sha mpoo appr ovedfor
Mercedes-Benz. 318
Maintenance and care
Page 333 of 489

&
WARNING Risk of accident from driving
wi th sealed tyres
A tyre temp orarily sealed with tyre sealant
impairs the handling characteristics and is
not suitable for higher speeds. #
Adapt your driving style according lyand
drive carefull y. #
Do not exceed the maximum speed
limit with a tyre that has been repaired
using tyre sealant. #
Obser vethe maximum permissible speed for
a tyre sealed with tyre sealant 80 km/h.
* NO
TEStaining from leaking tyre sealant Af
ter use, excess tyre sealant may leak out
from thefilling hose. #
Therefore, place thefilling hose in the
plastic bag that con tained the TIREFIT
kit. +
ENVIRONMEN
TALNO TEEnvironmental
pollution caused byenvironmen tally ir re‐
sponsible disposal Ty
re sealant contains polluta nts. #
Have the tyre sealant bottle disposed of
professionall y,e.g. at a Mercedes-Benz
Service Centre. #
Stow th e tyre sealant bottle and the tyre
inflation compressor. #
Pull away immediatel y. #
Stop driving af ter appro ximately ten minu tes
and check the tyre pressure using the tyre
inflation compressor.
The tyre pressure must now be at least
13 0 kPa (1.3 bar/19 psi). &
WARNING Risk of accident due tothe
specified tyre pressure not being
attained
If th e specified tyre pressure is not reached,
th e tyre is too badly damaged. The tyre seal‐
ant cannot repair the tyre in this ins tance. The braking and driving
characteristics may
be great lyimpaired. #
Do not continue driving. #
Consult a qualified specialist workshop. Countries
that ha veMercedes-Benz
Service24h: you will find a sticke r with thete le‐
phone number, e.g. on the B‑pillar on the driver's
side. #
Cor rect the tyre pressure if it is still at least
13 0 kPa (1.3 bar/19 psi). See the tyre pres‐
sure table on the fuel filler flap forva lues. #
Toincrease the ty repressure: switch on
th e tyre inflation compressor. 330
Breakdown assis tance
Page 337 of 489

&
WARNING Risk ofexplosion during
ch arging process and starting assis tance
During thech arging process and starting
assis tance, the battery may release an explo‐
sive gas mixture. #
Avoid fire , naked flames, creating
spar ksand smoking. #
Make sure there is suf ficient ventila‐
tion. #
Do not lean over a batter y. &
WARNING Risk ofexplosion from a fro‐
zen battery
A dischar ged battery may freeze at temp era‐
tures slightly abo veor below freezing point.
During starting assis tance or battery charg‐
ing, bat tery gas can be released. #
Alw ays allow a battery tothaw before
ch arging it or per form ing starting assis‐
ta nce. If
th e indicator/warning lamps in the instrument
clus ter do not light up at low temp eratures, it is
ve ry likely that the dischar ged battery has fro‐
zen. In this case you may neither jump-s tart the
ve hicle nor charge the batter y.
The service life of a battery that has been
th awe d may be dramatically shor tened. The
st arting characteristics may be impaired, espe‐
cially at low temp eratures.
It is recommended that you ha veathaw ed bat‐
te ry checked at a qualified specialist workshop.
Plug-in hybrid: be sure toobser vethe no tes in
th e Supplement. You could otherwise failto rec‐
ognise dangers.
All vehicles
* NO
TEDama gecaused bynumerous or
ex tended attem ptsto start the engine Nume
rous or extended attem ptsto start the
engine may damage the catalytic con verter
due tonon-combu sted fuel. #
Avoid numerous and extended attem pts
to start the engine. Obser
vethefo llowing points during starting
assis tance and when charging the battery:
R Only use undamaged jump lead/charging
cables with a suf ficient cross-section and
insula tedte rm inal clamps.
R Non- insulated parts of thete rm inal clamps
must not come into con tact wi thother me tal
parts while the jump lead/charging cable is
connected tothe battery/jump-s tart connec‐
tion point.
R The jump lead/charging cable must not
come into contact wi thany parts which may
mo vewhen the engine is running.
R Alw ays make sure that nei ther you nor the
battery is elect rostatically charge d.
R Keep away from fire and naked flames.
R Do not lean overth e batter y.
Obser vethe additional following points when
ch arging the battery:
R Only use battery charge rs tested and
appr oved for Mercedes-Benz.
R Read the battery charge r's operating instruc‐
tions before charging the batter y. 334
Breakdown assis tance