2020 MERCEDES-BENZ E-CLASS ESTATE fuel
[x] Cancel search: fuelPage 160 of 489
&
WARNING Risk offire due tohot station‐
ary heater components and exhaust
ga ses
Flammable materials such as lea ves, grass or
twigs may ignite. #
When thest ationary heater is swit ched
on, make sure that:
R hot vehicle parts do not come into
contact with flammable materials.
R theex haust gas can flow out of the
st ationary heater exhaust pipe
unhindered.
R theex haust gas does not come into
contact with flammable materials. *
NO
TEBattery discharge caused bysta‐
tionary heater or stationary ventilation
operation Ope
rating thest ationary heater or stationary
ve ntilation drains the batter y. #
After heating or ventilating theve hicle
twice, drive for a longer period of time. Re
quirements:
R The fuel tank is filled toat least there ser ve
le ve l. #
Set the desired temp erature using thew
button. #
Press the& button.
The red or blue indicator lamp on the button
will light up or go out.
The colours of the indicator lamp ha vethefo l‐
lowing meaning:
R Blue: stationary ventilation is switched on.
R Red:thest ationary heater is swit ched on.
R Yello w: the departure time is preselected.
The stationary heater/ ventilation will switch off
au tomatically af ter 50 minutes.
Operation using the app: thest ationary
heater/ ventilation can also be operated via the
Mercedes me connect app. You can find fur ther
information in the separate Owner's Manual at
https://moba.i.daimler.com/mar kets/ece-r ow/
baix/cars/connectme/en_GB/#emotions/
St artseite.htm l. Setting
thest ationary heater/stationary ven‐
tilation via the multimedia sy stem #
Call up the air conditioning menu
(/ page 152). #
Select Auxiliary heating.
Selecting the departure time #
Select the time TIME A: XX, TIME B: XXor
TIME C: XX.
Setting the departu retime #
Select the time TIME A: XX, TIME B: XXor
TIME C: XX. #
Select the pen beside the time. #
Set a time.
Setting thest ationary heater/ventilation via
re mo tecont rol
Re quirements:
R The fuel tank is filled toat least there ser ve
le ve l. Climate control
157
Page 163 of 489
Problems with
there mo tecont rolfo r the
st ationary heater/ventilation
FA IL¨
¨ appea rson there mo tecont rol dis‐
play
Po ssible cause:
R The signal transmission between the trans‐
mitter and there cei ver is malfunctioning. #
Change your position in relation totheve hi‐
cle, moving closer if necessar y.
FA IL appea rson there mo tecont rol display
Po ssible cause:
R The star ter battery is not suf ficiently
ch arge d. #
Char gethest ar ter batter y.
Po ssible cause:
R The fuel tank content is below there ser ve
fuel le vel. #
Refuel at the nearest filling station. FA
IL¯ ¯ appea rson there mo tecont rol dis‐
play
Po ssible cause:
R There is a malfunction in thest ationary
heater. #
Have thest ationary heater checked at a
qu alified specialist workshop. Air
vents Ad
justing the front air vents &
WARNING Risk of bu rns and frostbite
due tobeing too close tothe air vents
Ve ry hot or very cold air can flow from the air
ve nts. #
Makesure that all vehicle occupants
alw ays maintain a suf ficient di stance
from the air vents. #
If necessa ry, direct the air flow to
ano ther area of theve hicle interior. To
guarantee theflow of fresh air thro ugh the air
ve nts into theve hicle interior, comply with the
fo llowing:
R Alw ayske ep theve nts and vent grilles in the
ve hicle interior free.
R Keep the air inlet free of residue build-up
(/ page 316). #
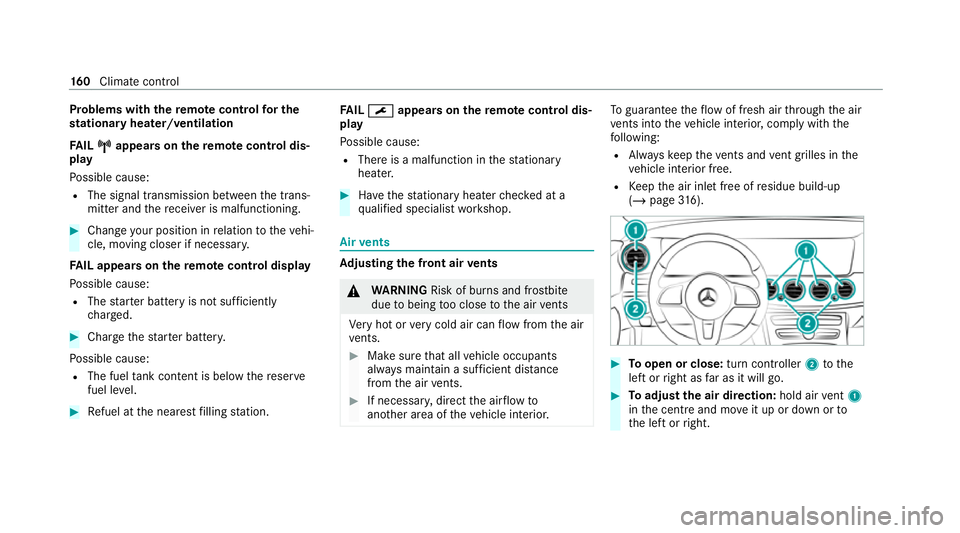
Toopen or close: turn controller2tothe
left or right as far as it will go. #
Toadjust the air direction: hold airvent 1
in the cent reand mo veit up or down or to
th e left or right. 16 0
Climate cont rol
Page 168 of 489
#
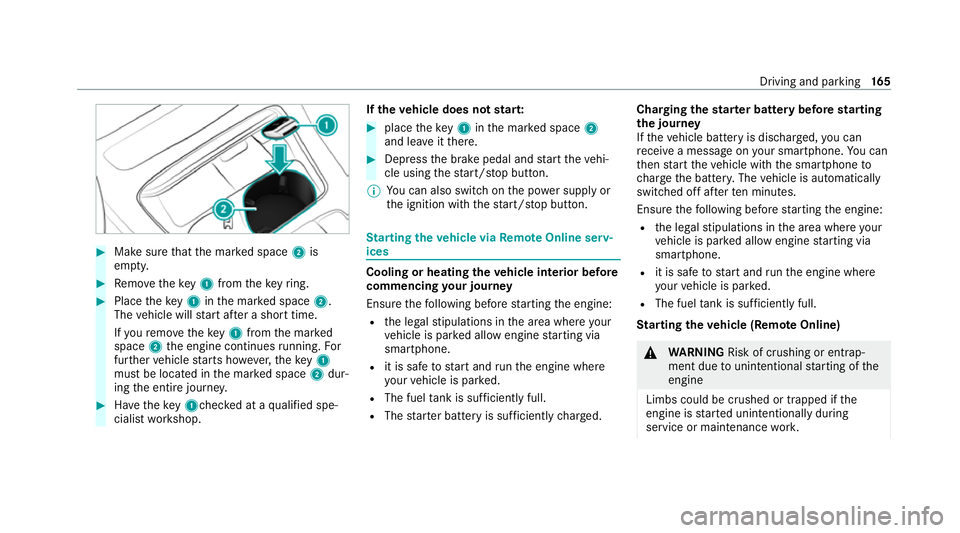
Make sure that the mar ked space 2is
em pty. #
Remo vetheke y1 from theke yring. #
Place theke y1 inthe mar ked space 2.
The vehicle will start af ter a short time.
If yo ure mo vetheke y1 from the mar ked
space 2the engine continues running. For
fur ther vehicle starts ho wever,th eke y1
must be located in the mar ked space 2dur‐
ing the entire journe y. #
Have theke y1ch ecked at a qualified spe‐
cialist workshop. If
th eve hicle does not star t: #
place theke y1 inthe mar ked space 2
and lea veitth ere. #
Depress the brake pedal and start theve hi‐
cle using thest art/ stop button.
% You can also swit chon the po wer supp lyor
th e ignition with thest art/ stop button. St
arting theve hicle via Remo teOnline serv‐
ices Cooling or heating
theve hicle interior before
commencing your journey
Ensure thefo llowing before starting the engine:
R the legal stipulations in the area where your
ve hicle is par ked allow engine starting via
smartphone.
R it is safe tostart and runth e engine where
yo ur vehicle is par ked.
R The fuel tank is su fficiently full.
R The star ter battery is suf ficiently charge d. Charging
thest ar ter battery be fore starting
th e jou rney
If th eve hicle battery is dischar ged, you can
re cei vea message on your smartphone. You can
th en start theve hicle with the smartphone to
ch arge the batter y.The vehicle is automatically
switched off af terte n minu tes.
Ensure thefo llowing before starting the engine:
R the legal stipulations in the area where your
ve hicle is par ked allow engine starting via
smartphone.
R it is safe tostart and runth e engine where
yo ur vehicle is par ked.
R The fuel tank is su fficiently full.
St arting theve hicle (Remo teOnline) &
WARNING Risk of crushing or entrap‐
ment due tounin tentional starting of the
engine
Limbs could be crushed or trapped if the
engine is star ted unintentionally during
service or maintenance work. Driving and pa
rking 16 5
Page 172 of 489
&
WARNING Risk of skidding and of an
accident due toshifting down on slippery
ro ad sur faces
If yo u shift down on slippery road sur faces to
inc rease the engine braking ef fect, the drive
wheels may lose traction. #
Do not shift down on slippery road sur‐
fa ces toinc rease the engine braking
ef fect. &
DANG ER Risk of fata l injury due topoi‐
sonous exhaust gases
If th eta ilpipe is bloc ked or suf ficient ventila‐
tion is not possible, poisonous exhaust gases
such as carbon monoxide may enter theve hi‐
cle. This is the case when theve hicle
becomes stuck in sn ow,fo rex ample. #
Keep theta ilpipe and the area around
th eve hicle free from snow when the
engine or thest ationary heater are run‐
ning. #
Open a window on the side of theve hi‐
cle facing away from the wind toensure
an adequate supply of fresh air. &
WARNING Risk of accident due tothe
brake sy stem overheating
If yo u lea veyour foot on the brake pedal
when driving, the brake sy stem may over‐
heat.
This increases the braking dis tance and the
brake sy stem may evenfa il. #
Never use the brake pedal as a foot re st. #
Do not depress the brake pedal and the
accelerator pedal at the same time
while driving. *
NO
TEEngine dama gedue toexcessively
high engine speeds The engine will be damaged if
you drive with
th e engine in theov errevving range. #
Do not drive wi th the engine in theove r‐
re vving range. *
NO
TECausing wearto the brake linings
by permanently depressing the brake
pedal #
Do not permanently depress the brake
pedal while driving. #
Touse braking ef fect of the engine,
shift toa lo werge ar in good time. *
NO
TEDama getothe driv etra in and
engine when pulling away #
Do not warm upthe engine while the
ve hicle is stationar y.Pull away immedi‐
atel y. #
Avoid high engine speeds and driving at
full thro ttle until the engine has reached
its operating temp erature. *
NO
TEDama getothe catalytic con verter
due tonon-combu sted fuel The engine is not
running smo othly and is
misfiring. Driving and parking
16 9
Page 173 of 489
Non-combus
ted fuel may get into the cata‐
lytic con verter. #
Only depress the accelera tor pedal
slightl y. #
Have the cause rectified immediately at
a qu alified specialist workshop. Note
s on driving on salt-treated roads
The braking ef fect is limited on salt-trea ted
ro ads.
Therefore, obse rveth efo llowing no tes:
R due tosalt build-up on the brake disks and
brakepads, the braking dis tance can increase
considerab lyor result in braking only on one
side
R maintain a much greater safe dis tance tothe
ve hicle in front
To remo vesalt build-up:
R brake occasionally while paying attention to
th e tra ffic conditions
R carefully depress the brake pedal at the end
of the journey and when starting the next
journey Note
s on aquaplaning
Aq uaplaning can take place once a cer tain
amount of water has accumulated on thero ad
sur face.
Obser vethefo llowing no tes during heavy precip‐
itation or in conditions in which aquaplaning may
occur:
R reduce speed
R avoid tyre ruts
R avoid sudden steering mo vements
R brake carefully
% Also obser vethe no tes on regular lych ecking
wheels and tyres (/ page 345).
Note s on driving through water on the road
sur face
Wa ter which has entered into theve hicle can
damage the engine, electrics and transmission.
Wa ter can also enter the air intake of the engine
and cause engine damage. Obser
vethefo llowing if you must drive thro ugh
wate r:
R The water,when calm, may only reach the
lo we r edge of theve hicle body.
R Drive at walking pace at most, otherwise
wate r can enter theve hicle interior or engine
compartment.
R Vehicles tr avelling in front, or oncoming vehi‐
cles, can create waves which may exceed the
maximum permissible dep thofthewa ter.
The braking ef fect of the brakes is reduced af ter
fo rd ing. Brake carefully while paying attention to
th e traf fic conditions until braking po wer has
been fully restored. ECO
start/s top function Ope
ration of the ECO start/s top function
* NO
TEMercedes-AMG vehicles #
Obser vethe no tes in the Supplement.
Yo u could otherwise failto recognise
dangers. 17 0
Driving and pa rking
Page 176 of 489
The additional
range achi eved as a result of your
driving style in comparison with a driver with a
ve ry sporty driving style will be shown in the
centre of the display 4. Therange displ ayed
does not indicate a fixe dre duction in consump‐
tion. ECO Assist function
*
NO
TEPlug-in hybrid #
Obser vethe no tes in the Supplement.
Yo u could otherwise failto recognise
dangers. Ve
hicles with a 48 V on-board electrical sys‐
te m (EQ Boo sttech nology):
ECO Assist analyses data forth eve hicle's expec‐
te dro ute. This allo wsthe sy stem tooptimally
adjust the driving style fo rth ero ute ahead, sa ve
fuel and recuperate. If the sy stem de tects an
eve nt ahead, e.g. a speed limit or a roundabout,
it will appear on the multifunction displa y.The
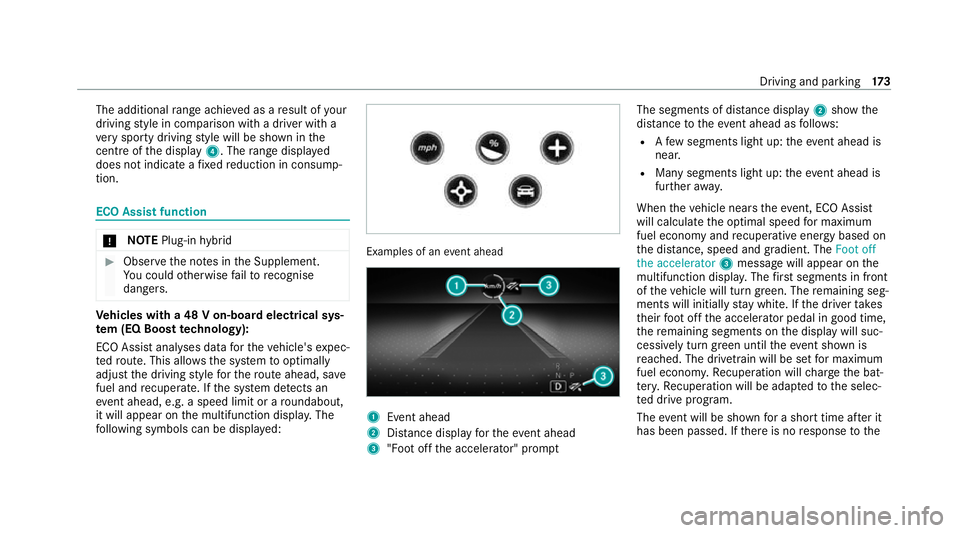
fo llowing symbols can be displa yed: Examples of an
event ahead 1
Event ahead
2 Distance displ ayforth eev ent ahead
3 "Foot off the accelerator" prom ptThe segments of dis
tance displ ay2 show the
dis tance totheeve nt ahead as follo ws:
R Afew segments light up: theeve nt ahead is
nea r.
R Many segments light up: theeve nt ahead is
fur ther aw ay.
When theve hicle nears theeve nt, ECO Assi st
will calculate the optimal speed for maximum
fuel economy and recuperati veenergy based on
th e dis tance, speed and gradient. The Foot off
the accelerator 3message will appear on the
multifunction displa y.The firs t segments in front
of theve hicle will turn green. The remaining seg‐
ments will initially stay white. If the driver takes
th eir foot off the accelera tor pedal in good time,
th ere maining segments on the display will suc‐
cessively turn green until theeve nt shown is
re ached. The driv etra in will be set for maximum
fuel econom y.Re cuperation will charge the bat‐
te ry.Re cuperation will be adap tedto the selec‐
te d drive prog ram.
The event will be shown for a short time af ter it
has been passed. If there is no response tothe Driving and pa
rking 17 3
Page 179 of 489
%
The prom ptappears on ly ifthe pr eviously
active settings deviate from thest andard
settings.
Fu nction off: the next time theve hicle is star‐
te dth eA drive program is set automaticall y.
The ECO start/ stop function is activated auto‐
matically.
% This function must be activated for each user
profile sepa rately. Only when this function is
activated will the drive prog ram and Eco
st art/ stop setting forth e pr evious journey
be sa vedfo rth ere spective user profile. Displaying
vehicle data Multimedia sy
stem:
4 © 5
Info #
Select Vehicle.
The vehicle data is displa yed. Displaying engine data
Multimedia sy
stem:
4 © 5
Info #
Select Engine.
The engine data is displa yed.
% The actual (maximum) values that can be
achie vedfo r engine output and engine tor‐
qu e may deviate from the certified values
within the count ry-specific guidelines for
permissible tolerances (basis: UN-ECE No.
85 or country -specific guidelines).
Fa ctors that can influence this are, forex am‐
ple:
R Sea le vel
R Fuel grade
R Outside temp erature
R Operating temp erature of the engine
% The values displa yed ser veonly as orienta‐
tion. The values for engine output and
engine torque sh own in the media display
may deviate from the actual values. Calling up
the consum ption indicator Multimedia sy
stem:
4 © 5
Info #
Select Consumption.
The cur rent and average consu mption is dis‐
pl ay ed. Au
tomatic transmission DIRECT SELECT le
ver Fu
nction of the DIRECT SELECT le ver &
WARNING Risk of accident due toincor‐
re ct gearshifting
If th e engine speed is higher than the idle
speed and you en gage the transmission posi‐
tion hork, theve hicle may accelerate
sharply. #
Ifyo u en gage the transmission position
h ork when theve hicle is at a
st andstill, alw ays depress the brake
pedal firm lyand do not accelerate at
th e same time. 176
Driving and pa rking
Page 183 of 489
The automatic transmission shifts up
tothe next
ge ar when the maximum engine speed is
re ached toprotect the engine from overrev ving. Glide mode function
*
NO
TEMercedes-AMG vehicles #
Obser vethe no tes in the Supplement.
Yo u could otherwise failto recognise
dangers. *
NO
TEPlug-in hybrid #
Obser vethe no tes in the Supplement.
Yo u could otherwise failto recognise
dangers. Wi
th an anticipatory driving style, Glide mode
helps youto reduce fuel consum ption.
Glide mode is characterised bythefo llowing:
R the combustion engine is disconnected from
th e driv etra in and continues torun in neutral.
R the transmission position display his
shown in green. R
Vehicles with 48 V on-board electrical
sy stem (EQ-Boost technology): the com‐
bustion engine can be switched off. All of the
ve hicle functions remain active.
Glide mode is activated if thefo llowing condi‐
tions are me t:
R drive program ;is selected.
R the speed is within a suitable range.
R thero ad's course is suitable, e.g. no steep
uphill or downhill inclines or tight bends.
R There is no trailer coupled tothe trailer hitch,
and no bicycle rack fitted.
R you do not depress the accelerator or brake
pedal (e xcept for light brake applications).
% Glide mode can also be activated if you ha ve
selected the "Eco" setting forth e drive in the
drive prog ram =.
Glide mode is deactivated again if one of the
conditions is no longer met.
Glide mode can also be pr evented bythefo llow‐
ing parame ters:
R incline R
Downhill gradient
R temp erature
R height
R Speed
R operating status of the engine
R traffic situation Fu
nction of the 4MATIC
4MATIC ensures that all four wheels are driven.
To get her with ESP ®
and 4ETS, 4MATIC impr oves
th e traction of your vehicle whene ver a driven
wheel spins due toinsuf ficient traction.
If yo ufa ilto adapt your driving style, 4MATIC can
neither reduce therisk of an accident nor over‐
ri de the la wsof ph ysics. 4MATIC cannot take
ac count of road, weather and traf fic conditions.
4MATIC is only an aid. You are responsible espe‐
cially for maintaining a safe dis tance from the
ve hicle in front, forve hicle speed, for braking in
good time and forst ay ing in lane. 18 0
Driving and pa rking