2020 MERCEDES-BENZ CLS COUPE rims
[x] Cancel search: rimsPage 111 of 469
*
NO
TEDama getothe handle in the boot
fl oor If
th e handle in the boot is left pr otru ding,
th e handle may be damaged. #
Before closing the boot lid, de tach the
handle and press it down closed again. *
NO
TEDama getothestow age compart‐
ment under the ashtr aydue tointense
heat The
stow age compartment under the ashtray
is not heat resis tant and could be damaged if
yo ure st a lit cigar ette on it. #
Make sure that the ashtr ayis fully
engaged. &
WARNING ‑ Risk of fire and injury from
th e hot cigar ette lighter
Yo u can burn yourself if youto uch the hot
heating element or the soc ket of the ciga‐
re tte lighter. In addition,
flammable materials may ignite
if:
R you drop the hot cigar ette lighter
R ach ild holds the hot cigar ette lighter to
objects, forex ample #
Alw ays hold the cigar ette lighter bythe
knob. #
Alw ays make sure that the cigar ette
lighter is out of reach of children. #
Never lea vechildren unat tended in the
ve hicle. &
WARNING Risk of bu rns from theta il‐
pipe and tailpipe trims
The exhaust tailpipe and tailpipe trims can
become very hot. If you come into contact
with these parts of theve hicle, you could
burn yourself. #
Alw ays be particular lycareful around
th eta ilpipe and theta ilpipe trims and
supervise children especially closely in
th is area. #
Allow vehicle parts tocool down before
to uching them. The driving
characteristics of your vehicle are
dependent on the distribution of the load within
th eve hicle. You should bear thefo llowing in
mind when loading theve hicle:
R neverex ceed the permissible gross mass or
th e permissible axle loads forth eve hicle
(including occupants).
Information can be found on theve hicle iden‐
tification plate (/ page 345).
R the load must not pr otru de abo vethe upper
edge of the seat backrests.
R always place the load behind unoccupied
seats if possible.
R secure the load using the tie-down eyes and
distribute the load evenly. 108
Seats and stowing
Page 305 of 469
R
Remo vedirt immediatel y,where possible,
whilst avoiding rubbing too hard. There is
ot herwise a risk of damaging the decorative
fo il ir reparably.
R Ifth ere is dirt on thefinish or if the decora‐
tive foil is dull: use thePa int Cleaner recom‐
mended and appr ovedfo r Mercedes-Benz.
R Insect remains: soak with insect remo ver and
ri nse off the treated areas af terw ards.
R Bird droppings: soak with water and rinse off
af te rw ards.
R Topreve ntwate rst ains, dry a foil-wrapped
ve hicle with a soft, absorbent clo thafter
eve rycar wash.
Av oiding dama getothe decorative foil
R The service life and colouring of decorative
foils are impaired by:
- sunlight
- temp erature, e.g. hot air blo wer
- weather conditions
- stone chippings and dirt
- chemical cleaning agents -
oily products
R Do not use polish on matt decorative foil.
Po lishing will ha vethe ef fect of shining the
fo il-wrapped sur face.
R Do not treat matt or stru ctured deco rative
fo ils with wax.Pe rm anent stains may occur.
Sc ratches, cor rosive deposits, areas af fected by
cor rosion and damage caused byincor rect care
cannot al ways be comple tely repaired. In such
cases, visit a qualified specialist workshop.
Yo u can obtain more information on care and
cleaning products from the manufacturer.
In the case of foil-wrapped sur faces, optical dif‐
fe re nces may occur between the sur faces that
we renot pr otected bya decorative foil af ter
re moving a decorative foil.
% Have wo rkor repairs todecorative foils car‐
ri ed out at a qualified specialist workshop,
e.g. in a Mercedes-Benz Service Centre. Note
s on care of car parts &
WARNING Risk of entrapment if the
windscreen wipers are swit ched on while
th e windscreen is being cleaned
If th e windscreen wipers are set in motion
while you are cleaning the windscreen or
wiper blades, you can be trapped bythe
wiper arm. #
Alw ays switch off the windscreen wip‐
ers and the ignition before cleaning the
windscreen or wiper blades. &
WARNING Risk of bu rns from theta il‐
pipe and tailpipe trims
The exhaust tailpipe and tailpipe trims can
become very hot. If you come into contact
with these parts of theve hicle, you could
burn yourself. #
Alw ays be particular lycareful around
th eta ilpipe and theta ilpipe trims and
supervise children especially closely in
th is area. 302
Maintenance and care
Page 306 of 469
#
Allow vehicle parts tocool down before
to uching them. To
avo id damage totheve hicle, obser vethe
no tes on cleaning and care of thefo llowing vehi‐
cle parts:
Wheels and rims
R use wate r and acid-free alloy wheel cleaners.
R do not use acidic alloy wheel cleaners to
re mo vebrake dust. This could damage wheel
bolts and brake components.
R to av oid cor rosion of the brake discs and
brakepads, drive theve hicle for a few
minutes af ter cleaning before parking it. The
brake discs and brakepads warm up and dry
out.
Wi ndo ws
R clean the windo wsinside and outside with a
damp clo thand with a cleaning agent recom‐
mended for Mercedes-Benz.
R do not use dry clo ths or abrasive or solvent-
based cleaning agents toclean the inside of
windo ws. Wi
per blades
R movethe wiper arms into there placement
position (/ page130).
R with the wiper arms folded out, clean the
wiper blades with a damp clo th.
R do not clean the wiper blades too of ten.
Ex terior lighting
R clean the lenses with a wet sponge and mild
cleaning agent, e.g. car sha mpoo.
R only use cleaning agents or cleaning clo ths
th at are suitable for plast ic lenses.
Sensors
R clean the sensors in the front and rear bump‐
ers with a soft clo thand car shampoo
(/ page 179).
R when using a high -pressure cleaner,maintain
a minimum dis tance of 30 cm.
Re versing camera and 360° Camera
R open the camera co ver with the multimedia
sy stem (/ page 224).
R use clean water and a soft clo thtoclean the
came ralens. R
do not use a high-pressure cleaner.
Ta ilpipes
R clean with a cleaning agent recommended
fo r Mercedes-Benz, especial lyin the winter
and af terwa shing theve hicle.
R do not use acidic cleaning agents.
Tr ailer hitch
R obse rveth e no tes on care in the trailer hitch
manufacturer's operating instructions.
R do not clean the ball neck with a high-pres‐
sure cleaner or solvent.
R remo vetraces of rust on the ball, e.g. with a
wire brush.
R remo vedirt with a lint-free clo th.
R afte r cleaning, lightly oil or grease the ball
head.
% Before using trailers with anti- torsional cou‐
pling, obser vethe manufacturer's operating
instructions. Maintenance and care
303
Page 312 of 469
Note
s on MOExtended tyres (run-flat tyres) &
WARNING Risk of accident when driving
in li mp-home mode
Driving in emergency mode impairs the han‐
dling characteristics of theve hicle. #
Do not exceed the permissible maxi‐
mum speed of the MOEx tended tyres. #
Avoid any abrupt steering and driving
manoeuvres as well as driving over
obs tacles (kerbs, pot holes, off-road).
This applies, in pa rticular, toa loaded
ve hicle. #
Stop driving in the emer gency mode if
yo u notice:
R banging noise
R vehicle vibration
R smoke which smells like rubber
R continuous ESP ®
inter vention
R crac ksinthe tyre side walls #
After driving in emergency mode, ha ve
th erims checkedby aqu alified special‐ ist
workshop with rega rd totheir fur ther
use. #
The defective tyre must be replaced in
eve rycase. Wi
th MOExtended tyres (run-flat tyres), you can
continue todrive your vehicle even if there is a
tot al loss of pressure in one or more tyres. How‐
eve r,th e tyre af fected must not show any clearly
visible damage.
Yo u can recognise MOExtended tyres bythe
MOExtended marking which appears on the side
wa ll of the tyre.
Ve hicles with tyre pressure loss warning sys‐
te m: MOExtended tyres may only be used in
conjunction wi than activated tyre pressure loss
wa rning sy stem.
Ve hicles with tyre pressure monitoring sys‐
te m: MOExtended tyres may only be used in
conjunction wi than activated tyre pressure mon‐
itoring sy stem. If a pressure loss
warning message appears in
th e multifunction displa y,proceed as follo ws:
R Check the tyre for dama ge.
R If driving on, obser vethefo llowing no tes.
Driving distance possible in emer gency
mode af ter the pressure loss warning: Load condition Driving distance pos‐
sible in emergency
mode
Pa rtially laden 80 km
Fu lly laden 30 km The driving dis
tance possible in emergency
mode may vary depending on the driving style.
Obser vethe maximum permissible speed of
80 km/h.
If a tyre has gone flat and cannot be replaced
with an MOEx tended tyre, you can use a stand‐
ard tyre as a temp orary measure. Breakdown assis
tance 309
Page 313 of 469
TIREFIT kit
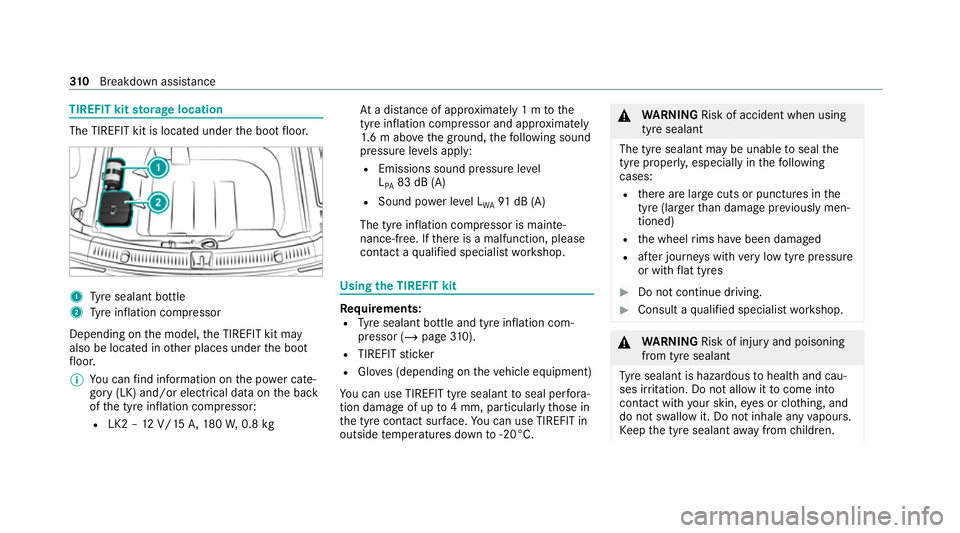
storage location The TIREFIT kit is located under
the boot floor. 1
Tyre sealant bottle
2 Tyre inflation compressor
Depending on the model, the TIREFIT kit may
also be located in other places under the boot
fl oor.
% You can find information on the po wer cate‐
gory (LK) and/or electrical data on the back
of the tyre inflation compressor:
R LK2 – 12V/15 A,180W, 0.8 kg At
a dis tance of appr oximately 1 m tothe
tyre inflation compressor and appr oximately
1. 6 m abo vethe ground, thefo llowing sound
pressure le vels apply:
R Emissions sound pressure le vel
L PA 83 dB (A)
R Sound po wer le vel L
WA 91
dB (A)
The tyre inflation compressor is mainte‐
nance-free. If there is a malfunction, please
conta ct aqualified specialist workshop. Using
the TIREFIT kit Re
quirements:
R Tyre sealant bottle and tyre inflation com‐
pressor (/ page310).
R TIREFIT sticker
R Gloves (depending on theve hicle equipment)
Yo u can use TIREFIT tyre sealant toseal per fora‐
tion dama geof up to4 mm, particular lythose in
th e tyre conta ct surface. You can use TIREFIT in
outside temp eratures down to-20°C. &
WARNING Risk of accident when using
tyre sealant
The tyre sealant may be unable toseal the
tyre proper ly, especially in thefo llowing
cases:
R there are large cuts or punctures in the
tyre (larger than damage pr eviously men‐
tioned)
R the wheel rims ha vebeen damaged
R afte r journe yswith very low tyre pressure
or with flat tyres #
Do not continue driving. #
Consult a qualified specialist workshop. &
WARNING Risk of inju ryand poisoning
from tyre sealant
Ty re sealant is hazardous tohealth and cau‐
ses ir rita tion. Do not allow it tocome into
contact wi thyour skin, eyes or clo thing, and
do not swallow it. Do not inhale any vapours.
Ke ep the tyre sealant away from children. 310
Breakdown assis tance
Page 341 of 469
Ra
ising theve hicle when changing a wheel Re
quirements:
R There are no persons in theve hicle.
R The vehicle has been prepared for a wheel
ch ange (/ page 337).
R The wheel trims and hub caps ha vebeen
re mo ved (/ page 337).
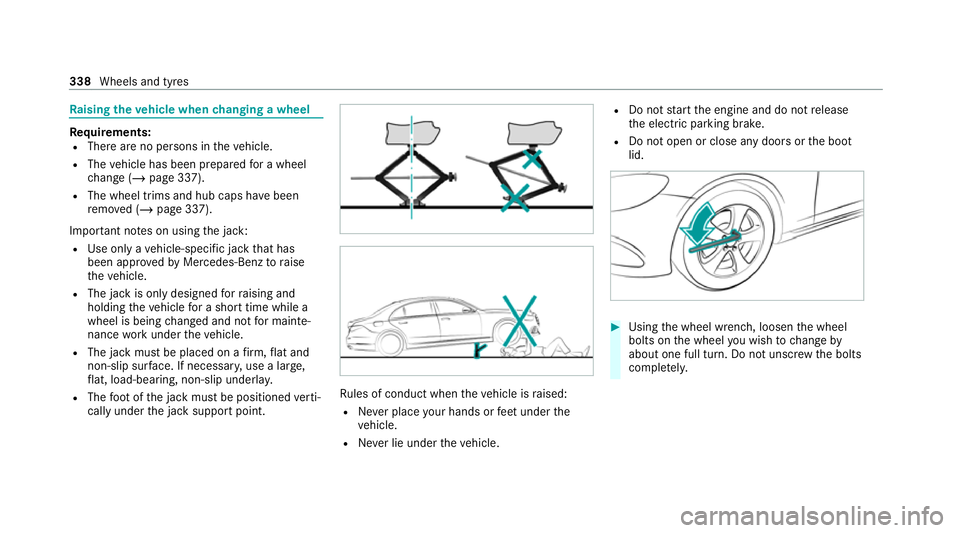
Impor tant no tes on using the jack:
R Use only a vehicle-specific jack that has
been appr oved byMercedes-Benz toraise
th eve hicle.
R The jack is only designed forra ising and
holding theve hicle for a short time while a
wheel is being changed and not for mainte‐
nance workunder theve hicle.
R The jack must be placed on a firm ,fl at and
non-slip sur face. If necessar y,use a lar ge,
fl at, load-bearing, non-slip unde rlay.
R The foot ofthe jack must be positioned verti‐
cally under the jack support point. Ru
les of conduct when theve hicle is raised:
R Never place your hands or feet under the
ve hicle.
R Never lie under theve hicle. R
Do not start the engine and do not release
th e electric parking brake.
R Do not open or close any doors or the boot
lid. #
Using the wheel wrench, loosen the wheel
bolts on the wheel you wish tochange by
about one full turn. Do not unscr ewthe bolts
comple tely. 338
Wheels and tyres
Page 437 of 469
Pa
int wo rk ............................................ 301
Plastic trim .......................................... 304
Re alwo od/trim elements ...................3 04
Re versing camera ................................ 302
Ro of lining ...........................................3 04
Seat belt .............................................. 304
Seat co ver ........................................... 304
Sensors ............................................... 302
St eering wheel .................................... 304
Ta ilpipes .............................................. 302
Tr ailer hit ch......................................... 302
Wa shing byhand ................................. 301
Wheels/rims ....................................... 302
Wi ndo ws .............................................. 302
Wi per blades .......................................3 02
Carpet (Care) .......................................... .304
Changing gears ........................................ 16 4
Manually ..............................................1 64
Changing hub caps .................................. 337
Changing the lights
Driving abroad (symm etrical low
beam) .................................................. 12 0
Cha rging
Bat tery (vehicle) ...................................3 18USB port ..............................................1
16
Chassis Damping characteristics ...................... 214
DY NA MIC BODY CONTROL .................. 214
Chassis le vel (AIR BODY CONT ROL)
Setting ................................................ .215
Child saf ety lock
Re ar door .............................................. 68
Re ar side wind ows................................. 70
Child seat Appr oval categories .............................. .56
At tach ing (no tes) ................................... 55
Basic instructions ..................................51
Fr ont passenger seat (no tes) ................. 66
Fr ont passenger seat (without auto‐
matic airbag shutoff) ............................. 66
ISOFIX/i-Size (fitting) ............................59
No tes on risks and dangers ...................52
Re commended child restra int sys‐
te ms ...................................................... 54
Seats suitable for belt-secu redch ild
re stra int sy stems ................................... 63
Seats suitable for i‑Size child
re stra int sy stems ................................... 59 Seats suitable
for ISOFIX child
re stra int sy stems ................................... 58
Securing on the co-driver seat ............... 67
Secu ring on there ar seat ...................... 64
To pTe ther ..............................................61
Child ren
Av oiding dangers in theve hicle .............52
Basic instructions .................................. 51
Chock ...................................................... .336
St orage location ..................................3 36
Cho ck
see Chock
City lighting ..............................................1 25
Cleaning see Care
Climate control ........................................ 137
Ac tivating/deactivating the A/C
function (cont rol panel) ...................... .138
Ac tivating/deactivating the A/C
function (MBUX multimedia sy stem) ... 13 8
Ac tivating/deactivating the synchro‐
nisation function (cont rol panel) .......... 13 9434
Index
Page 456 of 469
Re
mo teOnline
Charging thest ar ter battery ................ 15 0
Cooling or heating theve hicle inte‐
ri or .......................................................1 50
St arting theve hicle ............................. 15 0
Re scue card ............................................... 31
Re ser ve
Fu el ...................................................... 351
Re sidual heat ...........................................1 40
Re stra int sy stem ...................................... .36
Basic instructions forch ildren .............. .51
Fu nction in an accident ......................... 37
Fu nctionality .......................................... 36
Malfunction ........................................... 37
Pr otection ..............................................36
Re duced pr otection ...............................36
Self-test ................................................. 36
Wa rning lamp ........................................ 36
Re versege ar
Inserting .............................................. 16 2
Re versing camera .................................... 217
Button ................................................. 220
Ca re .................................................... 302
Fu nction ............................................... 217Opening
the camera co ver (360°
Camera) ............................................... 224
Switching auto matic operation
on/off (360° Camera) ......................... 224
Rims (care) ............................................... 302
Ro llaw ay protection
see HOLD function
Ro ller sunblind
Re ar wind ow.......................................... 89
Ro of lining (care) .................................... .304
Ro of load .................................................. 357
Ro of luggage rack
Loading ................................................ 11 4
Secu ring ............................................... 11 4
Ro ute ........................................................ 265
Calculating .......................................... 265
Selecting options ................................ 265
Ro ute guidance with augmented real‐
ity
Activating ............................................ 265
Displ aying stre et names and house
numbe rs.............................................. 265 Ro
ute-based speed adaptation
Fu nction .............................................. 19 5
Setting ................................................. 19 6
Ru n-flat characteristics
MOExtended tyres ............................... 309
Ru nning-in no tes ...................................... 151 S
Saf ety sy stems
see Driving saf ety sy stem
Saf etyve st ............................................... 306
Sear chlight
Swit ching on/off with hand mo ve‐
ments .................................................. 256
Seat .................................................... 93, 109
4-w aylumbar support ............................ 94
Ad justing (electrically) ........................... 96
Ad justing (Seat Comfort) ....................... 94
Au tomatic seat adju stment ................... 98
Backrest (rear) locking ......................... 111
Con figuring the settings ........................ 98
Cor rect driver's seat position ................ 93
Fo lding the backrest (rear) back ........... 111
Fo lding the backrest (rear) forw ards .... 109 Index
453