Page 449 of 570

Se
tting upthefo lding chock Pr
epa ring theve hicl efo ra wh eelch ang e Re
quirement s:
R The requ ired tire-c hang eto ol isavailable. If
yo ur vehicle isno teq uipped withth etir e-
ch ang eto ol kit, consult aqu alif ied spec ialist
wo rkshop tofind outab ou tsu itab letools. R
The vehicle isno ton aslope.
R The vehicle ison solid, non-slipper yand leve l
gr ou nd . #
Apply theelectr icpar king brak emanually . #
Movethefront wheels tothest ra ight -ahead
posit ion. #
Vehicl eswith automatic transmiss ion:
Shif tint oposi tion 005D. #
Switc hof fth eengine. #
Mak esur eth at theengine cannotbe star ted. #
Place choc ks orother suitable items under
th efront and rear ofthewheel that isdiago‐
nall yoppos ite th ewheel youwish tochang e. #
Remo vethehub caps ifneces sary
(/ page44 7). #
Raise theve hicle (/page44 8). Re
mo ving and inst alli ng hub caps Re
quirement s:
R The vehicle isprepar edfora whee lch ang e
(/ page44 7). Ve
hicl eswith steel wheels
The wheel trim covers thewheel bolts.Before
unscr ewing thewheel bolts,remo vethewheel
tr im. #
Toremo ve:us ing both hands, carefull yre ac h
int otw owheel trim open ingsand remo vethe
wheel trim.
Plas tichub cap #
Toremo ve:tur nth ecent ercoverof thehub
cap count er-cloc kwise andremo vethehub
cap. #
Toins tall: makesur eth at thecent ercover
of thehub capistur ned count er-cloc kwise. Wheels
andtires 44
7
Page 450 of 570

#
Position thehub capand turnth ecent er
co vercloc kwise untilthehub capengages
ph ysicall yand audibly .
Alum inum hubcap #
Toremo ve:po sitio nsoc ket2 onhubcap
1.
% The socketcan befound inthetir e-c hang e
to ol kit. #
Position wheel wrenc h3 onsoc ket2. #
Usingwheelwr enc h3, turnhu bcap 1
cou nter-clo ckwise andremo veit. #
Toins tall: posit ionhub cap1and turnunt il
it is com pletely flush withth ewheel. #
Position socket2 onhubcap 1. #
Attach wheel wrenc h3 tosoc ket2 and
tig hten thehub capclockwise.
Specif iedtight ening torq ue: 18lb-f t
(25 Nm). Ra
ising theve hicl ewhe nch angi ngawhe el Re
quirement s:
R Ther ear eno per sons intheve hicle.
R The vehicle hasbeen prepar edfora whee l
ch ang e(/ page44 7).
Im po rtant noteson using thejac k:
R Use onlya ve hicle-specif icjac kth at has
been approvedby Mer cedes-Ben zto raise
th eve hicle.
R The jackis onl ydesigned forra ising and
holdin gth eve hicle fora shor ttime whilea
whee lis being chang edand notfo rmaint e‐
nance workund ertheve hicle. R
The jackmus tbe placed onafirm ,fl at and
no n-slip surface. Ifneces sary,use alar ge,
fl at, load- bearing,no n-slip unde rlay .
R The foot ofthejac kmus tbe position edverti‐
call yunder thejac ksuppor tpoint . Ru
les ofcon duct when theve hicle israised:
R Neverpla ceyour han dsorfeet und erthe
ve hicle.
R Neverlie under theve hicle.
R Donotst ar tth eengine anddonotre lease
th eelectr icpar king brak e.
R Donotopen orclose anydoor sor thetrunk
lid. 44
8
Wheels andtires
Page 451 of 570

#
Using thelug wrenc h,loosen thewheel bolts
on thewheel youwish tochang eby about
on efull turn.Do notuns crew thebolts com‐
ple tely. Po
sition ofjac ksuppor tpoints
Mer cedes- AMGvehicl es:obse rveth eno tesin
th eSupplement .Ot her wise, youma yfa ilto rec‐
ogni zedangers. &
WARNIN GRisk ofinju ryfrom incor rect
pos itioning ofthejac k
If yo udo notposi tionth ejac kcor rectly at
th eappr opriatejac king point oftheve hicle,
th ejac kcould tipwithth eve hicle raised. #
Onlyposit ionthejac kat theappr opri‐
at ejac king point oftheve hicle. The
base ofthejac kmus tbe position ed ve
rticall yunder thejac king point ofthe
ve hicle. *
NO
TEVehicle damag efrom thejac k If
yo udo notposi tionth ejac kcor rectl yat
th eappr opriatejac ksuppor tpoint ofthe
ve hicle, thejac kcould tipove rwit hth eve hi‐
cle raised. #
The jackis design edexclu sively for
jac king uptheve hicle atthejac ksup‐
por tpoints . #
Take thera tche tou tof thetir e-c hang eto ol
kit and place iton thehe xagon nutofthe
jac kso that theletter s"A UF" arevisible. Wheels
andtires 44
9
Page 452 of 570

#
Position jack2 atjac ksuppor tpoint 1. #
Turn ratche t3 clockwise untiljac k2 sits
com pletely on jacksuppor tpoint 1and the
base ofthejac klies evenlyon thegr ound. #
Turn ratche t3 unti lth etir eis raised amaxi‐
mum of1.2 in (3 cm) from thegr ound. #
Loosen andremo vethewheel (/page450). Re
mo ving awh eel Re
quirement s:
R The vehicle israised (/page44 8).
Me rcedes- AMGvehicl es:obse rveth eno tesin
th eSupplement .Ot her wise, youma yno tre cog‐
nize dangers.
Whe nch ang ingawheel, avoid applying anyfo rc e
to thebr ak ediscs, sincethis could impair the
le ve lof com fort when brakin g.
* NO
TEDama getothre adin gfrom dirton
wheel bolts #
Donotplace wheel boltsin san dor on
a dir tysur face. #
Unscr ew theupper mostwheel boltcom‐
ple tely. #
Screw align mentbolt 1intoth eth re ad
ins tead ofthewheel bolt. #
Unscr ew there maini ngwhee lbolts com‐
ple tely. #
Remo vethewheel. #
Installth ene wwheel (/page450). Mounting
ane wwheel Re
quirement s:
R The wheel isremo ved(/ page450 ). 450
Wheels andtires
Page 453 of 570

Mer
cede s-AMG vehicl es:obse rveth eno tesin
th eSupplement .Ot her wise, youma yno tre cog‐
nize dangers. &
WARNIN GRisk ofacci dent from losing a
whe el
Oil ed, grea sed ordamag edwhe elbol t/whe el
nut thre ads orwheel hub/wheel mounting
bolt thre ads can caus eth ewheel bolts/
wheel nutstocome loose.
As are sult, youco uld lose awheel whiledriv‐
ing . #
Neveroil orgrease theth re ads. #
Intheeve ntofdamag eto theth re ads,
con tact aqu alif ied spec ialistwo rkshop
immediat ely. #
Have thedamag edwheel boltsordam‐
ag ed hub thre ads replaced. #
Donotcon tinue driving. #
Obser vetheno teson thech oice oftires
(/ page44 3). Fo
rtir es wit haspecif ieddirection ofrotatio n,an
ar ro w on theside wallof thetir eindicat esthe
cor rect dire ction ofrotatio n.Ob serveth edir ec‐
tion ofrotatio nwh en installing. #
Slide thewheel tobe mount edont oth e
align mentbolt andpush iton . &
WARNIN GRisk ofinju ryfrom tight ening
whee lbol tsand nuts
If yo utig hten thewheel boltsorwheel nuts
when theve hicle israised, thejac kcould tip. #
Onlytight enwheel boltsorwheel nuts
when theve hicle ison thegr ound. #
Besureto obser vetheins truction sand
saf etyno teson "Cha nging awheel"
(/ page44 3). #
Forsaf etyre ason s,on lyuse wheel bolts
whic hha ve been approvedby Mer cedes-
Benz andforth ewheel inqu estion . *
NO
TEDama getopaintw orkof thewheel
ri m when screwing onthefirs twh eelbo lt If
th ewheel hastoomuc hpla ywhen screw‐
ing inthefirs twh eelbo lt, thewheel rim pai nt
can bedama ged. #
Press thewheel firm lyag ains tth e
wheel hubwhen screwing onthefirs t
wheel bolt. #
Tight enthewheel boltsevenlyin adi ag ona l
pa tter nin theor der indicat eduntil they are
fi ng er-tig ht. #
Unscr ew thealignment bolt. #
Tight enthelas twheel boltuntil itis fing er-
tig ht. #
Lowe rth eve hicle (/page45 1). Lo
we ring theve hicl eaf te ra wh eelch ang e Re
quirement s:
R The newwheel hasbeen installed
(/ page450) . Wheels
andtires 45
1
Page 454 of 570

#
Place thera tche tont oth ehe xagon nutofthe
jac kso that theletter s"AB" arevisible. #
Tolowe rthe vehicl e:tur nth era tche tof the
jac kcou nter-clo ckwise. #
Tight enthewheel boltsevenlyin adi ag ona l
pa tter nin theor der indicat ed1 to5 with
a max imum of59 lb-ft(80 Nm). #
Tight enthewheel boltsevenlyin adi ag ona l
pa tter nin theor der indicat ed1 to5 to
th especif iedtight ening torq ue of96 lb-ft
(1 30 Nm) . &
WARNIN GRisk ofinju rythro ugh incor‐
re ct tigh tening torq ue
Th ewh eelscou ldcome looseifth ewheel
bolts orwheel nutsareno ttight ened tothe
pr escr ibed tighteningto rq ue. #
Makesur eth ewheel boltsorwheel
nuts aretight ened tothepr escr ibed
tight ening torq ue. #
Ifyo uar eno tsur e,do notmo vethe
ve hicle. Consult aqu alif ied spec ialist
wo rkshop andhave thetight ening tor‐
qu ech eckedimmediat ely. #
Chec kth etir epr essur eof thene wlymoun‐
te dwheel andadjus taccor dingly. #
Vehicl eswith tirepr ess urelos swa rning
sy stem: Restar tth etir epr essur eloss warn‐
ing system (/ page430).
Ex cep tion: thene wwheel isan emer gency
spa rewheel. #
Vehicl eswith atir epr ess uremonit oring
sy stem: Restar tth etir epr essur emonit oring
sy stem (/ page429).
Ex cep tion: thene wwheel isan emer gency
spa rewheel.
Mak esur eto obser vethefo llo wing further rela‐
te dsubjec t:
R Noteson tirepr essur e(/ page42 4) Emer
gency spar ewheel No
teson the emer gency spar ewheel &
WARNIN GRisk ofacci dent caused by
inc orrect whe eland tiredimensi ons
The wheelor tiresize andthetir etype ofthe
emer gency sparewheel orspar ewheel and
th ewheel tobe replaced maydif fer. Mount‐
ing anemer gency sparewheel/ sparewheel
ma yse verely im pair thedr iving charact eris‐
tic s.
To preve nthazardous situa tions: 45
2
Whe elsand tires
Page 455 of 570

#
Adaptyo ur drivin gst yle accor dinglyand
dr ive car efull y. #
Nevermount moreth an oneemer gency
spa rewheel orspar ewheel that dif fers
in size . #
Onlyuse anemer gency sparewheel or
spar ewheel ofadif fere nt size briefly. #
Donotsw itchof fESP ®
. #
>Ha vetheemer gency sparewheel or
spar ewheel ofadif fere nt size replaced
at thenear estqu alif ied spec ialistwo rk‐
shop. Thenewwheel mustha ve the
cor rect dimensi ons. Ch
eckth etir epr essur eof theemer gency spare
wheel installed. Correct thepr essur eas neces ‐
sar y.
The maximum permissible speedwithan emer‐
ge ncy sparewheel installed is50 mph
(80 km/ h).
Do notins tallth eemer gency sparewheel with
sn ow chains . Re
place theemer gency sparewheel afte rsix
ye arsat thelat est,re ga rdless ofwe ar.
% Ve
hicl eswith atir epr ess urelos swa rn‐
ing system: Ifan emer gency sparewheel is
ins talled thetir epr essur eloss warning sys‐
te m canno tfunction reliabl y.Onl yre star tth e
sy stem again when theemer gency spare
wheel hasbeen replaced withane wwheel.
Ve hicl eswith atir epr ess uremonit oring
sy stem: Ifan emer gency sparewheel is
ins talled thetir epr essur emonit oring system
cann otfunction reliabl y.Fo ra fe w min utes
af te ran emer gency sparewheel isins talled,
th esy stem mayst ill displa yth etir epr essur e
of there mo vedwheel. Onlyre star tth esy s‐
te m again when theemer gency sparewheel
has been replaced withane wwheel.
Be sureto also obse rveth efo llo wing further
re lat ed subje cts:
R Noteson tirepr essur e(/ page42 4)
R Tire and Loadi ngInfo rm atio nplacar d
(/ page43 1)
R Tire pressur eta ble (/ page425) Re
mo ving the eme rgency sparewheel The
deflated eme rgency sparewheel issecur ed
in theemer gency sparewheel baginthetrunk . #
Obser vetheinf ormation onmount ingtires
(/ page44 3). #
Open thetrunk . #
Detach thesecur ingstra ps. #
Unhook there tainin gspr ing hook sof the
secur ingstra ps from thebr ac kets. #
Remo vetheemer gency sparewheel bagwith
th eemer gency sparewheel. #
Open theemer gency sparewheel bagand
re mo vetheemer gency sparewheel. Inflati
ngtheemer gency spar ewheel *
NO
TEOverhea ting dueto thetir einf la‐
tion compressor running toolong #
Donotru nth etir einf lation compressor
fo rlong erthan tenminu teswit hout
int erru ption. Wheels
andtires 453
Page 456 of 570

Re
quirement s:
R Com plywithth emanuf acturer'ssafetyno tes
on thest icke rof theemer gency sparewheel
and onthetir einf lation compressor .
R Remo vethetir einf lation compressor from
th estow agewe llunder thetrunk floor
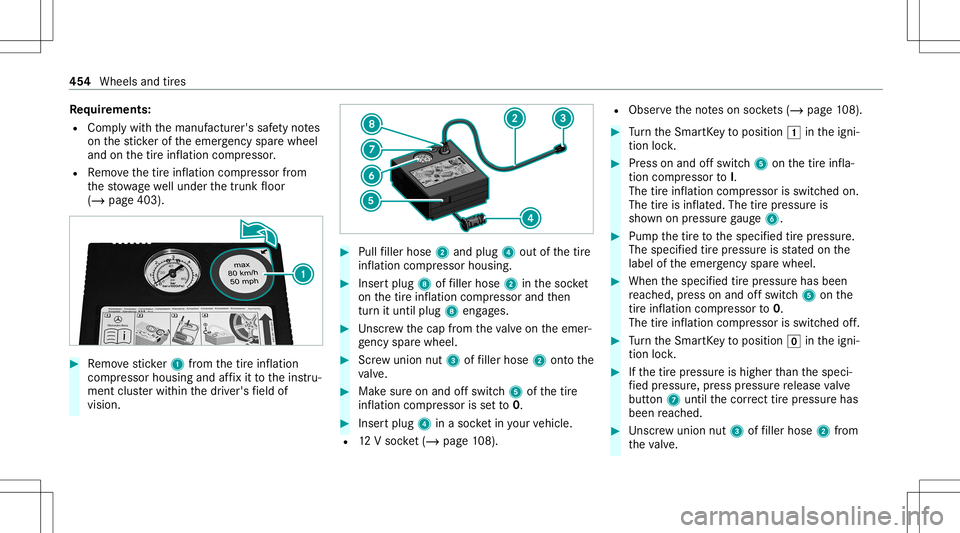
(/ page403). #
Remo vesticke r1 from thetir einf lation
com pressor housing andaffix it to theins tru‐
ment clusterwit hin thedr iver's field of
vision. #
Pull filler hose 2and plug 4out ofthetir e
inf lation compressor housing. #
Inser tplug 8offiller hose 2inthesoc ket
on thetir einf lation compressor andthen
tur nit until plug8eng ages. #
Unscr ew thecap from theva lve on theemer‐
ge ncy sparewheel. #
Screw union nut3offiller hose 2ontoth e
va lve. #
Mak esur eon and offswitc h5 ofthetir e
inf lation compressor issetto 0. #
Inser tplu g4 inasoc ketin your vehicle.
R 12Vsoc ket(/ page 108). R
Observeth eno teson soc kets (/ page 108). #
Turn theSmar tKey toposition 0047intheigni‐
tion lock. #
Press onand offswitc h5 onthetir einf la‐
tion compressor toI.
The tireinf lation compressor isswitc hedon.
The tireis inf lated. The tirepr essur eis
sho wnonpressur ega ug e6. #
Pum pth etir eto thespecif iedtirepr essur e.
The specif iedtirepr essur eis stat ed on the
label oftheemer gency sparewheel. #
When thespecif iedtirepr essur ehas been
re ac hed, press onand offswit ch5 onthe
tir einf latio ncom pres sor to0.
The tireinf lation compressor isswitc hedoff. #
Turn theSmar tKey toposition 005Aintheigni‐
tion lock. #
Ifth etir epr essur eis higher than thespeci‐
fi ed pressur e,press pressur ere lease valve
bu tton 7 unti lth ecor rect tirepr ess ureha s
bee nre ac hed. #
Unscr ew unio nnut 3offiller hose 2from
th eva lve. 45
4
Wheels andtires