2020 MERCEDES-BENZ AMG GT COUPE steering
[x] Cancel search: steeringPage 152 of 433

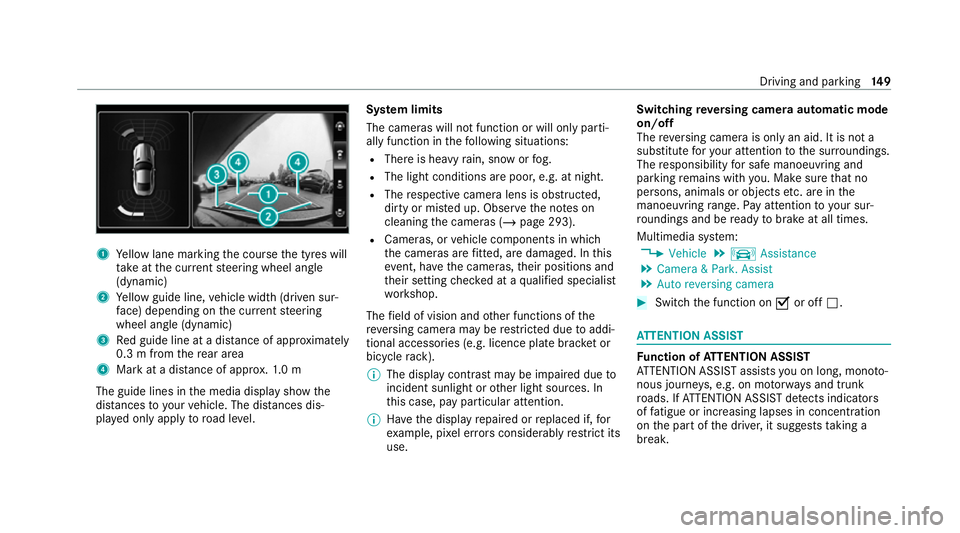
1
Yellow lane marking the course the tyres will
ta ke atthe cur rent steering wheel angle
(dynamic)
2 Yellow guide line, vehicle width (driven sur‐
fa ce) depending on the cur rent steering
wheel angle (dynamic)
3 Red guide line at a dis tance of appr oximately
0.3 m from there ar area
4 Mark at a distance of appr ox.1. 0 m
The guide lines in the media display show the
dis tances to yourvehicle. The dis tances dis‐
pl ay ed only apply toroad le vel. Sy
stem limits
The cameras will not function or will only parti‐
ally function in thefo llowing situations:
R There is heavy rain, snow or fog.
R The light conditions are poor, e.g. at night.
R The respective camera lens is obstructed,
dirty or mis ted up. Obser vethe no tes on
cleaning the cameras (/ page 293).
R Cameras, or vehicle components in which
th e cameras are fitted, are dama ged. In this
eve nt, ha vethe cameras, their positions and
th eir setting checked at a qualified specialist
wo rkshop.
The field of vision and other functions of the
re ve rsing camera may be restricted due toaddi‐
tional accesso ries (e.g. licence plate brac ket or
bicycle rack ).
% The display contrast may be impaired due to
incident sunlight or other light sources. In
th is case, pay particular attention.
% Have the display repaired or replaced if, for
ex ample, pixel er rors considerably restrict its
use. Switching
reve rsing camera automatic mode
on/off
The reve rsing camera is only an aid. It is not a
substitute foryo ur attention tothe sur roundings.
The responsibility for safe manoeuvring and
parking remains with you. Make sure that no
persons, animals or objects etc. are in the
manoeuvring range. Pay attention to your sur‐
ro undings and be ready tobrake at all times.
Multimedia sy stem:
4 Vehicle 5
k Assistance
5 Camera & Park. Assist
5 Auto reversing camera #
Switch the function on Oor off ª. AT
TENTION ASSI ST Fu
nction of ATTENTION ASSI ST
AT TENTION ASSIST assists you on long, mon oto‐
nous journe ys, e.g. on mo torw ays and trunk
ro ads. If ATTENTION ASSIST de tects indicators
of fatigue or increasing lapses in concentration
on the part of the driver, it suggests taking a
brea k. Driving and pa
rking 14 9
Page 156 of 433

If Blind Spot Assist is activated,
thewa rning
lamp in theex terior mir ror lights up yellow at
speeds of up to30 km/h. Atspeeds abo ve
appr oximately 30 km/h, thewa rning lamp goes
out and Blind Spot Assist is operational.
If a vehicle is de tected with inthe monitoring
ra nge at speeds ab ove30 km/h, thewa rning
lamp in theex terior mir ror lights up red.
If a vehicle is de tected close to yourvehicle in
th e lateral monitoring range and you swit chon
th e turn signal indicator in the cor responding
direction, a warning tone sounds once and the
wa rning lamp in theex terior mir rorflashes red. If
th e turn signal indicator remains switched on, all
ot her de tected vehicles are indicated only bythe
fl ashing of there dwa rning lamp.
If yo uove rtake a vehicle quickl y,no warning is
given. &
WARNING Risk of accident despite Blind
Spot Assi st
Blind Spot Assi stdoes not react tovehicles
approaching and overtaking you at a greatly
di fferent speed. Blind Spot Assist cann
otwa rndrivers in this
situation. #
Alw ays pay careful attention tothe traf‐
fi c situation and maintain a safe dis‐
ta nce at the side of theve hicle. Blind Spot Assist is only an aid. It may
failto
de tect some vehicles and is not a substitute for
attentive driving. Alw ays ensure that there is suf‐
fi cient dist ancetothe side forot her road users
and obs tacles.
Sy stem limits
The sy stem may be limited in thefo llowing situa‐
tions:
R The sensors are dirty or co vered.
R Poor visibility, e.g. due tofog, heavy rain,
snow or spr ay.
R Narrow vehicles, e.g. bicycles, are within the
monitoring range.
R Ifth e lanes are very nar row or very wide,
especially if vehicles are not driving in the
middle of their lane. Wa
rnings may be issued in er ror when driving
close tocrash barr iers or similar continuous lane
borders. Warnings may be inter rupte d when driv‐
ing alongside long vehicles, forex ample lor ries,
fo r a prolonged time.
Blind Spot Assist is not operational when reve rse
ge ar is engaged.
Ac tivating/deactivating Blind Spot Assi stor
Ac tive Blind Spot Assi st
Multimedia sy stem:
4 Vehicle 5
k Assistance
5 Blind Spot Assist #
Activate Oor deacti vate ª the function. Lane
Keeping Assist Fu
nction of Lane Keeping Assist
Lane Keeping Assist monitors the area in front of
yo ur vehicle bymeans of multifunction camera
(/ page 127). It ser vesto protect you against
unin tentional lyleaving your lane. You will be
wa rned bymeans of a vibration in thesteering
wheel. Driving and parking
15 3
Page 163 of 433

Note
s on operating saf ety&
WARNING Risk of dist raction from infor‐
mation sy stems and communications
equipment
If yo u operate information and communica‐
tion equipment integ rated in theve hicle
when driving, you will be distracted from the
traf fic situation. This could also cause youto
lose control of theve hicle. #
Only operate this equipment when the
traf fic situation permits. #
Ifyo u cannot be sure of this, stop the
ve hicle whilst paying attention toroad
and traf fic conditions and ope rate the
equipment with theve hicle stationar y. Fo
ryo ur ow n sa fety, al ways obser vethefo llow‐
ing points when operating mobile communica‐
tions equipment and especially your voice con‐
trol sy stem:
R Obser vethe legal requ irements forth e coun‐
try in which you are driving. R
Ifyo u use thevo ice control sy stem in an
emer gency your voice can change and your
te lephone call, e.g. an emer gency call, can
th ereby be unnecessarily dela yed.
R Familiarise yourself with thevo ice control
sy stem functions before starting the journe y. Operation
Overview of operation of LINGU
ATRO NIC on
the multifunction steering wheel LINGU
ATRO NIC is operational appr oximately
th irty seconds af terth e ignition is switched on. 1
Press therock er switch up: £starts LIN‐
GU ATRO NIC
2 Press the control: 8switches the sound
off or on (ends LINGU ATRO NIC)
Tu rn the control up/down: increases/
decreases thevo lume 16 0
LINGU ATRO NIC
Page 164 of 433

3
Press therock er switch up: 6makes/
accepts a call
Press therock er switch down: ~rejects/
ends a call (ends LINGU ATRO NIC) Conducting a dialogue with LINGU
ATRO NIC #
Tostart or continue a dialogue: onthe
multifunction steering wheel, press the£
rock er switch up.
Yo u can say a voice command af ter an
acou stic signal. #
Tocor rect an ent ry:say theCorrection
vo ice command. #
Toselect an entry from the selection lis t:
say the line number or the conte nts. #
Tobrows eth e selection lis t:say theNext
or Back voice command. #
Tointer rupt the dialogue: saythePause
vo ice command. #
Tocancel the dialogue: saytheCancel
vo ice command. Operable functions
Yo
u can use the LINGU ATRO NIC voice control
sy stem tooperate thefo llowing equipment
depending on thefe atures:
R Telephone
R Text messa ges
R Navigation
R Address book
R Radio
R Audio (memory card, Media Inter face, USB
and Blu etoo th®
audio)
R TV
R Vehicle Overview of types of
voice command A distinction is made between
thefo llowing
vo ice commands:
R Global voice commands can be said at any
time and rega rdless of the cur rent applica‐
tion, e.g. thevo ice commands Navigate to,
Call orText message to. R
Application-specific voice commands are
only available forth e active application.
Once Linguatronic is star ted an autocue is
shown. Apart from theav ailable voice com‐
mands forth e application cur rently acti ve,th is
also cites example voice commands forot her
applications which are not active. In this wa y,
yo u will be familiar more quickly with theav aila‐
ble voice commands. The list can be scrolled or
it can be operated byspeech or the controller/
to uchpad. Information on
the language setting Yo
u can change the language of LINGU ATRO NIC
via the sy stem language settings. If the set sys‐
te m language is not suppor tedby LINGUA‐
TRONIC, English will be selected.
LINGU ATRO NIC is available foryo u in thefo llow‐
ing languages:
R English
R English
R French LINGU
ATRO NIC 161
Page 183 of 433

#
Select Rename . #
Enter thech aracters. #
Toconfirm the entr y:select ¡.
Moving favo urites #
Press the© button.
The main functions are displa yed. #
Navigate down wards once. #
Select a favo urite. #
Navigate down wards once.
The Favourites menu appears. #
Select Move. #
Movethefa vo urite tothe desired position.
If a favo urite has already been added at this
position, it will be overwritten.
Deleting favo urites #
Press the© button.
The main functions are displa yed. #
Navigate down wards once. #
Select a favo urite. #
Navigate down wards once.
The Favourites menu appears. #
Todel ete: select Delete. #
Select Yes. #
Toresto reall favo urites: selectReset all.
A prom ptappears. #
Select Yes.
The favo urites are reset tothefa ctory set‐
tings. Switching the sound on/off
#
Tomute: pressvolume control 1.
The 8 symbol appears in thest atus line
of the media displa y. Yo
u will also hear traf fic announcements and
navigation announcements even when the
sound is muted. #
Toswitch on: change the media source or
turn volume control 1. Ad
justing the volume Setting with
thevo lume control on the multi‐
function steering wheel #
Turn volume control 1.
The volume of the cur rent radio or media
source is set. The volume of other audio
sources can be adjus ted separatel y. 18 0
Multimedia sy stem
Page 197 of 433

ve
hicle. Park your vehicle safely before operating
th e application. Setting
Track Race Multimedia sy
stem:
4 vehicle 5
TRACK PACE 5
Track Race
Re cording a track #
Select New track. #
Atthe desired starting point, select Start.
The track recording starts at this point. Dur‐
ing track recording, sectors can be set to
de term ine inter vals. #
Tofinish track recording, select Stopor cross
th est arting line again. #
Enterth ewe ather and the track name.
Sear ching bytrack name #
Select All tracks . #
Select ªSearch . #
Enter the tra ckname.
Tr ac ks with the sear ched name are dis‐
pla yed. Measuring
the time on the track #
Select Timekeeping.
An ove rview of near bytrac ksappears.
The dis tance and di rection tothest arting
line of the track is displa yed. #
Select the desired trac k.
If yo u ha vealready driven on this trac k,you
can select a driven time as a refere nce time.
Ti mekeeping begins auto maticallywhen the
st arting line has been crossed.
% When Zoomis selec ted, the tra ckdisplay
can be switched from 2D to3D.
Displaying the ana lysis #
Select Lap times.
An ove rview of all the driven track s appears. #
Select a trac k.
The following data is displa yed:
R Lap and sector times
R average and maximum permissible speed
R driver
R vehicle R
Date
R Weather #
Select a desired lap.
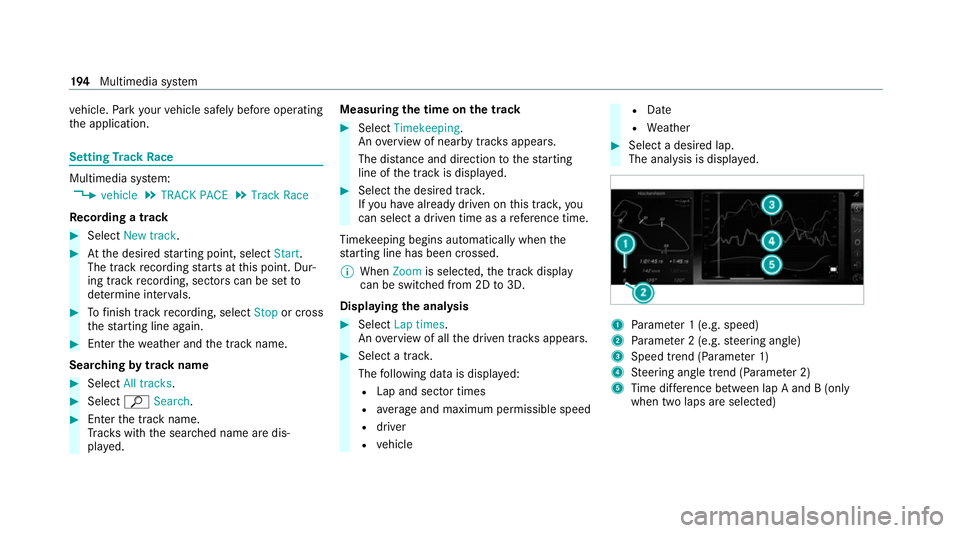
The anal ysis is displa yed. 1
Parame ter 1 (e.g. speed)
2 Parame ter 2 (e.g. steering angle)
3 Speed trend (Parame ter 1)
4 Steering angle trend (Parame ter 2)
5 Time dif fere nce between lap A and B (only
when two laps are selected) 194
Multimedia sy stem
Page 198 of 433

%
The following values can be set for parame‐
te rs 1 and 2, forex ample:
R Speed
R longitudinal/lateral acceleration
R steering angle
R Engine speed
R engine oil/tyre temp erature
Based on the anal ysis yo u can check and opti‐
mise driving characteristics for any position on
th e tra ck.
Exporting trac ksorraces (USB) #
Select All tracks.
An ove rview of all stored trac ksand races
appea rs. #
Highlight desired trac ksorraces. #
Select ÜOptions. #
Select Export.
The selected trac ksorraces can be expor ted
to a USB storage device connected tothe
ve hicle. Editing trac
ksand recordings #
Select All tracks. #
Highlight the desired trac k. #
Select Üoptions. #
Select Rename orDelete.
or #
Select a trac k. #
Highlight the desired recording. #
Select Üoptions. #
Select Weather orDelete. Setting Drag
Race Multimedia sy
stem:
4 vehicle 5
TRACK PACE 5
Drag Race
Measuring acceleration #
Select Acceleration.
Measurement begins when theve hicle accel‐
erates. Measurement is incremental, in steps
of 50 km/h toa maximum of 300 km/h or
up tothe set maximum speed. Measurement can be
stopped early by
selecting Stoporby stopping theve hicle.
Quar ter-mile race #
Select Quarter Mile.
The time measurement runs until a mile has
been tr avelled or a pr eviously set dis tance
(e.g. quarter mile, third mile or half mile) has
been reached.
% The possible values for setting the end dis‐
ta nce are de term ined bythe sy stem and
cann otbe freely chosen.
Measurement can be stopped early byselecting
Stop orby stopping theve hicle.
Manual start for accele ration and quarter-
mile race #
Select Acceleration orQuarter Mile . #
Select Manual start .
Three red traf fic lights appear one af terthe
ot her. The reaction time measurement starts
when they change togreen at the same time.
The reaction time is displa yed as soon as you
drive off. If you drive off too ear ly,th e mes‐
sage Jump start will appear and acceleration Multimedia sy
stem 19 5
Page 199 of 433

or
quarter mile measure ment will be cancel‐
led.
Measuring braking #
Select Braking . #
Select Start Record .
Measurement is incremental, in steps of
50 km/h toast andstill. If the braking proce‐
dure is star ted e.g. at a speed of 160 km/h,
measurement starts as soon as 150 km/h
has been reached.
St oring and calling up measurement values
When a measurement has been comple ted or
cancelled, the measured time can be stored. #
After a measu rement, select Save measure-
ment? .
The stored measurements can be displa yed via
th eHistory menu item.
Editing measu rements #
Select History . #
Highlight the desired measurement. #
Select Üoptions. #
Select Weather orDelete.
% The measurements can be displa yedby cate‐
gor y,e.g. acceleration measurements, by
applying a filter. Calling up
thete lemetry display Multimedia sy
stem:
4 Vehicle 5
TRACK PACE 5
Telemetry
The telemetry display sho wscurrent vehicle data
as a digital value and as a diagram.
Up tofour parame ters can be selected that are
to be shown in the displa y,such as:
R engine speed
R wheel angle
R speed
R steering angle #
Set the desired parame ters. #
Set the time.
The set parame ters are evaluated in the dia‐
gram forth e time set. %
The time can range between 30 seconds and
a maximum of 20 minu tes. Configuring AMG TRA
CKPACE Re
quirements:
To use the TRACK PACE app:
R the TRA CKPACE app is ins talled on the
mobile end device.
R the mobile end device is connected tothe
multimedia sy stem via Wi-Fi.
Multimedia sy stem:
4 vehicle 5
TRACK PACE 5
Options
Setting driver profiles #
Select Driver Profile. #
Create a new driver profile.
or #
Select an existing driver profile.
The driver profile is activated. 19 6
Multimedia sy stem