2020 MASERATI GRANTURISMO odometer
[x] Cancel search: odometerPage 112 of 286

Instrument Cluster
The instrument cluster is divided into
three main areas displaying
information, signs and text and/or icon
messages.
AFuel level gage with low fuel
indicator and analog
speedometer showing the
vehicle speed.
BAnalog tachometer and coolant
thermometer with high
temperature warning light.
CTFT display. In addition to other
information, in this area the
odometer display shows the
total distance covered by the
vehicle.
Speedometer and tachometer display
the main warning lights (see “Warning
and Indicator Lights on Analog
Instruments” in this chapter). The
other warning and indicator lights are
displayed on the TFT display together
with mode and drive function
indicators (see “TFT Display:
Warning/Indicator Lights" in this
chapter).
NOTE:
The image shows the instrument
cluster after the initial check cycle.
Sport Version
MC Version
Dashboard Instruments and Controls
4
108
Page 118 of 286

TFT Display: Menus and
Settings
The TFT display performs the following
functions:
• provides general information while
driving;
• signals failures and warnings.
The user can interact with the system
by setting the parameters for the
information that can be recalled.
The screen page displayed following
the initial check cycle, in normal
operating conditions, (standard screen
page) contains the following
information:
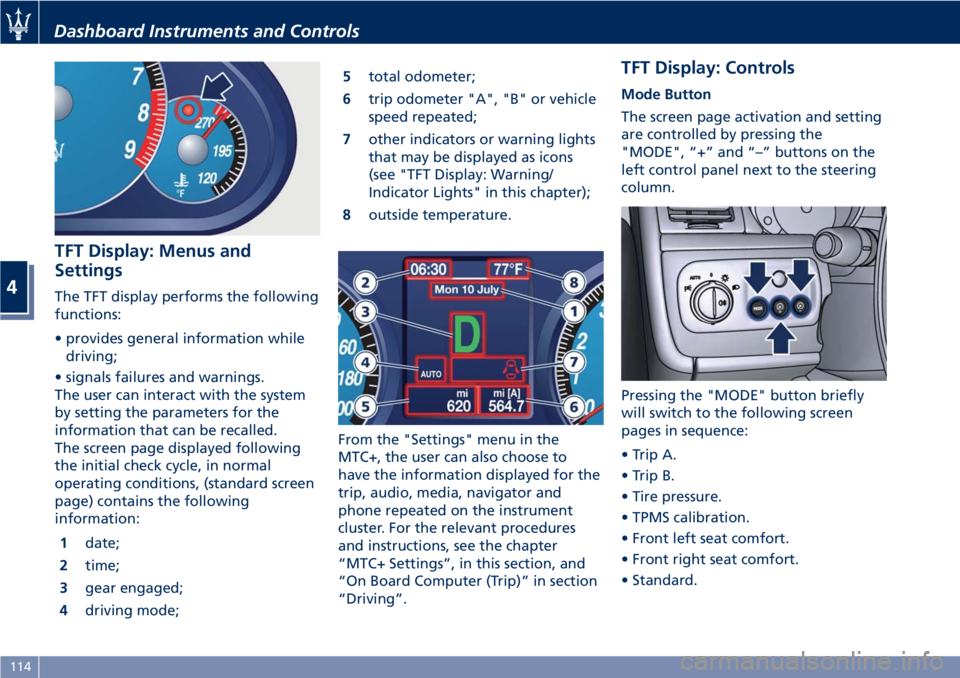
1date;
2time;
3gear engaged;
4driving mode;5total odometer;
6trip odometer "A", "B" or vehicle
speed repeated;
7other indicators or warning lights
that may be displayed as icons
(see "TFT Display: Warning/
Indicator Lights" in this chapter);
8outside temperature.
From the "Settings" menu in the
MTC+, the user can also choose to
have the information displayed for the
trip, audio, media, navigator and
phone repeated on the instrument
cluster. For the relevant procedures
and instructions, see the chapter
“MTC+ Settings”, in this section, and
“On Board Computer (Trip)” in section
“Driving”.
TFT Display: Controls
Mode Button
The screen page activation and setting
are controlled by pressing the
"MODE", “+” and “–” buttons on the
left control panel next to the steering
column.
Pressing the "MODE" button briefly
will switch to the following screen
pages in sequence:
• Trip A.
• Trip B.
• Tire pressure.
• TPMS calibration.
• Front left seat comfort.
• Front right seat comfort.
• Standard.
Dashboard Instruments and Controls
4
114
Page 119 of 286

“+“ and “–” Buttons
By means of the “+ “ and “–” buttons,
the user can adjust the instrument
cluster brightness.
When a screen page is viewed, these
buttons can be used to select the
available options (see paragraph "TFT
Display: Screen Pages" in this chapter).
TFT Display: Screen Pages
Trip Screen Page
The Trip screen page is recalled by
pressing the “MODE” button. Each
Trip screen page “A” or “B” is timed,
i.e. it is displayed for a maximum of 10
seconds, after which the screen page
previously active is displayed once
again.
Before the 10 second timing has
elapsed, pressing the “MODE” button
briefly (less than 2 seconds) will reset
the trip information relating to the
flashing odometer “A” or “B”.
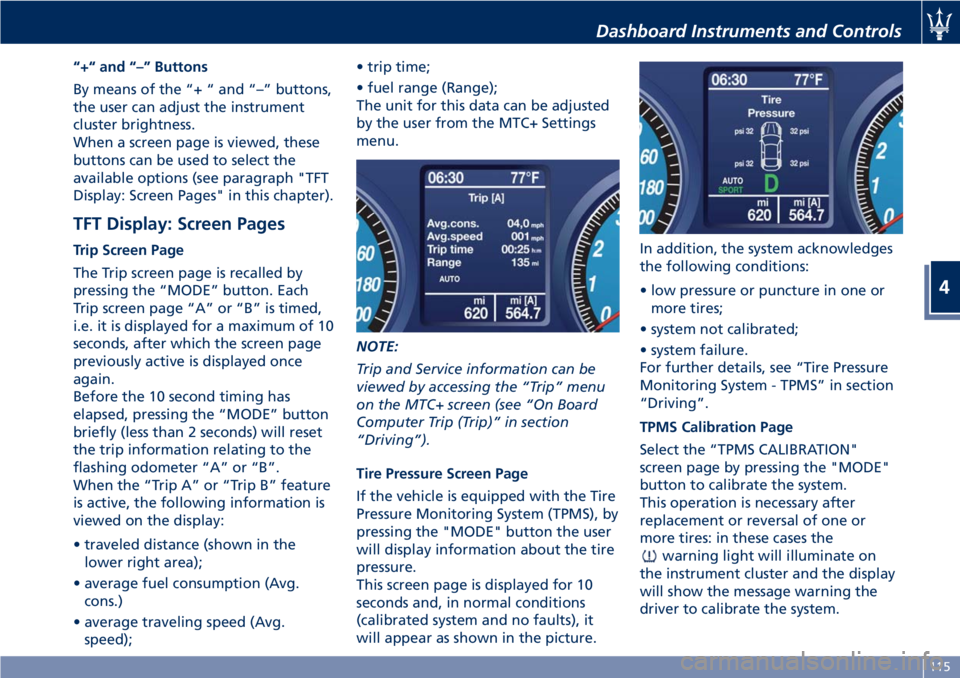
When the “Trip A” or “Trip B” feature
is active, the following information is
viewed on the display:
• traveled distance (shown in the
lower right area);
• average fuel consumption (Avg.
cons.)
• average traveling speed (Avg.
speed);• trip time;
• fuel range (Range);
The unit for this data can be adjusted
by the user from the MTC+ Settings
menu.
NOTE:
Trip and Service information can be
viewed by accessing the “Trip” menu
on the MTC+ screen (see “On Board
Computer Trip (Trip)” in section
“Driving”).
Tire Pressure Screen Page
If the vehicle is equipped with the Tire
Pressure Monitoring System (TPMS), by
pressing the "MODE" button the user
will display information about the tire
pressure.
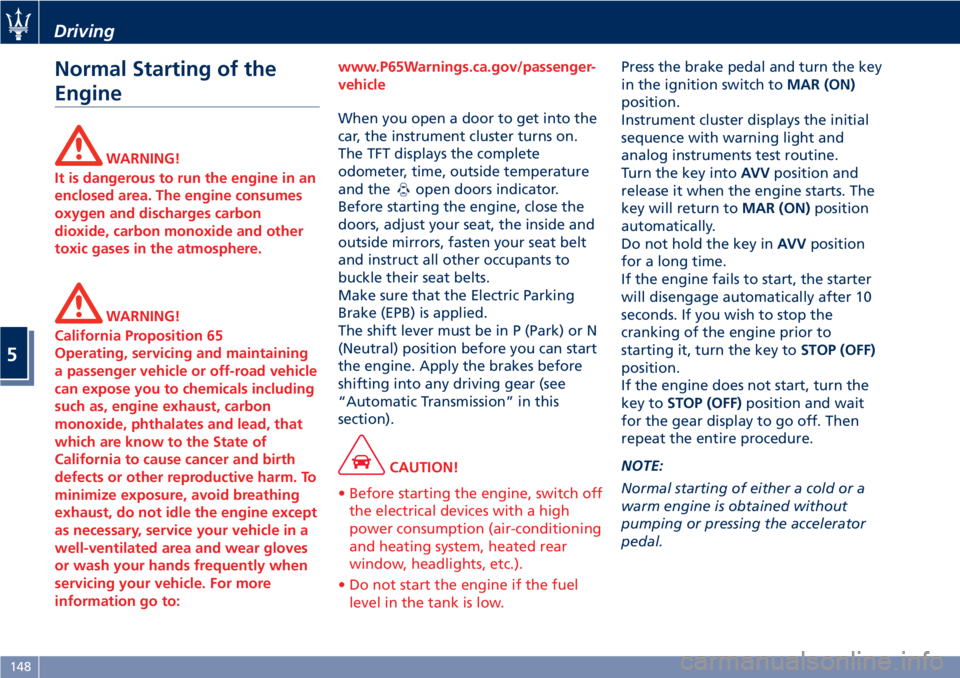
This screen page is displayed for 10
seconds and, in normal conditions
(calibrated system and no faults), it
will appear as shown in the picture.In addition, the system acknowledges
the following conditions:
• low pressure or puncture in one or
more tires;
• system not calibrated;
• system failure.
For further details, see “Tire Pressure
Monitoring System - TPMS” in section
“Driving”.
TPMS Calibration Page
Select the “TPMS CALIBRATION"
screen page by pressing the "MODE"
button to calibrate the system.
This operation is necessary after
replacement or reversal of one or
more tires: in these cases the
warning light will illuminate on
the instrument cluster and the display
will show the message warning the
driver to calibrate the system.
Dashboard Instruments and Controls
4
115
Page 152 of 286

Normal Starting of the
Engine
WARNING!
It is dangerous to run the engine in an
enclosed area. The engine consumes
oxygen and discharges carbon
dioxide, carbon monoxide and other
toxic gases in the atmosphere.
WARNING!
California Proposition 65
Operating, servicing and maintaining
a passenger vehicle or off-road vehicle
can expose you to chemicals including
such as, engine exhaust, carbon
monoxide, phthalates and lead, that
which are know to the State of
California to cause cancer and birth
defects or other reproductive harm. To
minimize exposure, avoid breathing
exhaust, do not idle the engine except
as necessary, service your vehicle in a
well-ventilated area and wear gloves
or wash your hands frequently when
servicing your vehicle. For more
information go to:www.P65Warnings.ca.gov/passenger-
vehicle
When you open a door to get into the
car, the instrument cluster turns on.
The TFT displays the complete
odometer, time, outside temperature
and the
open doors indicator.
Before starting the engine, close the
doors, adjust your seat, the inside and
outside mirrors, fasten your seat belt
and instruct all other occupants to
buckle their seat belts.
Make sure that the Electric Parking
Brake (EPB) is applied.
The shift lever must be in P (Park) or N
(Neutral) position before you can start
the engine. Apply the brakes before
shifting into any driving gear (see
“Automatic Transmission” in this
section).
CAUTION!
• Before starting the engine, switch off
the electrical devices with a high
power consumption (air-conditioning
and heating system, heated rear
window, headlights, etc.).
• Do not start the engine if the fuel
level in the tank is low.
Press the brake pedal and turn the key
in the ignition switch toMAR (ON)
position.
Instrument cluster displays the initial
sequence with warning light and
analog instruments test routine.
Turn the key intoAVVposition and
release it when the engine starts. The
key will return toMAR (ON)position
automatically.
Do not hold the key inAVVposition
for a long time.
If the engine fails to start, the starter
will disengage automatically after 10
seconds. If you wish to stop the
cranking of the engine prior to
starting it, turn the key toSTOP (OFF)
position.
If the engine does not start, turn the
key toSTOP (OFF)position and wait
for the gear display to go off. Then
repeat the entire procedure.
NOTE:
Normal starting of either a cold or a
warm engine is obtained without
pumping or pressing the accelerator
pedal.
Driving
5
148
Page 187 of 286

•Failure to equip your vehicle with
tires having adequate speed
capability can result in tire failure.
CAUTION!
Replacing original tires with tires of a
different size may result in false
speedometer and odometer readings.
Winter Tires
These tires are specially designed for
driving on snow and ice and are fitted
to replace the ones supplied with the
vehicle. Winter or all-season tires can
be identified by the M+S (Mud &
Snow) or 3PMSF (3 Peaks Mountain
Snow Flake) designation on the tire
sidewall.
Before mounting winter tires, contact
anAuthorized Maserati Dealerto
receive the technical information
necessary to advise you on wheel and
tire compatibility.
As to the type of tires to use, inflation
pressures and winter tires
specifications, carefully follow the
indications as reported in the
“Technical Data” and “Tire Inflation
Pressure” chapters in section “Features
and Specifications”.
WARNING!
The standard tires profile and rubber
mixture are optimized for wet and dry
driving conditions. Standard tires may
not prove favorable for snow
conditions.
NOTE:
Snow tires should have the same load
capacity as original equipment tires
and should be mounted on all four
wheels.
Snow Chains
Maserati approved traction devices (or
snow chains) may be used to improve
traction on compacted snow in heavy
snow conditions.
The use of snow chains is specified by
local regulations of each country.
Use snow chains of reduced
dimensions, with a maximum
projection of 0.35 in (9 mm) beyond
the tire tread.
Maserati recommended to use snow
chains KONIG, type “Supermagic”.
The snow chains may be fitted only on
rear wheel tires.
Please, contact your Service for further
information.Check the snow chain tension after
driving for a distance of about 55 yd
(50 m) with the chains fitted.
With the snow chains fitted, it is
advisable to deactivate the ESC system
(see chapter “Drive Mode” in this
section).
CAUTION!
• The use of non-recommended snow
chains may damage the vehicle.
• Broken chains can cause serious
damage. Stop the vehicle
immediately if noise occurs that
could indicate chain breakage.
Remove the damaged parts of the
chain before further use.
• Do not exceed 30 mph (50 km/h).
• Drive cautiously and avoid severe
turns and large bumps, especially
with a loaded vehicle.
• Avoid holes in the road, do not drive
over steps or sidewalks and do not
drive on long stretches without
snow. This will prevent damage to
the vehicle and the roadbed.
Driving
5
183