2020 MASERATI GRANTURISMO cruise control
[x] Cancel search: cruise controlPage 11 of 286

Abbreviations
Some descriptions and terms with
particular meanings are found in this
manual in abbreviated form.
A/CAir-Conditioning System.
ABSAnti-Lock Braking System.
ALCAdaptive Light Control.
ALRAutomatic Locking Retractor.
ASRAnti-Slip Regulation.
BOSBrake Override System.
CANController Area Network.
CCCruise Control.
CRSChild Restraint System.
DRLDaytime Running Lights.
EBDElectronic Brake-force
Distribution.
ECUElectronic Control Unit.
EDREvent Data Recorder.
EPBElectric Parking Brake.
ESCElectronic Stability Control.
ETDEmergency Tensioning
Device.
FTPFlash To Pass.
HBAHydraulic Brake Assistance.
ICEIncrease Control and
Efficiency.LATCHLower Anchors and Tether
for CHildren.
MILMalfunction Indicator Light.
MTC+Maserati Touch Control Plus.
OBDOn Board Diagnostics.
ORCOccupant Restraint
Controller.
RHDRight-Hand Drive.
SBRSeat Belt Reminder.
TFTThin Film Transistor.
TPMSTire Pressure Monitoring
System.
VINVehicle Identification
Number.
Updating
Constant improvements are being
performed to maintain this vehicle's
high level of quality. Therefore, there
may be differences between this
manual and your vehicle.
Maserati reserves the right to carry
out design and functional changes
and to provide updates or
improvements.
This Owner's Manual illustrates and
describes all versions of the current
vehicle model. Therefore, some of the
equipment and accessories in this
publication may not appear on your
vehicle; please only consider the
information related to your vehicle.
All specifications and illustrations
contained in this manual are as of the
Manual publishing date.
NOTE:
The updated version of the on-board
documentation can be consulted by
accessing the section “SERVICES” on
the websitewww.maserati.comor by
using the specific apps developed for
the more common Tablet and
Smartphone.
Introduction
1
7
Page 75 of 286

1Adjustable side air vents.
2Hood lid opening lever.
3Headlight and fog light switch.
4"Mode" and adjust "+" and
"–" buttons.
5Front parking sensors
disabling/enabling.
6Trunk lid opening button.
7Fuel tank door opening button
(see "Refueling" in section
"Driving" for operation).
8Multifunction lever (Cruise
Control, turn signals, headlight
washer and headlight
selection).
9Lower gearshift paddle
"DOWN".
10Instrument cluster.
11Steering wheel height and
depth adjustment lever.
12Upper air vent.
13Sun radiation sensor.
14Horn control.
15Multimedia controls repeated
on the steering wheel.
16Windshield/headlight
wiper/washer control lever.17Upper gearshift paddle "UP".
18Ignition switch.
19Clock.
20Central adjustable air vents.
21MTC+ display.
22Glove compartment.
23Side window vents.
Front Dome Console
Components
1Reading lights control button.
2Central light control button.
3Reading lights.
4Central light.
5Anti-lift alarm system
deactivation button.6Volumetric alarm system
deactivation button.
7Paired phone hands-free
microphone.
Understanding the Vehicle
3
71
Page 90 of 286

Rear Fog Lights
Pressbutton on the light switch to
turn on the rear fog lights.
Fog lights only work when the low
beams are on by operating the light
switch in
(low beam) or "AUTO"
position.
The symbol on the button and the
dedicated indicator light in the
instrument cluster illuminate when the
lights are on.
WARNING!
Do not use the rear fog lights in
normal visibility conditions to avoid
dazzling vehicles behind.
Pressing again thebutton will
deactivate the rear fog lights.
Twilight Sensor
This device consists of two sensors: a
global sensor, capable of measuring
the light intensity above and a
directional sensor, which measures the
light intensity in the vehicle’s traveling
direction, enabling it to recognize
tunnels and driveways.
You can adjust the sensing range of
the twilight sensor by means of the
MTC+, by selecting the “Settings”
menu and "Safety & Driving Assistant"
function (see chapter "MTC+ Settings"
in section "Dashboard instruments and
Controls").
In the event of a sensor failure, the
system will turn on the low beams and
the position lights, regardless of the
light outside, and a failure message
will appear on the instrument cluster
display.
The failure indication will be displayed
as long as the light switch is turned to
"AUTO" position.
In this case, we recommend that you
deactivate the automatic system and
turn on the external lights manually if
necessary; contact anAuthorized
Maserati Dealeras soon as possible.
Left-hand Multifunction Lever
The multifunction lever on the left side
of the steering column controls the
operation of the turn signals,
headlight beam selection and
overtaking lights.
This multifunction lever also controls
the Cruise Control. See chapter "Cruise
Control" in section "Driving" for
further information.
Turn Signals
Move the left-hand multifunction lever
all the way up or down until the stop
trigger.
The left or right arrow indicator on
respectively the speedometer and
tachometer instrument cluster, flashes
to show proper operation of the front
and rear turn signal lights.
Understanding the Vehicle
3
86
Page 124 of 286

Cruise Control (CC) set indicator
This green light indicator will
illuminate when the CC is set.
For further information, check
“Electronic Cruise Control” in
section “Driving”.
SPORT Drive Mode Indicator
This indicator illuminates
when the button that sets the
vehicle to the SPORT mode is
pressed.
NOTE:
•SPORT mode changes the vehicle
driving features.
•SPORT mode should not be activated
if the road surface is in poor
conditions or slippery.
•In low- and medium-grip conditions
(e.g., rain, snow, ice, sand, etc.) it is
advisable not to activate SPORT
mode, even with the ESC enabled.
ICE Drive Mode Indicator
This indicator illuminates
when the low grip function is
active.Fuel Economy Indicator
While driving, the system will
indicate that you should shift
gears in order to optimize fuel
consumption when the
required speed is reached.
The recommended gearshift indicator
will only work when the transmission
is set to manual sequential operation.
AUTO Drive Mode Indicator
This indicator illuminates
when the automatic drive
mode is active.
MANUAL Drive Mode Indicator
This indicator illuminates
when the manual drive mode
is active.Infotainment System
The vehicle is equipped with the
Infotainment Maserati Touch Control
Plus (MTC+) System, an advanced user
interface which incorporates the
on-board computer and combines
innovative and exclusive technical
features integrating entertainment,
user settings, satellite navigation
system (with digital maps where
available), communication and
information features within a single
system.
The MTC+ System features an audio
system which is acoustically optimized
for this specific vehicle.
WARNING!
The navigation system assists the
driver while driving, providing advice
and suggestions, by voice guidance
and graphic information, for the best
route to reach the set destination. The
suggestions provided by the
navigation system do not relieve the
driver from full responsibility for the
maneuvers made through traffic while
driving, or from compliance with road
regulations and other provisions
regarding road traffic. The person
Dashboard Instruments and Controls
4
120
Page 151 of 286

5 – Driving
Normal Starting of the Engine............................. 148
Automatic Transmission.................................. 150
Onboard Computer (Trip)................................ 157
Drive Mode........................................... 159
Parking Brake......................................... 164
Parking.............................................. 166
Brake and Stability Control System......................... 167
Using the Brakes....................................... 171
Use of the Engine...................................... 173
Cruise Control (CC)...................................... 175
Tires - General Information............................... 177
Tire Pressure Monitoring System - TPMS...................... 184
Fuel Requirements...................................... 189
Refueling............................................. 192
Driving Conditions...................................... 194
Pollution Control Devices................................. 197
147
Page 160 of 286

the efficiency of engine braking
together with the standard braking
system.
ESC System Operations
In order to prevent unstable driving
conditions, the ESC system may request
the transmission system to deactivate
gearshifting. The system handles this
request depending on the gear
engaged and on the rpm, and decides
whether to accept it or not.
Driving with Cruise Control
With the Cruise Control function
activated, the transmission system
selects such settings as to provide
enhanced comfort and fuel-economy.
MC Start Strategy (for MC version
only)
With the aim of optimizing standing
starts for performance driving (only
recommended for use in areas closed
to traffic and in accordance with the
Highway Code), the automatic
transmission system is equipped with
quick start strategy.
This strategy is activated when the
following conditions occur
simultaneously:
• AUTO and SPORT modes active;
•
ESC mode off;
• brake pedal depressed.In these conditions, the driver has the
possibility to accelerate and, keeping
the brake pedal depressed, keep the
vehicle standing until reaching an
engine speed between 2300 an 2500
rpm. Then, upon releasing the brake
pedal, have the best standing start
performance.
WARNING!
This strategy must only be used on
vehicles in areas closed to traffic, in
accordance with the Highway Code
and only by skilled drivers.
Transmission Malfunction and
Overheating Conditions
Transmission Failure
Transmission function is electronically
monitored to detect abnormal
conditions. If a condition that could
result in transmission damage is
detected, Transmission Limp Home
Mode will be activated. In this
situation, the transmission may
operate only in certain gears, or may
not shift at all.
CAUTION!
In these conditions, we recommendedthat you stop the vehicle and turn off
the engine for at least one minute.
When restarting the engine, the
self-diagnosis system may cancel the
malfunction, which will in any case be
recorded by the ECU.
A message and thewarning light
in the instrument cluster will inform
the driver about the transmission
failure.
In failure conditions, the transmission
shift lever can however be shifted to R
(Reverse), N (Neutral) and D (Drive)
position.
When shifting to D (Drive) position,
only a few gears will be available,
depending on the malfunction found.
CAUTION!
If a transmission failure is signaled,
take your vehicle to the nearest
Authorized Maserati Dealeras soon as
possible to have the problem
corrected.
If the failure is signaled when the
engine is started, it means that the
transmission ECU detected a fault
when the vehicle was last used. Also in
this case, take your vehicle to the
nearest Center of theAuthorized
Driving
5
156
Page 179 of 286

exhaust, do not idle the engine except
as necessary, service your vehicle in a
well-ventilated area and wear gloves
or wash your hands frequently when
servicing your vehicle. For more
information go to:
www.P65Warnings.ca.gov/passenger-
vehicle
Position of the Diagnostic Connector
The diagnostic connector is positioned
underneath the dashboard, next to
the hood opening lever. It can be
accessed without removing any cover.
Cruise Control (CC)
The CC enables the driver to maintain
the desired vehicle speed without
pressing the accelerator pedal,
reducing driving fatigue on highways,
especially long trips, as the set speed is
automatically maintained. A firm press
on the accelerator pedal or the
braking pedal will temporarily
deactivate the cruise control function.
CAUTION!
The device can only be switched on at
speeds exceeding 19 mph (30 km/h)
and it switches off automatically when
the brake pedal is pressed or when a
speed of 125 mph (200 km/h) is
exceeded.
WARNING!
The Cruise Control function must only
be activated when traffic and the
route permit a constant speed to be
maintained safely for a sufficiently
long distance.
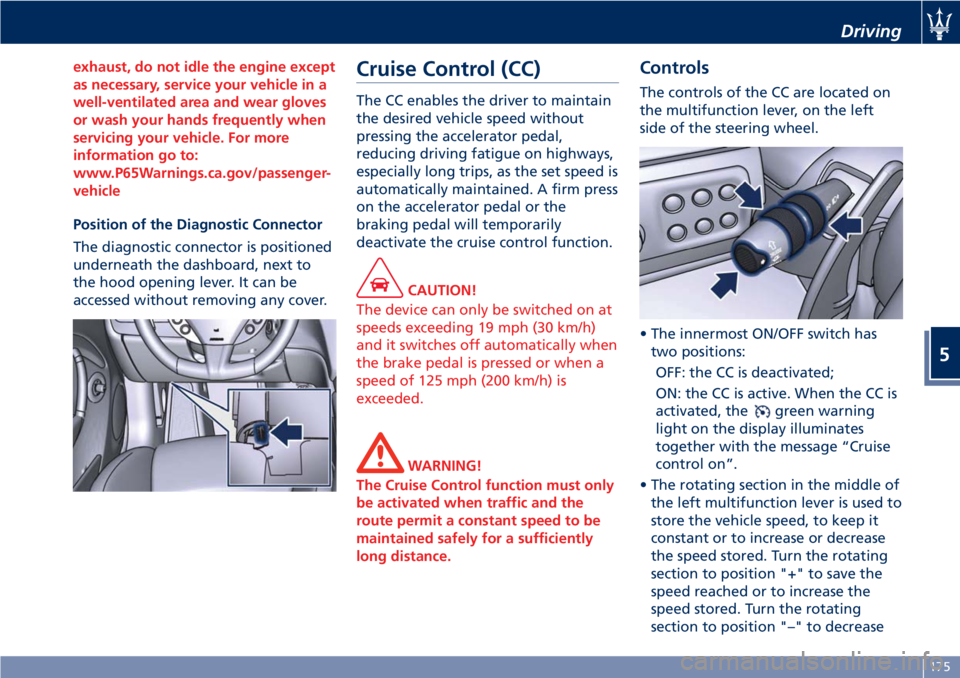
Controls
The controls of the CC are located on
the multifunction lever, on the left
side of the steering wheel.
• The innermost ON/OFF switch has
two positions:
OFF: the CC is deactivated;
ON: the CC is active. When the CC is
activated, the
green warning
light on the display illuminates
together with the message “Cruise
control on”.
• The rotating section in the middle of
the left multifunction lever is used to
store the vehicle speed, to keep it
constant or to increase or decrease
the speed stored. Turn the rotating
section to position "+" to save the
speed reached or to increase the
speed stored. Turn the rotating
section to position "–" to decrease
Driving
5
175
Page 180 of 286

the speed stored. Every time rotating
section is reset, the speed is increased
or decrease by approx. 0.6 mph (1
Km/h). Keep the rotating section
turned to vary the speed
continuously. When a new speed is
reached, it will automatically remain
constant.
• Button "RCL" at end of left
multifunction lever is used to resume
the speed stored.
NOTE:
•When the key in the ignition switch
is turned toSTOP (OFF)position or
ON/OFF switch is in the "OFF"
position, the speed stored is erased
and the system deactivated.
•The CC must be deactivated when
not in use.
WARNING!
Leaving the Cruise Control system on
when not in use is dangerous. You
could accidentally set the system or
cause it to go faster than you want.
Always leave the CC off when you are
not using it.
Storing a Speed
Turn the ON/OFF switch to "ON" and
reach the desired speed driving
normally. Turn the rotating section in
the middle of the left multifunction
lever to "+" for at least 3 seconds and
then release it.
The vehicle speed is stored and the
accelerator pedal can be released.
The vehicle will proceed at the
constant speed stored until the brake
pedal is pressed.
If necessary, (for example, to pass
another vehicle), you can accelerate by
simply pressing the accelerator pedal.
Afterward, when you release the
accelerator pedal, the vehicle will
return to the speed previously stored.
Resuming the Speed Stored
If the CC has been deactivated after
braking, the speed previously stored
can be resumed as follows:
• gradually accelerate until you reach a
speed close to that stored;
• engage the gear selected when the
speed was stored (4th, 5th or 6th
gear);
• press button "RCL".
Increasing the Speed Stored
The speed stored can be increased in
two ways:• by pressing the accelerator and then
storing the new speed reached (turn
the rotating section in the middle of
the left multifunction lever for more
than 3 seconds); or
• by turning the rotating section to
position "+": each impulse
transmitted by the rotating section
will cause a slight increase in speed
(about 0.6 mph/1 Km/h), whereas a
constant pressure on the same
rotating section will cause a
continuous increase in speed. When
the rotating section is released, the
new speed will be automatically
stored in the memory.
Decreasing the Speed Stored
The speed stored can be reduced in
two ways:
• by deactivating the CC, pressing the
brake pedal and then storing the
new speed (turning the rotating
section to position “+” for at least 3
seconds); or
• by keeping the rotating section
turned to position “-” until reaching
the new speed, which will be stored
automatically.
Resetting the Speed Stored
The speed stored is automatically
reset:
Driving
5
176