2020 MASERATI GRANTURISMO service reset
[x] Cancel search: service resetPage 119 of 286

“+“ and “–” Buttons
By means of the “+ “ and “–” buttons,
the user can adjust the instrument
cluster brightness.
When a screen page is viewed, these
buttons can be used to select the
available options (see paragraph "TFT
Display: Screen Pages" in this chapter).
TFT Display: Screen Pages
Trip Screen Page
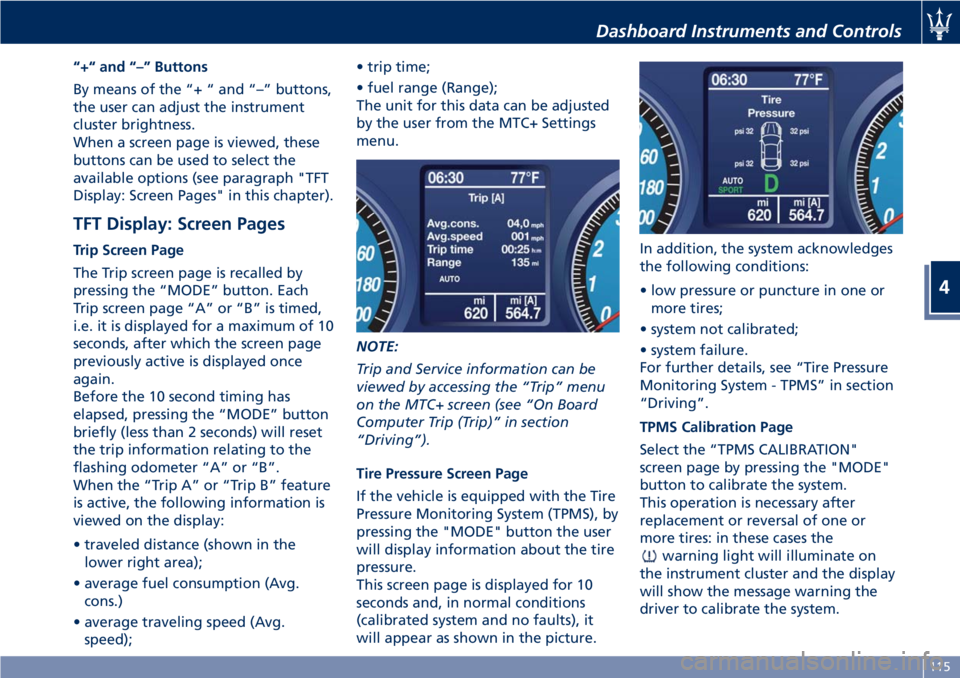
The Trip screen page is recalled by
pressing the “MODE” button. Each
Trip screen page “A” or “B” is timed,
i.e. it is displayed for a maximum of 10
seconds, after which the screen page
previously active is displayed once
again.
Before the 10 second timing has
elapsed, pressing the “MODE” button
briefly (less than 2 seconds) will reset
the trip information relating to the
flashing odometer “A” or “B”.
When the “Trip A” or “Trip B” feature
is active, the following information is
viewed on the display:
• traveled distance (shown in the
lower right area);
• average fuel consumption (Avg.
cons.)
• average traveling speed (Avg.
speed);• trip time;
• fuel range (Range);
The unit for this data can be adjusted
by the user from the MTC+ Settings
menu.
NOTE:
Trip and Service information can be
viewed by accessing the “Trip” menu
on the MTC+ screen (see “On Board
Computer Trip (Trip)” in section
“Driving”).
Tire Pressure Screen Page
If the vehicle is equipped with the Tire
Pressure Monitoring System (TPMS), by
pressing the "MODE" button the user
will display information about the tire
pressure.
This screen page is displayed for 10
seconds and, in normal conditions
(calibrated system and no faults), it
will appear as shown in the picture.In addition, the system acknowledges
the following conditions:
• low pressure or puncture in one or
more tires;
• system not calibrated;
• system failure.
For further details, see “Tire Pressure
Monitoring System - TPMS” in section
“Driving”.
TPMS Calibration Page
Select the “TPMS CALIBRATION"
screen page by pressing the "MODE"
button to calibrate the system.
This operation is necessary after
replacement or reversal of one or
more tires: in these cases the
warning light will illuminate on
the instrument cluster and the display
will show the message warning the
driver to calibrate the system.
Dashboard Instruments and Controls
4
115
Page 142 of 286

•Do Not Disturb
Settings available for this feature:
•Auto Reply
To change the mode status, touch
the “Text”, “Call” or “Both”
softkey.
•Auto Reply Message
To change the mode status, touch
the “Custom” or “Default” softkey.
•Customize Auto Reply Message
This feature allows you to
customize the “Auto Reply
Message”. Text messages are
limited to 160 characters (key pad
is not available while vehicle is it
motion).
SiriusXM Setup
After pressing the “SiriusXM Setup”
softkey the following settings will be
available.•Tune Start
“Tune Start” begins playing the
current song from the beginning
when you tune to a music channel,
so you can enjoy the complete song.
“Tune Start” works in the
background, so you will not even
realize it’s on, except that you will
miss the experience of joining your
favorite song with only a few
seconds left to play.
•Channel Skip
SiriusXM can be programmed to
designate a group of channels that
are the most desirable to listen to or
to exclude undesirable channels
while scanning. To make your
selection, touch the Channel Skip
softkey, select the channels you
would like to skip followed by
pressing the arrow◄softkey.
•Subscription Information
SiriusXM Satellite Radio requires a
user-paid subscription to access
these stations.
It will be necessary to access the
information on the Subscription
Information Screen in order to
subscribe.
Touch the “Subscription
Information” soft key to access your
receiver ID number. Write down theSiriusXM ID numbers for your radio.
To activate SiriusXM service, either
call the number listed on the screen
or visit SiriusXM online at
www.siriusxm.com/subscriptions or
call the number listed.
Restore Settings
When this feature is selected, it will
reset the “Display”, “Clock”, “Audio”,
and “SiriusXM Setup” to their default
settings.
Run this feature and a pop-up will
appear asking user to confirm default
settings resetting. Select “Yes” to
restore, or “Cancel” to exit. Once the
settings are restored, a pop-up appears
confirming that settings have been
reset to default.
Clear Personal Data
When this feature is selected, it will
remove personal data concerning
Dashboard Instruments and Controls
4
138
Page 162 of 286

TripA-TripB
In these screens are displayed the
detailed data on "Trip A" and "Trip B".
These data are also displayed in the
Trip pages of the instrument cluster
(see paragraph "TFT Display: Screen
Pages" of chapter "Instrument
Cluster" of this section).
For each of these submenus the screen
will display the following data:
• Distance traveled.
• Average fuel consumption.
• Average speed.
• Duration.
The unit for these submenus can be
adjusted by the user from MTC+
setting menu (see "MTC+ Settings" in
this section).
In addition to these, there is also the
"reset" softkey to reset the "Trip A"
and/or the "Trip B".
Service
When checking this item, the MTC+
displays mileage and days remaining
before the execution of schedule
maintenance service and warns when
it is expired.For further details, see “Scheduled
Maintenance Service” in section
“Maintenance and Care”.
Driving
5
158
Page 222 of 286

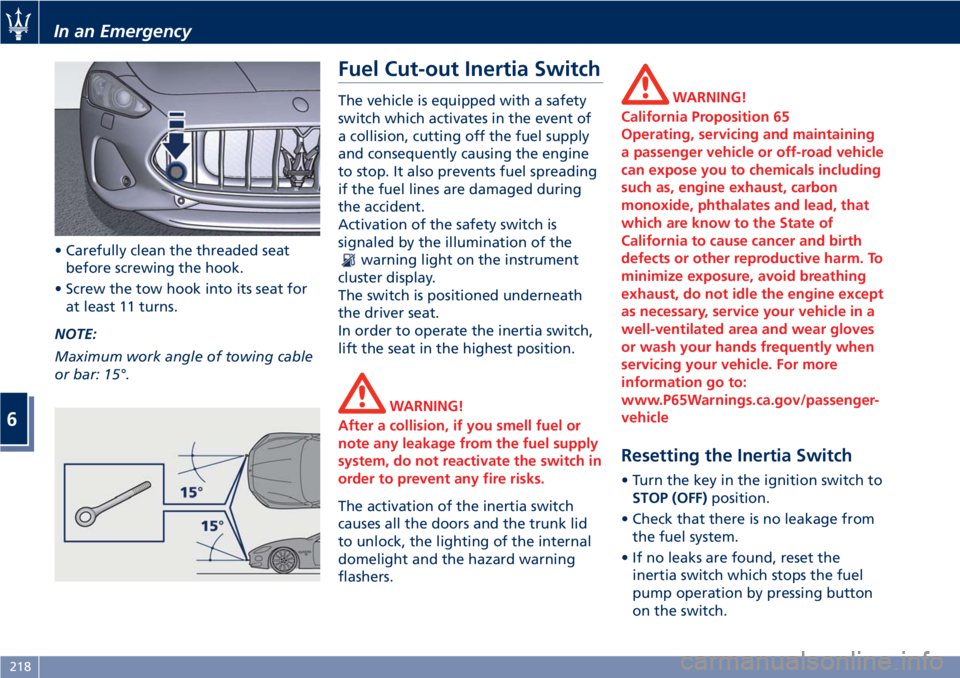
• Carefully clean the threaded seat
before screwing the hook.
• Screw the tow hook into its seat for
at least 11 turns.
NOTE:
Maximum work angle of towing cable
or bar: 15°.
Fuel Cut-out Inertia Switch
The vehicle is equipped with a safety
switch which activates in the event of
a collision, cutting off the fuel supply
and consequently causing the engine
to stop. It also prevents fuel spreading
if the fuel lines are damaged during
the accident.
Activation of the safety switch is
signaled by the illumination of the
warning light on the instrument
cluster display.
The switch is positioned underneath
the driver seat.
In order to operate the inertia switch,
lift the seat in the highest position.
WARNING!
After a collision, if you smell fuel or
note any leakage from the fuel supply
system, do not reactivate the switch in
order to prevent any fire risks.
The activation of the inertia switch
causes all the doors and the trunk lid
to unlock, the lighting of the internal
domelight and the hazard warning
flashers.
WARNING!
California Proposition 65
Operating, servicing and maintaining
a passenger vehicle or off-road vehicle
can expose you to chemicals including
such as, engine exhaust, carbon
monoxide, phthalates and lead, that
which are know to the State of
California to cause cancer and birth
defects or other reproductive harm. To
minimize exposure, avoid breathing
exhaust, do not idle the engine except
as necessary, service your vehicle in a
well-ventilated area and wear gloves
or wash your hands frequently when
servicing your vehicle. For more
information go to:
www.P65Warnings.ca.gov/passenger-
vehicle
Resetting the Inertia Switch
• Turn the key in the ignition switch to
STOP (OFF)position.
• Check that there is no leakage from
the fuel system.
• If no leaks are found, reset the
inertia switch which stops the fuel
pump operation by pressing button
on the switch.
In an Emergency
6
218
Page 227 of 286

Once the set limit in kilometers or the
expiry date is reached, every time the
instrument cluster is turned on
thereafter, the message “Service
coupon expired” will be displayed.Selecting the function “Service” in the
“Trip” menu of the MTC+, you can
display the next service deadline (see
“Onboard Computer (Trip)” in section
"Driving"). The residual mileage left
to the service deadline is always
indicated. The days remaining before
the scheduled service date instead, are
only indicated starting from the 511th
day (approximately 17 months).
NOTE:
Every time the battery is disconnected,
the date and time must be set (see
"MTC+ Settings" in section
"Dashboard Instruments and
Controls").
CAUTION!
• Failure to reset the system may cause
it to malfunction and indicate wrong
maintenance service intervals.
• If you incorrectly set a date earlier
than the last service coupon, the
system updates the indication
“Scheduled service within... days”
automatically entering a later date
considering the maximum number of
days allowable for the next service
coupon.
Maintenance and Care
7
223
Page 283 of 286

Menus and Settings.........114
Screen Pages..............115
Tire Repair Kit...............204
Tires
Department of Transportation
Uniform Tire Quality Grades. . . .179
General Information.........177
Inflation Pressure...........274
Punctured Tire.............204
Replacement Tires..........182
Snow Chains..............183
Tire Pressure..............180
Tire Pressure Checkup........181
Tire Repair Kit.............204
Tire Safety Information.......177
Tires Durability.............182
TPMS - Tire Pressure Monitoring
System..................184
Tread Wear Indicators........181
Winter Tires...............183
ToolKit ...................202
Towing the Vehicle...........216
TPMS System................184
Transmission, Automatic
Automatic Transmission Lever . .150
Malfunction and Overheating
Conditions................156
Transmission Manual Release of
P (Park) Position............210
Trip - Onboard Computer.......157
Trunk
Trunk Safety...............37
Trunk Compartment Lid.........35Trunk Lid
Trunk Lid Emergency Release from
inside the Trunk.............37
Updating....................7
USB, AUX and SD Memory Card
Ports....................122
Vehicle Identification Data
Homologation Labels.........18
Vehicle Identification Number
(VIN)....................17
Warning and Information
Labels....................18
Voice Commands.............145
Warning Icons.................6
Warning/Indicator Lights on TFT
Display...................116
Warnings when Driving
.........14
Warranty and Service............8
Warranty Information..........10
Wheels
Tires Maintenance..........254
Wheels Rims Maintenance.....255
Windows
Auto Down/Auto Up Feature....34
Reset Auto-Up/Down.........35
Windshield Wipers and Washers . . .90
Adding Washer, Headlight Washer
Fluid....................233
Rain Sensing Wipers..........91Windshield and Headlight
Washers..................92
Windshield Wipers...........90
Wiper Maintenance and Blades
Replacement..............235
Index
9
279