2020 MASERATI GRANTURISMO warning
[x] Cancel search: warningPage 58 of 286
• how far (if at all) the driver was
depressing the accelerator and/or
brake pedal; and
• how fast the vehicle was traveling.
These data can help provide a better
understanding of the circumstances in
which crashes and injuries occur.
NOTE:
EDR data are recorded by your vehicle
only if a non-trivial crash situation
occurs; no data are recorded by the
EDR under normal driving conditions
and no personal data (e.g., name,
gender, age, and crash location) are
recorded. However, other parties, such
as law enforcement, could combine
the EDR data with the type of
personally identifying data routinely
acquired during a crash investigation.
To read data recorded by an EDR,
special equipment is required, and
access to the vehicle or the EDR is
needed.
In addition to the vehicle
manufacturer, other parties, such as
law enforcement, that have the special
equipment, can read the information
if they have access to vehicle or the
EDR.Child Restraint Systems
NOTE:
A child restraint system can help
protect a child in a vehicle so ensure
that the child restraint selected has a
certification label applicable to FMVSS
213 and 225 in the U.S., or CMVSS 213
and 210.2 in Canada.
Everyone in your vehicle must be
buckled up all the time, including
babies and children. Every state in the
United States and all Canadian
provinces require that small children
ride in proper restraint systems. Please
be reminded that you can be
prosecuted for ignoring this law.
Children 12 years or younger should
ride properly buckled up in a rear seat,
if available. According to crash
statistics, children are safer when
properly restrained in the rear seats
rather than in the front.
WARNING!
In a collision, an unrestrained child,
even a baby, can become a projectile
inside the vehicle. The force required
to hold even an infant on your lap
could become so great that you couldnot hold the child, no matter how
strong you are. The child and others
could be badly injured. Any child
riding in your vehicle should always
be in a proper restraint system
suitable for the child’s size.
There are different sizes and types of
restraint systems for children from
newborn size to the child almost large
enough for an adult safety belt.
Always refer to the manual provided
with child seat to ensure it is the
proper type according the travelling
child. Use the restraint system that is
correct for your child.
Infants and Child Restraints
Safety experts recommend that
children ride rearwardfacing in the
vehicle until they are two years old or
until they reach either the height or
weight limit of their rear facing child
seat.
Two types of child restraint systems
can be used rearward-facing: infant
carriers and convertible child seats.
The infant carrier is only used
rearward-facing in the vehicle. It is
recommended for children from birth
until they reach the weight or height
limit of the infant carrier.
Before Starting
2
54
Page 59 of 286
Convertible child seats can be used
either rearward-facing or
forward-facing in the vehicle.
Convertible child seats often have a
higher weight limit in the
rearward-facing direction than infant
carriers do, so they can be used
rearward-facing by children who have
outgrown their infant carrier but are
still younger than at least two years
old.
Children should remain rearward-
facing until they reach the highest
weight or height allowed by their
child seat. Both types of child restraint
systems are fixed to the car by the
lap/shoulder belt or the LATCH child
restraint anchor system. Refer to
“Lower Anchors and Tether for
CHildren (LATCH)” in this section.
WARNING!
•Never place a rear facing infant seat
in front of an air bag. A deploying of
the passenger front air bag can
cause death or serious injury to a
child 12 years or younger, including
a child in a rearward facing infant
seat.•Only use a rearward-facing child
restraint in a vehicle with a rear
seat.
Older Children and Child
Restraints
Children who are two years old or
who have outgrown their rear-facing
child seat can ride forward-facing in
the vehicle. Forward-facing child seats
and convertible child seats used in the
forward-facing direction are for
children who are over two years old or
who have outgrown the rear-facing
weight or height limit of their
rear-facing child seat.
Children should remain in a
forward-facing child seat with a
harness for as long as possible, up to
the highest weight or height allowed
by the child seat. These child seats are
also fixed to the car by the
lap/shoulder belt or the LATCH child
restraint anchorage system. Refer to
“Lower Anchors and Tether for
CHildren (LATCH)” in this section.
All children whose weight or height is
above the forward-facing limit for the
child seat should use a belt-
positioning booster seat until the
vehicle’s seat belts fit properly. If the
child cannot sit with knees bent overthe vehicle’s seat cushion while the
back is against the seatback, they
should use a belt-positioning booster
seat.
The child and belt-positioning booster
seat are fixed to the car by the
lap/shoulder belt.
Children Too Large for Booster
Seats
Children who are large enough to
wear the shoulder belt comfortably
and whose legs are long enough to
bend over the front of the seat when
their back is against the seatback
should use the lap/shoulder belt in a
rear seat.
• Make sure that the child is upright in
the seat.
• The lap portion should be low on
the hips and as snug as possible.
• Check belt fit periodically. A child’s
squirming or slouching can move the
belt out of position.
• If the shoulder belt contacts the face
or neck, move the child closer to the
center of the vehicle. Never allow a
child to put the shoulder belt under
an arm or behind their back.
Before Starting
2
55
Page 60 of 286

NOTE:
For additional information, refer to
www.seatcheck.org or call
1–866–SEATCHECK. Canadian residents
should refer to Transport Canada’s
website for additional information:
http://www.tc.gc.ca/roadsafety/
safedrivers/childsafety/index.htm
WARNING!
•Improper installation can lead to
failure of an infant or child restraint.
It could come loose in a collision. The
child could be badly injured or killed.
Follow the restraint manufacturer’s
directions exactly when installing an
infant or child restraint.
•A rearward-facing child restraint
should only be used in a rear seat. A
rearward-facing child restraint in the
front seat may be struck by a
deploying passenger air bag, which
may cause severe or fatal injury to
the infant.
Here are Some Tips on Getting
the Most Out of Your Child
Restraint
• Before buying any restraint system,
make sure that it has a labelcertifying that it meets all applicable
Safety Standards. Maserati also
recommends that you make sure that
you can install the child restraint in
the vehicle where you will use it
before you buy it.
• The restraint system must be
appropriate for your child’s weight
and height.
• Check the label on the restraint
system for weight and height limits.
• Carefully follow the instructions that
come with the restraint system.
• If installed improperly, it may not
work when needed.
• Fit the child into the seat according
to the child restraint manufacturer’s
directions.
WARNING!
When your child restraint system is
not in use, secure it in the vehicle with
the seat belt or remove it from the
vehicle. Do not leave it loose in the
vehicle. In a sudden stop or accident, it
could strike the occupants or
seatbacks and cause serious personal
injury.
Installing Child Restraint
Systems using the Vehicle Seat
Belt equipped with ALR
All the passenger seat belts are
equipped with an Automatic Locking
Retractor (ALR) to secure child
protection through a Child Restraint
System (CRS). These types of seat belts
are designed to keep the lap portion
of the seat belt tight around the child
restraint seat avoiding to use a locking
clip.
The ALR will make a ratcheting noise if
the entire belt is pulled out of the
retractor in order to enable the belt to
retract subsequently. For additional
information on ALR, see “Using Seat
Belt in Automatic Locking Retractor
(ALR) Mode” in “Occupants Restraint
Systems” in this section.
To install a Child Restraint System with
ALR, pull enough of the belt out of the
retractor leading it through the belt
path of the protection device. Slide the
latch into the buckle until it clicks,
then remove the entire safety belt
from the retractor in order to
rewound. While rewinding a click will
indicate the safety belt is now in
Automatic Locking mode.
Exert then a traction on the exceeded
lap section of the belt in order to
Before Starting
2
56
Page 63 of 286
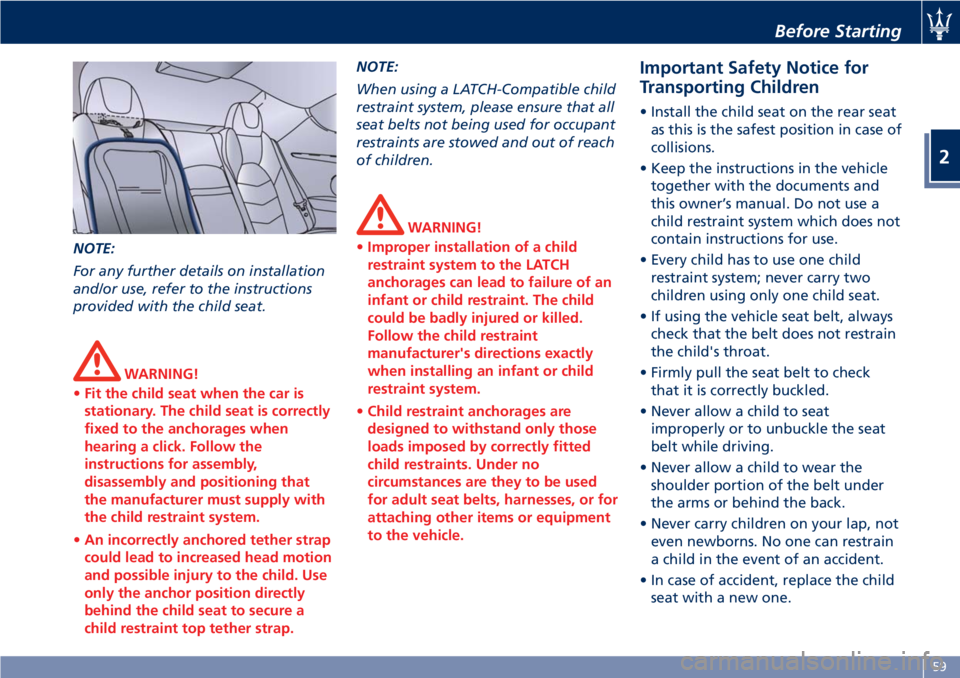
NOTE:
For any further details on installation
and/or use, refer to the instructions
provided with the child seat.
WARNING!
•Fit the child seat when the car is
stationary. The child seat is correctly
fixed to the anchorages when
hearing a click. Follow the
instructions for assembly,
disassembly and positioning that
the manufacturer must supply with
the child restraint system.
•An incorrectly anchored tether strap
could lead to increased head motion
and possible injury to the child. Use
only the anchor position directly
behind the child seat to secure a
child restraint top tether strap.
NOTE:
When using a LATCH-Compatible child
restraint system, please ensure that all
seat belts not being used for occupant
restraints are stowed and out of reach
of children.
WARNING!
•Improper installation of a child
restraint system to the LATCH
anchorages can lead to failure of an
infant or child restraint. The child
could be badly injured or killed.
Follow the child restraint
manufacturer's directions exactly
when installing an infant or child
restraint system.
•Child restraint anchorages are
designed to withstand only those
loads imposed by correctly fitted
child restraints. Under no
circumstances are they to be used
for adult seat belts, harnesses, or for
attaching other items or equipment
to the vehicle.
Important Safety Notice for
Transporting Children
• Install the child seat on the rear seat
as this is the safest position in case of
collisions.
• Keep the instructions in the vehicle
together with the documents and
this owner’s manual. Do not use a
child restraint system which does not
contain instructions for use.
• Every child has to use one child
restraint system; never carry two
children using only one child seat.
• If using the vehicle seat belt, always
check that the belt does not restrain
the child's throat.
• Firmly pull the seat belt to check
that it is correctly buckled.
• Never allow a child to seat
improperly or to unbuckle the seat
belt while driving.
• Never allow a child to wear the
shoulder portion of the belt under
the arms or behind the back.
• Never carry children on your lap, not
even newborns. No one can restrain
a child in the event of an accident.
• In case of accident, replace the child
seat with a new one.
Before Starting
2
59
Page 64 of 286
Transporting Pets
Air bags deploying in the front seat
could harm your pet. An unrestrained
pet will be thrown about and possibly
injured, or injure a passenger during
panic braking or in an accident.
Pets should be restrained in the rear
seat in pet harnesses or pet carriers
that are secured by vehicle seat belts.
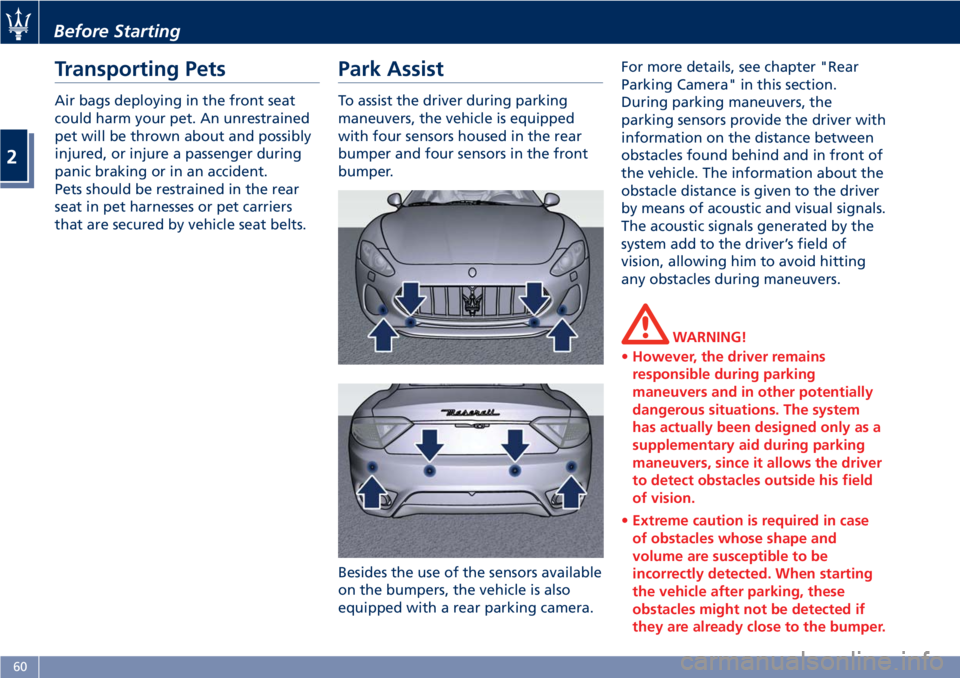
Park Assist
To assist the driver during parking
maneuvers, the vehicle is equipped
with four sensors housed in the rear
bumper and four sensors in the front
bumper.
Besides the use of the sensors available
on the bumpers, the vehicle is also
equipped with a rear parking camera.For more details, see chapter "Rear
Parking Camera" in this section.
During parking maneuvers, the
parking sensors provide the driver with
information on the distance between
obstacles found behind and in front of
the vehicle. The information about the
obstacle distance is given to the driver
by means of acoustic and visual signals.
The acoustic signals generated by the
system add to the driver’s field of
vision, allowing him to avoid hitting
any obstacles during maneuvers.
WARNING!
•However, the driver remains
responsible during parking
maneuvers and in other potentially
dangerous situations. The system
has actually been designed only as a
supplementary aid during parking
maneuvers, since it allows the driver
to detect obstacles outside his field
of vision.
•Extreme caution is required in case
of obstacles whose shape and
volume are susceptible to be
incorrectly detected. When starting
the vehicle after parking, these
obstacles might not be detected if
they are already close to the bumper.
Before Starting
2
60
Page 66 of 286

NOTE:
Front sensors are enabled only when
button LED is illuminated. In
addition, any pressing of
button
when vehicle speed is above 6 mph
(10 km/h) will be ignored by the
system.
Obstacle Signalling
The acoustic signals are emitted by
two buzzers, one under the dashboard
and one in proximity of the luggage
shelf.
When the obstacle is located at a
distance of less than 14 in (35 cm) from
the bumper, the beep is continuous.
The warning beep stops immediately if
the distance between the vehicle and
the obstacle increases. The tone cycle is
constant if the distance measured by
the central sensors remains unaltered.
If this occurs with the lateral sensors,
the signal stops after approximately 7
seconds, to prevent for example
continuous beeps in the event of
maneuvers alongside walls.
The distance from the obstacles can
also be graphically shown on the
instrument cluster display by means of
an image that shows the vehicle
surrounded by explanatory symbols of
the distance (maximum/average/minimum) and the position
(front/rear/central/side) of the obstacle
detected.
The color represents the distance,
while the field represents the position.
The green color represents the
maximum distance detected, the
yellow color the medium distance and
the red color the minimum one. The
rear sensors are not shown in the
image on the instrument cluster
display if only the front sensors are
active.
WARNING!
For the system to operate correctly the
sensors positioned on the bumper
must be kept clean (remove any mud,
dirt, snow or ice).
Sensor Range
The sensors allow the system to
monitor the front and rear of the
vehicle; they are positioned so as to
monitor the central and lateral zones
at the front and at the rear of the
vehicle.
In the event of an obstacle located in a
central area, this will be detected at
distances of less than 35 in (0,9 m) at
the front and 59 in (1,50 m) at the rear,
depending on the type of obstacle and
its dimensions.
If the obstacle is located in a lateral
position, it will be detected at
distances of less than 31 in (0,8 m).
Failure Indicators
The system ECU checks all the
components every time R (Reverse)
gear is engaged.
In the event that the parking sensors
fail, the relative
warning light and
message illuminate on the instrument
cluster display.
In the event of a failure signal, stop
the vehicle and turn the key in the
ignition switch toSTOP (OFF)position.
Then try cleaning the sensors or
moving the vehicle away from any
possible ultrasound sources (e.g.
pneumatic truck brakes or pneumatic
Before Starting
2
62
Page 67 of 286
hammers) and rotate the key to the
MAR (ON)position. So, if the
operating failure cause has been
eliminated, system full operation will
be recovered. If however, the failure
beep continues, contact anAuthorized
Maserati Dealerto have the system
checked.
Cleaning the Park Assist
Sensors
When cleaning the sensors, take
special care not to scratch or damage
them; therefore, do not use dry, rough
or hard cloths.
The sensors must be washed with
clean water, possibly adding car
shampoo.
Should you need to repaint the
bumper or in case of paint touch-ups
in the sensor area, please contact
exclusively theAuthorized Maserati
Dealer. Incorrect paint application
could affect the parking sensors
operation.
Park Assist System Usage
Precautions
NOTE:
•Jackhammers, large trucks, and
other vibrations could affect the
performance of Park Assist.•Objects such as bicycle carriers,
trailer hitches, etc., must not be
placed within 12 in (30 cm) from the
rear bumper while driving the
vehicle. Failure to do so can result in
the system misinterpreting a close
object as a sensor problem, causing
the service Park Assist message to be
displayed in the instrument cluster.
CAUTION!
• Park Assist is only a parking aid and
it is unable to recognize every
obstacle, including small obstacles.
Parking curbs might only be
temporarily detected or not
detected at all. Obstacles located
above or below the sensors will not
be detected when they are in close
proximity.
• The vehicle must be driven slowly
when using Park Assist in order to be
able to stop in time when an
obstacle is detected. When backing
up, it is recommended that the
driver looks over his/her shoulder
when using Park Assist.
WARNING!
Drivers must be careful when backing
up even when using the Park Assist
system. Always check carefully behind
your vehicle, look behind you, and be
sure to check for pedestrians, animals,
other vehicles, obstructions, and blind
spots before backing up. You are
responsible for safety and must
continue to pay attention to your
surroundings. Failure to do so can
result in serious injury or death.
Before Starting
2
63
Page 68 of 286

Rear Parking Camera
Your vehicle is equipped with a rear
parking camera that allows you to see
an image on the MTC+ screen of the
rear surroundings of your vehicle
whenever the shift lever is put into R
(Reverse).
When “Parkview Backup Camera
Delay” mode is enabled on MTC+, the
rear view image shall be displayed for
up to 10 seconds after shifting out of R
(Reverse).
The rear parking camera is located on
the rear of the vehicle above the rear
license plate.
When the shift lever is shifted out of R
(Reverse), the rear camera mode is
exited and the navigation or audio
screen appears again.
When displayed, dynamic grid lines (if
the function is set to “MTC+ Settings”)will illustrate the width of the vehicle
while a dashed center-line will indicate
the center of the vehicle to assist with
parking or aligning to a hitch/receiver.
The dynamic grid lines will show
separate zones in different color that
will help indicate the distance to the
rear of the vehicle.
The following table shows the
approximate distances for each zone
and color:
Zone Distance to the rear of
the vehicle
Red 11-12in(28-30cm)
Yellow 12 - 78 in (30 cm-2m)
Green 78 - 157 in (2-4m)
WARNING!
Drivers must be careful when
reversing even when using the
rearview camera. Always check
carefully behind your vehicle, and be
sure to check for pedestrians, animals,
other vehicles, obstructions, or blind
spots before reversing. You are
responsible for the safety of your
surroundings and must continue to be
careful while reversing. Failure to do
so can result in serious injury or death.
CAUTION!
• To avoid vehicle damage, the rear
parking camera should only be used
as a parking aid, as the rear camera is
unable to view every obstacle or
object in your drive path.
• To avoid vehicle damage, the vehicle
must be driven slowly when using
the rear parking camera to be able
to stop in time when an obstacle is
seen. It is recommended that the
driver looks frequently over his/her
shoulder when using this system.
Before Starting
2
64