2020 MASERATI GRANTURISMO warning
[x] Cancel search: warningPage 222 of 286

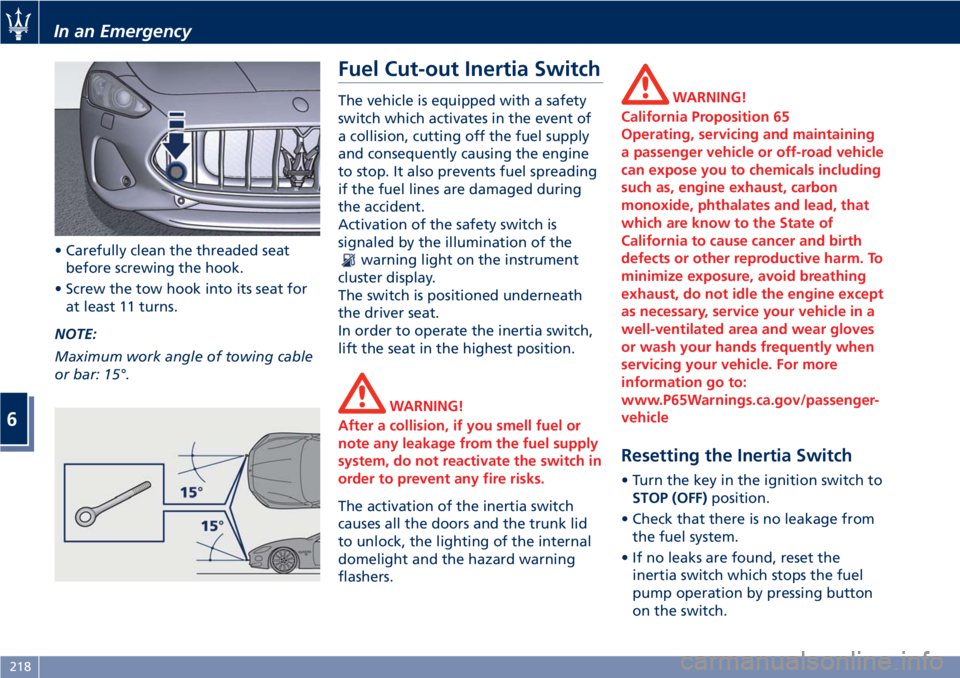
• Carefully clean the threaded seat
before screwing the hook.
• Screw the tow hook into its seat for
at least 11 turns.
NOTE:
Maximum work angle of towing cable
or bar: 15°.
Fuel Cut-out Inertia Switch
The vehicle is equipped with a safety
switch which activates in the event of
a collision, cutting off the fuel supply
and consequently causing the engine
to stop. It also prevents fuel spreading
if the fuel lines are damaged during
the accident.
Activation of the safety switch is
signaled by the illumination of the
warning light on the instrument
cluster display.
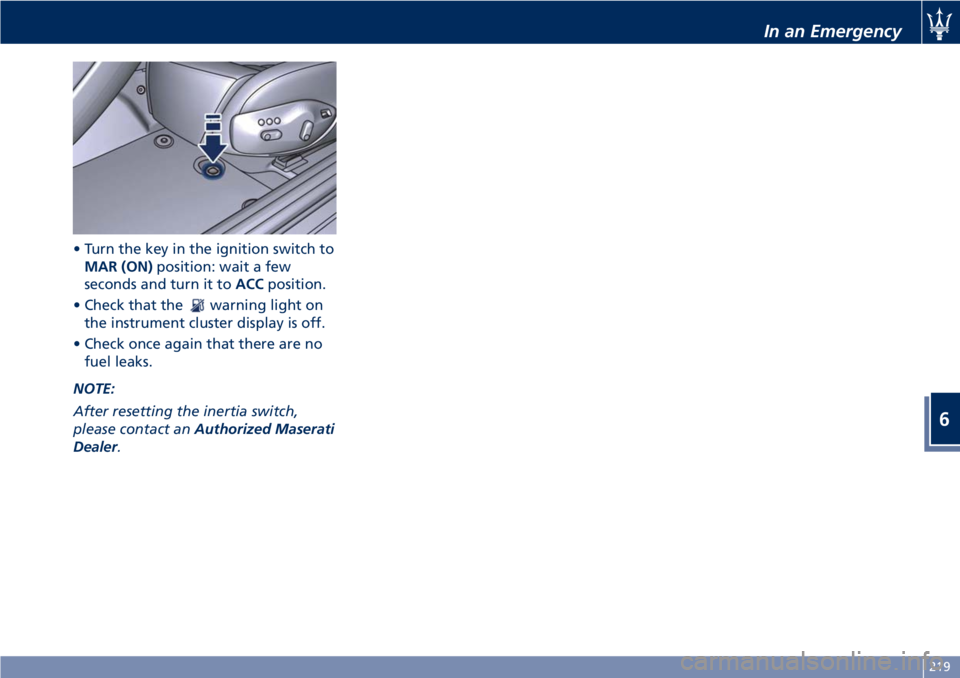
The switch is positioned underneath
the driver seat.
In order to operate the inertia switch,
lift the seat in the highest position.
WARNING!
After a collision, if you smell fuel or
note any leakage from the fuel supply
system, do not reactivate the switch in
order to prevent any fire risks.
The activation of the inertia switch
causes all the doors and the trunk lid
to unlock, the lighting of the internal
domelight and the hazard warning
flashers.
WARNING!
California Proposition 65
Operating, servicing and maintaining
a passenger vehicle or off-road vehicle
can expose you to chemicals including
such as, engine exhaust, carbon
monoxide, phthalates and lead, that
which are know to the State of
California to cause cancer and birth
defects or other reproductive harm. To
minimize exposure, avoid breathing
exhaust, do not idle the engine except
as necessary, service your vehicle in a
well-ventilated area and wear gloves
or wash your hands frequently when
servicing your vehicle. For more
information go to:
www.P65Warnings.ca.gov/passenger-
vehicle
Resetting the Inertia Switch
• Turn the key in the ignition switch to
STOP (OFF)position.
• Check that there is no leakage from
the fuel system.
• If no leaks are found, reset the
inertia switch which stops the fuel
pump operation by pressing button
on the switch.
In an Emergency
6
218
Page 223 of 286

• Turn the key in the ignition switch to
MAR (ON)position: wait a few
seconds and turn it toACCposition.
• Check that the
warning light on
the instrument cluster display is off.
• Check once again that there are no
fuel leaks.
NOTE:
After resetting the inertia switch,
please contact anAuthorized Maserati
Dealer.
In an Emergency
6
219
Page 229 of 286

Service coupons 1° 2° 3° 4° 5° 6° 7° 8° 9° 10° 11° 12°
Main operations Maintenance schedules: every 12500 mi (20000 km) or 2 years
Air injection system: connections and pipes
valvesIIIIIIIIIIII
Blow-by systemIII II
Fuel emission control system: lines,
connections and valvesIII III
Automatic transmission oil levelIIIIIIIIIIII
Differential oil levelIIIIIIIIIIII
Hydraulic steering fluid level (bleed if
necessary)IIIIIIIIIIII
Replace at least every 2 years
Engine coolant levelIIIIIIIIIIII
Replace at least every 2 years
Brake fluid level (bleed if necessary)IIIIIIIIIIII
Replace at least every 2 years
Brake system: lines, calipers, connections -
Efficiency of the dashboard warning lights
- Parking brake operationIIIIIIIIIIII
Wear condition of the braking parts
(rotors, pads); replace if necessaryIIIIIIIIIIII
Joints for front and rear suspensions, front
and rear under-chassis – Tightening
torquesIIIIIIIIIIII
Steering system components, joint
protection, rack trunks on the steering
levers and on the axle shaftsIIIIIIIIIIII
Maintenance and Care
7
225
Page 231 of 286

Service coupons 1° 2° 3° 4° 5° 6° 7° 8° 9° 10° 11° 12°
Main operations Maintenance schedules: every 12500 mi (20000 km) or 2 years
Update navigation maps with the latest
version availableIIIIIIIIIIII
I= Inspect and carry out any other necessary operation
A= Adjust
R= Replace
NOTE:
All the operations marked with an
asterisk(*)in the “Scheduled Service
Plan” are not compulsory but rather
recommended, in the event that the
vehicle is frequently used in
heavy-traffic conditions or on dusty or
sandy roads. The warranty concerning
emissions and the Manufacturer's
responsibility to recall the vehicle in
case of problems shall not be
invalidated if the Customer does not
carry out the operations marked with
the asterisk(*).
Periodic Maintenance
Every 300 mi (500 km) or before long
journeys
Check:
• engine coolant;
• windshield washer fluid level;
• tire inflation pressure and condition;• operation of lighting system
(headlights, turn signals, hazard
warning flashers, etc.);
• operation of windshield
washer/wiper system and wear of
windshield wiper blades.
Every 1900 mi (3000 km)
Check and top up, if required, the
engine oil level.
WARNING!
California Proposition 65
Operating, servicing and maintaining
a passenger vehicle or off-road vehicle
can expose you to chemicals including
such as, engine exhaust, carbon
monoxide, phthalates and lead, that
which are know to the State of
California to cause cancer and birth
defects or other reproductive harm. To
minimize exposure, avoid breathingexhaust, do not idle the engine except
as necessary, service your vehicle in a
well-ventilated area and wear gloves
or wash your hands frequently when
servicing your vehicle. For more
information go to:
www.P65Warnings.ca.gov/passenger-
vehicle
Heavy-Duty Vehicle Use
If the car is mainly used under one of
the following conditions:
• dusty roads;
• short, repeated journeys (less than
4-5 mi/7-8 km) at sub-zero outside
temperatures;
• engine often idling or driving long
distances at low speeds or long
periods of idleness;
you should perform the following
inspections more frequently than
Maintenance and Care
7
227
Page 235 of 286

When adding engine coolant
(antifreeze) use pure water only, such
as distilled or deionized water when
mixing the water/engine coolant
(antifreeze) solution. The use of
impure water will reduce the amount
of corrosion protection in the engine
cooling system.
• Mix a minimum solution of 50%
engine coolant (antifreeze) and
distilled water. Use higher
concentrations (do not exceed 70%)
if temperatures below -35°F (-37°C)
are forecast.
Please note that it is the owner's
responsibility to maintain the proper
level of protection against freezing
according to the temperatures
occurring in the circulation area of the
vehicle.
The coolant tank provides a quick
visual method to determine that the
coolant level is adequate. As long as
the engine operating temperature is
satisfactory, the coolant bottle only
needs to be checked once a month.
With the engine off and cold, the level
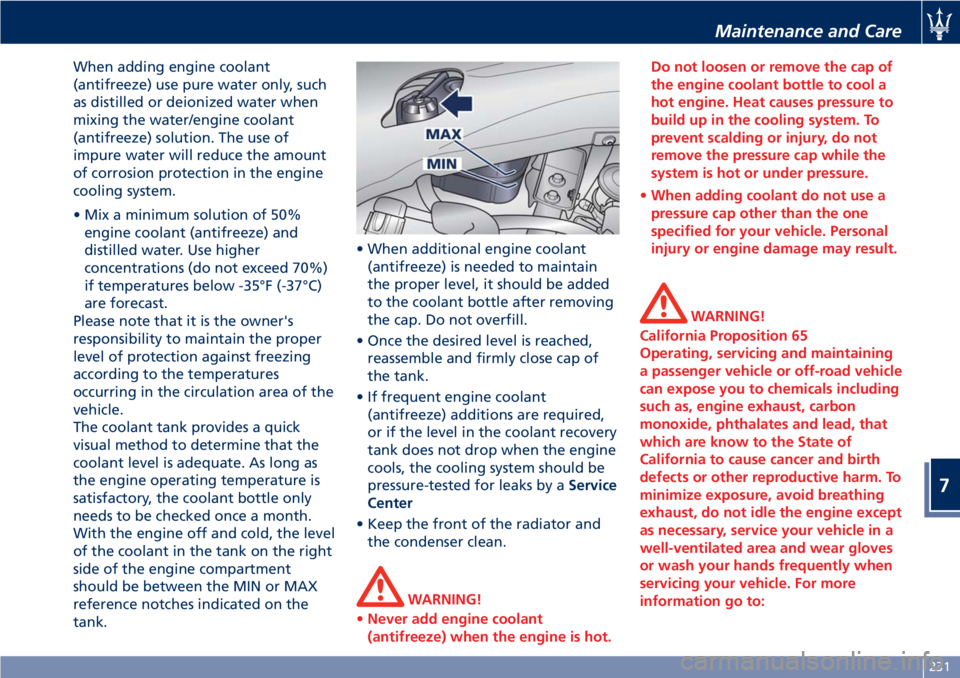
of the coolant in the tank on the right
side of the engine compartment
should be between the MIN or MAX
reference notches indicated on the
tank.• When additional engine coolant
(antifreeze) is needed to maintain
the proper level, it should be added
to the coolant bottle after removing
the cap. Do not overfill.
• Once the desired level is reached,
reassemble and firmly close cap of
the tank.
• If frequent engine coolant
(antifreeze) additions are required,
or if the level in the coolant recovery
tank does not drop when the engine
cools, the cooling system should be
pressure-tested for leaks by aService
Center
• Keep the front of the radiator and
the condenser clean.
WARNING!
•Never add engine coolant
(antifreeze) when the engine is hot.Do not loosen or remove the cap of
the engine coolant bottle to cool a
hot engine. Heat causes pressure to
build up in the cooling system. To
prevent scalding or injury, do not
remove the pressure cap while the
system is hot or under pressure.
•When adding coolant do not use a
pressure cap other than the one
specified for your vehicle. Personal
injury or engine damage may result.
WARNING!
California Proposition 65
Operating, servicing and maintaining
a passenger vehicle or off-road vehicle
can expose you to chemicals including
such as, engine exhaust, carbon
monoxide, phthalates and lead, that
which are know to the State of
California to cause cancer and birth
defects or other reproductive harm. To
minimize exposure, avoid breathing
exhaust, do not idle the engine except
as necessary, service your vehicle in a
well-ventilated area and wear gloves
or wash your hands frequently when
servicing your vehicle. For more
information go to:
Maintenance and Care
7
231
Page 236 of 286

(Continued)
www.P65Warnings.ca.gov/passenger-
vehicle
Brake Fluid Level Check
Check the fluid level immediately if
the brake system
red warning
light and the related message turn on
indicating a low level of brake fluid.
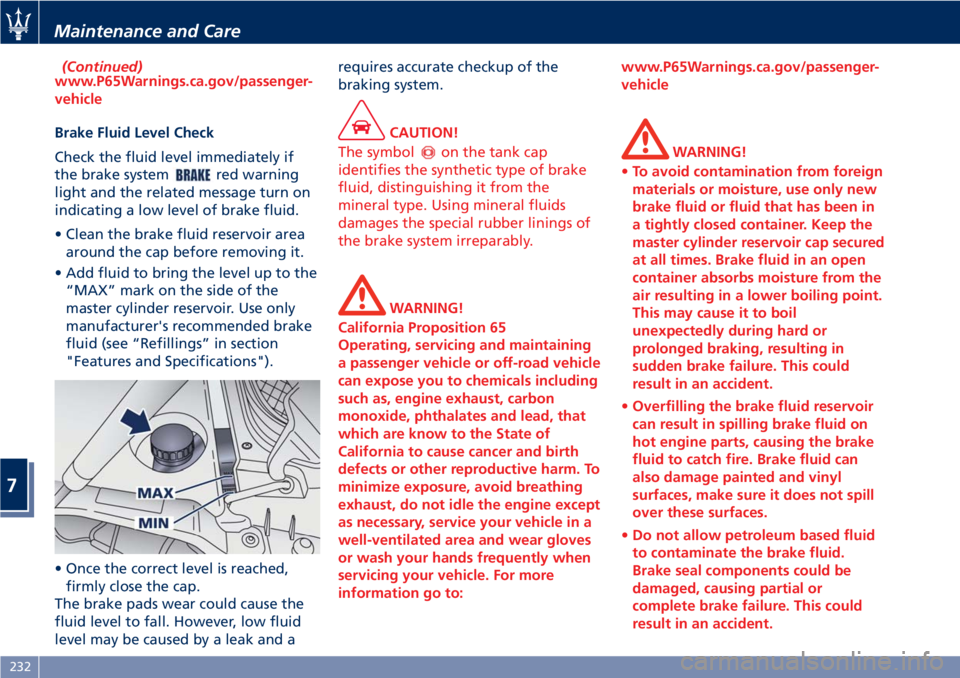
• Clean the brake fluid reservoir area
around the cap before removing it.
• Add fluid to bring the level up to the
“MAX” mark on the side of the
master cylinder reservoir. Use only
manufacturer's recommended brake
fluid (see “Refillings” in section
"Features and Specifications").
• Once the correct level is reached,
firmly close the cap.
The brake pads wear could cause the
fluid level to fall. However, low fluid
level may be caused by a leak and arequires accurate checkup of the
braking system.
CAUTION!
The symbol
on the tank cap
identifies the synthetic type of brake
fluid, distinguishing it from the
mineral type. Using mineral fluids
damages the special rubber linings of
the brake system irreparably.
WARNING!
California Proposition 65
Operating, servicing and maintaining
a passenger vehicle or off-road vehicle
can expose you to chemicals including
such as, engine exhaust, carbon
monoxide, phthalates and lead, that
which are know to the State of
California to cause cancer and birth
defects or other reproductive harm. To
minimize exposure, avoid breathing
exhaust, do not idle the engine except
as necessary, service your vehicle in a
well-ventilated area and wear gloves
or wash your hands frequently when
servicing your vehicle. For more
information go to:www.P65Warnings.ca.gov/passenger-
vehicle
WARNING!
•To avoid contamination from foreign
materials or moisture, use only new
brake fluid or fluid that has been in
a tightly closed container. Keep the
master cylinder reservoir cap secured
at all times. Brake fluid in an open
container absorbs moisture from the
air resulting in a lower boiling point.
This may cause it to boil
unexpectedly during hard or
prolonged braking, resulting in
sudden brake failure. This could
result in an accident.
•Overfilling the brake fluid reservoir
can result in spilling brake fluid on
hot engine parts, causing the brake
fluid to catch fire. Brake fluid can
also damage painted and vinyl
surfaces, make sure it does not spill
over these surfaces.
•Do not allow petroleum based fluid
to contaminate the brake fluid.
Brake seal components could be
damaged, causing partial or
complete brake failure. This could
result in an accident.
Maintenance and Care
7
232
Page 237 of 286

Adding Windshield/Headlight Washer
Fluid
The reservoir on the left side of the
engine compartment contains the
fluid to wash the windshield and
headlights.
During scheduled services or when the
message of low level of the washer
fluid appears together with the
related telltale add more fluid as
soon as possible.
The fluid reservoir may contain nearly
1.58 US gallons (6 liters) of
windshield/headlight washer fluid.
• Remove the reservoir cap in the
engine compartment and lift the
filler neck extension.
• Fill the reservoir with windshield
washer solvent (refer to “Refillings”
in section "Features and
Specifications") and operate thesystem for a few seconds to flush out
the residual water.
• When refilling the washer fluid
reservoir, apply some washer fluid to
a cloth or towel and wipe the wiper
blades clean. This will help blade
performance.
To prevent freeze-up of your
windshield washer system in cold
weather, select a solution or mixture
that meets or exceeds the
temperature range of your climate.
This rating information can be found
on most washer fluid containers.
NOTE:
TheAuthorized Maserati Dealercan
provide you with information about
the “Maserati recommended
Windshield Washer Fluid” with
antifreeze, available in the “Genuine
Accessories” range.
WARNING!
•Commercially available windshield
washer solvents are flammable.
They could ignite and burn you.
Care must be exercised when filling
or when working around the
windshield/headlight washer
system.•Do not drive with the windshield/
headlight washer reservoir empty:
the action of the washer is essential
for improving visibility when
driving.
WARNING!
California Proposition 65
Operating, servicing and maintaining
a passenger vehicle or off-road vehicle
can expose you to chemicals including
such as, engine exhaust, carbon
monoxide, phthalates and lead, that
which are know to the State of
California to cause cancer and birth
defects or other reproductive harm. To
minimize exposure, avoid breathing
exhaust, do not idle the engine except
as necessary, service your vehicle in a
well-ventilated area and wear gloves
or wash your hands frequently when
servicing your vehicle. For more
information go to:
www.P65Warnings.ca.gov/passenger-
vehicle
Engine Oil Level Check
To assure proper lubrication of your
vehicle's engine, the engine oil must
be maintained at the correct level. If
the
warning light illuminates and
Maintenance and Care
7
233
Page 238 of 286

the related message of low oil level
displays, or during scheduled services
(see “Scheduled Maintenance Service”
in this section) it is necessary to check
the engine oil level.
The vehicle should be parked on level
ground to improve the accuracy of the
oil level readings.
CAUTION!
• Do not top up with oil with different
characteristics than the engine one
(refer to “Refillings” in section
“Features and Specifications”).
• Overfilling or underfilling the oil pan
will cause aeration or loss of oil
pressure. This could damage your
engine.
• Do not add any supplemental
materials to the engine oil, other
than leak detection dyes. Engine oil
is an engineered product, and its
performance may be impaired by
supplemental additives.
WARNING!
California Proposition 65
Operating, servicing and maintaining
a passenger vehicle or off-road vehiclecan expose you to chemicals including
such as, engine exhaust, carbon
monoxide, phthalates and lead, that
which are know to the State of
California to cause cancer and birth
defects or other reproductive harm. To
minimize exposure, avoid breathing
exhaust, do not idle the engine except
as necessary, service your vehicle in a
well-ventilated area and wear gloves
or wash your hands frequently when
servicing your vehicle. For more
information go to:
www.P65Warnings.ca.gov/passenger-
vehicle
• Start the vehicle and warm it up until
the temperature stabilizes.
• Turn off the engine, remove the filler
neck cap and wait 5 minutes to allow
the oil to flow into the oil pan.• Remove the dipstick and clean it with
a dry and clean cloth.
• Re-insert the dipstick completely and
remove: the oil level should maintain
between the “MIN” and “MAX”
reference ranges (SAFE range).
• If a refilling is necessary, adding 0.4
US gallons (1,5 liters ) of oil when the
level is at the bottom of the SAFE
range will result in the level being at
the top of the SAFE range.
Maintenance and Care
7
234