2020 MASERATI GRANTURISMO CONVERTIBLE wheel
[x] Cancel search: wheelPage 200 of 296

(Continued)
style. Aftermarket wheels can cause
sensor damage. Do not use
aftermarket tire sealants or balance
beads, as damage to the sensors may
result.
• The system can temporarily
experience radio-electric interference
emitted by devices using similar
frequencies.
• After inspecting or adjusting the tire
pressure, always reinstall the valve
stem cap. This will prevent moisture
and dirt from entering the valve
stem and damage the TPMS internal
sensor.
NOTE:
•Driving on a significantly
underinflated tire causes the tire to
overheat and may lead to tire failure.
Under-inflation also reduces fuel
efficiency and tire tread life, and may
affect the vehicle’s handling and
stopping ability.
•The TPMS is not a substitute for
proper tire maintenance, and it is the
driver’s responsibility to maintain
correct tire pressure using an
accurate tire pressure gage, even if
under-inflation has not reached thelevel to trigger illumination of the
TPMS light
.
•Seasonal temperature changes will
affect tire pressure, and the TPMS
will monitor the actual tire pressure
in the tire.
Viewing Messages on the
Display
By pressing repeatedly the “MODE”
button of the control panel on left
side of the steering column, the user
can access the information page that
shows the pressure values of each tire
(“Tire Pressure” screen page: see
paragraph "TFT Display: Screen Pages"
in chapter "Instrument Cluster" of
section "Dashboard Instruments and
Controls").
If system faults or low pressure is
detected on a not indentified tire,"Check Tire Pressure" or "TPMS
Malfunction" pop-up message will be
displayed for 10 seconds. The
amber warning light will
permanently illuminate on the right
side of the instrument cluster display.
With a malfunction detected, the "Tire
Pressure" screen page will not be
available while will be available the
calibration screen page.
The “Tire Pressure” screen page
becomes available again, until the
malfunction is corrected.
Low Tire Pressure Conditions
The signal transmitted by the ECU
activates messages and symbols on the
TFT display with two priority levels
corresponding to the following
thresholds:
• Soft Warning: if the pressure is 10%
lower than the rated pressure;
• Hard Warning: if the pressure is 17%
lower than the rated pressure.
The system refers to the rated pressure
acquired after calibration.
The two alarm thresholds for
monitoring the tire pressure
respectively activate the following
alerts:
• “Check tire pressure” illuminates on
the display when the pressure of one
Driving
5
196
Page 201 of 296
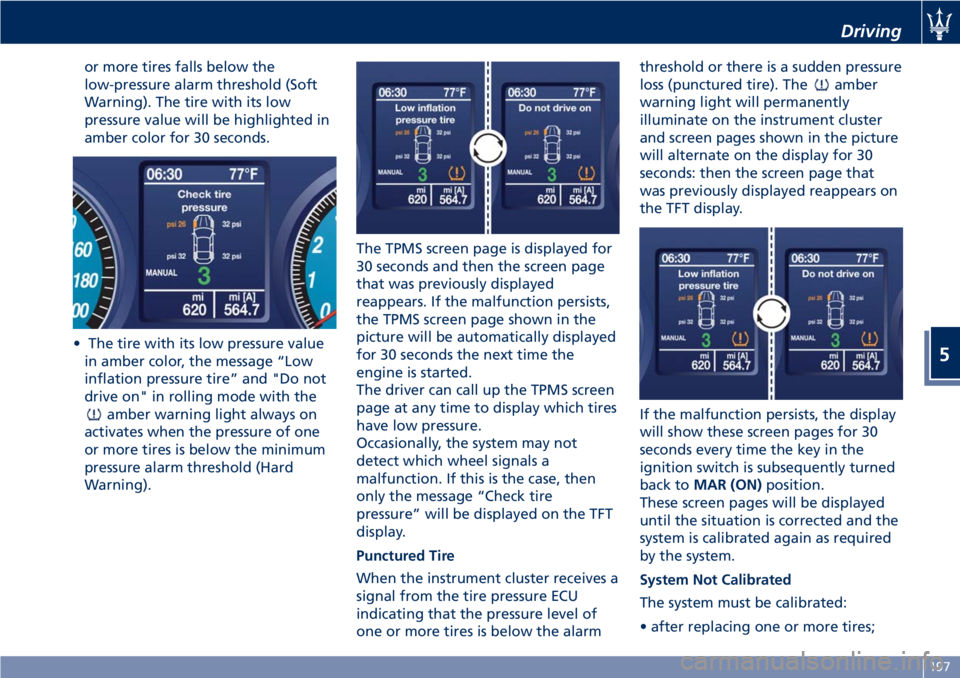
or more tires falls below the
low-pressure alarm threshold (Soft
Warning). The tire with its low
pressure value will be highlighted in
amber color for 30 seconds.
• The tire with its low pressure value
in amber color, the message “Low
inflation pressure tire” and "Do not
drive on" in rolling mode with the
amber warning light always on
activates when the pressure of one
or more tires is below the minimum
pressure alarm threshold (Hard
Warning).The TPMS screen page is displayed for
30 seconds and then the screen page
that was previously displayed
reappears. If the malfunction persists,
the TPMS screen page shown in the
picture will be automatically displayed
for 30 seconds the next time the
engine is started.
The driver can call up the TPMS screen
page at any time to display which tires
have low pressure.
Occasionally, the system may not
detect which wheel signals a
malfunction. If this is the case, then
only the message “Check tire
pressure” will be displayed on the TFT
display.
Punctured Tire
When the instrument cluster receives a
signal from the tire pressure ECU
indicating that the pressure level of
one or more tires is below the alarmthreshold or there is a sudden pressure
loss (punctured tire). The
amber
warning light will permanently
illuminate on the instrument cluster
and screen pages shown in the picture
will alternate on the display for 30
seconds: then the screen page that
was previously displayed reappears on
the TFT display.
If the malfunction persists, the display
will show these screen pages for 30
seconds every time the key in the
ignition switch is subsequently turned
back toMAR (ON)position.
These screen pages will be displayed
until the situation is corrected and the
system is calibrated again as required
by the system.
System Not Calibrated
The system must be calibrated:
• after replacing one or more tires;
Driving
5
197
Page 202 of 296
• after inverting the wheels;
• if you are not sure whether at least
one of the operations above was
performed.
If you simply corrected the tire
inflation pressure, you do not need to
recalibrate the system.
In the event that the system has not
been calibrated or calibration has been
performed incorrectly and following
replacement or reversal of one or
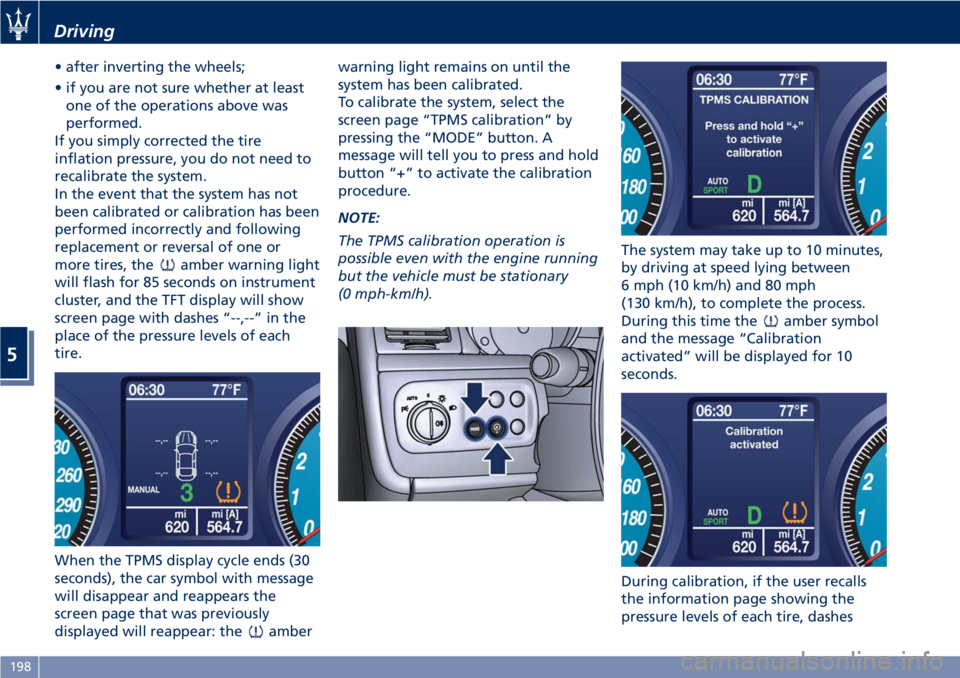
more tires, the
amber warning light
will flash for 85 seconds on instrument
cluster, and the TFT display will show
screen page with dashes “--,--” in the
place of the pressure levels of each
tire.
When the TPMS display cycle ends (30
seconds), the car symbol with message
will disappear and reappears the
screen page that was previously
displayed will reappear: the
amberwarning light remains on until the
system has been calibrated.
To calibrate the system, select the
screen page “TPMS calibration” by
pressing the “MODE” button. A
message will tell you to press and hold
button “+” to activate the calibration
procedure.
NOTE:
The TPMS calibration operation is
possible even with the engine running
but the vehicle must be stationary
(0 mph-km/h).The system may take up to 10 minutes,
by driving at speed lying between
6 mph (10 km/h) and 80 mph
(130 km/h), to complete the process.
During this time the
amber symbol
and the message “Calibration
activated” will be displayed for 10
seconds.
During calibration, if the user recalls
the information page showing the
pressure levels of each tire, dashes
Driving
5
198
Page 206 of 296
Refueling
Fuel Filler Neck Access
The fuel filler door is found on the
rear, left-hand side of the vehicle.
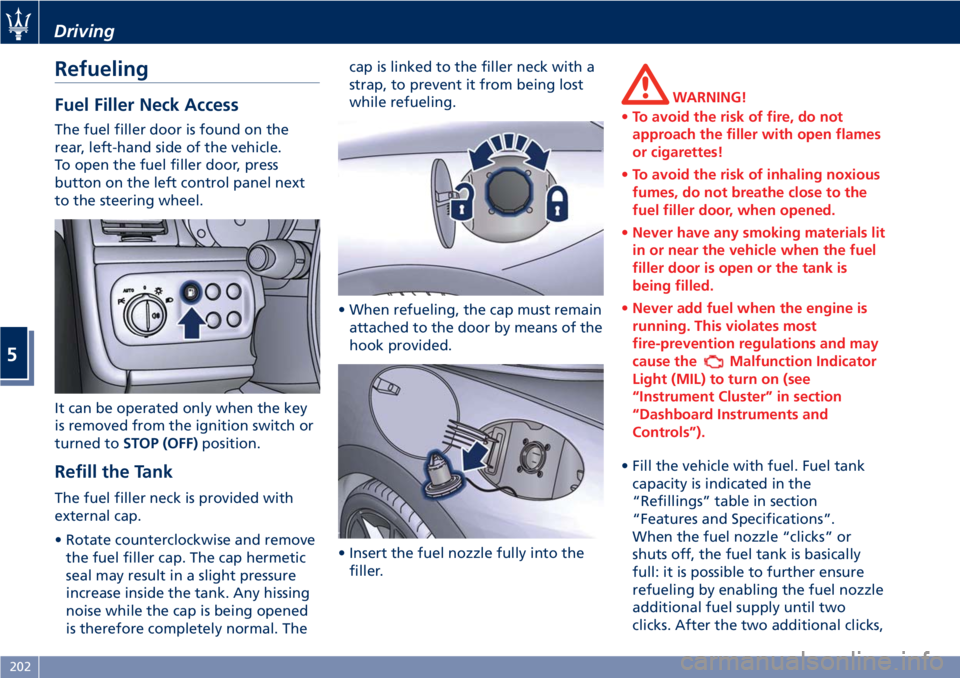
To open the fuel filler door, press
button on the left control panel next
to the steering wheel.
It can be operated only when the key
is removed from the ignition switch or
turned toSTOP (OFF)position.
Refill the Tank
The fuel filler neck is provided with
external cap.
• Rotate counterclockwise and remove
the fuel filler cap. The cap hermetic
seal may result in a slight pressure
increase inside the tank. Any hissing
noise while the cap is being opened
is therefore completely normal. Thecap is linked to the filler neck with a
strap, to prevent it from being lost
while refueling.
• When refueling, the cap must remain
attached to the door by means of the
hook provided.
• Insert the fuel nozzle fully into the
filler.
WARNING!
•To avoid the risk of fire, do not
approach the filler with open flames
or cigarettes!
•To avoid the risk of inhaling noxious
fumes, do not breathe close to the
fuel filler door, when opened.
•Never have any smoking materials lit
in or near the vehicle when the fuel
filler door is open or the tank is
being filled.
•Never add fuel when the engine is
running. This violates most
fire-prevention regulations and may
cause the
Malfunction Indicator
Light (MIL) to turn on (see
“Instrument Cluster” in section
“Dashboard Instruments and
Controls”).
• Fill the vehicle with fuel. Fuel tank
capacity is indicated in the
“Refillings” table in section
“Features and Specifications”.
When the fuel nozzle “clicks” or
shuts off, the fuel tank is basically
full: it is possible to further ensure
refueling by enabling the fuel nozzle
additional fuel supply until two
clicks. After the two additional clicks,
Driving
5
202
Page 208 of 296
Driving Conditions
Before the Trip
Check the following at regular
intervals and always before long trips:
• tire pressure and condition;
• levels of fluids and lubricants;
• conditions of the windshield wiper
blades;
• clean the glass on the external light
and all other glass surfaces;
• proper operation of the indicator
lights and of the external lights.
CAUTION!
It is however advisable to perform
these checks at least every 500 mi
(800 km) and always following the
maintenance schedule reported in
section “Maintenance and Care”.
Before you drive:
• adjust seat position, steering wheel
and rearview mirrors in order to have
the best driving position;
• ensure that nothing (mat covers, etc.)
is obstructing the pedals movement;
• carefully arrange and secure any
objects in the trunk, to prevent themfrom moving forward in case of
sudden stops;
• avoid heavy meals before a trip. A
light snack helps keep your reflexes
sharp. In particular, avoid drinking
alcohol.
WARNING!
Beyond being prohibited by law, it is
extremely dangerous to ride inside the
trunk or on the hood. In the event of
an accident, passengers sitting here
are more exposed to the risk of
serious injury. Passengers must only
travel seated in the vehicle seats, with
the seat belts fastened. Always check
that the driver and all passengers
have the seat belts correctly fastened.
Safe Driving
Although the vehicle is equipped with
active and passive safety devices, the
driver's conduct is always a decisive
factor for road safety.
Some simple rules for traveling safely
in different conditions are listed
below. Some of them will probably
already sound familiar but, in any case,
it would be useful to read them
carefully.Driving at Night
The main guidelines to follow when
driving at night are set out below.
• Drive carefully. Night conditions
demand more focus and attention.
• Reduce your speed, especially on
roads with no streetlights.
• Stop at early signs of drowsiness.
Continuing to drive would be a risk
for yourself and for others. Have a
rest before continuing your trip.
• Keep the vehicle at a greater
distance from vehicles in front of you
than you would during the day: it is
difficult to assess the speed of other
vehicles when you only see the lights.
• Use the high beams only outside of
densely-populated areas and when
you are sure that they will not
disturb other drivers.
• When another vehicle is
approaching, switch from high
beams (if on) to low beams.
• Keep lights and headlights clean.
• Outside of densely-populated areas,
beware of animals crossing the road.
Driving in the Rain
Rain and wet roads are dangerous. On
a wet road all maneuvers are more
difficult since wheel grip on the
Driving
5
204
Page 210 of 296
with the key removed to the ignition
switch.
• Remember that passing other
vehicles when driving uphill is slower
and thus requires more free distance
on the road. If you are being
overtaken on a hill, slow down and
allow the other vehicle to pass.
Driving on Snow or Ice
Please consider some general advice
for driving in these conditions, listed
below.
• Maintain a very moderate speed.
• Fit snow chains or specific tires if the
road is covered with snow: see the
paragraphs “Tires – General
Information” in this section.
• We recommend you to activate the
“ICE” drive mode (see chapters
“Drive Mode” in this section).
• During the winter season, even
apparently dry roads can have icy
sections. Be careful when crossing
bridges, viaducts and roads that have
little exposure to the sun and are
bordered by trees and rocks. They
may be icy.
• Keep an ample safe distance from
the vehicles in front of you.
• Avoid sharp braking, sharp changes
in direction and rapid acceleration.Rapid acceleration on snow covered
or icy surfaces may cause the driving
wheels to pull erratically to the right
or left. This phenomenon occurs
when there is a difference in the
surface traction under the rear
(driving) wheels.
WARNING!
Rapid acceleration on slippery surfaces
is dangerous. Unequal traction can
cause sudden pulling of the rear
driving wheels. You could lose control
of the vehicle and possibly have a
collision. Accelerate slowly and
carefully whenever there is likely to be
poor traction (ice, snow, wet mud,
loose sand, etc.).
Driving through Flooded
Sections
Driving through more than a
centimeters deep shallow standing
water section will require extra
caution to ensure passenger safety and
prevent damage to your vehicle.
WARNING!
Do not drive on or across a road or
path where water is flowing and/or
rising (as in storm run-off). Flowing
water can wear away the road or path
surface and cause your vehicle to sink
into deeper water. Furthermore,
flowing and/or rising water can carry
your vehicle away swiftly. Failure to
follow this warning may result in
injuries that are serious or fatal to
you, your passengers, and others
around you.
Although your vehicle is capable of
driving through shallow standing
water, consider the following Caution
and Warning before doing so.
CAUTION!
• Always check the depth of the
standing water before driving
through it. Never drive through
standing water that is deeper than
the bottom of the tire rims mounted
on the vehicle.
• Determine the condition of the road
or the path that is under water and if
there are any obstacles in the way
Driving
5
206
Page 218 of 296

Engine Overheating
To reduce potentially overheating of
the engine in city traffic, while
stationary, place the transmission in N
(Neutral), but do not increase the
engine idle speed.
NOTE:
There are steps that you can take to
slow down an impending overheat
condition:
•If your air conditioner (A/C) is on,
turn it off. The A/C system adds heat
to the engine cooling system and
turning the A/C off can help remove
this heat.
•You can also turn the temperature
control to maximum heat, the mode
control to floor and the blower
control to high. This allows the
heater core to act as a supplement to
the radiator and aids in removing
heat from the engine cooling system.
CAUTION!
Driving with a hot cooling system
could damage the engine. If the
temperature gauge is positioned on
the red zone (refer to “Instrument
Cluster” in section “DashboardInstruments and Controls”), pull over
and stop the vehicle. Idle the vehicle
with the air conditioner turned off
until the temperature gauge drops
back into the normal range. If the
temperature gauge remains on the red
zone turn the engine off immediately
and contact theAuthorized Maserati
Dealer.
WARNING!
You or others can be badly burned by
hot engine coolant (antifreeze) or
steam from your radiator. If you see or
hear steam coming from under the
hood, do not open it until the radiator
has had time to cool.
Never try to open a coolant bottle
pressure cap (refer to “Maintenance
Procedures” in section “Maintenance
and Care”) when the radiator is
overheated.
In case of a Punctured Tire
The vehicle can be equipped with a
tire repair kit or with a compact spare
wheel.
Using Tire Repair Kit
Small punctures up to 1⁄4” (6 mm) in
the tire tread can be sealed using the
tire repair kit, fitted beneath the floor
panel of the trunk compartment.
The kit comes in a bag and consists of
two parts:
• an electric compressor with pressure
gage, hose to be connected to the
punctured tire and power cable;
• a gas cylinder containing sealant.
In an Emergency
6
214
Page 219 of 296
WARNING!
California Proposition 65
Operating, servicing and maintaining
a passenger vehicle or off-road vehicle
can expose you to chemicals including
such as, engine exhaust, carbon
monoxide, phthalates and lead, that
which are know to the State of
California to cause cancer and birth
defects or other reproductive harm. To
minimize exposure, avoid breathing
exhaust, do not idle the engine except
as necessary, service your vehicle in a
well-ventilated area and wear gloves
or wash your hands frequently when
servicing your vehicle.
NOTE:
For the tire repair procedures with tire
repair kit see instructions included in
the kit.
This kit will provide a temporary tire
seal, allowing you to drive your
vehicle up to 6 miles (10 km) with a
maximum speed of 50 mph (80 km/h).
CAUTION!
• Intruding objects (e.g., screws or
nails) should not be removed fromthe tire, which could compromise
the repair with the tire repair kit.
• Do not use the tire repair kit if the
tire shows lateral damages and/or
the rim is damaged by driving with
flat tire.
• Tire repair kit can be used in outside
temperatures down to
approximately -4°F (-20°C).
• Replace the tire repair kit sealant gas
cylinder prior to the expiration date
(printed on the gas cylinder label) to
assure optimum operation of the
system.
NOTE:
•The compressor power plug can be
inserted either in the 12 V power
outlet housed in the trunk or inside
the passenger compartment (see
“Interior Features” in section
“Understanding the Vehicle”).
•When having the tire serviced,
advise theAuthorized Maserati
Dealeror service center that the tire
has been sealed using the tire repair
kit.
Using the Compact Spare
Wheel (for versions/markets
where provided)
Upon request, the vehicle may come
equipped with a compact spare wheel
(emergency wheel), jack and tools for
replacing a wheel.
The compact spare wheel is stored in
the trunk and housed in a bag: it is
supplied deflated in order to limit the
amount of space occupied. An electric
compressor is also provided for
inflating.
The bag covering the compact spare
wheel has a side pocket containing
the protective bag for the standard
wheel that has been removed along
with a pair of gloves.
In the event of a tire puncture,
proceed as follows.
• Stop the vehicle in a place that does
not constitute a danger to traffic
and where the wheel can be
changed safely. The vehicle must be
level and on firm ground.
• Select the P (Park) mode and then
engage manually the electric
parking brake and turn the key in
the ignition switch toSTOP (OFF)
position.
In an Emergency
6
215