2020 MASERATI GRANTURISMO CONVERTIBLE wheel
[x] Cancel search: wheelPage 220 of 296
• If necessary, turn the hazard warning
flashers on and place the warning
triangle at the required distance.
WARNING!
•The jack should be used on level firm
ground wherever possible.
•It is recommended that the wheels
of the vehicle be chocked, and that
no person should remain in a vehicle
that is being jacked.
•If the vehicle has been stopped on a
slope or an uneven surface, place
chocks or other suitable items in
front of or behind the wheels to
stop the vehicle from moving.
•Never start or run the engine with
the vehicle on a jack.
•No person should place any portion
of their body under a vehicle that is
supported by a jack.
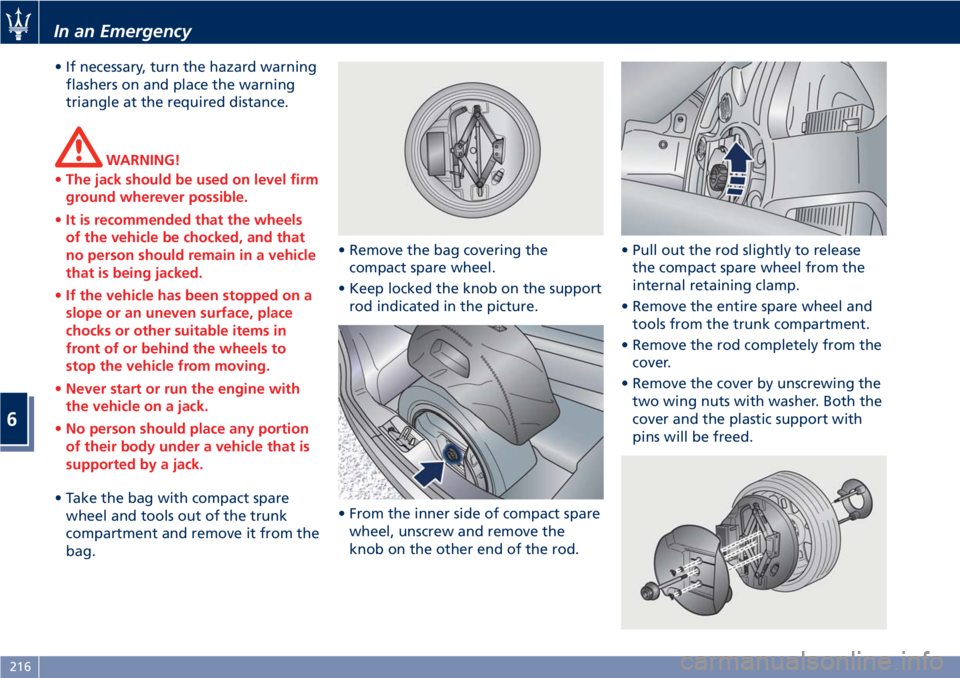
• Take the bag with compact spare
wheel and tools out of the trunk
compartment and remove it from the
bag.• Remove the bag covering the
compact spare wheel.
• Keep locked the knob on the support
rod indicated in the picture.
• From the inner side of compact spare
wheel, unscrew and remove the
knob on the other end of the rod.• Pull out the rod slightly to release
the compact spare wheel from the
internal retaining clamp.
• Remove the entire spare wheel and
tools from the trunk compartment.
• Remove the rod completely from the
cover.
• Remove the cover by unscrewing the
two wing nuts with washer. Both the
cover and the plastic support with
pins will be freed.
In an Emergency
6
216
Page 221 of 296
• Remove from the compressor case
the inflation hose and the cable with
a plug for the power outlet.
• Unscrew the valve cap of the
compact spare wheel and screw the
fitting of the inflation hose onto the
valve.
• Insert the plug in one of the
available power outlets fitted in the
trunk or passenger compartment.
• Turn the key in the ignition switch in
MAR (ON)position.
• Turn the compressor on by pressing
the switch.
• Stop the compressor pressing switch
again, when the pressure indicated
by the gage reaches the
recommended level (see “Tire
Inflation Pressure” in section
“Features and Specifications”) and
screw the cap on the compact spare
wheel valve.
CAUTION!
• In order to obtain a more accurate
reading, the compressor should be
switched off when checking the tire
pressure of the compact spare wheel
on the pressure gage.
• Do not run the compressor for more
than 20 minutes: there is a risk it
could overheat. Also, prolonged
power absorption may discharge the
battery, subsequently preventing the
engine from starting.
• The compressor has been designed
exclusively to inflate compact spare
wheels; do not use it to inflate air
mattresses, dinghies etc.
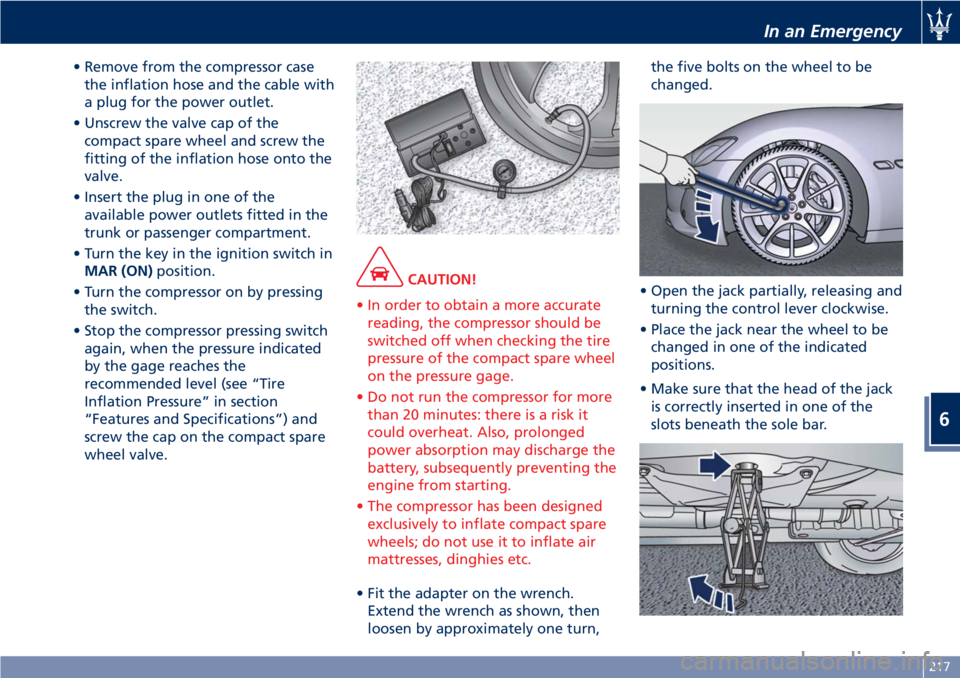
• Fit the adapter on the wrench.
Extend the wrench as shown, then
loosen by approximately one turn,the five bolts on the wheel to be
changed.
• Open the jack partially, releasing and
turning the control lever clockwise.
• Place the jack near the wheel to be
changed in one of the indicated
positions.
• Make sure that the head of the jack
is correctly inserted in one of the
slots beneath the sole bar.
In an Emergency
6
217
Page 222 of 296

WARNING!
•Never position yourself under a
jacked vehicle.
•The lifted vehicle may fall and
damage the vehicle's body if the jack
is not positioned correctly.•Never use the jack to carry out
maintenance or repairs under the
vehicle.
• Turn the jack lever until the wheel is
raised a few centimeters off the
ground.
• Completely unscrew the five bolts
and remove the wheel. In case a
“Wheel Security Stud Bolt” is
installed, it can only be removed byusing the specific fitting wrench
provided with the “Wheel Security
Stud Bolt Kit”, available in the
Genuine Accessories range.
• Fit the compact spare wheel with the
valve stem facing outward, securing
it with the five bolts previously
removed.
• Turn the lever of the jack to lower
the vehicle and remove the jack.
• Fully tighten the bolts, alternately
tightening diametrically opposite
following the sequence shown in the
picture.
WARNING!
•Observe the tightening torque for
the bolts securing the wheels (72 ±
7 lbf·ft / 98 ± 10 Nm). This is
equivalent to a load of
In an Emergency
6
218
Page 223 of 296

approximately 44 lb (20 kg) being
placed on the handle of the wrench
supplied when extended for use.
•After refitting the standard wheel,
check the tire pressure.
WARNING!
•The spare wheel is narrower than
standard wheels and must only be
used to travel the distance required
to reach a service station, where the
punctured tire can be repaired or
replaced.
•Do not exceed a maximum speed of
50 mph (80 km/h) when using the
compact spare wheel; when this
limit is exceeded, the stability, road
holding and braking of the vehicle
will be compromised. Avoid
accelerating to full speed, heavy
braking and fast cornering.
•The compact spare wheel must be
inflated to the recommended tire
pressure (see “Tire Inflation
Pressure” in section “Features and
Specifications”).
•For safety reasons, it is absolutely
forbidden to drive with more than
one compact spare wheel fitted on
the vehicle.•Snow chains cannot be fitted on the
compact spare wheel.
•The spare wheel can travel a
maximum of 1,800 mi (3.000 km).
NOTE:
The used wheel may soil the mats if it
is housed in the car: insert the used
wheel in the protective bag housed in
the side pocket of the covering bag.
To Refit the Standard Wheel with
Repaired or Replaced Tire
• Following the procedure and the
caution described above, raise the
vehicle and remove the compact
spare wheel reusing the supplied
wrench with adapter, suitably
extended.
• Fit the standard wheel with repaired
or replaced tire.
• Tighten the original bolts on the
wheel.
• Lower the vehicle and remove the
jack.
• Fully tighten the bolts, alternately
tightening diametrically opposite.
WARNING!
•Observe the tightening torque for
the bolts securing the wheels (72 ±
7 lbf·ft / 98 ± 10 Nm). This is
equivalent to a load of
approximately 44 lb (20 kg) being
placed on the handle of the wrench
supplied when extended for use.
•After refitting the standard wheel,
check the tire pressure.
Once finished:
• completely deflate the compact
spare wheel by pressing on the valve
with the overhang of the valve cap;
• wrap the power cable and the
inflation hose inside the compressor
case;
• place the compressor, the jack, the
wrench and the adapter in the
In an Emergency
6
219
Page 224 of 296
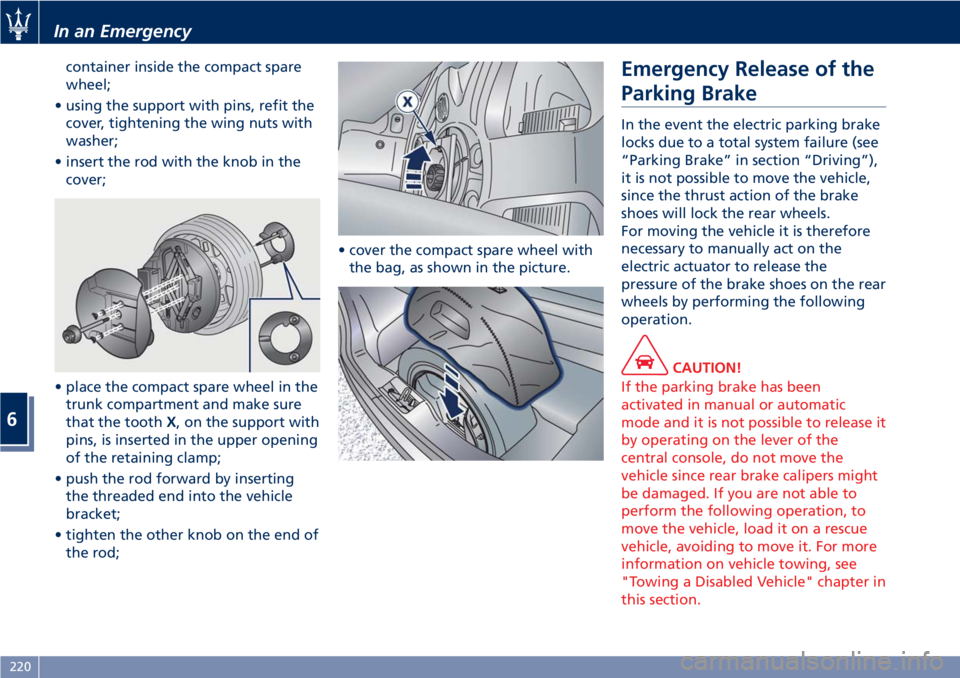
container inside the compact spare
wheel;
• using the support with pins, refit the
cover, tightening the wing nuts with
washer;
• insert the rod with the knob in the
cover;
• place the compact spare wheel in the
trunk compartment and make sure
that the toothX, on the support with
pins, is inserted in the upper opening
of the retaining clamp;
• push the rod forward by inserting
the threaded end into the vehicle
bracket;
• tighten the other knob on the end of
the rod;• cover the compact spare wheel with
the bag, as shown in the picture.Emergency Release of the
Parking Brake
In the event the electric parking brake
locks due to a total system failure (see
“Parking Brake” in section “Driving”),
it is not possible to move the vehicle,
since the thrust action of the brake
shoes will lock the rear wheels.
For moving the vehicle it is therefore
necessary to manually act on the
electric actuator to release the
pressure of the brake shoes on the rear
wheels by performing the following
operation.
CAUTION!
If the parking brake has been
activated in manual or automatic
mode and it is not possible to release it
by operating on the lever of the
central console, do not move the
vehicle since rear brake calipers might
be damaged. If you are not able to
perform the following operation, to
move the vehicle, load it on a rescue
vehicle, avoiding to move it. For more
information on vehicle towing, see
"Towing a Disabled Vehicle" chapter in
this section.
In an Emergency
6
220
Page 225 of 296
Manual Release Procedure
To manually release the parking brake,
you need to use the special tool
provided in the tool kit (see "Tool Kit"
in this section).
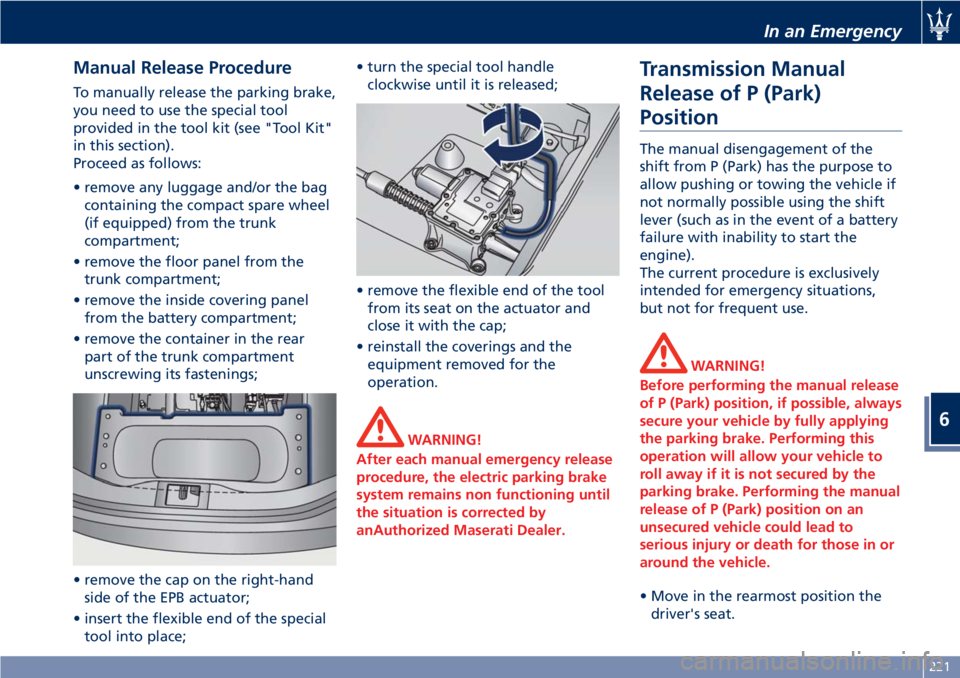
Proceed as follows:
• remove any luggage and/or the bag
containing the compact spare wheel
(if equipped) from the trunk
compartment;
• remove the floor panel from the
trunk compartment;
• remove the inside covering panel
from the battery compartment;
• remove the container in the rear
part of the trunk compartment
unscrewing its fastenings;
• remove the cap on the right-hand
side of the EPB actuator;
• insert the flexible end of the special
tool into place;• turn the special tool handle
clockwise until it is released;
• remove the flexible end of the tool
from its seat on the actuator and
close it with the cap;
• reinstall the coverings and the
equipment removed for the
operation.
WARNING!
After each manual emergency release
procedure, the electric parking brake
system remains non functioning until
the situation is corrected by
anAuthorized Maserati Dealer.
Transmission Manual
Release of P (Park)
Position
The manual disengagement of the
shift from P (Park) has the purpose to
allow pushing or towing the vehicle if
not normally possible using the shift
lever (such as in the event of a battery
failure with inability to start the
engine).
The current procedure is exclusively
intended for emergency situations,
but not for frequent use.
WARNING!
Before performing the manual release
of P (Park) position, if possible, always
secure your vehicle by fully applying
the parking brake. Performing this
operation will allow your vehicle to
roll away if it is not secured by the
parking brake. Performing the manual
release of P (Park) position on an
unsecured vehicle could lead to
serious injury or death for those in or
around the vehicle.
• Move in the rearmost position the
driver's seat.
In an Emergency
6
221
Page 227 of 296
• Remove the screwdriver from the
hole, being careful not to move the
transmission shift lever.
• Shift the lever fully into N (Neutral).
This position will allow vehicle
towing.
• Reinstall all the removed electrical
parts pushing it in the central
console seat until you hear the
locking click.
• Reinstall the covering panel on the
external side of the central console
press it until all pins are engaged in
their clips and “click” in place.
CAUTION!
Work extremely carefully so as not to
damage the central console trim
panels.
Freeing the Stuck Vehicle
If your vehicle is stuck in mud, sand, or
snow, it can probably be moved
backward and forward by a simple
rocking motion.
Steer the wheel right and left to clear
the area around the front wheels.
Shift then between D (Drive) or
MANUAL mode and R (Reverse) (see
chapter “Automatic Transmission” and
“Drive Mode” in section “Driving”).
Shifting to MANUAL mode, try to free
the car starting in second gear.
At low speed motion of the vehicle,
you can switch quickly from D (Drive)
to R (Reverse), and vice versa, just by
pressing the release button on the
shift lever.
For more effectiveness press lightly on
the accelerator pedal in order to avoid
wheel slippage.
If unable to release the vehicle in one
of the previously described ways,
enter the low-grip driving mode, by
pressing the “ICE” button, and
completely exclude the yaw and slip
control system, by pressing the
(ESC
Off) button for at least 2 seconds.
Moving the shift lever between D
(Drive) and R (Reverse) to start.
CAUTION!
Racing the engine or spinning the
drive wheels may lead to transmission
overheating and failure. Allow the
engine to idle with the shift lever in N
(Neutral) for at least one minute after
every five rocking-motion cycles. This
will minimize overheating and reduce
the risk of transmission failure during
prolonged efforts to free a stuck
vehicle.
WARNING!
Fast spinning tires can be dangerous.
Forces generated by excessive drive
wheel speeds may cause damage, or
even failure, of the drivetrain and
tires.
In an Emergency
6
223
Page 232 of 296

Towing a Disabled Vehicle
Proper towing or lifting equipment is
required to prevent damage to your
vehicle. Use only towing bars and
other equipment designed for the
purpose, following equipment
manufacturer’s instructions.
Safety chains are mandatory.
Except for the front threaded seat to
fix the supplied hook (see “Tool Kit”
chapter in this section), the vehicle is
not equipped with other connection
points for towing operations with tow
truck.
CAUTION!
Any improper maneuver and use of
unsuitable equipment for recovering
vehicle in an emergency from off road
location could seriously damage the
vehicle. Contact theAuthorized
Maserati Dealeror anyone having
suitable equipment and the required
expertise to safely and properly carry
out any required operations.
Make sure you comply with local
towing regulations.
•If the vehicle's battery is discharged,
it is necessary to shift the automatic
transmission out of the P (Park)Position and release the parking
brake (see “ Transmission Manual
Release of P (Park) position” and
“Emergency Release of the Parking
Brake” in this section).
•If the vehicle battery is still charged,
turn off the engine and disengage
the parking brake manually (if
automatically engaged) by using the
command at the side of the
transmission shift lever (see “Parking
Brake” chapter in section “Driving”).
Shift then manually the transmission
out of P (Park) as described in
“Transmission Manual Release of P
(Park) Position” chapter of this
section. If you need to use the
accessories (wipers, defrosters, etc.)
while being towed, the key in the
ignition switch must be turned in
MAR (ON)position, do not use the
ACCposition.
Vehicle Towing Conditions
Maserati only allows vehicle towing
either on a flatbed or with all four
wheels off the ground.
If flatbed equipment is not available,
and the transmission is still operable,
the vehicle may be flat towed (with all
four wheels on the ground) under the
following conditions.• The shift lever must be in N (Neutral).
• The distance to be traveled must not
exceed 30 mi (50 km ).
• The towing speed must not exceed
30 mph (50 km/h).
If the transmission is not operable, or
the vehicle must be towed faster than
30 mph (50 km/h ) or farther than 30
mi (50 km) (for example on a
highway), tow with the rear driving
wheels off the ground and on a
platform of a rescue vehicle, or with
the rear wheels raised using a wheel
lift.
CAUTION!
If you have to tow the vehicle with 2
wheels raised, ensure that the key in
the ignition switch is in theSTOP (OFF)
position. If this is not observed, when
the ESC is active, the ECU will store a
malfunction and the relative indicator
light
will illuminate on the
instrument cluster display. This
requires the intervention of an
Authorized Maserati Dealerto reset
the system.
In an Emergency
6
228