2020 MASERATI GRANTURISMO CONVERTIBLE ignition
[x] Cancel search: ignitionPage 137 of 296
for at least 2 seconds, it brings the
cursor back in the lower bar of the
main menus.
Enter Button
To confirm the function or setting
highlighted on MTC+ display. When in
"Radio" mode and the key in the
ignition switch inMAR (ON)position,
holding this button you can save your
preset stations.
With key not inserted in the ignition
switch or inSTOP (OFF)position,
pressing and holding this button for
2-3 seconds will turn off the MTC+
system. If pressed again and held for
2-3 seconds, the MTC+ will turn back
on.
Main Menu Bar on MTC+
Display
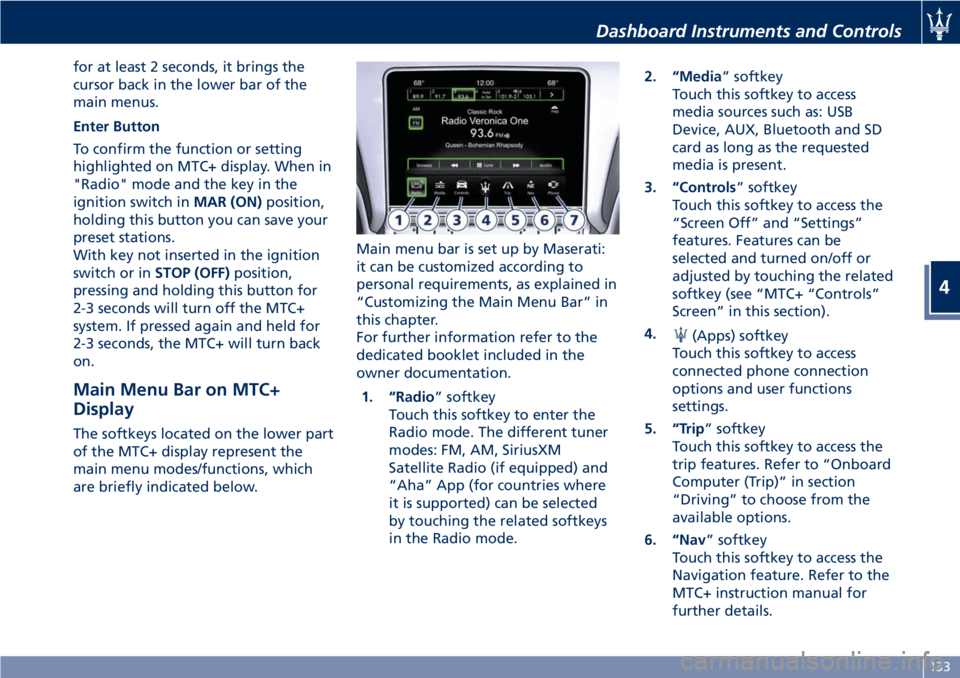
The softkeys located on the lower part
of the MTC+ display represent the
main menu modes/functions, which
are briefly indicated below.Main menu bar is set up by Maserati:
it can be customized according to
personal requirements, as explained in
“Customizing the Main Menu Bar” in
this chapter.
For further information refer to the
dedicated booklet included in the
owner documentation.
1. “Radio” softkey
Touch this softkey to enter the
Radio mode. The different tuner
modes: FM, AM, SiriusXM
Satellite Radio (if equipped) and
“Aha” App (for countries where
it is supported) can be selected
by touching the related softkeys
in the Radio mode.2. “Media” softkey
Touch this softkey to access
media sources such as: USB
Device, AUX, Bluetooth and SD
card as long as the requested
media is present.
3. “Controls” softkey
Touch this softkey to access the
“Screen Off” and “Settings”
features. Features can be
selected and turned on/off or
adjusted by touching the related
softkey (see “MTC+ “Controls”
Screen” in this section).
4.
(Apps) softkey
Touch this softkey to access
connected phone connection
options and user functions
settings.
5. “Trip” softkey
Touch this softkey to access the
trip features. Refer to “Onboard
Computer (Trip)” in section
“Driving” to choose from the
available options.
6. “Nav” softkey
Touch this softkey to access the
Navigation feature. Refer to the
MTC+ instruction manual for
further details.
Dashboard Instruments and Controls
4
133
Page 145 of 296
MTC+ “Controls” Screen
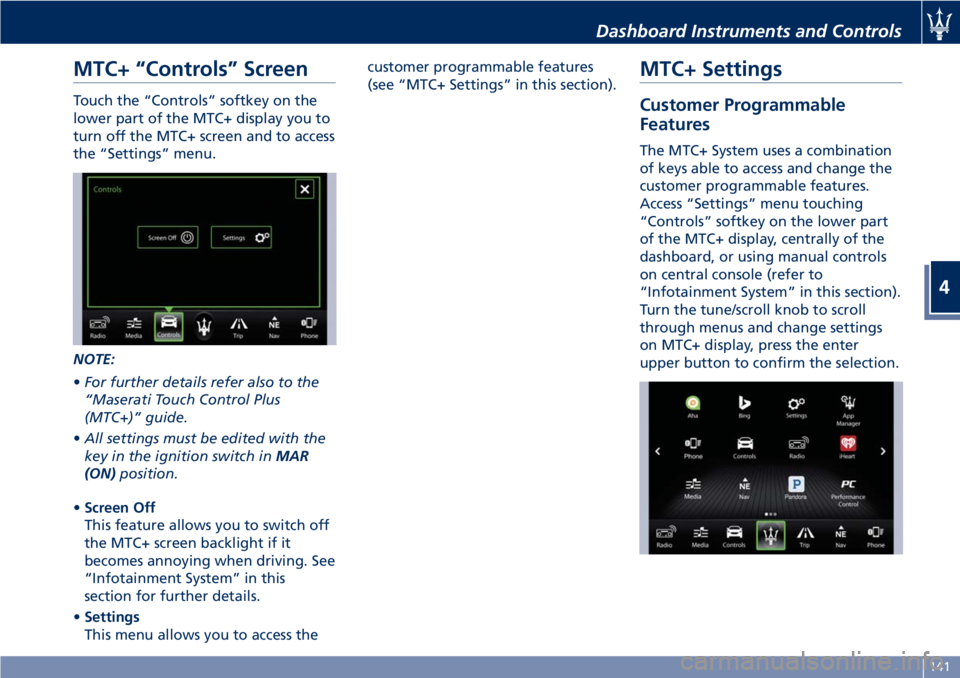
Touch the “Controls” softkey on the
lower part of the MTC+ display you to
turn off the MTC+ screen and to access
the “Settings” menu.
NOTE:
•For further details refer also to the
“Maserati Touch Control Plus
(MTC+)” guide.
•All settings must be edited with the
key in the ignition switch inMAR
(ON)position.
•Screen Off
This feature allows you to switch off
the MTC+ screen backlight if it
becomes annoying when driving. See
“Infotainment System” in this
section for further details.
•Settings
This menu allows you to access thecustomer programmable features
(see “MTC+ Settings” in this section).
MTC+ Settings
Customer Programmable
Features
The MTC+ System uses a combination
of keys able to access and change the
customer programmable features.
Access “Settings” menu touching
“Controls” softkey on the lower part
of the MTC+ display, centrally of the
dashboard, or using manual controls
on central console (refer to
“Infotainment System” in this section).
Turn the tune/scroll knob to scroll
through menus and change settings
on MTC+ display, press the enter
upper button to confirm the selection.
Dashboard Instruments and Controls
4
141
Page 146 of 296
NOTE:
•For further details refer to the
“Maserati Touch Control Plus
(MTC+)” guide.
•All settings must be edited with key
in the ignition switch inMAR (ON)
position.
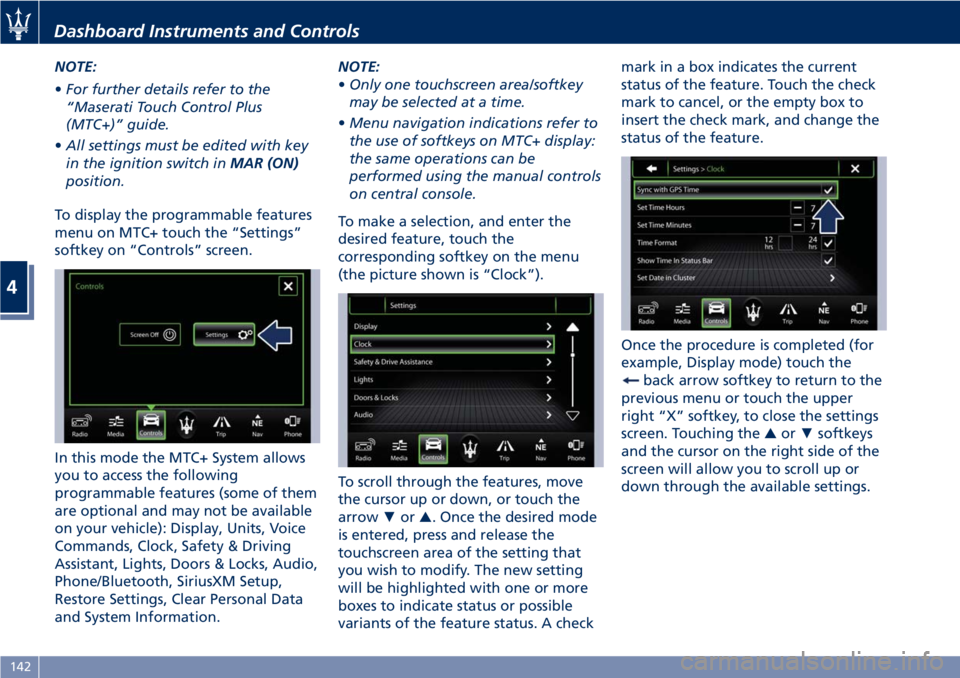
To display the programmable features
menu on MTC+ touch the “Settings”
softkey on “Controls” screen.
In this mode the MTC+ System allows
you to access the following
programmable features (some of them
are optional and may not be available
on your vehicle): Display, Units, Voice
Commands, Clock, Safety & Driving
Assistant, Lights, Doors & Locks, Audio,
Phone/Bluetooth, SiriusXM Setup,
Restore Settings, Clear Personal Data
and System Information.NOTE:
•Only one touchscreen area/softkey
may be selected at a time.
•Menu navigation indications refer to
the use of softkeys on MTC+ display:
the same operations can be
performed using the manual controls
on central console.
To make a selection, and enter the
desired feature, touch the
corresponding softkey on the menu
(the picture shown is “Clock”).
To scroll through the features, move
the cursor up or down, or touch the
arrow▼or▲. Once the desired mode
is entered, press and release the
touchscreen area of the setting that
you wish to modify. The new setting
will be highlighted with one or more
boxes to indicate status or possible
variants of the feature status. A checkmark in a box indicates the current
status of the feature. Touch the check
mark to cancel, or the empty box to
insert the check mark, and change the
status of the feature.
Once the procedure is completed (for
example, Display mode) touch the
back arrow softkey to return to the
previous menu or touch the upper
right “X” softkey, to close the settings
screen. Touching the▲or▼softkeys
and the cursor on the right side of the
screen will allow you to scroll up or
down through the available settings.
Dashboard Instruments and Controls
4
142
Page 149 of 296

•Set Time Hours
With “Sync with GPS Time” feature
unchecked and this mode selected,
you can set the hours manually
from 1 to 24. To select, touch the
“+” or “–” softkeys to adjust the
hours.
•Set Time Minutes
With “Sync with GPS Time” feature
unchecked and this mode selected,
you can set the minutes manually
from 0 to 59. To select, touch the
“+” or “–” softkeys as done for the
hours.
•Time Format
When in this mode, you can select
the time format display. To change
the current setting, touch and
release the “12 Hrs” or “24 Hrs”
softkey.•Show Time In Status Bar
This feature will allow you to turn
on or shut off the digital clock in
the status bar.
•Set Date in Cluster
When in this mode, you can set the
date manually on the instrument
cluster display.
Tick the soft-key to enable the
feature and enter the setting page.
Touch than the “+” or “-” soft-keys
to set the day, the month and the
year”.
Safety & Driving Assistant
Touch this softkey to set the following
modes.
•Stop & Go Parking Sensors
This feature allows you to disablethe parking sensors signal under
special traffic conditions.
See “Park Assist” in section “Before
Starting” for further information.
•ParkView Camera with Dynamic
Guidelines
When this feature is selected, by
moving the transmission lever in R
(Reverse) position, the rearview
image with dynamic guidelines will
appear on MTC+ display.
The feature can be set to “On” or
“Off”.
•ParkView Camera Off Delay
By selecting this feature, when the
transmission lever is moved out of R
(Reverse), the rear view image with
dynamic guidelines will be displayed
for up to 10 seconds after shifting
unless the forward vehicle speed
exceeds 8 mph (12 km/h), or the
transmission is shifted into P (Park)
or the key in the ignition switch is
turned inSTOP (OFF)position.
The feature can be set to “On” or
“Off”.
•Instrument Panel Buzzer Volume
This feature allows adjusting the
volume of the acoustic signal that
accompanies some instrument panel
warnings (EPB overheating, seat
Dashboard Instruments and Controls
4
145
Page 162 of 296
Normal Starting of the
Engine
WARNING!
It is dangerous to run the engine in an
enclosed area. The engine consumes
oxygen and discharges carbon
dioxide, carbon monoxide and other
toxic gases in the atmosphere.
WARNING!
California Proposition 65
Operating, servicing and maintaining
a passenger vehicle or off-road vehicle
can expose you to chemicals including
such as, engine exhaust, carbon
monoxide, phthalates and lead, that
which are know to the State of
California to cause cancer and birth
defects or other reproductive harm. To
minimize exposure, avoid breathing
exhaust, do not idle the engine except
as necessary, service your vehicle in a
well-ventilated area and wear gloves
or wash your hands frequently when
servicing your vehicle. For more
information go to:www.P65Warnings.ca.gov/passenger-
vehicle
When you open a door to get into the
car, the instrument cluster turns on.
The TFT displays the complete
odometer, time, outside temperature
and the
open doors indicator.
Before starting the engine, close the
doors, adjust your seat, the inside and
outside mirrors, fasten your seat belt
and instruct all other occupants to
buckle their seat belts.
Make sure that the Electric Parking
Brake (EPB) is applied.
The shift lever must be in P (Park) or N
(Neutral) position before you can start
the engine. Apply the brakes before
shifting into any driving gear (see
“Automatic Transmission” in this
section).
CAUTION!
• Before starting the engine, switch off
the electrical devices with a high
power consumption (air-conditioning
and heating system, heated rear
window, headlights, etc.).
• Do not start the engine if the fuel
level in the tank is low.
Press the brake pedal and turn the key
in the ignition switch toMAR (ON)
position.
Instrument cluster displays the initial
sequence with warning light and
analog instruments test routine.
Turn the key intoAVVposition and
release it when the engine starts. The
key will return toMAR (ON)position
automatically.
Do not hold the key inAVVposition
for a long time.
If the engine fails to start, the starter
will disengage automatically after 10
seconds. If you wish to stop the
cranking of the engine prior to
starting it, turn the key toSTOP (OFF)
position.
If the engine does not start, turn the
key toSTOP (OFF)position and wait
for the gear display to go off. Then
repeat the entire procedure.
NOTE:
Normal starting of either a cold or a
warm engine is obtained without
pumping or pressing the accelerator
pedal.
Driving
5
158
Page 163 of 296

Engine Start Failure
CAUTION!
• Do not attempt to push or tow your
vehicle to get it started. Vehicles
equipped with an automatic
transmission cannot be started this
way.
• If the vehicle battery is dead, booster
cables may be used to obtain a start
from a booster battery or the
battery in another vehicle. This type
of start can be dangerous if done
improperly. See “Auxiliary Jump
Start Procedure” in section “In an
Emergency” for further information.
Starting by cold engine
Start-off slowly, avoiding sudden
acceleration and rev the engine up at
low medium speeds. High-
performance driving should be
avoided until the engine temperature
reaches 149-158°F (65-70°C).
Engine Turn-Off
• Place the shift lever in P (Park) (see
“Automatic Transmission” in this
section).
• With the engine at idle, turn the key
in the ignition switch toSTOP (OFF)position. A burst on the accelerator
pedal before turning off the engine
has no purpose and increases fuel
consumption.
WARNING!
Never leave a vehicle out of the P
(Park) position, as it could move.
The key can only be removed from the
ignition switch when the transmission
is in P (Park) position and within 30
seconds after turning the key toSTOP
(OFF)position. If you do not remove
the key within 30 seconds, you will
need to turn it back toMAR (ON)and
then toSTOP (OFF)position to have a
further 30 seconds within which to
remove the key from the ignition
switch.
In the event that the key unlocking
system fails or if it is not possible to
shift the transmission to P (Park)
position, to remove the key you must
turn it toSTOP (OFF)position, then
remove the cap shown in picture using
a pen or sufficiently pointed tool.
Then press the button just uncovered
and at the same time extract the key
from the ignition switch. Once the key
has been removed, refit the removed
cap.
Driving
5
159
Page 164 of 296

Automatic Transmission
The electronic shift lever replaces the
conventional mechanical lever and has
no mechanical connection to the
transmission. The transmission is
operated by electrical actuators on the
hydraulic system and all commands to
the control system are transmitted by
the CAN network.
The automatic transmission has six
forward gear ratios and one reverse
gear. The gears can also be engaged
manually once you have shifted the
transmission shift lever to the sector
provided.
CAUTION!
In order to properly use the automatic
transmission, it is essential that you
read through the whole chapter, so
that you can understand right from
the start what the correct and
permitted operations are.
Damage to the transmission may occur
if the following precautions are not
observed:
• Shift into P (Park) only after the
vehicle has come to a complete stop.
This is the default position of the
lever and should be used every timethe key in the ignition switch is
turned toSTOP (OFF)position.
• Shift into or out of R (Reverse) only
after the vehicle has come to a
complete stop and the engine is at
idle speed.
• Do not shift between P (Park), R
(Reverse), N (Neutral) or D (Drive)
when the engine is above idle speed.
• To effect any change from vehicle
stop to R (Reverse), D (Drive), 1
stor
2ndgear, it is necessary to keep the
brake pedal fully depressed.
WARNING!
•It is dangerous to move the shift
lever out of P (Park) or N (Neutral) if
the engine speed is higher than idle
speed. Only shift into gear when the
engine is idling normally and when
your foot is firmly pressing on the
brake pedal.
•As with all vehicles, you should
never exit a vehicle while the engine
is running. Before exiting a vehicle,
always apply the electronic parking
brake, shift the transmission into P
(Park), and turn the engine off.
•When leaving the vehicle, always
remove the key from the ignitionswitch and lock your vehicle.
•Do not leave the key in or near the
vehicle.
The transmission system is equipped
with "Shift-Lock" and "Key-Lock"
safety functions.
Shift-Lock
This safety function allows you to shift
from P (Park) to another position only
if the brake pedal is depressed. This
prevents the vehicle from involuntarily
jumping forward or backward.
Key-Lock
This function allows you to remove the
key from the ignition switch only
when the transmission shift lever is in
P (Park) position and within a
maximum time of 30 seconds. When
this time has elapsed, the key can no
longer be removed.
Automatic Transmission Lever
Automatic transmission is operated by
a lever with unlock button to engage
R (Reverse) and P (Park) located on the
central console.
By using the transmission shift lever it
is possible to select following
positions, indicated on the gear display
at the side of the transmission shift
Driving
5
160
Page 165 of 296
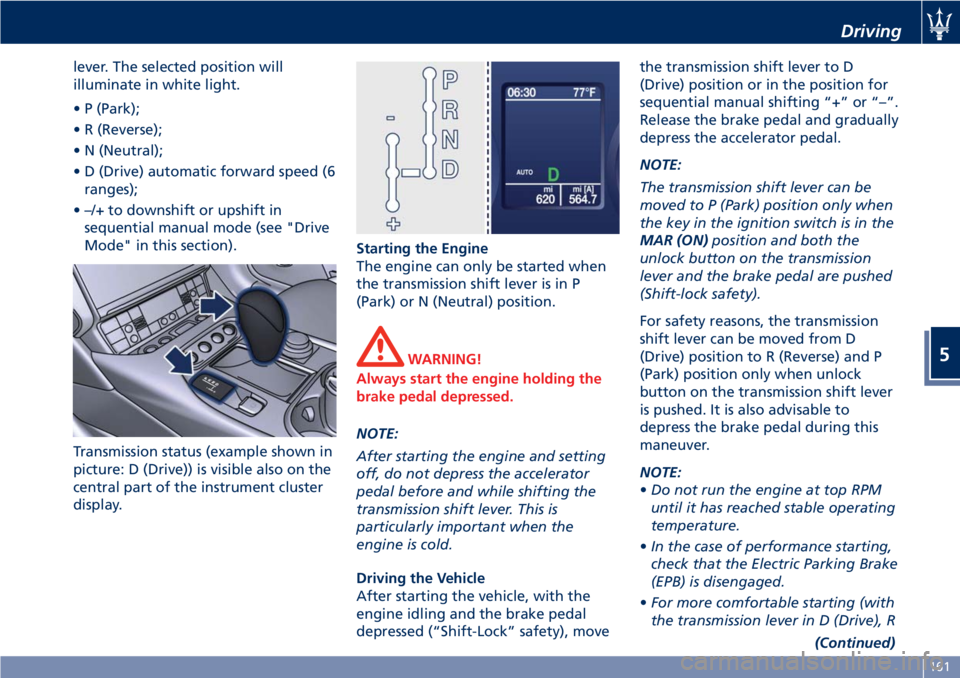
lever. The selected position will
illuminate in white light.
• P (Park);
• R (Reverse);
• N (Neutral);
• D (Drive) automatic forward speed (6
ranges);
• –/+ to downshift or upshift in
sequential manual mode (see "Drive
Mode" in this section).
Transmission status (example shown in
picture: D (Drive)) is visible also on the
central part of the instrument cluster
display.Starting the Engine
The engine can only be started when
the transmission shift lever is in P
(Park) or N (Neutral) position.
WARNING!
Always start the engine holding the
brake pedal depressed.
NOTE:
After starting the engine and setting
off, do not depress the accelerator
pedal before and while shifting the
transmission shift lever. This is
particularly important when the
engine is cold.
Driving the Vehicle
After starting the vehicle, with the
engine idling and the brake pedal
depressed (“Shift-Lock” safety), movethe transmission shift lever to D
(Drive) position or in the position for
sequential manual shifting “+” or “–”.
Release the brake pedal and gradually
depress the accelerator pedal.
NOTE:
The transmission shift lever can be
moved to P (Park) position only when
the key in the ignition switch is in the
MAR (ON)position and both the
unlock button on the transmission
lever and the brake pedal are pushed
(Shift-lock safety).
For safety reasons, the transmission
shift lever can be moved from D
(Drive) position to R (Reverse) and P
(Park) position only when unlock
button on the transmission shift lever
is pushed. It is also advisable to
depress the brake pedal during this
maneuver.
NOTE:
•Do not run the engine at top RPM
until it has reached stable operating
temperature.
•In the case of performance starting,
check that the Electric Parking Brake
(EPB) is disengaged.
•For more comfortable starting (with
the transmission lever in D (Drive), R
(Continued)
Driving
5
161