2020 MASERATI GRANTURISMO CONVERTIBLE ECO mode
[x] Cancel search: ECO modePage 200 of 296

(Continued)
style. Aftermarket wheels can cause
sensor damage. Do not use
aftermarket tire sealants or balance
beads, as damage to the sensors may
result.
• The system can temporarily
experience radio-electric interference
emitted by devices using similar
frequencies.
• After inspecting or adjusting the tire
pressure, always reinstall the valve
stem cap. This will prevent moisture
and dirt from entering the valve
stem and damage the TPMS internal
sensor.
NOTE:
•Driving on a significantly
underinflated tire causes the tire to
overheat and may lead to tire failure.
Under-inflation also reduces fuel
efficiency and tire tread life, and may
affect the vehicle’s handling and
stopping ability.
•The TPMS is not a substitute for
proper tire maintenance, and it is the
driver’s responsibility to maintain
correct tire pressure using an
accurate tire pressure gage, even if
under-inflation has not reached thelevel to trigger illumination of the
TPMS light
.
•Seasonal temperature changes will
affect tire pressure, and the TPMS
will monitor the actual tire pressure
in the tire.
Viewing Messages on the
Display
By pressing repeatedly the “MODE”
button of the control panel on left
side of the steering column, the user
can access the information page that
shows the pressure values of each tire
(“Tire Pressure” screen page: see
paragraph "TFT Display: Screen Pages"
in chapter "Instrument Cluster" of
section "Dashboard Instruments and
Controls").
If system faults or low pressure is
detected on a not indentified tire,"Check Tire Pressure" or "TPMS
Malfunction" pop-up message will be
displayed for 10 seconds. The
amber warning light will
permanently illuminate on the right
side of the instrument cluster display.
With a malfunction detected, the "Tire
Pressure" screen page will not be
available while will be available the
calibration screen page.
The “Tire Pressure” screen page
becomes available again, until the
malfunction is corrected.
Low Tire Pressure Conditions
The signal transmitted by the ECU
activates messages and symbols on the
TFT display with two priority levels
corresponding to the following
thresholds:
• Soft Warning: if the pressure is 10%
lower than the rated pressure;
• Hard Warning: if the pressure is 17%
lower than the rated pressure.
The system refers to the rated pressure
acquired after calibration.
The two alarm thresholds for
monitoring the tire pressure
respectively activate the following
alerts:
• “Check tire pressure” illuminates on
the display when the pressure of one
Driving
5
196
Page 201 of 296
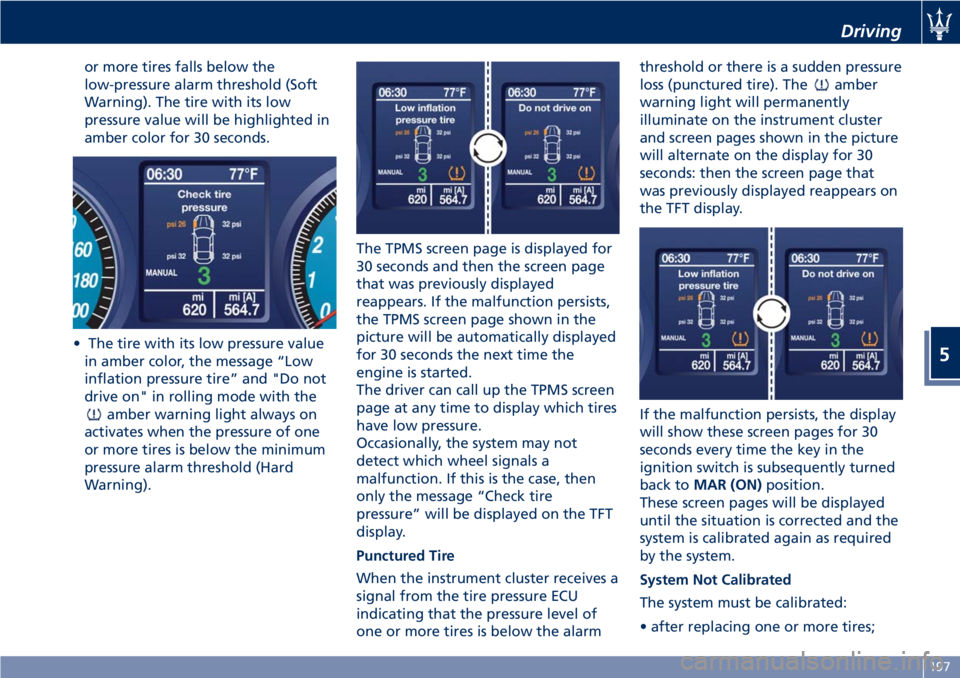
or more tires falls below the
low-pressure alarm threshold (Soft
Warning). The tire with its low
pressure value will be highlighted in
amber color for 30 seconds.
• The tire with its low pressure value
in amber color, the message “Low
inflation pressure tire” and "Do not
drive on" in rolling mode with the
amber warning light always on
activates when the pressure of one
or more tires is below the minimum
pressure alarm threshold (Hard
Warning).The TPMS screen page is displayed for
30 seconds and then the screen page
that was previously displayed
reappears. If the malfunction persists,
the TPMS screen page shown in the
picture will be automatically displayed
for 30 seconds the next time the
engine is started.
The driver can call up the TPMS screen
page at any time to display which tires
have low pressure.
Occasionally, the system may not
detect which wheel signals a
malfunction. If this is the case, then
only the message “Check tire
pressure” will be displayed on the TFT
display.
Punctured Tire
When the instrument cluster receives a
signal from the tire pressure ECU
indicating that the pressure level of
one or more tires is below the alarmthreshold or there is a sudden pressure
loss (punctured tire). The
amber
warning light will permanently
illuminate on the instrument cluster
and screen pages shown in the picture
will alternate on the display for 30
seconds: then the screen page that
was previously displayed reappears on
the TFT display.
If the malfunction persists, the display
will show these screen pages for 30
seconds every time the key in the
ignition switch is subsequently turned
back toMAR (ON)position.
These screen pages will be displayed
until the situation is corrected and the
system is calibrated again as required
by the system.
System Not Calibrated
The system must be calibrated:
• after replacing one or more tires;
Driving
5
197
Page 202 of 296
• after inverting the wheels;
• if you are not sure whether at least
one of the operations above was
performed.
If you simply corrected the tire
inflation pressure, you do not need to
recalibrate the system.
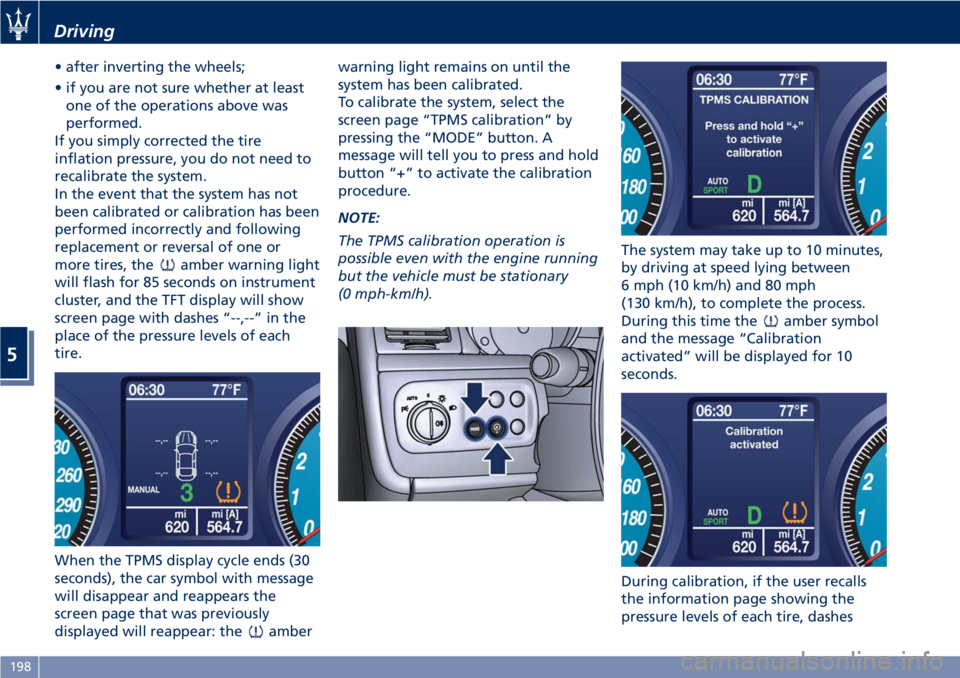
In the event that the system has not
been calibrated or calibration has been
performed incorrectly and following
replacement or reversal of one or
more tires, the
amber warning light
will flash for 85 seconds on instrument
cluster, and the TFT display will show
screen page with dashes “--,--” in the
place of the pressure levels of each
tire.
When the TPMS display cycle ends (30
seconds), the car symbol with message
will disappear and reappears the
screen page that was previously
displayed will reappear: the
amberwarning light remains on until the
system has been calibrated.
To calibrate the system, select the
screen page “TPMS calibration” by
pressing the “MODE” button. A
message will tell you to press and hold
button “+” to activate the calibration
procedure.
NOTE:
The TPMS calibration operation is
possible even with the engine running
but the vehicle must be stationary
(0 mph-km/h).The system may take up to 10 minutes,
by driving at speed lying between
6 mph (10 km/h) and 80 mph
(130 km/h), to complete the process.
During this time the
amber symbol
and the message “Calibration
activated” will be displayed for 10
seconds.
During calibration, if the user recalls
the information page showing the
pressure levels of each tire, dashes
Driving
5
198
Page 207 of 296
the amount of fuel allowed by the
system is very low, we recommend
therefore not to persist further.
• Wait approximately 10 seconds
before removing the fuel nozzle in
order to ensure completed supply of
residual fuel and restrict the risk of
fouling the fuel filler door area.
• Remove the fuel nozzle.
• Insert the cap on the fuel filler neck.
• Tighten the cap, turning it clockwise
until it stops.
• Close the fuel tank door.
CAUTION!
To avoid fuel spillage and overfilling,
do not “top off” the fuel tank after
filling.
Emergency Fuel Filler Door
Release
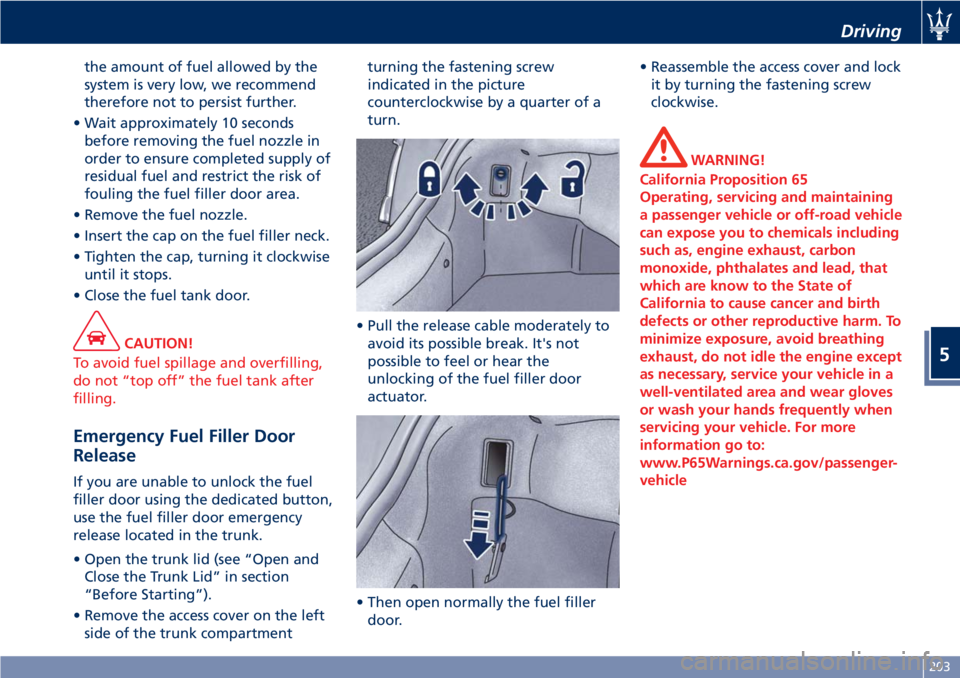
If you are unable to unlock the fuel
filler door using the dedicated button,
use the fuel filler door emergency
release located in the trunk.
• Open the trunk lid (see “Open and
Close the Trunk Lid” in section
“Before Starting”).
• Remove the access cover on the left
side of the trunk compartmentturning the fastening screw
indicated in the picture
counterclockwise by a quarter of a
turn.
• Pull the release cable moderately to
avoid its possible break. It's not
possible to feel or hear the
unlocking of the fuel filler door
actuator.
• Then open normally the fuel filler
door.• Reassemble the access cover and lock
it by turning the fastening screw
clockwise.
WARNING!
California Proposition 65
Operating, servicing and maintaining
a passenger vehicle or off-road vehicle
can expose you to chemicals including
such as, engine exhaust, carbon
monoxide, phthalates and lead, that
which are know to the State of
California to cause cancer and birth
defects or other reproductive harm. To
minimize exposure, avoid breathing
exhaust, do not idle the engine except
as necessary, service your vehicle in a
well-ventilated area and wear gloves
or wash your hands frequently when
servicing your vehicle. For more
information go to:
www.P65Warnings.ca.gov/passenger-
vehicle
Driving
5
203
Page 210 of 296
with the key removed to the ignition
switch.
• Remember that passing other
vehicles when driving uphill is slower
and thus requires more free distance
on the road. If you are being
overtaken on a hill, slow down and
allow the other vehicle to pass.
Driving on Snow or Ice
Please consider some general advice
for driving in these conditions, listed
below.
• Maintain a very moderate speed.
• Fit snow chains or specific tires if the
road is covered with snow: see the
paragraphs “Tires – General
Information” in this section.
• We recommend you to activate the
“ICE” drive mode (see chapters
“Drive Mode” in this section).
• During the winter season, even
apparently dry roads can have icy
sections. Be careful when crossing
bridges, viaducts and roads that have
little exposure to the sun and are
bordered by trees and rocks. They
may be icy.
• Keep an ample safe distance from
the vehicles in front of you.
• Avoid sharp braking, sharp changes
in direction and rapid acceleration.Rapid acceleration on snow covered
or icy surfaces may cause the driving
wheels to pull erratically to the right
or left. This phenomenon occurs
when there is a difference in the
surface traction under the rear
(driving) wheels.
WARNING!
Rapid acceleration on slippery surfaces
is dangerous. Unequal traction can
cause sudden pulling of the rear
driving wheels. You could lose control
of the vehicle and possibly have a
collision. Accelerate slowly and
carefully whenever there is likely to be
poor traction (ice, snow, wet mud,
loose sand, etc.).
Driving through Flooded
Sections
Driving through more than a
centimeters deep shallow standing
water section will require extra
caution to ensure passenger safety and
prevent damage to your vehicle.
WARNING!
Do not drive on or across a road or
path where water is flowing and/or
rising (as in storm run-off). Flowing
water can wear away the road or path
surface and cause your vehicle to sink
into deeper water. Furthermore,
flowing and/or rising water can carry
your vehicle away swiftly. Failure to
follow this warning may result in
injuries that are serious or fatal to
you, your passengers, and others
around you.
Although your vehicle is capable of
driving through shallow standing
water, consider the following Caution
and Warning before doing so.
CAUTION!
• Always check the depth of the
standing water before driving
through it. Never drive through
standing water that is deeper than
the bottom of the tire rims mounted
on the vehicle.
• Determine the condition of the road
or the path that is under water and if
there are any obstacles in the way
Driving
5
206
Page 227 of 296
• Remove the screwdriver from the
hole, being careful not to move the
transmission shift lever.
• Shift the lever fully into N (Neutral).
This position will allow vehicle
towing.
• Reinstall all the removed electrical
parts pushing it in the central
console seat until you hear the
locking click.
• Reinstall the covering panel on the
external side of the central console
press it until all pins are engaged in
their clips and “click” in place.
CAUTION!
Work extremely carefully so as not to
damage the central console trim
panels.
Freeing the Stuck Vehicle
If your vehicle is stuck in mud, sand, or
snow, it can probably be moved
backward and forward by a simple
rocking motion.
Steer the wheel right and left to clear
the area around the front wheels.
Shift then between D (Drive) or
MANUAL mode and R (Reverse) (see
chapter “Automatic Transmission” and
“Drive Mode” in section “Driving”).
Shifting to MANUAL mode, try to free
the car starting in second gear.
At low speed motion of the vehicle,
you can switch quickly from D (Drive)
to R (Reverse), and vice versa, just by
pressing the release button on the
shift lever.
For more effectiveness press lightly on
the accelerator pedal in order to avoid
wheel slippage.
If unable to release the vehicle in one
of the previously described ways,
enter the low-grip driving mode, by
pressing the “ICE” button, and
completely exclude the yaw and slip
control system, by pressing the
(ESC
Off) button for at least 2 seconds.
Moving the shift lever between D
(Drive) and R (Reverse) to start.
CAUTION!
Racing the engine or spinning the
drive wheels may lead to transmission
overheating and failure. Allow the
engine to idle with the shift lever in N
(Neutral) for at least one minute after
every five rocking-motion cycles. This
will minimize overheating and reduce
the risk of transmission failure during
prolonged efforts to free a stuck
vehicle.
WARNING!
Fast spinning tires can be dangerous.
Forces generated by excessive drive
wheel speeds may cause damage, or
even failure, of the drivetrain and
tires.
In an Emergency
6
223
Page 286 of 296
Performance
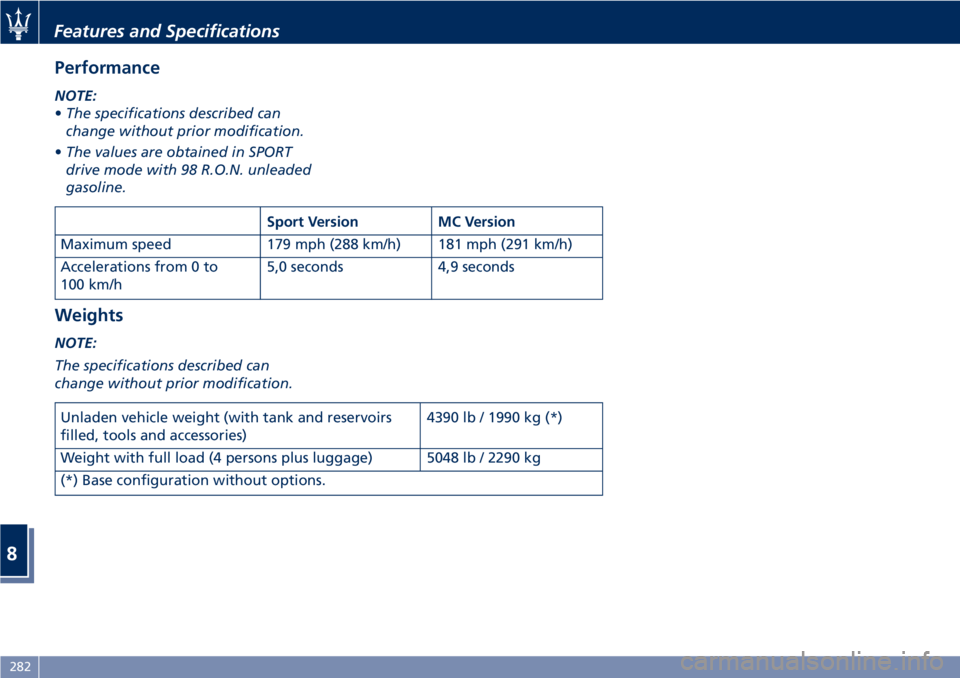
NOTE:
•The specifications described can
change without prior modification.
•The values are obtained in SPORT
drive mode with 98 R.O.N. unleaded
gasoline.
Weights
NOTE:
The specifications described can
change without prior modification.
Sport Version MC Version
Maximum speed 179 mph (288 km/h) 181 mph (291 km/h)
Accelerations from 0 to
100 km/h5,0 seconds 4,9 seconds
Unladen vehicle weight (with tank and reservoirs
filled, tools and accessories)4390 lb / 1990 kg (*)
Weight with full load (4 persons plus luggage) 5048 lb / 2290 kg
(*) Base configuration without options.
Features and Specifications
8
282
Page 290 of 296

Abbreviations.................7
ABS (Anti-lock Braking System) . . .179
A/C Air Filter Replacement.......263
Accessories
Aftermarket Parts and Accessories
Statement.................11
Accident, in the event of........213
A/C System Maintenance........262
Airbag.....................46
Air bag System Components.....46
Air bag Warning Light.........66
Passenger Air bag Labels.......18
Supplemental Restraint System
(SRS).....................46
Air Conditioning Controls.......151
Air Conditioning Distribution.....112
Alarm, Vehicle Security..........26
ALR (Automatic Locking Retractor) . .43
Assistance....................9
Assistance, if you need.........9
Audio Controls...............138
Steering Wheel Audio Controls . .138
Audio, Customer Setting........147
Audio System................140
Automatic Transmission........160
Automatic Transmission Range . .162
AUX, USB and SD Memory Card
Ports.....................132
Battery....................247
Access the Battery...........226
Jump Start Procedure........226
Maintenance - Free Battery. . . .247To Reconnect the Battery......248
Bluetooth, Customer settings.....147
Bodywork Maintenance and Care . .265
Protection from Atmospheric
Agents..................265
Useful Advice to Keep the
Bodywork in Good Condition . . .265
Brakes
Brake and Stability Control
System...................177
Brake Fluid Level Check.......242
Brake Overheating..........182
Parking Brake..............174
Parking Brake - Manual
Release..................220
Using the Brakes............181
Bulb Replacement............257
Cargo Area.................107
Child Restraint Systems
Children too large for Booster
Seats.....................56
Infants and Child Restraints.....55
Lower Anchors and Tether for
Children (LATCH)............57
Older Children and Child
Restraints.................55
Tips on getting the most out of
your child restraint...........56
Clock, analog................144
Comfort Pack Front Seats........76
Driver Memory Seat..........77
Front Heated Seats...........76Console
Central Console Components....73
Front Dome Console
Components...............71
Cruise Control...............185
Cupholders
Front Seats Cupholders.......103
Rear Seats Cupholders........104
Dashboard Components.........70
Data, Technical..............279
Defroster...................66
Doors Components.............72
Drive Mode, Controls..........169
Driving Conditions
Before the Trip.............204
Driving at Night............204
Driving in Fog..............205
Driving in the Mountains......205
Driving in the Rain..........204
Driving on Snow or Ice........206
Driving through Flooded
Sections..................206
Safe Driving...............204
DRL (Daytime Running Light)......83
Easy Entry/Exit function.........79
EDR (Event Data Recorder).......52
Emergency
Emergency Fuel Filler Door
Release..................203
Hazard Warning Flasher.......88
In the Event of an Accident. . . .213
Index
9
286