2020 MASERATI GRANTURISMO CONVERTIBLE ECO mode
[x] Cancel search: ECO modePage 130 of 296

NOTE:
The TPMS calibration operation is
possible even with the engine running
but the vehicle must be stationary
(0 mph-km/h).
See "Tire Pressure Monitoring System
(TPMS)" in section "Driving" to
calibrate the system.
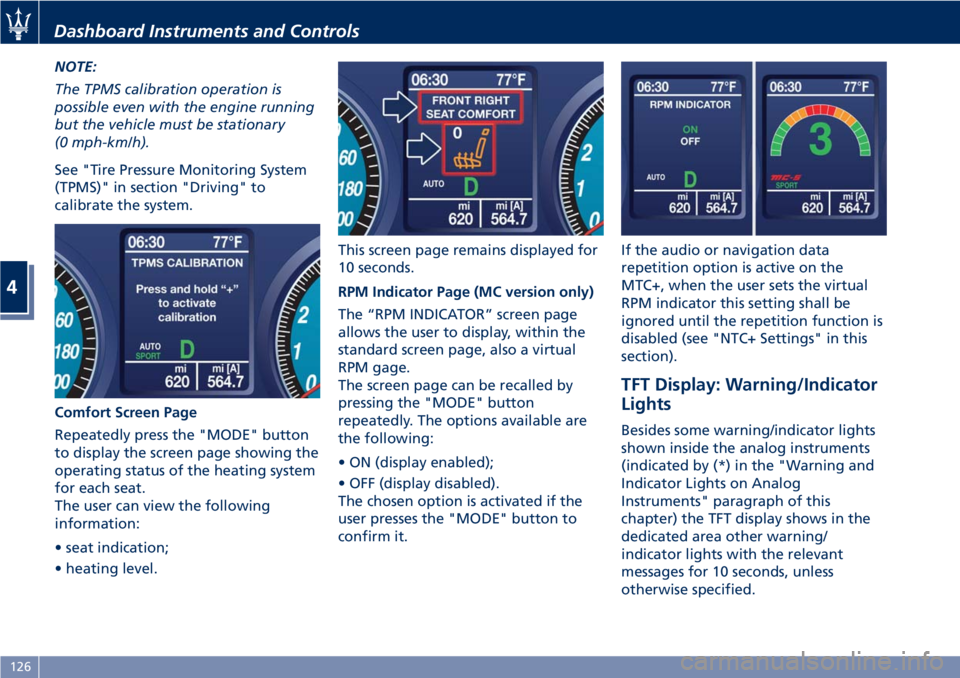
Comfort Screen Page
Repeatedly press the "MODE" button
to display the screen page showing the
operating status of the heating system
for each seat.
The user can view the following
information:
• seat indication;
• heating level.This screen page remains displayed for
10 seconds.
RPM Indicator Page (MC version only)
The “RPM INDICATOR” screen page
allows the user to display, within the
standard screen page, also a virtual
RPM gage.
The screen page can be recalled by
pressing the "MODE" button
repeatedly. The options available are
the following:
• ON (display enabled);
• OFF (display disabled).
The chosen option is activated if the
user presses the "MODE" button to
confirm it.If the audio or navigation data
repetition option is active on the
MTC+, when the user sets the virtual
RPM indicator this setting shall be
ignored until the repetition function is
disabled (see "NTC+ Settings" in this
section).
TFT Display: Warning/Indicator
Lights
Besides some warning/indicator lights
shown inside the analog instruments
(indicated by (*) in the "Warning and
Indicator Lights on Analog
Instruments" paragraph of this
chapter) the TFT display shows in the
dedicated area other warning/
indicator lights with the relevant
messages for 10 seconds, unless
otherwise specified.
Dashboard Instruments and Controls
4
126
Page 133 of 296

Adaptive Light Control System Failure
Warning Light
This warning light, and the
related message, indicate a
failure of the automatic
headlight aiming system.
Please contact anAuthorized Maserati
Dealerto check the system.
ASR System Failure Warning Light
This warning light indicates
the deactivation or failure of
the ASR system.
In the event of a failure,
contact anAuthorized Maserati
Dealer.
Rain Sensor Failure Warning Light
This warning light indicates
that the rain sensor of the
windshield wiper system is
faulty.
Please contact anAuthorized Maserati
Dealerto check the system.
Park Assist Sensor Failure Warning
Light
This warning light indicates
that the sensor of the park
assist system is faulty.
Please contact anAuthorized
Maserati Dealerto check the system.Suspensions Failure Warning Light
This warning light and the
related message turn on while
driving if there is a failure of
the suspension system.
Please contact anAuthorized Maserati
Dealerto check the system.
Ice Hazard Indicator
When the external
temperature falls below 3°C
(38°F), the temperature value
blinks for a few seconds, the
warning light turns on and a message
is displayed to warn the driver of the
risk of icy roadbed.
Under such conditions, we recommend
using the ICE drive mode (see
“Automatic Transmission” in section
“Driving”) drive carefully and slow
down as the grip of the tires may be
significantly reduced.
The warning light switches off when
the temperature reaches 6°C (43°F) or
higher.
EPB Automatic Operation Disabled
Warning Light
This warning light and related
message illuminate when the
EPB automatic activation/
deactivation function is
disabled.The failure could also completely or
partially block the vehicle because the
parking brake could remain on even
after it has been automatically or
manually disengaged though its
controls.
If it is still possible to use the vehicle
(parking brake not engaged) drive to
the nearestAuthorized Maserati
Dealerand remember to perform each
operation/command during which the
electric parking brake does not work.
Seat Heating Indicator
It indicates that the heating
function is activated on one or
more seats.
Maintenance Schedule Indicator
Depending on the
accompanying message, this
indicates that service schedule
deadlines are either
approaching or due.
Upon reaching a deadline, contact an
Authorized Maserati Dealer.
Cruise Control (CC) set indicator
This green light indicator will
illuminate when the CC is set.
For further information, check
“Electronic Cruise Control” in
section “Driving”.
Dashboard Instruments and Controls
4
129
Page 134 of 296

Maintenance Schedule Indicator
Depending on the
accompanying message, this
indicates that service schedule
deadlines are either
approaching or due.
Upon reaching a deadline, contact an
Authorized Maserati Dealer.
Cruise Control (CC) set indicator
This green light indicator will
illuminate when the CC is set.
For further information, check
“Electronic Cruise Control” in
section “Driving”.
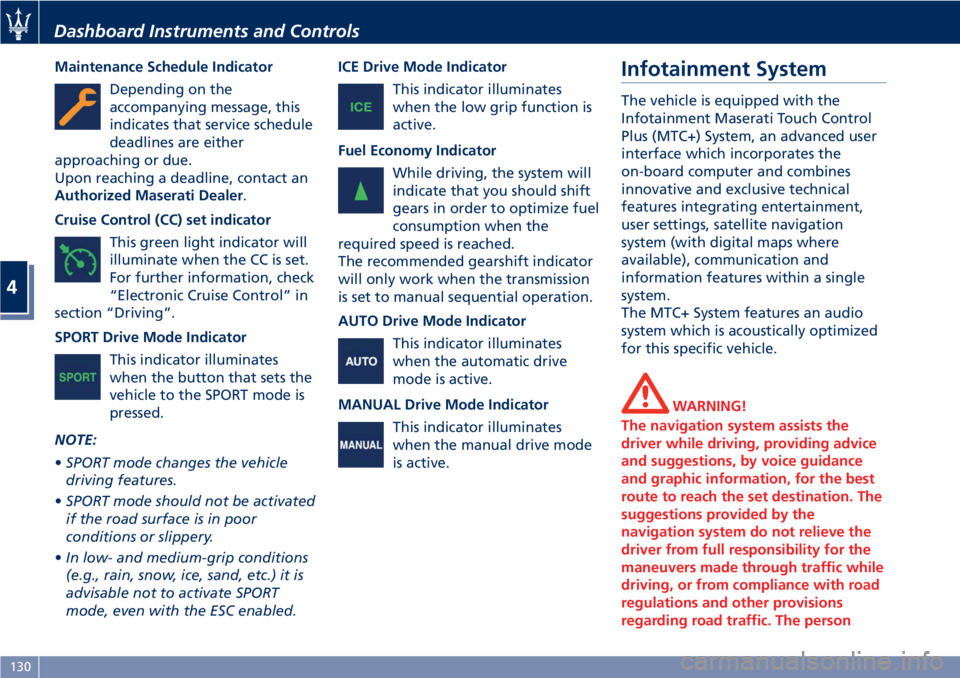
SPORT Drive Mode Indicator
This indicator illuminates
when the button that sets the
vehicle to the SPORT mode is
pressed.
NOTE:
•SPORT mode changes the vehicle
driving features.
•SPORT mode should not be activated
if the road surface is in poor
conditions or slippery.
•In low- and medium-grip conditions
(e.g., rain, snow, ice, sand, etc.) it is
advisable not to activate SPORT
mode, even with the ESC enabled.ICE Drive Mode Indicator
This indicator illuminates
when the low grip function is
active.
Fuel Economy Indicator
While driving, the system will
indicate that you should shift
gears in order to optimize fuel
consumption when the
required speed is reached.
The recommended gearshift indicator
will only work when the transmission
is set to manual sequential operation.
AUTO Drive Mode Indicator
This indicator illuminates
when the automatic drive
mode is active.
MANUAL Drive Mode Indicator
This indicator illuminates
when the manual drive mode
is active.Infotainment System
The vehicle is equipped with the
Infotainment Maserati Touch Control
Plus (MTC+) System, an advanced user
interface which incorporates the
on-board computer and combines
innovative and exclusive technical
features integrating entertainment,
user settings, satellite navigation
system (with digital maps where
available), communication and
information features within a single
system.
The MTC+ System features an audio
system which is acoustically optimized
for this specific vehicle.
WARNING!
The navigation system assists the
driver while driving, providing advice
and suggestions, by voice guidance
and graphic information, for the best
route to reach the set destination. The
suggestions provided by the
navigation system do not relieve the
driver from full responsibility for the
maneuvers made through traffic while
driving, or from compliance with road
regulations and other provisions
regarding road traffic. The person
Dashboard Instruments and Controls
4
130
Page 136 of 296

Manual Controls and Devices
SD, AUX and USB Ports
When an SD card is inserted into its
housing, the MTC+ is able to read it
and select multimedia files (music and
images) from the device.
By using the AUX and USB (full) inputs
it is possible to connect external
devices to the MTC+ (see chapter
“Interior features” in section
“Understanding the Vehicle”).
After connecting the device, by using
the MTC+ display softkeys, knobs on
the central console and controls at the
steering wheel, user can navigate
through the content of the connected
device and set its playing mode.
Multimedia Navigation Controls on
Central Console
The manual controls located on the
central console are a further interface
for the driver and nearby passenger,
that adds to the MTC+ display
softkeys. Using the manual controls,
the MTC+ display will work as a
graphic display of the inputs from the
controls.
Volume Control
By working this knob in “Radio”,
“SiriusXM Satellite Radio” (if available)
or “Media” mode, user can adjust thevolume of the radio or audio files,
from minimum to maximum and vice
versa. Turn knob clockwise to increase
the volume, anti-clockwise to decrease
it. The volume status will be indicated
in the top part of the MTC+ display.
Tune/Scroll Control
By working this knob in “Radio”,
“SiriusXM Satellite Radio” (if available)
or “Media” mode, user can shift
through the radio stations/channels or
scroll the tracks inside connected
external devices and confirm the
selection by pressing enter button.
In any other mode of the MTC+, use
this knob to scroll the list of available
options or to manage the cursor
movement in the lower bar of the
main menus. Then press enter button
to confirm the function or setting
highlighted on MTC+ display.
Browse/Mute Button
After selecting a function, using the
tune/scroll knob or softkeys on MTC+
display, press this button to see the
detail of the items/options of the
selected function. This button is also
used as short cut to display the phone
book, when the “Phone” menu is
selected, or the favorites when the
“Nav (Navigation)” menu is selected.
Press and hold this button for 2-3
seconds to mute the volume of the
radio or media files.
The volume mute status will be
indicated in the top part of the MTC+
display.
Back Button
Press this button to go back to
previous menu or previous screen.
Press this button to shift the
navigation one level backward on
MTC+ screen. If it is pressed and held
Dashboard Instruments and Controls
4
132
Page 137 of 296

for at least 2 seconds, it brings the
cursor back in the lower bar of the
main menus.
Enter Button
To confirm the function or setting
highlighted on MTC+ display. When in
"Radio" mode and the key in the
ignition switch inMAR (ON)position,
holding this button you can save your
preset stations.
With key not inserted in the ignition
switch or inSTOP (OFF)position,
pressing and holding this button for
2-3 seconds will turn off the MTC+
system. If pressed again and held for
2-3 seconds, the MTC+ will turn back
on.
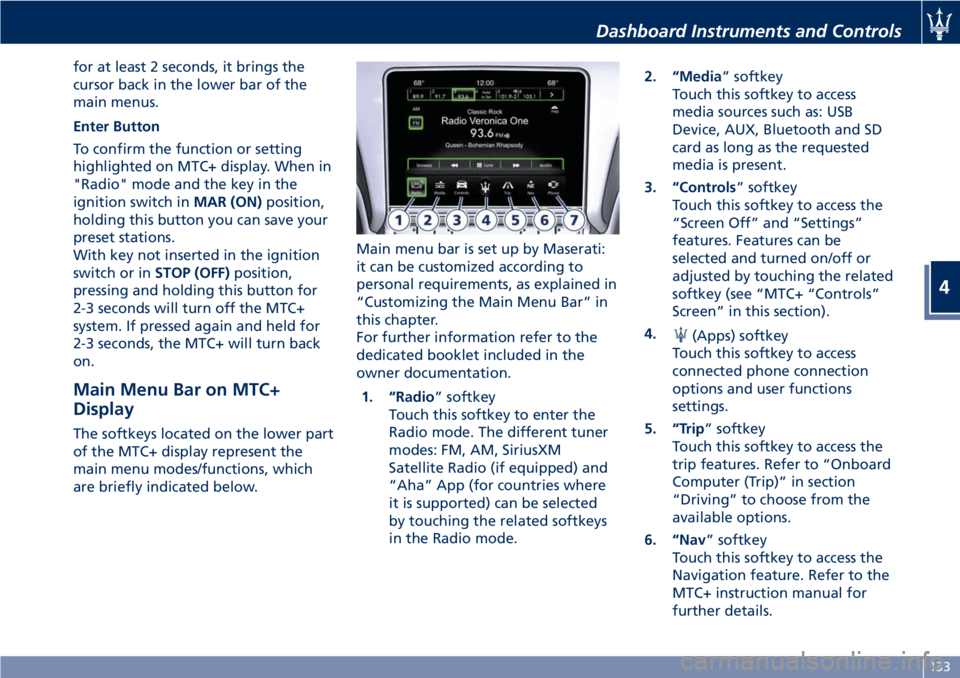
Main Menu Bar on MTC+
Display
The softkeys located on the lower part
of the MTC+ display represent the
main menu modes/functions, which
are briefly indicated below.Main menu bar is set up by Maserati:
it can be customized according to
personal requirements, as explained in
“Customizing the Main Menu Bar” in
this chapter.
For further information refer to the
dedicated booklet included in the
owner documentation.
1. “Radio” softkey
Touch this softkey to enter the
Radio mode. The different tuner
modes: FM, AM, SiriusXM
Satellite Radio (if equipped) and
“Aha” App (for countries where
it is supported) can be selected
by touching the related softkeys
in the Radio mode.2. “Media” softkey
Touch this softkey to access
media sources such as: USB
Device, AUX, Bluetooth and SD
card as long as the requested
media is present.
3. “Controls” softkey
Touch this softkey to access the
“Screen Off” and “Settings”
features. Features can be
selected and turned on/off or
adjusted by touching the related
softkey (see “MTC+ “Controls”
Screen” in this section).
4.
(Apps) softkey
Touch this softkey to access
connected phone connection
options and user functions
settings.
5. “Trip” softkey
Touch this softkey to access the
trip features. Refer to “Onboard
Computer (Trip)” in section
“Driving” to choose from the
available options.
6. “Nav” softkey
Touch this softkey to access the
Navigation feature. Refer to the
MTC+ instruction manual for
further details.
Dashboard Instruments and Controls
4
133
Page 142 of 296

Audio Controls
The vehicle is equipped with audio
controls that allow both driver and
front passenger to operate the audio
system. These controls can be used to
adjust audio volume, change radio
station/channel or mode (FM, AM,
USB, etc).
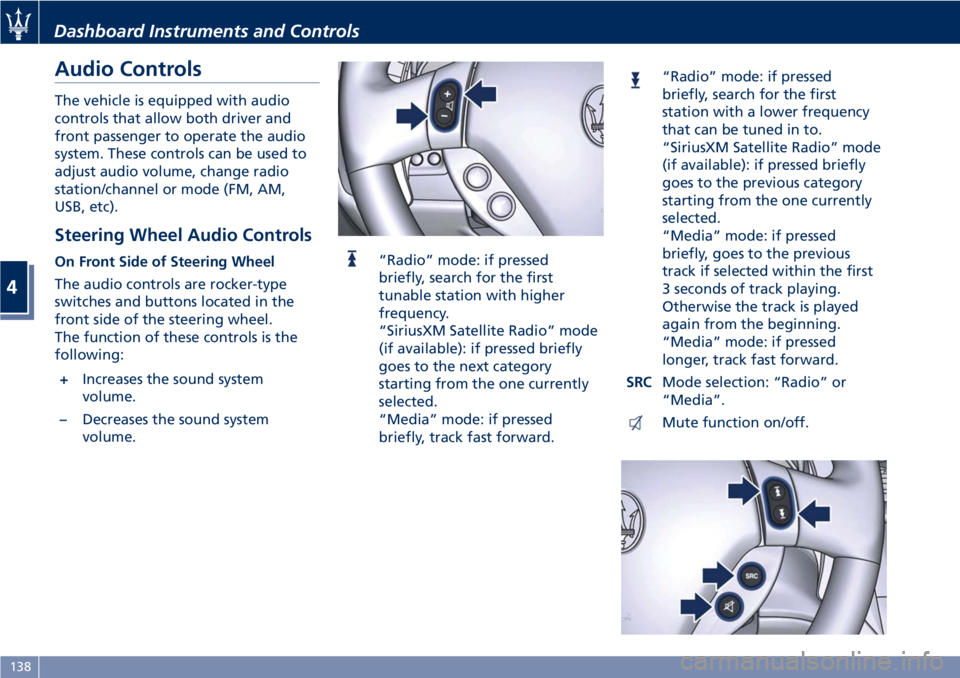
Steering Wheel Audio Controls
On Front Side of Steering Wheel
The audio controls are rocker-type
switches and buttons located in the
front side of the steering wheel.
The function of these controls is the
following:
+Increases the sound system
volume.
–Decreases the sound system
volume.“Radio” mode: if pressed
briefly, search for the first
tunable station with higher
frequency.
“SiriusXM Satellite Radio” mode
(if available): if pressed briefly
goes to the next category
starting from the one currently
selected.
“Media” mode: if pressed
briefly, track fast forward.
“Radio” mode: if pressed
briefly, search for the first
station with a lower frequency
that can be tuned in to.
“SiriusXM Satellite Radio” mode
(if available): if pressed briefly
goes to the previous category
starting from the one currently
selected.
“Media” mode: if pressed
briefly, goes to the previous
track if selected within the first
3 seconds of track playing.
Otherwise the track is played
again from the beginning.
“Media” mode: if pressed
longer, track fast forward.
SRCMode selection: “Radio” or
“Media”.
Mute function on/off.
Dashboard Instruments and Controls
4
138
Page 147 of 296

Display
After pressing the “Display” softkey
the following mode settings will be
available.
•Display Mode
When in this display you can select
one of the auto display settings. To
change mode status, checkmark
"Night", “Day” or “Auto”.
•Display Brightness Night
When in this display, you can select
the brightness with the headlights
on. Adjust the brightness from level
0 to 10 with the “+” and “–” setting
softkeys or by selecting any point
on the scale between the “+” and
“–” softkeys.•Display Brightness Day
When in this display, you can select
the brightness with the headlights
off. Adjust the brightness as
previously explained for "Night"
setting.
•Set Language
When in this display, you can select
one language for all display
descriptions, including the trip
features and the navigation system.
The available languages are specific
to the target markets.
•Keyboard
Selecting this feature, the display
shows the alphanumeric keyboard
to enter address, stations, etc..
•Touch screen Beep
When in this display, you can turn
on or shut off the sound activatedby pressure of a touch screen
softkey.
•Controls Screen Time-Out
When this mode is selected, the
“Controls” screen will remain
displayed for 5 seconds. If this mode
is not selected, the screen will
remain displayed until closed
manually.
•Nav Next Turn Pop-ups in Cluster
By selecting this feature, the next
turn direction will appear on the
instrument cluster along a
programmed route until the desired
destination is reached (see picture).
•Phone Pop-ups Displayed In Cluster
When this mode is selected, the
display will show the pop-ups
messages with the number and
state of the call in progress.
Dashboard Instruments and Controls
4
143
Page 149 of 296

•Set Time Hours
With “Sync with GPS Time” feature
unchecked and this mode selected,
you can set the hours manually
from 1 to 24. To select, touch the
“+” or “–” softkeys to adjust the
hours.
•Set Time Minutes
With “Sync with GPS Time” feature
unchecked and this mode selected,
you can set the minutes manually
from 0 to 59. To select, touch the
“+” or “–” softkeys as done for the
hours.
•Time Format
When in this mode, you can select
the time format display. To change
the current setting, touch and
release the “12 Hrs” or “24 Hrs”
softkey.•Show Time In Status Bar
This feature will allow you to turn
on or shut off the digital clock in
the status bar.
•Set Date in Cluster
When in this mode, you can set the
date manually on the instrument
cluster display.
Tick the soft-key to enable the
feature and enter the setting page.
Touch than the “+” or “-” soft-keys
to set the day, the month and the
year”.
Safety & Driving Assistant
Touch this softkey to set the following
modes.
•Stop & Go Parking Sensors
This feature allows you to disablethe parking sensors signal under
special traffic conditions.
See “Park Assist” in section “Before
Starting” for further information.
•ParkView Camera with Dynamic
Guidelines
When this feature is selected, by
moving the transmission lever in R
(Reverse) position, the rearview
image with dynamic guidelines will
appear on MTC+ display.
The feature can be set to “On” or
“Off”.
•ParkView Camera Off Delay
By selecting this feature, when the
transmission lever is moved out of R
(Reverse), the rear view image with
dynamic guidelines will be displayed
for up to 10 seconds after shifting
unless the forward vehicle speed
exceeds 8 mph (12 km/h), or the
transmission is shifted into P (Park)
or the key in the ignition switch is
turned inSTOP (OFF)position.
The feature can be set to “On” or
“Off”.
•Instrument Panel Buzzer Volume
This feature allows adjusting the
volume of the acoustic signal that
accompanies some instrument panel
warnings (EPB overheating, seat
Dashboard Instruments and Controls
4
145