2020 MASERATI GRANTURISMO CONVERTIBLE radio
[x] Cancel search: radioPage 148 of 296
•AutoShow Smartphone Display
Upon Connection
This feature allows to use the MTC+
display as a projection device
connected via USB port in order to
browse the Apple CarPlay and
Android Auto apps. By setting this
feature, automatic switch from
native screen to projection device
will happen every time you connect
your smartphone. For further details
refer to the “Maserati Touch Control
Plus (MTC+)” guide.
Units
After pressing the “Units” and then
“Custom” softkey on the touch screen
you may select between Metric and
Imperial units of measure. Each unit of
measure can be independently
displayed in the TFT Display and in the
navigation system. The following
selectable units of measure are listed
below:
•Speedunit:
select from: “mph” or “km/h”.
•Consumptionunit:
select from: “mpg US”, “mpg UK”,
“l/100km” and “km/l”.
•Distanceunit:
select from: “mi or km”.•Pressureunit:
select from: “PSI” or “BAR”.
•Temperatureunit:
select from: “°F” or “°C”.
Voice Commands
After pressing “Voice” softkey the
following modes will be available.
•Voice Response Length
When in this display, you can change
the voice response length settings.
To change the voice response
length, touch the “Brief” or
“Detailed” softkey.
•Show Command List
When this feature is selected, it is
possible to select options during a
voice control session. Options for
available controls are: “Always”,
“w/Help” or “Never”.
Clock
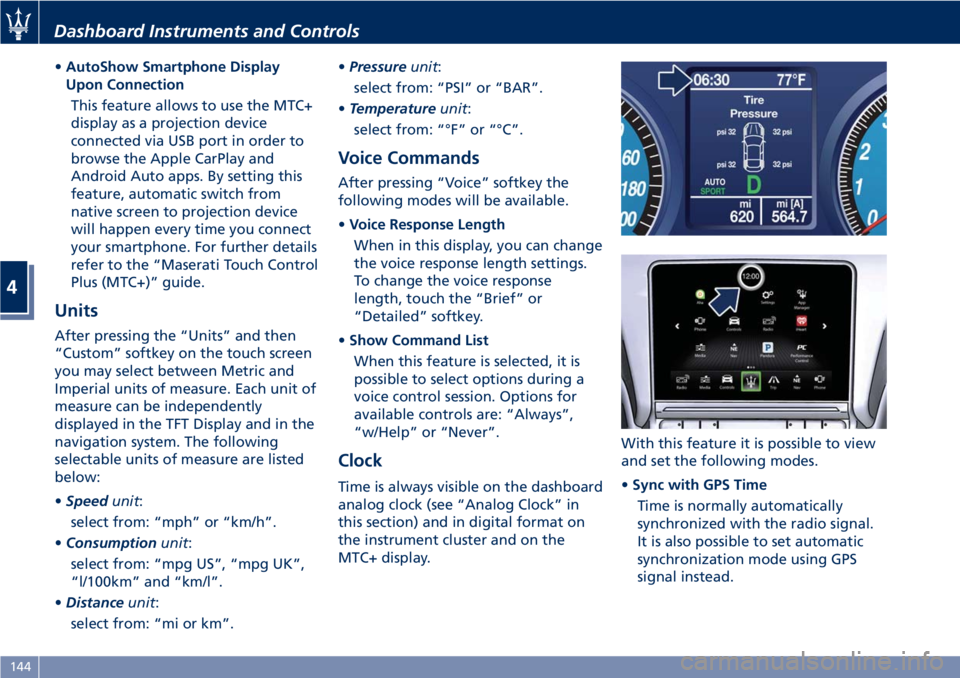
Time is always visible on the dashboard
analog clock (see “Analog Clock” in
this section) and in digital format on
the instrument cluster and on the
MTC+ display.With this feature it is possible to view
and set the following modes.
•Sync with GPS Time
Time is normally automatically
synchronized with the radio signal.
It is also possible to set automatic
synchronization mode using GPS
signal instead.
Dashboard Instruments and Controls
4
144
Page 150 of 296

and rearview mirror position
storage).
The volume can be set to 7 levels
identified by numbers from "1" to
"7" by pressing the "+" or "–"
softkey.
•Light Sensor
This feature allows to adjust the
sensitivity of the twilight sensor for
turning on the lights.
The feature can be set to 3 levels:
"Low", "Medium" (default setting)
and "High".
•Speed Limit
This feature allows to set a speed
limit and activate an alarm signal
which will sound when themaximum speed limit set is
exceeded.
Checkmarked the softkey to enable
the feature.
Press then the "+" or "–" softkey to
increase or decrease the speed limit.
Each touch increases/decreases the
value by 5 units.
Lights
Press the “Lights” softkey to set the
following modes.
•Daytime Lights(DRL, for
versions/markets where provided)
If activated, this feature allows the
automatic switching on of the DRL
upon switching off of the position
lights and vice versa. When the
position lights switch on, the DRL
switch off.
See “Lights” in section
“Understanding the Vehicle” for
further information.
Doors & Locks
Press the “Doors & Locks” softkey to
set the following modes.
•Auto Door Locks(Autoclose)
When this feature is selected, all
doors will automatically lock whenthe vehicle is in motion. The feature
can be set to “On” or “Off”.
•Independent Trunk Lid Unlocking
When this feature is selected and
checkmarked, only the trunk
compartment lid remains unlocked
and can be opened by pressing the
button between the license plate
lights.
When there is not checkmark, the
trunk lid unlocking follows the logic
of the doors.
•Key Fob Unlocks
By selecting this feature you may set
up only the driver's door or all doors
mode will unlock on the first press
of the
button on the radio
control case (key fob). When "Driver
Door" is selected, you must press the
key fob
button twice to unlock
also the passenger’s door. When
Dashboard Instruments and Controls
4
146
Page 152 of 296
further information, see the MTC+
guide.
NOTE:
On the Maserati website, at
www.maserati.com, or through the
Authorized Maserati Dealeryou may
consult the list of telephones that are
compatible with the MTC+, and their
level of compatibility.
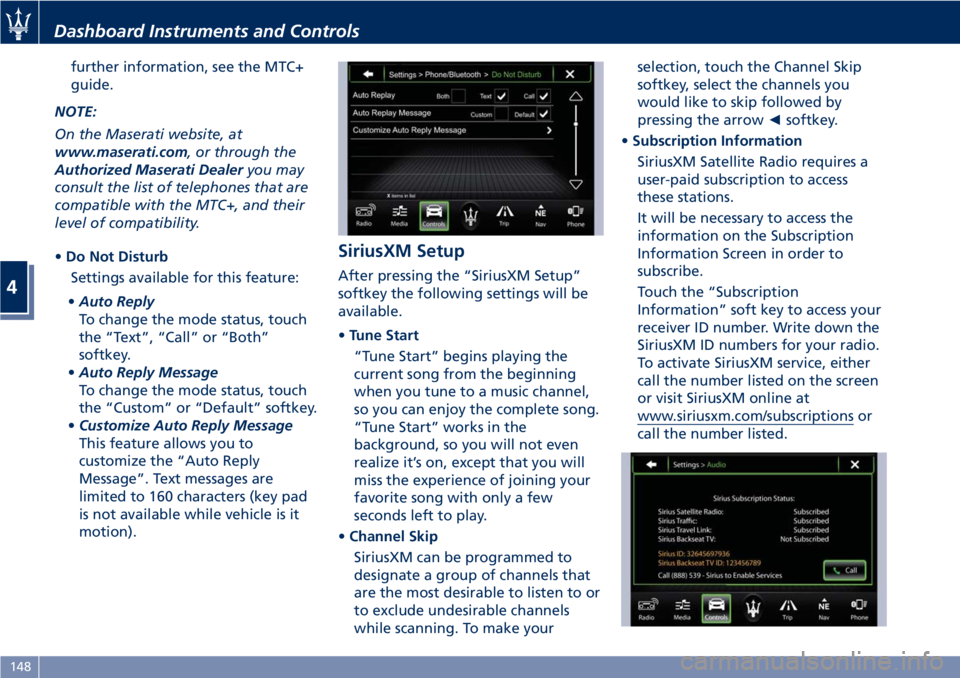
•Do Not Disturb
Settings available for this feature:
•Auto Reply
To change the mode status, touch
the “Text”, “Call” or “Both”
softkey.
•Auto Reply Message
To change the mode status, touch
the “Custom” or “Default” softkey.
•Customize Auto Reply Message
This feature allows you to
customize the “Auto Reply
Message”. Text messages are
limited to 160 characters (key pad
is not available while vehicle is it
motion).
SiriusXM Setup
After pressing the “SiriusXM Setup”
softkey the following settings will be
available.
•Tune Start
“Tune Start” begins playing the
current song from the beginning
when you tune to a music channel,
so you can enjoy the complete song.
“Tune Start” works in the
background, so you will not even
realize it’s on, except that you will
miss the experience of joining your
favorite song with only a few
seconds left to play.
•Channel Skip
SiriusXM can be programmed to
designate a group of channels that
are the most desirable to listen to or
to exclude undesirable channels
while scanning. To make yourselection, touch the Channel Skip
softkey, select the channels you
would like to skip followed by
pressing the arrow◄softkey.
•Subscription Information
SiriusXM Satellite Radio requires a
user-paid subscription to access
these stations.
It will be necessary to access the
information on the Subscription
Information Screen in order to
subscribe.
Touch the “Subscription
Information” soft key to access your
receiver ID number. Write down the
SiriusXM ID numbers for your radio.
To activate SiriusXM service, either
call the number listed on the screen
or visit SiriusXM online at
www.siriusxm.com/subscriptions or
call the number listed.
Dashboard Instruments and Controls
4
148
Page 159 of 296
• compressor enabled (the LED on the
button is illuminated);
• defrosting/defogging function (MAX
DEF) deactivated (the LED on the
button is off);
• heated rear window deactivated
(the LED on the button is off);
• open recirculation (the LED on the
button is off);
• air ventilation and distribution are
set by the system;
• REAR disabled (the LED on the
button is off), the air flows to the
rear vents.
A/C Filter
The climate control system filters
outside air containing dust, pollen and
some odors. Strong odors cannot be
totally removed by A/C filter at the
entrance of the air climate system. See
“Maintenance Procedures” in section
“Maintenance and Care” for filter
replacement instructions.
Phone and Voice Controls
on Steering Wheel
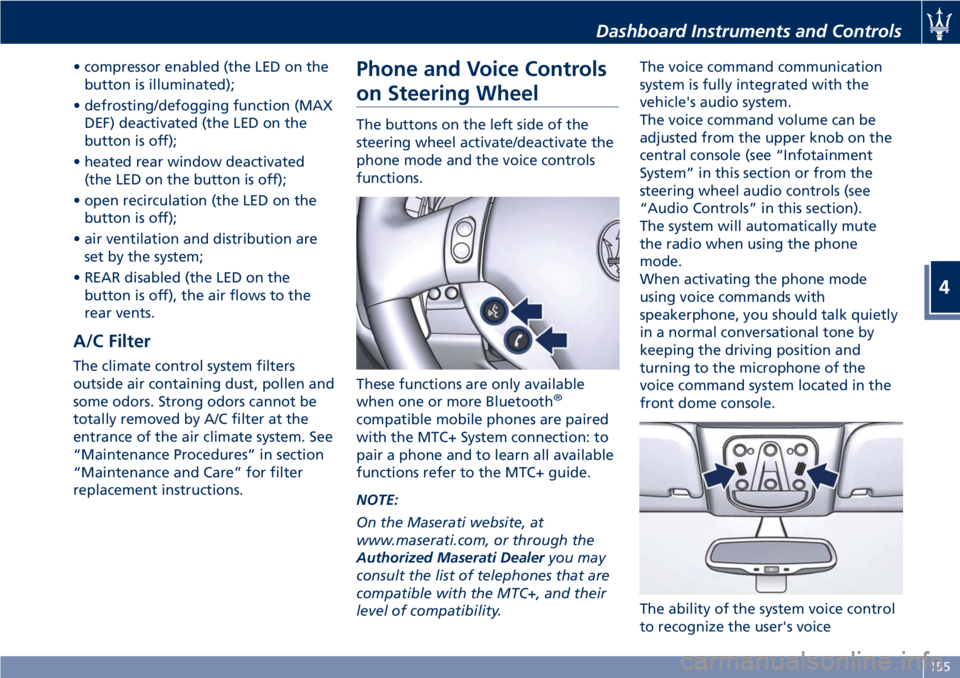
The buttons on the left side of the
steering wheel activate/deactivate the
phone mode and the voice controls
functions.
These functions are only available
when one or more Bluetooth
®
compatible mobile phones are paired
with the MTC+ System connection: to
pair a phone and to learn all available
functions refer to the MTC+ guide.
NOTE:
On the Maserati website, at
www.maserati.com, or through the
Authorized Maserati Dealeryou may
consult the list of telephones that are
compatible with the MTC+, and their
level of compatibility.The voice command communication
system is fully integrated with the
vehicle's audio system.
The voice command volume can be
adjusted from the upper knob on the
central console (see “Infotainment
System” in this section or from the
steering wheel audio controls (see
“Audio Controls” in this section).
The system will automatically mute
the radio when using the phone
mode.
When activating the phone mode
using voice commands with
speakerphone, you should talk quietly
in a normal conversational tone by
keeping the driving position and
turning to the microphone of the
voice command system located in the
front dome console.
The ability of the system voice control
to recognize the user's voice
Dashboard Instruments and Controls
4
155
Page 160 of 296
commands can be invalidated when
speaking too quickly or too loudly.
WARNING!
Any voice-controlled system should be
used only in safe driving conditions
following all applicable regulations.
Full attention should be kept on
driving. Failure to do so may result in
a collision causing serious injury or
death.
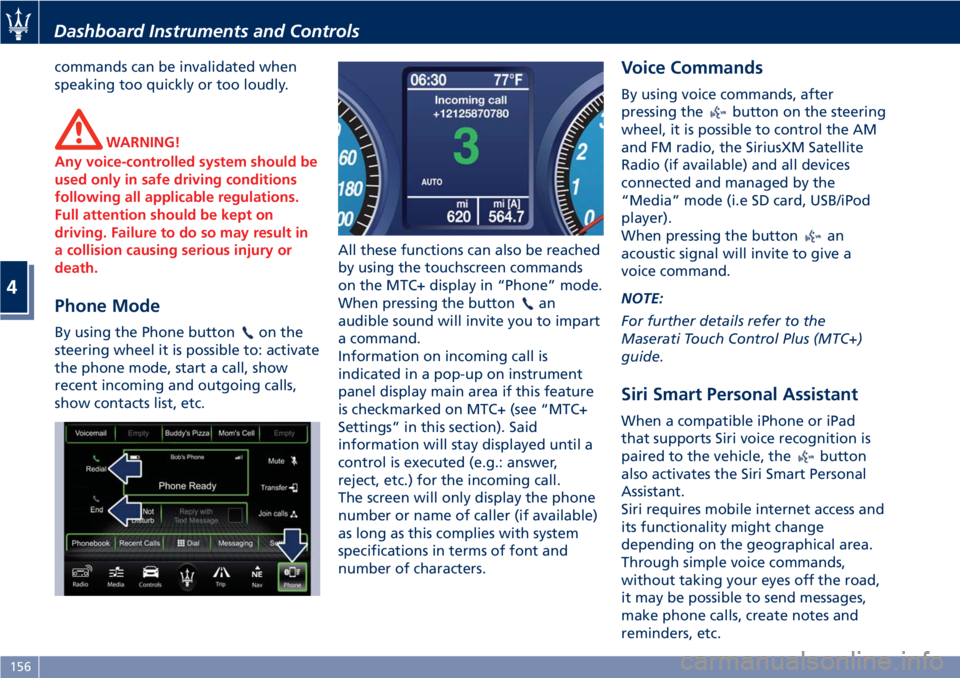
Phone Mode
By using the Phone buttonon the
steering wheel it is possible to: activate
the phone mode, start a call, show
recent incoming and outgoing calls,
show contacts list, etc.All these functions can also be reached
by using the touchscreen commands
on the MTC+ display in “Phone” mode.
When pressing the button
an
audible sound will invite you to impart
a command.
Information on incoming call is
indicated in a pop-up on instrument
panel display main area if this feature
is checkmarked on MTC+ (see “MTC+
Settings” in this section). Said
information will stay displayed until a
control is executed (e.g.: answer,
reject, etc.) for the incoming call.
The screen will only display the phone
number or name of caller (if available)
as long as this complies with system
specifications in terms of font and
number of characters.
Voice Commands
By using voice commands, after
pressing the
button on the steering
wheel, it is possible to control the AM
and FM radio, the SiriusXM Satellite
Radio (if available) and all devices
connected and managed by the
“Media” mode (i.e SD card, USB/iPod
player).
When pressing the button
an
acoustic signal will invite to give a
voice command.
NOTE:
For further details refer to the
Maserati Touch Control Plus (MTC+)
guide.
Siri Smart Personal Assistant
When a compatible iPhone or iPad
that supports Siri voice recognition is
paired to the vehicle, the
button
also activates the Siri Smart Personal
Assistant.
Siri requires mobile internet access and
its functionality might change
depending on the geographical area.
Through simple voice commands,
without taking your eyes off the road,
it may be possible to send messages,
make phone calls, create notes and
reminders, etc.
Dashboard Instruments and Controls
4
156
Page 184 of 296
WARNING!
The ABS helps prevent the wheels
from locking, but it does not increase
the physical grip limits between the
tires and the road. Therefore, always
keep a safe distance from the vehicle
in front of yours and reduce your
speed when entering a curve.
NOTE:
•When the vehicle's speed is higher
than 7 mph (11 km/h), you may also
hear a slight clicking sound as well as
other motor noises. The system is
performing a self-check cycle to
ensure that the ABS is working
properly.
•This self-check occurs each time the
vehicle is started and accelerated
past 7 mph (11 km/h).
ABS is activated during braking under
certain road or stopping conditions.
ABS-inducing conditions can include
ice, snow, gravel, bumps, railroad
tracks, loose debris.
You may also experience the following
when the brake system goes into Anti-
Lock:• The ABS motor running (it may
continue to run for a short time after
the vehicle stops).
• The clicking sound of solenoid valves.
• Brake pedal pulsations.
• A slight drop or fall away of the
brake pedal at the end of the stop.
These are all normal characteristics of
ABS functioning.WARNING!
•The ABS contains sophisticated
electronic equipment that may be
susceptible to interference caused by
improperly-installed or high-output
radio transmitting equipment. This
interference can cause possible loss
of anti-lock braking capability.
Installation of such equipment
should be performed by qualified
Maserati personnel.
•Pumping the Anti-Lock Brakes will
diminish their effectiveness and may
lead to a collision. Pumping brakes
makes the stopping distance longer.
Just press firmly and continuously on
your brake pedal when you need to
slow down or stop
ABS and EBD System Failure
In the event of a failure the ABS
system will be deactivated, but this will
not affect the efficiency of the
standard braking system.
The failure will be indicated by the
illumination of the
amber warning
light on the instrument cluster.
An EBD system failure is indicated by
the illumination of the
red
warning light on the instrument
cluster.
In this case we recommend that you
contact the nearestAuthorized
Maserati Dealerin order to identify
the fault as soon as possible, by means
of the system self-diagnostic function.
WARNING!
•The
failure warning light usually
illuminates with the engine running
to indicate a malfunction in the ABS
system only. In this case, the braking
system will remain fully functioning,
but will not use the ABS. In these
conditions, also the EBD system
efficiency may be affected. Drive
with the greatest care in order to
avoid sudden braking and have the
system immediately checked by the
Driving
5
180
Page 200 of 296

(Continued)
style. Aftermarket wheels can cause
sensor damage. Do not use
aftermarket tire sealants or balance
beads, as damage to the sensors may
result.
• The system can temporarily
experience radio-electric interference
emitted by devices using similar
frequencies.
• After inspecting or adjusting the tire
pressure, always reinstall the valve
stem cap. This will prevent moisture
and dirt from entering the valve
stem and damage the TPMS internal
sensor.
NOTE:
•Driving on a significantly
underinflated tire causes the tire to
overheat and may lead to tire failure.
Under-inflation also reduces fuel
efficiency and tire tread life, and may
affect the vehicle’s handling and
stopping ability.
•The TPMS is not a substitute for
proper tire maintenance, and it is the
driver’s responsibility to maintain
correct tire pressure using an
accurate tire pressure gage, even if
under-inflation has not reached thelevel to trigger illumination of the
TPMS light
.
•Seasonal temperature changes will
affect tire pressure, and the TPMS
will monitor the actual tire pressure
in the tire.
Viewing Messages on the
Display
By pressing repeatedly the “MODE”
button of the control panel on left
side of the steering column, the user
can access the information page that
shows the pressure values of each tire
(“Tire Pressure” screen page: see
paragraph "TFT Display: Screen Pages"
in chapter "Instrument Cluster" of
section "Dashboard Instruments and
Controls").
If system faults or low pressure is
detected on a not indentified tire,"Check Tire Pressure" or "TPMS
Malfunction" pop-up message will be
displayed for 10 seconds. The
amber warning light will
permanently illuminate on the right
side of the instrument cluster display.
With a malfunction detected, the "Tire
Pressure" screen page will not be
available while will be available the
calibration screen page.
The “Tire Pressure” screen page
becomes available again, until the
malfunction is corrected.
Low Tire Pressure Conditions
The signal transmitted by the ECU
activates messages and symbols on the
TFT display with two priority levels
corresponding to the following
thresholds:
• Soft Warning: if the pressure is 10%
lower than the rated pressure;
• Hard Warning: if the pressure is 17%
lower than the rated pressure.
The system refers to the rated pressure
acquired after calibration.
The two alarm thresholds for
monitoring the tire pressure
respectively activate the following
alerts:
• “Check tire pressure” illuminates on
the display when the pressure of one
Driving
5
196
Page 230 of 296

WARNING!
•Using booster packs that have not
been checked, which could therefore
release a too high charging voltage
(higher than 14 V), in extreme
environmental conditions (for
example: closed areas or without
proper ventilation and temperatures
higher than 122°F/50°C or lower
than -4°F/-20°C) create the right
conditions for ignition which could
then cause the battery to explode.
Therefore you shall always perform
jump-starting operations using the
adequate tools and in the best
environmental conditions, taking all
necessary precautions.
•Do not attempt jump-starting if the
discharged battery is frozen. It could
rupture or explode during jump start
and cause personal injury.
•Do not carry out this procedure if
you have not done it before:
incorrect maneuvers can originate
high electrical discharges and even
cause the battery to explode.
•To avoid the risk of explosion or fire,
do not approach the battery withopen flames or cigarettes that could
generate sparks.
NOTE:
If you need to disconnect the battery
from the vehicle electrical system, see
“Maintenance - Free Battery” in
section “Maintenance and Care”).
Access the Battery
The battery is stored in the trunk.
• Open the trunk lid (see “Open and
Close the Trunk Lid” in section
“Before Starting”).
• Remove any luggage from the trunk
compartment.
• Remove the floor panel from the
trunk compartment.
• Remove the inside covering panel
from the battery compartment.Remove the cover from the right side
of the battery which protects the
positive pole.
Jump-Start Procedure
WARNING!
•The battery is secured to the vehicle
with a metal clamp (indicated in the
picture), so be extremely careful not
to let the clips on the end of the
cables come into contact with it.
•Remove any metal jewelry such as
watch bands or bracelets that might
make an inadvertent electrical
contact. You could be seriously
injured.
•Do not allow the vehicles involved in
the jump-starting operation to touch
each other as this could establish a
ground connection and cause
personal injury.
• Turn off the heater, radio, and all
unnecessary electrical accessories.
• Set the parking brake, shift the
automatic transmission into P (Park)
and turn the key in the ignition
switch toSTOP (OFF)position.
• If using another vehicle to jump start
the battery, park the vehicle within
In an Emergency
6
226