2020 MASERATI GRANTURISMO CONVERTIBLE high beam
[x] Cancel search: high beamPage 71 of 296

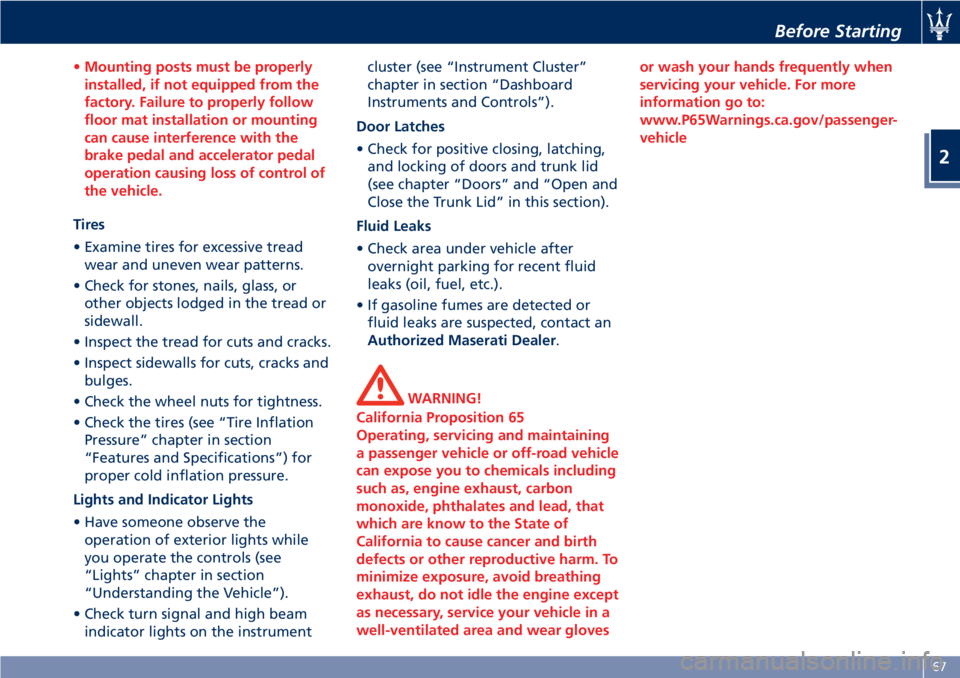
•Mounting posts must be properly
installed, if not equipped from the
factory. Failure to properly follow
floor mat installation or mounting
can cause interference with the
brake pedal and accelerator pedal
operation causing loss of control of
the vehicle.
Tires
• Examine tires for excessive tread
wear and uneven wear patterns.
• Check for stones, nails, glass, or
other objects lodged in the tread or
sidewall.
• Inspect the tread for cuts and cracks.
• Inspect sidewalls for cuts, cracks and
bulges.
• Check the wheel nuts for tightness.
• Check the tires (see “Tire Inflation
Pressure” chapter in section
“Features and Specifications”) for
proper cold inflation pressure.
Lights and Indicator Lights
• Have someone observe the
operation of exterior lights while
you operate the controls (see
“Lights” chapter in section
“Understanding the Vehicle”).
• Check turn signal and high beam
indicator lights on the instrumentcluster (see “Instrument Cluster”
chapter in section “Dashboard
Instruments and Controls”).
Door Latches
• Check for positive closing, latching,
and locking of doors and trunk lid
(see chapter “Doors” and “Open and
Close the Trunk Lid” in this section).
Fluid Leaks
• Check area under vehicle after
overnight parking for recent fluid
leaks (oil, fuel, etc.).
• If gasoline fumes are detected or
fluid leaks are suspected, contact an
Authorized Maserati Dealer.
WARNING!
California Proposition 65
Operating, servicing and maintaining
a passenger vehicle or off-road vehicle
can expose you to chemicals including
such as, engine exhaust, carbon
monoxide, phthalates and lead, that
which are know to the State of
California to cause cancer and birth
defects or other reproductive harm. To
minimize exposure, avoid breathing
exhaust, do not idle the engine except
as necessary, service your vehicle in a
well-ventilated area and wear glovesor wash your hands frequently when
servicing your vehicle. For more
information go to:
www.P65Warnings.ca.gov/passenger-
vehicle
Before Starting
2
67
Page 88 of 296

Adaptive Bi-Xenon Headlights
The gas-discharge (xenon) headlights
operate with an electric arc saturated
with Xenon gas under pressure,
instead of the incandescent filament.
The light produced is assuredly higher
compared to traditional light bulbs, in
terms of quality (brighter light) as well
as of the span and positioning of the
illuminated area.
In addition, the headlights are
equipped with an ALC system
(Adaptive Light Control).
This system combines the light beam
with the steering angle to assure
better visibility of the road surface
when driving in a curve, steering or in
the event of road deviations.
The advantages offered by improved
lighting system are perceived
especially in case of bad weather, fog
and/or insufficient road indications
providing broader illumination of the
side zones, which are normally left in
the dark, and for highway driving (see
comparison rendered below).
This surely increases driving safety as it
offers less eye strain and increased
orientation for the driver and better
detection of other persons on the road
sides (pedestrians, bicycle riders and
motorcycle drivers).The electric arc requires very high
voltage for activation, but afterward
power is supplied at a lower voltage.
The headlights reach maximum
brightness about 0,5 seconds after
being turned on.
The strong light produced by this type
of headlight requires the use of an
automatic system to keep the position
of the headlights constant and to
prevent dazzling approaching cars, in
the case of braking, acceleration or
load transport.
WARNING!
If xenon headlamp replacement is
necessary, contact the Authorized
Maserati Dealer only: DANGER - RISK
OF ELECTRICAL SHOCK.
Parking Lights
The parking lights only work with the
key in the ignition switch turned to
STOP (OFF)orACCposition, or with
the key removed.
They are activated by turning the light
switch to
position.
It is harder to turn the switch to
position than to the other
positions. This is to avoid activatingthe parking lights unintentionally and
wasting power.
When the parking lights are on, the
warning light on the instrument
cluster illuminates.
With parking lights on, move down
left-hand multifunction lever to switch
on position lights on left-hand side,
and move it up to switch on only the
ones on right-hand side.
Automatic Headlights
When the light switch is turned to
"AUTO" position and the key in the
ignition switch is inMAR (ON)
position, the position lights, low beam
lights and license plate lights turn on
and off automatically, depending on
the light outside.
NOTE:
The high beams can only be turned on
manually by pushing the left-hand
multifunction lever forward.
WARNING!
•If the low beams are activated, they
will come on automatically every
time the lights are turned on. You
are therefore advised to turn off the
high beams every time the twilight
Understanding the Vehicle
3
84
Page 90 of 296

Left-hand Multifunction Lever
The multifunction lever on the left side
of the steering column controls the
operation of the turn signals,
headlight beam selection and
overtaking lights.
This multifunction lever also controls
the Cruise Control. See chapter "Cruise
Control" in section "Driving" for
further information.
Turn Signals
Move the left-hand multifunction lever
all the way up or down until the stop
trigger.
The left or right arrow indicator on
respectively the speedometer and
tachometer instrument cluster, flashes
to show proper operation of the front
and rear turn signal lights.To activate lane change function, tap
the lever up or down once, without
moving beyond the detent. The turn
signals (right or left) will flash three
times then automatically turn off.
This function is useful when
overtaking or changing lanes.NOTE:
If either light remains on and does not
flash, or flashes at a fast rate, check for
a defective outside light bulb. If an
indicator on instrument cluster fails
while moving the lever, then the
indicator bulb is probably defective.
High Beams and Flashing
To switch on the high beams with the
light switch in headlamp
or
“AUTO” position, shift the left-hand
multifunction lever onward.
A related
blue telltale will
illuminate on the tachometer.
By pulling the lever backward (toward
the steering wheel) you switch off the
high beams and switch on the low
beams.
Understanding the Vehicle
3
86
Page 91 of 296

You can signal another vehicle with
your headlights by lightly pulling the
left-hand multifunction lever toward
you. This will turn on the high beams
headlights until the lever is released.
Flashing occurs also with lights off
(light switch in position “0”) if the key
in the ignition switch is inMAR (ON)
position.
CAUTION!
The high beams can only be switched
on manually by pushing the left-hand
multifunction lever forward.
WARNING!
If the high beams are activated, they
will turn on automatically every time
the low beams are switched on either
manually or automatically. We
recommend therefore that you switch
them off when they are no longer
necessary and every time the twilight
sensor deactivates the external lights.
“Follow me Home” Function
This function allows you to set a
timing for activation of the position
lights and low beams, so that they
may remain on for a set time after
turning off the vehicle.
This function is activated by pushing
the left-hand multifunction lever on
the steering column, used to flash the
headlights.
The position lights and low beams
turn on for 30 seconds, the message
“Follow me” appears on the
instrument cluster display for 20seconds, and the light activation time
is displayed.
When this function is active, every
time the left-hand multifunction lever
for flashing the headlights is
operated, the time the lights remain
on is increased by 30 seconds, with a
maximum total time of 210 seconds.
The display will show the time set.
If the left-hand multifunction lever for
flashing the headlights is operated for
more than 2 seconds, the function is
deactivated, and the indicator on the
instrument cluster display goes off.
When the function is active, turning
the key in the ignition switch back to
MAR (ON)position deactivates the
system.Front Domelights
The front domelight includes a central
and two reading lights.
The central light automatically turns
on together with the two lights on the
sides of the rear seats (see "Rear Side
Interior Lights" in this chapter) when
one of the doors is opened and turns
off when the door is closed (timed
switching off). These lights may be
switched on manually by pressing the
central button
The reading lights are controlled by
the respective side buttons.
Understanding the Vehicle
3
87
Page 124 of 296

CAUTION!
• When the key on the key in the
ignition switch is in theMAR (ON)
position and if the indicator light
does not switch on or if it switches
on while driving, contact an
Authorized Maserati Dealeras soon
as possible.
• Prolonged driving with the MIL on
could cause damage to the engine
control system. It also could affect
fuel economy and drivability. If the
MIL is flashing, severe catalytic
converter damage and power loss
will soon occur. Immediate service is
required.
Parking Lights Indicator
With the key removed from
the ignition switch, it indicates
that the parking lights are on.
Transmission Failure Warning Light (*)
Depending on the message
displayed it signals:
• a transmission failure. If the
failure permits, slowly drive
to the nearestAuthorized
Maserati Dealer;• a too high temperature of the
transmission oil. In this case, slow
down until the temperature goes
down to the normal values for use
(the warning light goes off).
For further information see chapter
“Automatic Transmission” in section
“Driving”.
CAUTION!
Continuous driving with the
transmission temperature warning
light illuminated will eventually cause
severe transmission damage or failure.
WARNING!
If the transmission temperature
warning light is illuminated and you
continue operating the vehicle, in
some circumstances you could cause
the fluid to boil over, come in contact
with hot engine or exhaust
components and cause a fire.
High Beam Indicator
This indicator lights up when
the high beams are switched
on or when blinking.Low Oil Pressure Warning Light (*)
Under normal conditions, the
warning light illuminates
when the key in the ignition
switch is turned toMAR (ON)
position and goes off as soon as the
engine is started.
If the warning light stays or turns on
while driving, the engine oil pressure is
too low. The warning light is combined
with a displayed message. In this case,
turn the engine off immediately and
carry out the necessary checks.
Do not operate the vehicle until the
problem has been solved. This light
does not indicate the oil level. The
engine oil level must be checked with
the dipstick located under the hood
(see “Maintenance Procedures” in
section “Maintenance and Care”).
If the problem persists, contact an
Authorized Maserati Dealer.
Headlight On Indicator
This indicator will illuminate
when the position lights or
headlights are turned on.
For further details, see
“Lights” in section “Understanding the
Vehicle”.
Dashboard Instruments and Controls
4
120
Page 208 of 296

Driving Conditions
Before the Trip
Check the following at regular
intervals and always before long trips:
• tire pressure and condition;
• levels of fluids and lubricants;
• conditions of the windshield wiper
blades;
• clean the glass on the external light
and all other glass surfaces;
• proper operation of the indicator
lights and of the external lights.
CAUTION!
It is however advisable to perform
these checks at least every 500 mi
(800 km) and always following the
maintenance schedule reported in
section “Maintenance and Care”.
Before you drive:
• adjust seat position, steering wheel
and rearview mirrors in order to have
the best driving position;
• ensure that nothing (mat covers, etc.)
is obstructing the pedals movement;
• carefully arrange and secure any
objects in the trunk, to prevent themfrom moving forward in case of
sudden stops;
• avoid heavy meals before a trip. A
light snack helps keep your reflexes
sharp. In particular, avoid drinking
alcohol.
WARNING!
Beyond being prohibited by law, it is
extremely dangerous to ride inside the
trunk or on the hood. In the event of
an accident, passengers sitting here
are more exposed to the risk of
serious injury. Passengers must only
travel seated in the vehicle seats, with
the seat belts fastened. Always check
that the driver and all passengers
have the seat belts correctly fastened.
Safe Driving
Although the vehicle is equipped with
active and passive safety devices, the
driver's conduct is always a decisive
factor for road safety.
Some simple rules for traveling safely
in different conditions are listed
below. Some of them will probably
already sound familiar but, in any case,
it would be useful to read them
carefully.Driving at Night
The main guidelines to follow when
driving at night are set out below.
• Drive carefully. Night conditions
demand more focus and attention.
• Reduce your speed, especially on
roads with no streetlights.
• Stop at early signs of drowsiness.
Continuing to drive would be a risk
for yourself and for others. Have a
rest before continuing your trip.
• Keep the vehicle at a greater
distance from vehicles in front of you
than you would during the day: it is
difficult to assess the speed of other
vehicles when you only see the lights.
• Use the high beams only outside of
densely-populated areas and when
you are sure that they will not
disturb other drivers.
• When another vehicle is
approaching, switch from high
beams (if on) to low beams.
• Keep lights and headlights clean.
• Outside of densely-populated areas,
beware of animals crossing the road.
Driving in the Rain
Rain and wet roads are dangerous. On
a wet road all maneuvers are more
difficult since wheel grip on the
Driving
5
204
Page 209 of 296

asphalt is significantly reduced. This
means that braking distances increase
considerably and road grip decreases.
Some advices for driving in the rain
are listed below.
• Reduce your speed and keep a
greater safety distance from the
vehicles in front of you. High speed
may result in a loss of vehicle
control.
• When driving on wet or slushy roads,
it is possible for a wedge of water to
build up between the tire and road
surface. This is known as
aquaplaning and may cause partial
or complete loss of vehicle control
and stopping ability. To reduce this
possibility: slow down if the road has
standing water or puddles.
• Heavy rain substantially reduces
visibility. In these circumstances, even
during the day, turn on the low
beams, to be more visible to other
drivers.
• Set the air conditioning and heating
system controls on the defogging
function, in order to avoid any
visibility problem.
• Periodically check the conditions of
the windshield wiper blades.• In low grip conditions use “ICE”
drive mode (see chapters “Drive
Mode” in this section).
Driving in Fog
If the fog is dense, avoid traveling if
possible.
When driving in mist, blanket fog or
when there is the possibility of banks
of fog, please consider some advices
listed below.
• Keep a moderate speed.
• Even in daytime, turn on the low
beams and rear fog lights. Do not
use the high beams.
• Remember that fog creates
dampness on the asphalt and thus
any type of maneuver is more
difficult and braking distances are
extended.
• Keep a safe distance from the
vehicle in front of you.
• Avoid sudden changes in speed as
much as possible.
• Whenever possible, avoid
overtaking.
• If you are forced to stop the vehicle
(breakdowns, impossibility of
proceeding due to poor visibility,
etc.), first of all, try to stop off of the
travel lane. Then turn on the hazardwarning flashers and, if possible, the
low beams.
• Sound the horn rhythmically if you
hear another vehicle approaching.
• When you get out of the vehicle, put
on the high-visibility vest (if
equipped).
CAUTION!
Be aware that rear fog lights can
bother the drivers following your
vehicle: when visibility is back to
normal, turn off these lights.
Driving in the Mountains
Mountain roads usually have many
narrow turns and curves, tunnels and
steep uphill or downhill slopes: please
consider some advices listed below.
• Drive at a moderate speed, avoid
“cutting” corners.
• When driving inside a tunnel in
daylight turn on the low beams in
advance; avoid high beams and be
aware of the rapid brightness
change. Avoid abrupt maneuvers
that could be dangerous for the
following vehicle.
• Never coast downhill with the
engine off or in neutral, and never
Driving
5
205
Page 257 of 296

Pos.Amp. –
ColorSystem /
Component
F04Maxi 40 A –
OrangeABS cylinder
F05Maxi 40 A –
OrangeA.C. Node
F06Maxi 60 A –
BlueFan 2 relay
F0730A–
GreenT07 I.E. main
relay
F087.5A–
BrownT08 - Air
conditioner
compressor
relay
F097.5A–
BrownT05 stop light
control relay
F10 15 A – Blue T06 horn relay
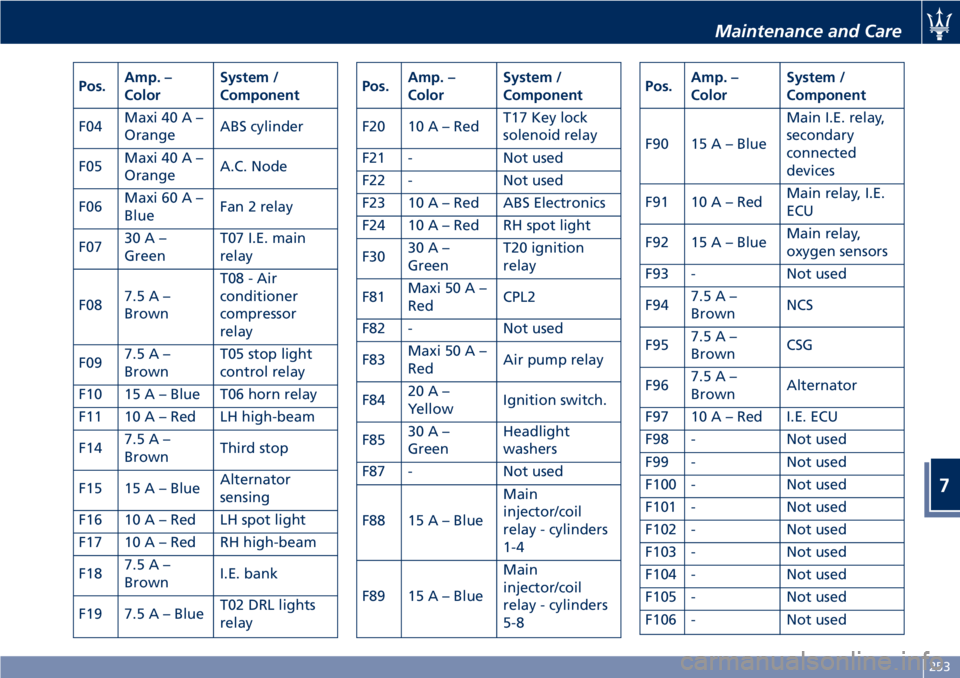
F11 10 A – Red LH high-beam
F147.5A–
BrownThird stop
F15 15 A – BlueAlternator
sensing
F16 10 A – Red LH spot light
F17 10 A – Red RH high-beam
F187.5A–
BrownI.E. bank
F19 7.5 A – BlueT02 DRL lights
relayPos.Amp. –
ColorSystem /
Component
F20 10 A – RedT17 Key lock
solenoid relay
F21 - Not used
F22 - Not used
F23 10 A – Red ABS Electronics
F24 10 A – Red RH spot light
F3030A–
GreenT20 ignition
relay
F81Maxi 50 A –
RedCPL2
F82 - Not used
F83Maxi 50 A –
RedAir pump relay
F8420A–
YellowIgnition switch.
F8530A–
GreenHeadlight
washers
F87 - Not used
F88 15 A – BlueMain
injector/coil
relay - cylinders
1-4
F89 15 A – BlueMain
injector/coil
relay - cylinders
5-8Pos.Amp. –
ColorSystem /
Component
F90 15 A – BlueMain I.E. relay,
secondary
connected
devices
F91 10 A – RedMain relay, I.E.
ECU
F92 15 A – BlueMain relay,
oxygen sensors
F93 - Not used
F947.5A–
BrownNCS
F957.5A–
BrownCSG
F967.5A–
BrownAlternator
F97 10 A – Red I.E. ECU
F98 - Not used
F99 - Not used
F100 - Not used
F101 - Not used
F102 - Not used
F103 - Not used
F104 - Not used
F105 - Not used
F106 - Not used
Maintenance and Care
7
253