2020 MASERATI GRANTURISMO CONVERTIBLE door lock
[x] Cancel search: door lockPage 37 of 296

WARNING!
Gearshifting is always active and may
be performed even when one or more
doors, the engine compartment lid or
the trunk lid are open. Therefore, in
these conditions, take great care to
avoid moving the transmission shift
lever and so accidentally engage
gears.
Power Windows
The power windows can only be
activated when the key in the ignition
switch is in theMAR (ON)position.
The controls for all power windows
are located in the armrest of the door
on the driver’s side. The external
switch commands the power window
driver’s side; the inner switch
commands the power window
passenger’s side.
The door on the passenger side only
has control for the window on the
passenger side.NOTE:
•The power window switches will
remain active for up to 10 minutes
after the key in the ignition switch is
turned to theSTOP (OFF)position.
Opening either door will cancel this
feature.
•Frequent activations of the power
windows could result in a temporary
lock out of the motors. In this case,
wait a moment before a new
activation.
•If the power window is closed when
the door is open, the window stops
before the upper limit so as not to
interfere with the seal when the
door is closed.
Before Starting
2
33
Page 39 of 296

Reset Auto-Up/Down
Should the auto-up/down feature stop
working, the window probably needs
to be reset.
To reset auto-up/down, pull the
window switch up to close the
window completely and push the
window switch down to open the
window completely.
If You have to Disconnect the
Battery
Before disconnecting the battery,
lower the side windows by at least 1-2
in (4-5 cm) to avoid damaging the soft
top strip when opening and closing
the door.
When the battery is connected, this
operation is performed automatically
when the door is opened and closed.
The windows must remain lowered
until the charged battery is
reconnected. If the battery is
completely discharged when the
windows are fully raised, only open
the door if absolutely necessary, with
the utmost care; do not close the door
again until it is possible to lower the
window.
Open and Close the Trunk
Lid
Opening
The trunk compartment lid can be
opened from inside or outside the
vehicle.
Button which opens the lid from
inside, is located to the left of the
steering wheel.
It can only be operated when the key
is removed from the ignition switch or
turned toSTOP (OFF)orACCposition.
To open the trunk compartment lid
from outside, press button on the
radio control case: this opens the lock
and the trunk lid rises slightly.To open the trunk lid from the
outside, when the security alarm is
deactivated and the key is inside the
vehicle, simply press the button
underneath the license plate light
frame.
To avoid accidental activation while
the vehicle is moving, it is only
possible to open the trunk
compartment when the key is
removed from the ignition switch or
turned toSTOP (OFF)orACCposition.
Before Starting
2
35
Page 40 of 296

Two gas struts facilitate the lid
opening. The struts are calibrated to
ensure they function correctly with the
weights specified by the manufacturer.
The arbitrary addition of objects
(spoiler, luggage rack etc.) may impair
the lid’s correct operation and safety.
WARNING!
When using the trunk compartment,
never exceed the maximum loads
allowed (see “Technical Data" in
section "Features and Specifications”).
Also check that the objects contained
in the luggage compartment are
arranged properly.
The trunk compartment is illuminated
by a light that comes on automatically
when the lid is opened; switching off is
timed.
If the trunk compartment lid is left
open, the light switches off after a few
minutes. To turn it on again, close the
lid and then reopen it.
NOTE:
The soft top automatic movement is
disabled when the trunk compartment
is open.
Closing
To close the trunk lid grasp one of the
handles as indicated on the inner
covering and lower the lid.
Then press gently on the outside of
the lid, in correspondence of the lock,
until hearing it click in place.
Emergency Opening
If necessary, the trunk compartment lid
can be opened by pulling the small
cable, located underneath the left rear
seat.Once you have located the cable and
pulled it out from the seat, pull it
forward to open the trunk
compartment lid.
Independent Trunk Lid
Unlocking
To allow the user to hold only the
trunk lid unlocked compared to the
doors condition, there is a dedicated
feature which can be activated by
MTC+ in “Doors & Locks” menu (see
"MTC+ Settings" in section
"Dashboard Instruments and
Controls".
Before Starting
2
36
Page 42 of 296

Lift the hood completely: this
operation is facilitated by two gas
struts keeping the fully open position.
With the key in the ignition switch in
MAR (ON)position, the specific red
warning light will display on the
instrument cluster with the message
indicating that the hood is open (see
chapter “Instrument Cluster” in section
“Dashboard Instrument and
Controls”).
Closing
Lower the hood to about 20 cm (8 in)
from the contact area of the engine
compartment and then drop it. This
should secure the inclusion of the
latch.
CAUTION!
To prevent possible damage, do not
slam the hood to close it.
WARNING!
•Be sure the hood is fully latched
before driving your vehicle. If the lid
is not fully latched, it could open
when the vehicle is in motion and
block your vision. Failure to follow
this warning could result in serious
injury or death.
•Gear shifting is always active and
may be performed even when one
or more doors, the hood or the trunk
lid are open. Therefore, in these
conditions, take great care to avoid
moving the transmission shift lever
and so accidentally engage gears.
Occupants Restraint
Systems
The listed occupants restraint systems
are some of the most important safety
features in your vehicle:
• Three-point seat belts (also called lap
and shoulder belts) for the driver and
all passengers.
• Front air bags for driver and
passenger.
• Seat-mounted side air bags for the
driver and front passenger.
• An energy-absorbing steering
column and steering wheel.
• Front seat belts incorporate a
pretensioner (Emergency Tensioning
Device - ETD) that may enhance
occupant protection by managing
the energy created during an impact.
• Front seat belt retractors are
equipped with load limiting devices
which control the seat belt reeling
out so as to adjust the force exerted
on the shoulders while the seat belt
is in restraining mode.
• All seat belts system (except the
driver’s) include Automatic Locking
Retractors (ALR), which lock the seat
belt webbing into position by
extending the belt all the way out
Before Starting
2
38
Page 44 of 296

• Do not lean against the door or
window. Your vehicle has
seat-mounted side air bag and, if
deployment occurs, they will inflate
forcefully into the space between
you and the door.
• If the air bag system in this vehicle
needs to be modified to
accommodate a disabled person,
contact anAuthorized Maserati
Dealer.
WARNING!
In an accident, all occupants can suffer
much greater injuries if not properly
buckled up. You can strike the interior
of your vehicle or other occupants or
you can be thrown out of the vehicle.
Always be sure you and others in your
vehicle are buckled up properly.
Buckle up even though you are an
excellent driver, even on short trips.
Someone on the road may be a poor
driver and cause an accident that
includes you. This can happen far
away from home or on your own
street.
Statistics report that seat belts save
lives and help reduce the seriousness
of injuries in an accident. Some of the
worst injuries happen when people arethrown from the vehicle. Seat belts
reduce the possibility of ejection and
the risk of injury caused by striking the
inside of the vehicle.
Everyone in a motor vehicle should be
belted at all times.
Three-Point Seat Belts
All seating positions in your vehicle are
equipped with combination lap and
shoulder belts.
The belt retractor is designed to lock
during very sudden stops or impacts.
This feature allows the shoulder part
of the belt to move freely with you
under normal conditions, conforming
to the body of the occupants.
However, in an accident, the belt will
lock and reduce your risk of striking
the inside of the vehicle or being
thrown out.
The driver is responsible for respecting,
and ensuring that all the other
occupants of the car also observe the
local regulations concerning the use of
seat belts. Always fasten the seat belts
before starting the vehicle.
Seat belts are designed to be used by
persons whose physical characteristics
(age, height, weight) are provided for
by established legislation in each
country. Anyone who does comply
with these provisions may not travel inthe front passenger seat. This also
applies to children. Their heads are
proportionally heavier and larger than
those of adults, while their bones and
muscles are relatively undeveloped. To
help protect them in case of a collision,
they must use special restraint or
safety systems, even in the rear seat
area.
WARNING!
•It is forbidden and dangerous to ride
in a cargo area. In an accident,
people riding in these areas are more
likely to be seriously injured or
killed.
•Do not allow any person to ride in
any area of your vehicle that is not
equipped with seats and seat belts.
•Be sure all passengers are in a seat
and using a seat belt properly.
•Wearing your belt improperly could
make your injuries in an accident
much worse. You might suffer
internal injuries, or you could even
slide out of part of the belt. Follow
these instructions to wear your seat
belt properly and to keep your
passengers safe, too.
Before Starting
2
40
Page 71 of 296

•Mounting posts must be properly
installed, if not equipped from the
factory. Failure to properly follow
floor mat installation or mounting
can cause interference with the
brake pedal and accelerator pedal
operation causing loss of control of
the vehicle.
Tires
• Examine tires for excessive tread
wear and uneven wear patterns.
• Check for stones, nails, glass, or
other objects lodged in the tread or
sidewall.
• Inspect the tread for cuts and cracks.
• Inspect sidewalls for cuts, cracks and
bulges.
• Check the wheel nuts for tightness.
• Check the tires (see “Tire Inflation
Pressure” chapter in section
“Features and Specifications”) for
proper cold inflation pressure.
Lights and Indicator Lights
• Have someone observe the
operation of exterior lights while
you operate the controls (see
“Lights” chapter in section
“Understanding the Vehicle”).
• Check turn signal and high beam
indicator lights on the instrumentcluster (see “Instrument Cluster”
chapter in section “Dashboard
Instruments and Controls”).
Door Latches
• Check for positive closing, latching,
and locking of doors and trunk lid
(see chapter “Doors” and “Open and
Close the Trunk Lid” in this section).
Fluid Leaks
• Check area under vehicle after
overnight parking for recent fluid
leaks (oil, fuel, etc.).
• If gasoline fumes are detected or
fluid leaks are suspected, contact an
Authorized Maserati Dealer.
WARNING!
California Proposition 65
Operating, servicing and maintaining
a passenger vehicle or off-road vehicle
can expose you to chemicals including
such as, engine exhaust, carbon
monoxide, phthalates and lead, that
which are know to the State of
California to cause cancer and birth
defects or other reproductive harm. To
minimize exposure, avoid breathing
exhaust, do not idle the engine except
as necessary, service your vehicle in a
well-ventilated area and wear glovesor wash your hands frequently when
servicing your vehicle. For more
information go to:
www.P65Warnings.ca.gov/passenger-
vehicle
Before Starting
2
67
Page 75 of 296

1Adjustable side air vents.
2Hood lid opening lever.
3Headlight and fog light switch.
4"Mode" and adjust "+" and
"–" buttons.
5Front parking sensors
disabling/enabling.
6Trunk lid opening button.
7Fuel tank door opening button
(see "Refueling" in section
"Driving" for operation).
8Multifunction lever (Cruise
Control, turn signals, headlight
washer and headlight
selection).
9Lower gearshift paddle
"DOWN".
10Instrument cluster.
11Steering wheel height and
depth adjustment lever.
12Upper air vent.
13Sun radiation sensor.
14Horn control.
15Multimedia controls repeated
on the steering wheel.
16Windshield/headlight
wiper/washer control lever.17Upper gearshift paddle "UP".
18Ignition switch.
19Clock.
20Central adjustable air vents.
21MTC+ display.
22Glove compartment.
23Side window vents.
Front Dome Console
Components
1Reading lights control button.
2Central light control button.
3Reading lights.
4Central light.5Anti-lift and anti-intrusion
alarm system deactivation
button.
6Paired phone hands-free
microphone.
Understanding the Vehicle
3
71
Page 76 of 296

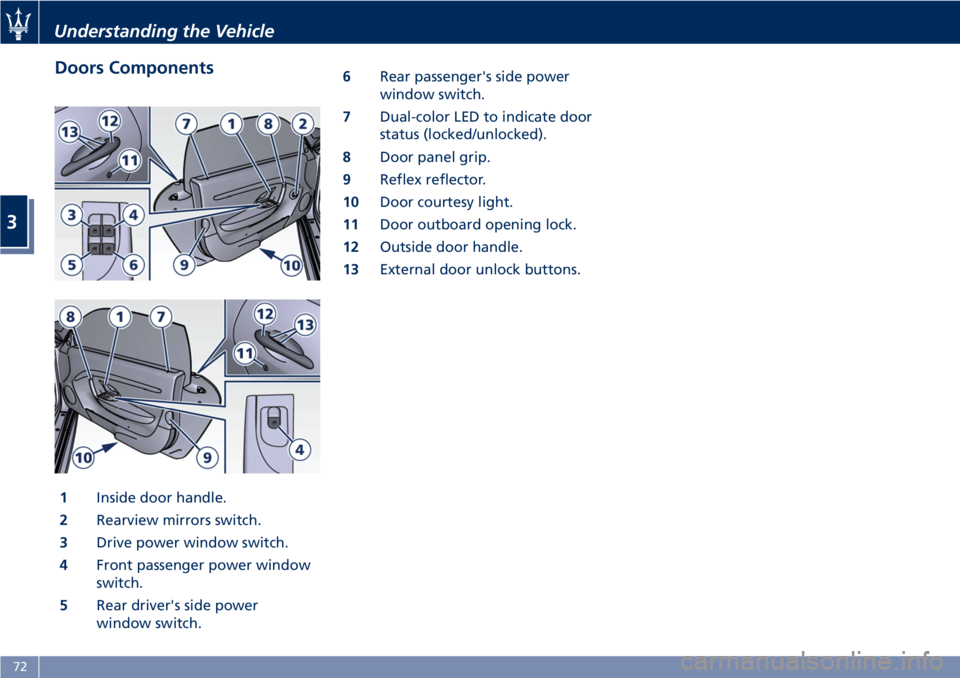
Doors Components
1Inside door handle.
2Rearview mirrors switch.
3Drive power window switch.
4Front passenger power window
switch.
5Rear driver's side power
window switch.6Rear passenger's side power
window switch.
7Dual-color LED to indicate door
status (locked/unlocked).
8Door panel grip.
9Reflex reflector.
10Door courtesy light.
11Door outboard opening lock.
12Outside door handle.
13External door unlock buttons.
Understanding the Vehicle
3
72