2020 LINCOLN CORSAIR change wheel
[x] Cancel search: change wheelPage 356 of 591
We engineer and test all motor vehicles and
their components for reliable, regular driving.
Under various conditions, long-term storage
may lead to degraded engine performance
or failure unless you use specific precautions
to preserve engine components.
General
•
Store all vehicles in a dry, ventilated
place.
• Protect from sunlight, if possible.
• If vehicles are stored outside, they
require regular maintenance to protect
against rust and damage.
Body
• Wash your vehicle thoroughly to remove
dirt, grease, oil, tar or mud from exterior
surfaces, rear-wheel housing and the
underside of front fenders.
• Periodically wash your vehicle if it is
stored in exposed locations.
• Touch-up exposed or primed metal to
prevent rust. •
Cover chrome and stainless steel parts
with a thick coat of auto wax to prevent
discoloration. Re-wax as necessary when
you wash your vehicle.
• Lubricate all hood, door and luggage
compartment hinges and latches with a
light grade oil.
• Cover interior trim to prevent fading.
• Keep all rubber parts free from oil and
solvents.
Engine
• Change the engine oil and filter prior to
storage because used engine oil contains
contaminates which may cause engine
damage.
• Start the engine every 15 days for a
minimum of 15 minutes. Run at fast idle
with the climate controls set to defrost
until the engine reaches normal
operating temperature.
• With your foot on the brake, shift through
all the gears while the engine is running.
• We recommend that you change the
engine oil before you use your vehicle
again. Fuel system
•
Fill the fuel tank with high-quality fuel
until the first automatic shutoff of the fuel
pump nozzle.
Cooling system
• Protect against freezing temperatures.
• When removing your vehicle from
storage, check coolant fluid level.
Confirm that there are no cooling system
leaks and that fluid is at the
recommended level.
Disconnecting Your 12 Volt Battery
• Check and recharge as necessary. Keep
connections clean.
• If storing your vehicle for more than 30
days without recharging the battery, we
recommend that you disconnect the
battery cables to maintain battery charge
for quick starting.
Note: It is necessary to reset memory
features if you disconnect the battery cables.
353
Corsair (CTF) Canada/United States of America, enUSA, Edition date: 201906, Second-Printing Vehicle Care
Page 358 of 591
GENERAL INFORMATION
The recommended tire inflation pressures
are found on the Tire Label which is located
on the B-pillar or the edge of the driver door.
This information can also be found on the
Safety Compliance Certification Label, affixed
to either the door hinge pillar, door-latch
post, or the door edge that meets the
door-latch post; next to the driver’
s seating
position.
We strongly recommend maintaining these
tire pressures at all times. Failure to follow
the tire pressure recommendations can
cause uneven treadwear patterns, reduced
fuel economy, and adversely affect the way
your vehicle handles.
Note: Check and set the tire pressure at the
ambient temperature in which you are
intending to drive your vehicle and when the
tires are cold.
Note: Check your tire pressures at least once
per month.
If your vehicle has a spare tire, set the
pressure to the highest value given for your
vehicle and tire size combination. Use only approved wheels and tire sizes,
using other sizes could damage your vehicle.
If you change the diameter of the factory
installed tires, the speedometer may not
display the correct speed. Take your vehicle
to an authorized dealer and have the engine
management system reprogrammed.
If you intend to change the size of the factory
installed tires, check the suitability with an
authorized dealer.
Additional information related to the
functionality and maintenance of your tires
can be found in the Wheels and Tire section.
See Tire Care (page 357).
Notice to utility vehicle and truck
owners WARNING:
Vehicles with a higher
center of gravity (utility and four-wheel
drive vehicles) handle differently than
vehicles with a lower center of gravity
(passenger cars). Avoid sharp turns,
excessive speed and abrupt steering in
these vehicles. Failure to drive cautiously
increases the risk of losing control of your
vehicle, vehicle rollover, personal injury
and death. WARNING:
In a rollover crash, an
unbelted person is significantly more likely
to die than a person wearing a seatbelt.
Utility vehicles and trucks handle differently
than passenger cars in the various driving
conditions that are encountered on streets,
highways and off-road. Utility vehicles and
trucks are not designed for cornering at
speeds as high as passenger cars any more
than low-slung sports cars are designed to
perform satisfactorily under off-road
conditions.
355
Corsair (CTF) Canada/United States of America, enUSA, Edition date: 201906, Second-Printing Wheels and Tires
Page 363 of 591

A. P: Indicates a tire, designated by the
Tire and Rim Association, that may be
used for service on cars, sport utility
vehicles, minivans and light trucks.
Note:
If your tire size does not begin with a
letter this may mean it is designated by
either the European Tire and Rim
Technical Organization or the Japan Tire
Manufacturing Association.
B.
215: Indicates the nominal width of
the tire in millimeters from sidewall edge
to sidewall edge. In general, the larger
the number, the wider the tire.
C.
65: Indicates the aspect ratio which
gives the tire's ratio of height to width.
D.
R: Indicates a radial type tire.
E.
15: Indicates the wheel or rim
diameter in inches. If you change your
wheel size, you will have to purchase
new tires to match the new wheel
diameter. F.
95: Indicates the tire's load index. It
is an index that relates to how much
weight a tire can carry. You may find this
information in your owner’ s manual. If
not, contact a local tire dealer.
Note: You may not find this information
on all tires because it is not required by
federal law.
G.
H: Indicates the tire's speed rating.
The speed rating denotes the speed at
which a tire is designed to be driven for
extended periods of time under a
standard condition of load and inflation
pressure. The tires on your vehicle may
operate at different conditions for load
and inflation pressure. These speed
ratings may need to be adjusted for the
difference in conditions. The ratings
range from
81 mph (130 km/h) to
186 mph (299 km/h). These ratings are
listed in the following chart.
Note: You may not find this information
on all tires because it is not required by
federal law. Speed rating
Letter rating
81 mph (130 km/h)
M
87 mph (140 km/h)
N
99 mph (159 km/h)
Q
106 mph (171 km/h)
R
112 mph (180 km/h)
S
118 mph (190 km/h)
T
124 mph (200 km/h)
U
130 mph (210 km/h)
H
149 mph (240 km/h)
V
360
Corsair (CTF) Canada/United States of America, enUSA, Edition date: 201906, Second-Printing Wheels and Tires
Page 366 of 591

B. Load Range and Load Inflation
Limits: Indicates the tire's load-carrying
capabilities and its inflation limits.
C.
Maximum Load Dual lb (kg) at psi
(kPa) cold: Indicates the maximum load
and tire pressure when the tire is used
as a dual, defined as four tires on the
rear axle (a total of six or more tires on
the vehicle).
D.
Maximum Load Single lb (kg) at psi
(kPa) cold: Indicates the maximum load
and tire pressure when the tire is used
as a single, defined as two tires (total)
on the rear axle.
Information on T Type Tires
T145/80D16 is an example of a tire size.
Note: The temporary tire size for your
vehicle may be different from this
example. Tire Quality Grades do not
apply to this type of tire. T type tires have some additional
information beyond those of P type tires;
these differences are described below:A.
T: Indicates a type of tire, designated
by the Tire and Rim Association, that is
intended for temporary service on cars,
sport utility vehicles, minivans and light
trucks.
B.
145: Indicates the nominal width of
the tire in millimeters from sidewall edge
to sidewall edge. In general, the larger
the number, the wider the tire.
C.
80: Indicates the aspect ratio which
gives the tire's ratio of height to width.
Numbers of 70 or lower indicate a short
sidewall.
D.
D: Indicates a diagonal type tire.
R:
Indicates a radial type tire.
E.
16: Indicates the wheel or rim
diameter in inches. If you change your
wheel size, you will have to purchase
new tires to match the new wheel
diameter.
363
Corsair (CTF) Canada/United States of America, enUSA, Edition date: 201906, Second-Printing Wheels and TiresA
BCDE
E142545
Page 368 of 591
Maximum Inflation Pressure is the tire
manufacturer's maximum permissible
pressure and the pressure at which the
maximum load can be carried by the tire.
This pressure is normally higher than the
manufacturer’ s recommended cold
inflation pressure which can be found
on the Safety Compliance Certification
Label (affixed to either the door hinge
pillar, door-latch post, or the door edge
that meets the door-latch post, next to
the driver's seating position), or Tire
Label which is located on the B-Pillar or
the edge of the driver’ s door. The cold
inflation pressure should never be set
lower than the recommended pressure
on the Safety Compliance Certification
Label or Tire Label.
When weather temperature changes
occur, tire inflation pressures also
change. A 11°F (6°C) temperature drop
can cause a corresponding drop of 1 psi
(7 kPa)
in inflation pressure. Check your
tire pressures frequently and adjust
them to the proper pressure which can
be found on the Safety Compliance
Certification Label or Tire Label. To check the pressure in your tire(s):
1. Make sure the tires are cool,
meaning they are not hot from
driving even a mile.
Note: If you are checking tire pressure
when the tire is hot, (for example, driven
more than
1 mi (1.6 km), never bleed or
reduce air pressure. The tires are hot
from driving and it is normal for
pressures to increase above
recommended cold pressures. A hot tire
at or below recommended cold inflation
pressure could be significantly
under-inflated.
Note: If you have to drive a distance to
get air for your tire(s), check and record
the tire pressure first and add the
appropriate air pressure when you get
to the pump. It is normal for tires to heat
up and the air pressure inside to go up
as you drive.
2. Remove the cap from the valve on
one tire, then firmly press the tire
gauge onto the valve and measure
the pressure. 3. Add enough air to reach the
recommended air pressure.
Note: If you overfill the tire, release air
by pressing on the metal stem in the
center of the valve. Then recheck the
pressure with your tire gauge.
4. Replace the valve cap.
5. Repeat this procedure for each tire,
including the spare.
Note: Some spare tires operate at a
higher inflation pressure than the other
tires. For T type mini-spare tires, see the
Dissimilar spare wheel and tire
assembly information for a description.
Store and maintain at
60 psi (4.15 bar).
For full-size and dissimilar spare tires,
see the Dissimilar spare wheel and tire
assembly information for a description.
Store and maintain at the higher of the
front and rear inflation pressure as
shown on the Tire Label.
365
Corsair (CTF) Canada/United States of America, enUSA, Edition date: 201906, Second-Printing Wheels and Tires
Page 376 of 591

WARNING: Changes or modifications
not expressively approved by the party
responsible for compliance could void the
user's authority to operate the equipment.
The term "IC:" before the radio certification
number only signifies that Industry Canada
technical specifications were met.
Changing Tires With a Tire Pressure
Monitoring System Note:
Each road tire is equipped with a tire
pressure sensor located inside the wheel
and tire assembly cavity. The pressure
sensor is attached to the valve stem. The
pressure sensor is covered by the tire and
is not visible unless the tire is removed. Take
care when changing the tire to avoid
damaging the sensor.
You should always have your tires serviced
by an authorized dealer.
Check the tire pressure periodically (at least
monthly) using an accurate tire gauge. See
When Inflating Your Tires in this chapter. Understanding Your Tire Pressure
Monitoring System The tire pressure monitoring system
measures pressure in your road tires and
sends the tire pressure readings to your
vehicle. You can view the tire pressure
readings through the information display.
See General Information (page 123). The low
tire pressure warning light will turn on if the
tire pressure is significantly low. Once the
373
Corsair (CTF) Canada/United States of America, enUSA, Edition date: 201906, Second-Printing Wheels and TiresE142549 E250820
Page 381 of 591
When driving with the full-size dissimilar
spare wheel and tire assembly, do not:
•
Exceed 70 mph (113 km/h).
• Use more than one dissimilar spare
wheel and tire assembly at a time.
• Use commercial car washing equipment.
• Use snow chains on the end of the
vehicle with the dissimilar spare wheel
and tire assembly.
The usage of a full-size dissimilar spare
wheel and tire assembly can lead to
impairment of the following:
• Handling, stability and braking
performance.
• Comfort and noise.
• Ground clearance and parking at curbs.
• Winter weather driving capability.
• Wet weather driving capability.
• All-wheel driving capability When driving with the full-size dissimilar
spare wheel and tire assembly additional
caution should be given to:
•
Towing a trailer.
• Driving vehicles equipped with a camper
body.
• Driving vehicles with a load on the cargo
rack.
Drive cautiously when using a full-size
dissimilar spare wheel and tire assembly and
seek service as soon as possible.
Tire Change Procedure WARNING:
Never place anything
between the vehicle jack and the ground. WARNING:
Never place anything
between the vehicle jack and your vehicle. WARNING:
To help prevent your
vehicle from moving when changing a
wheel, shift the transmission into park (P),
set the parking brake and use an
appropriate block or wheel chock to
secure the wheel diagonally opposite to
the wheel being changed. For example,
when changing the front left wheel, place
an appropriate block or wheel chock on
the right rear wheel. WARNING:
It is recommended that
the wheels of the vehicle be chocked, and
that no person should remain in a vehicle
that is being jacked. WARNING:
Always use the jack
provided as original equipment with your
vehicle. If using a jack other than the one
provided, make sure the jack capacity is
adequate for the vehicle weight, including
any vehicle cargo or modifications. If you
are unsure if the jack capacity is adequate,
contact the authorized dealer.
378
Corsair (CTF) Canada/United States of America, enUSA, Edition date: 201906, Second-Printing Wheels and Tires
Page 512 of 591
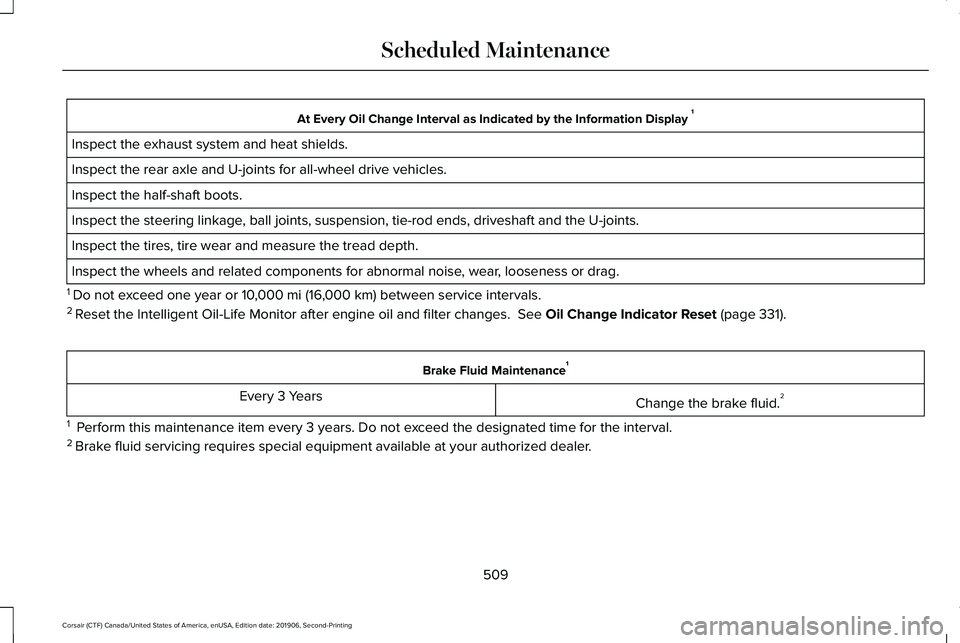
At Every Oil Change Interval as Indicated by the Information Display
1
Inspect the exhaust system and heat shields.
Inspect the rear axle and U-joints for all-wheel drive vehicles.
Inspect the half-shaft boots.
Inspect the steering linkage, ball joints, suspension, tie-rod ends, driveshaft and the U-joints.
Inspect the tires, tire wear and measure the tread depth.
Inspect the wheels and related components for abnormal noise, wear, looseness or drag.
1 Do not exceed one year or 10,000 mi (16,000 km) between service intervals.
2 Reset the Intelligent Oil-Life Monitor after engine oil and filter change\
s.
See Oil Change Indicator Reset (page 331). Brake Fluid Maintenance
1
Change the brake fluid. 2
Every 3 Years
1 Perform this maintenance item every 3 years. Do not exceed the designated time for the interval.
2 Brake fluid servicing requires special equipment available at your authorize\
d dealer.
509
Corsair (CTF) Canada/United States of America, enUSA, Edition date: 201906, Second-Printing Scheduled Maintenance