2020 LINCOLN CORSAIR instrument panel
[x] Cancel search: instrument panelPage 101 of 591
GENERAL INFORMATION
Condensation in the Exterior Front
Lamps and Rear Lamps
Exterior front lamps and rear lamps have
vents to accommodate normal changes in
air pressure.
Condensation can be a natural by-product
of this design. When moist air enters the
lamp assembly through the vents, there is a
possibility that condensation can occur when
the temperature is cold. When normal
condensation occurs, a fine mist can form on
the interior of the lens. The fine mist
eventually clears and exits through the vents
during normal operation.
Clearing time may take as long as 48 hours
under dry weather conditions.
Examples of acceptable condensation are:
•
The presence of a fine mist (no streaks,
drip marks or large droplets).
• A fine mist covers less than 50% of the
lens. Examples of unacceptable condensation are:
•
A water puddle inside the lamp.
• Streaks, drip marks or large droplets
present on the interior of the lens.
If you see any unacceptable condensation,
have your vehicle checked by an authorized
dealer.
LIGHTING CONTROL
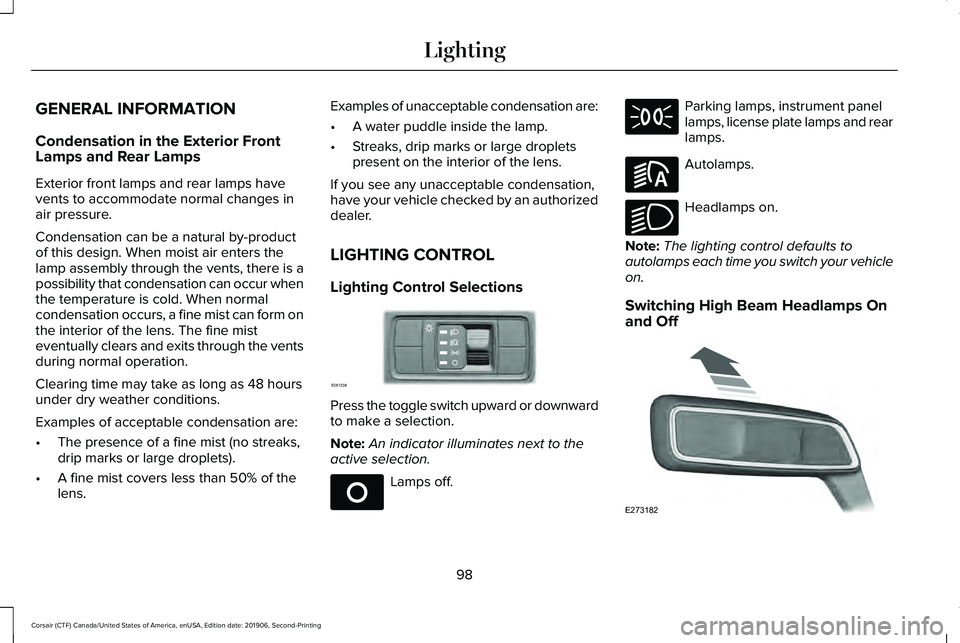
Lighting Control Selections Press the toggle switch upward or downward
to make a selection.
Note:
An indicator illuminates next to the
active selection. Lamps off. Parking lamps, instrument panel
lamps, license plate lamps and rear
lamps.
Autolamps.
Headlamps on.
Note: The lighting control defaults to
autolamps each time you switch your vehicle
on.
Switching High Beam Headlamps On
and Off 98
Corsair (CTF) Canada/United States of America, enUSA, Edition date: 201906, Second-Printing LightingE281338 E265031 E281240 E270968 E273182
Page 155 of 591
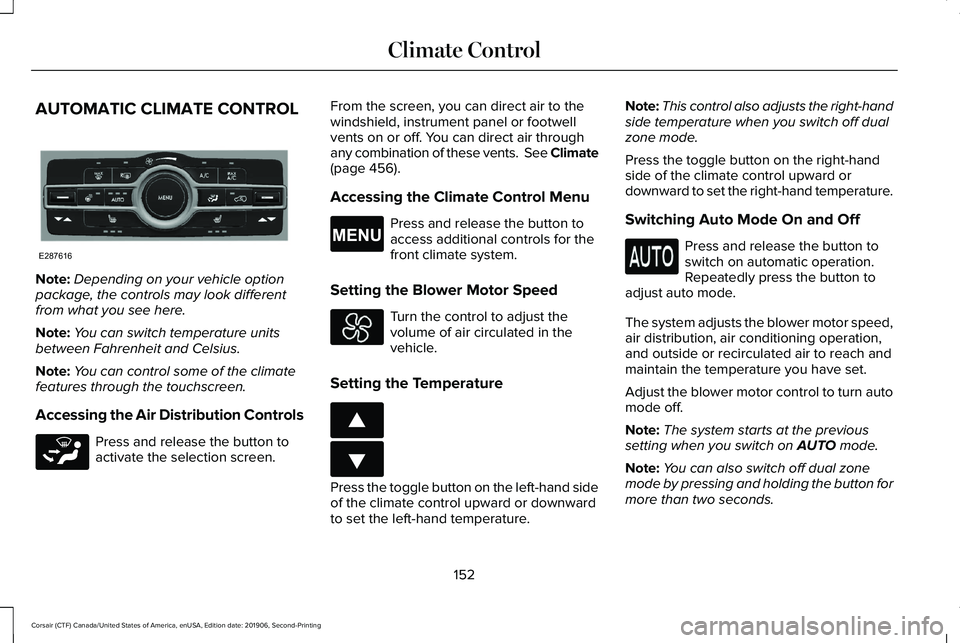
AUTOMATIC CLIMATE CONTROL
Note:
Depending on your vehicle option
package, the controls may look different
from what you see here.
Note: You can switch temperature units
between Fahrenheit and Celsius.
Note: You can control some of the climate
features through the touchscreen.
Accessing the Air Distribution Controls Press and release the button to
activate the selection screen. From the screen, you can direct air to the
windshield, instrument panel or footwell
vents on or off. You can direct air through
any combination of these vents. See Climate
(page 456).
Accessing the Climate Control Menu Press and release the button to
access additional controls for the
front climate system.
Setting the Blower Motor Speed Turn the control to adjust the
volume of air circulated in the
vehicle.
Setting the Temperature Press the toggle button on the left-hand side
of the climate control upward or downward
to set the left-hand temperature.Note:
This control also adjusts the right-hand
side temperature when you switch off dual
zone mode.
Press the toggle button on the right-hand
side of the climate control upward or
downward to set the right-hand temperature.
Switching Auto Mode On and Off Press and release the button to
switch on automatic operation.
Repeatedly press the button to
adjust auto mode.
The system adjusts the blower motor speed,
air distribution, air conditioning operation,
and outside or recirculated air to reach and
maintain the temperature you have set.
Adjust the blower motor control to turn auto
mode off.
Note: The system starts at the previous
setting when you switch on
AUTO mode.
Note: You can also switch off dual zone
mode by pressing and holding the button for
more than two seconds.
152
Corsair (CTF) Canada/United States of America, enUSA, Edition date: 201906, Second-Printing Climate ControlE287616 E265283 E265038 E266187 E266186
Page 157 of 591

The left-hand and right-hand settings set to
LO, recirculated air flows through the
instrument panel air vents, air conditioning
turns on and the blower motor adjusts to the
highest speed.
Switching Maximum Defrost On and
Off
Press and release the button for
maximum defrosting.
The left-hand and right-hand temperatures
are set to HI, air flows through the windshield
air vents, and the blower motor adjusts to
the highest speed.
Air flows through the windshield air vents,
and the blower motor adjusts to the highest
speed.
You can also use this setting to defog and
clear the windshield of a thin covering of ice.
Note: To prevent window fogging, you
cannot select recirculated air when
maximum defrost is on.
Note: The heated rear window also turns on
when you select maximum defrost. Switching Recirculated Air On and Off Press and release the button to
switch between outside air and
recirculated air.
The air currently in the passenger
compartment recirculates. This may reduce
the time needed to cool the interior, when
used with A/C, and reduce unwanted odors
from entering your vehicle.
Note: Recirculated air may turn off, or
prevent you from switching on, in all air flow
modes except MAX A/C to reduce the risk
of fogging. Recirculation may also turn on
and off in various air distribution control
combinations during hot weather to improve
cooling efficiency.
HINTS ON CONTROLLING THE
INTERIOR CLIMATE
General Hints
Note: Prolonged use of recirculated air may
cause the windows to fog up. Note:
You may feel a small amount of air
from the footwell air vents regardless of the
air distribution setting.
Note: To reduce humidity build-up inside
your vehicle, do not drive with the system
switched off or with recirculated air always
switched on.
Note: Do not place objects under the front
seats as this may interfere with the airflow
to the rear seats.
Note: Remove any snow, ice or leaves from
the air intake area at the base of the
windshield.
Note: To improve the time to reach a
comfortable temperature in hot weather,
drive with the windows open until you feel
cold air through the air vents.
Automatic Climate Control
Note: Adjusting the settings when your
vehicle interior is extremely hot or cold is not
necessary. Automatic mode is best
recommended to maintain set temperature.
154
Corsair (CTF) Canada/United States of America, enUSA, Edition date: 201906, Second-Printing Climate Control
Page 158 of 591
Note:
The system adjusts to heat or cool the
interior to the temperature you select as
quickly as possible.
Note: For the system to function efficiently,
the instrument panel and side air vents
should be fully open.
Note: If you select AUTO during cold outside
temperatures, the system directs air flow to
the windshield and side window air vents. In
addition, the blower motor may run at a
slower speed until the engine warms up.
Note: If you select
AUTO during hot
temperatures and the inside of the vehicle
is hot, the system uses recirculated air to
maximize interior cooling. Blower motor
speed may also reduce until the air cools.
Quickly Heating the Interior
1. Press and release
AUTO.
2. Adjust the temperature function to the setting you prefer.
Recommended Settings for Heating
1. Press and release
AUTO. 2. Adjust the temperature function to the
setting you prefer. Use
72°F (22°C) as a
starting point, then adjust the setting as
necessary.
Quickly Cooling the Interior
1. Press and release
MAX A/C.
Recommended Settings for Cooling
1. Press and release
AUTO.
2. Adjust the temperature function to the setting you prefer. Use
72°F (22°C) as a
starting point, then adjust the setting as
necessary.
Defogging the Side Windows in Cold
Weather
1. Press and release defrost or maximum defrost.
2. Adjust the temperature control to the setting you prefer. Use
72°F (22°C) as a
starting point, then adjust the setting as
necessary. HEATED WINDSHIELD
(IF EQUIPPED)
Windshield Wiper De-Icer When you switch the heated rear
window on, the windshield wiper
de-icer turns on.
HEATED REAR WINDOW Press the button to clear the rear
window of thin ice and fog. The
heated rear window turns off after
a short period of time.
Note: Do not use harsh chemicals, razor
blades or other sharp objects to clean or
remove decals from the inside of the heated
rear window. The vehicle warranty may not
cover damage to the heated rear window
grid lines.
HEATED EXTERIOR MIRRORS
When you switch the heated rear window
on, the heated exterior mirrors turn on.
155
Corsair (CTF) Canada/United States of America, enUSA, Edition date: 201906, Second-Printing Climate ControlE184884 E184884
Page 159 of 591

Note:
Do not remove ice from the mirrors
with a scraper or adjust the mirror glass
when it is frozen in place.
Note: Do not clean the mirror housing or
glass with harsh abrasives, fuel or other
petroleum-based cleaning products. The
vehicle warranty may not cover damage
caused to the mirror housing or glass.
CABIN AIR FILTER
The cabin air filter is under the instrument
panel in the passenger footwell area or
under the center console on the passenger
side.
The system filters airborne particles such as
dust, spores and pollen in the air supplied to
and recirculated in the interior of your
vehicle.
Make sure you have a cabin air filter installed
at all times. Running the system without a
filter in place could degrade or damage the
system. Your vehicle cabin air filter gives you and
your passengers the following benefits:
•
It improves your driving comfort by
reducing particle concentration.
• It improves the interior compartment
cleanliness.
• It protects the climate control
components from particle deposits.
Change the air filter element at the proper
intervals. See Scheduled Maintenance
(page 502).
For additional cabin air filter information, or
to replace the filter, see an authorized dealer.
REMOTE START
(IF EQUIPPED)
The system adjusts the interior temperature
depending on your chosen settings during
remote start.
You cannot adjust the climate control setting
during remote start operation. When you
switch the ignition on, the climate control
system returns to the previous settings. You
can now make adjustments. Some features may remain on if they turn on
during remote start:
•
Driver heated seat.
• Driver ventilated seat.
• Heated steering wheel.
• Heated mirrors.
• Heated rear window.
• Windshield wiper de-icer.
Note: If the passenger heated or ventilated
seats are on when you switch the vehicle
off, they default to the driver setting when
you switch the vehicle on.
You can adjust the default remote start
settings using the information display
controls. See Information Displays (page
123).
Automatic Settings
In hot weather, the system sets to
72°F
(22°C). The ventilated seats set to high (if
available, and if you select AUTO in the
information display).
156
Corsair (CTF) Canada/United States of America, enUSA, Edition date: 201906, Second-Printing Climate Control
Page 181 of 591

12 Volt DC Power Point
WARNING: Do not plug optional
electrical accessories into the cigar lighter
socket. Incorrect use of the cigar lighter
can cause damage not covered by the
vehicle warranty, and can result in fire or
serious injury.
Note: When you switch the ignition on, you
can use the socket to power 12 volt
appliances with a maximum current rating
of 15 amps.
Note: If the power supply does not work after
you switch the ignition off, switch the ignition
on.
Note: Do not hang any accessory from the
accessory plug.
Note: Do not use the power point over the
vehicle capacity of 12 volt DC 180 watts or
a fuse may blow.
Note: Always keep the power point caps
closed when not in use. Do not insert objects other than an accessory
plug into the power point. This damages the
power point and may blow the fuse.
Run the vehicle for full capacity use of the
power point.
To prevent the battery from running out of
charge:
•
Do not use the power point longer than
necessary when the vehicle is not
running.
• Do not leave devices plugged in
overnight or when you park your vehicle
for extended periods.
USB Port and Power Point Locations
USB Ports and Power Points may be in the
following locations:
• On the lower instrument panel.
• Inside the center console.
• On the front of the center console.
• On the rear of the center console.
• In the cargo area.
• On the passenger side floor panel.
• 3rd row on the quarter trim panels. Note:
Some of the USB ports may not have
data transfer capabilities.
Note: Incorrect use of the USB ports can
cause damage not covered by the vehicle
warranty.
110 Volt AC Power Point
(If Equipped) WARNING:
Do not keep electrical
devices plugged in the power point
whenever the device is not in use. Do not
use any extension cord with the 110 volt
AC power point, since it will defeat the
safety protection design. Doing so may
cause the power point to overload due to
powering multiple devices that can reach
beyond the 150 watt load limit and could
result in fire or serious injury.
Note: The power point turns off when you
switch off the ignition, when the vehicle is
not in accessory mode or when the battery
voltage drops below 11 volts.
You can use the power point for electric
devices that require up to 150 watts. It is on
the rear of the center console.
178
Corsair (CTF) Canada/United States of America, enUSA, Edition date: 201906, Second-Printing Auxiliary Power Points
Page 193 of 591
If the instrument cluster is
equipped with a grey
Auto-Start-Stop indicator light, it is
illuminated when automatic engine stop is
not available due to one of the above noted
conditions not being met.
Automatic Engine Restart
Any of the following conditions will result in
an automatic restart of the engine:
• Your foot is removed from the brake
pedal.
• You press the accelerator pedal.
• You press the accelerator and the brake
pedal at the same time.
• The driver safety belt becomes
unfastened or the driver door is ajar.
• Your vehicle is moving.
• The interior compartment does not meet
customer comfort when air conditioning
or heat is on.
• Fogging of the windows could occur and
the air conditioning is on. •
The battery is not within optimal
operating conditions.
• The maximum engine off time is
exceeded.
• When you press the Auto-Start-Stop
button while the engine is stopped
automatically.
• The heated windshield is turned on.
Any of the following conditions may result in
an automatic restart of the engine:
• The blower fan speed is increased or the
climate control temperature is changed.
• An electrical accessory is turned on or
plugged in. Disabling Auto-Start-Stop Press the button on the instrument panel to
access the Auto-Start-Stop feature on the
touchscreen. Use the touchscreen to
deactivate the feature. Deactivating the
feature lasts only 1 key cycle. Use the
touchscreen to restore Auto-Start-Stop
function.
190
Corsair (CTF) Canada/United States of America, enUSA, Edition date: 201906, Second-Printing Unique Driving CharacteristicsE146361 E307324
Page 209 of 591
SelectShift in drive (D):
Provides a temporary manual mode for
performing more demanding maneuvers
where extra control of gear selection is
required (for example, when towing, downhill
driving or overtaking). This mode holds a
selected gear for a temporary period of time
dependent on driver inputs (for example,
steering or accelerator pedal input).
In SelectShift mode, the instrument cluster
displays your currently selected gear. If you
request a gear, but it is not available due to
vehicle conditions, low speed, too high
engine speed for requested gear selection,
the current gear briefly flashes.
Note:
At full accelerator pedal travel, the
transmission downshifts for maximum
performance. Note:
In low traction conditions, you can pull
away in second gear using SelectShift. To
perform this operation, select drive (D) and
press the (+) paddle until 2 is displayed on
the cluster. Your vehicle is now ready to
move in 2nd gear.
Manual Park Release WARNING: When doing this
procedure, you need to take the
transmission out of park (P) which means
your vehicle can roll freely. To avoid
unwanted vehicle movement, always fully
apply the parking brake prior to doing this
procedure. Use wheels chocks if
appropriate. WARNING:
If the parking brake is
fully released, but the brake warning lamp
remains illuminated, the brakes may not
be working properly. Have your vehicle
checked as soon as possible. WARNING: Do not drive your vehicle
until you verify that the stoplamps are
working.
Use the manual park release to move your
transmission from the park (P) position in the
event of an electrical malfunction or
emergency.
Activating the Manual Park Release Cable
1. Apply the parking brake.
See Electric
Parking Brake (page 215).
Note: If the vehicle battery is dead, for
example, no electrical power is available,
you could require external power to apply
the parking brake.
2. Locate the Manual Park Release cable access cover on the lower instrument
panel dash to the bottom left hand side
of the steering column.
206
Corsair (CTF) Canada/United States of America, enUSA, Edition date: 201906, Second-Printing Transmission