2020 LINCOLN CORSAIR ignition
[x] Cancel search: ignitionPage 303 of 591
The fuel pump shutoff stops the flow of fuel
to the engine in the event of a moderate to
severe crash. Not every impact causes a
shutoff.
Should your vehicle shut off after a crash,
you may restart your vehicle.
If your vehicle has a key system:
1. Switch off the ignition.
2. Switch to start position.
3. Switch off the ignition.
4. Switch on the ignition to re-enable the
fuel pump.
5. If the vehicle does not start, repeat steps
1 through 4.
If your vehicle has a push button start
system:
1. Press START/STOP to switch off your
vehicle.
2. Press the brake pedal and
START/STOP
to switch on your vehicle.
3. Remove your foot from the brake pedal and press
START/STOP to switch off
your vehicle. 4. You can attempt to start the vehicle by
pressing the brake pedal and
START/STOP
, or press START/STOP
without pressing the brake pedal.
5. If the vehicle does not start, repeat steps
1 through 4.
JUMP STARTING THE VEHICLE WARNING:
Batteries normally
produce explosive gases which can cause
personal injury. Therefore, do not allow
flames, sparks or lighted substances to
come near the battery. When working near
the battery, always shield your face and
protect your eyes. Always provide correct
ventilation. WARNING:
Keep batteries out of
reach of children. Batteries contain sulfuric
acid. Avoid contact with skin, eyes or
clothing. Shield your eyes when working
near the battery to protect against possible
splashing of acid solution. In case of acid
contact with skin or eyes, flush immediately
with water for a minimum of 15 minutes and
get prompt medical attention. If acid is
swallowed, call a physician immediately. WARNING:
Use only adequately
sized cables with insulated clamps. WARNING: Make sure that the cables
are clear of any moving parts and fuel
delivery system parts.
Note: Do not attempt to push-start your
automatic transmission vehicle. Attempting
to push-start a vehicle with an automatic
transmission may cause transmission
damage.
Note: Do not disconnect the battery of the
disabled vehicle as this could damage the
vehicle electrical system.
300
Corsair (CTF) Canada/United States of America, enUSA, Edition date: 201906, Second-Printing Roadside Emergencies
Page 325 of 591

Passenger Compartment Fuse Box
The fuse box is below the glove
compartment. Protected Component
Fuse Rating
Fuse Location
Not used.
5 A
1
Rear heated seats.
5 A
2
Pedestrian sounder.
10 A
3
Ignition switch.
10 A
4
Lock.
20 A
5
322
Corsair (CTF) Canada/United States of America, enUSA, Edition date: 201906, Second-Printing FusesE293328
Page 345 of 591
A message could appear in the information
display to alert you that battery protection
actions are active. These messages are only
for notification that an action is taking place,
and not intended to indicate an electrical
problem or that the battery requires
replacement.
After battery replacement, or in some cases,
after charging the battery with an external
charger, the battery management system
requires eight hours of vehicle sleep time to
relearn the battery state of charge. During
this time, keep your vehicle fully locked with
the ignition switched off.
Note:
Prior to relearning the battery state of
charge, the battery management system
could temporarily disable some electrical
systems. Electrical Accessory Installation
To make sure the battery management
system works correctly, do not connect an
electrical device ground connection directly
to the battery negative post. This can cause
inaccurate measurements of the battery
condition and potential incorrect system
operation.
Note:
If you add electrical accessories or
components to the vehicle, it could adversely
affect battery performance and durability.
This could also affect the performance of
other electrical systems in the vehicle.
Battery Disposal Make sure that you dispose of old
batteries in an environmentally
friendly way. Seek advice from
your local authority about recycling old
batteries. ADJUSTING THE HEADLAMPS
Vertical Aim Adjustment
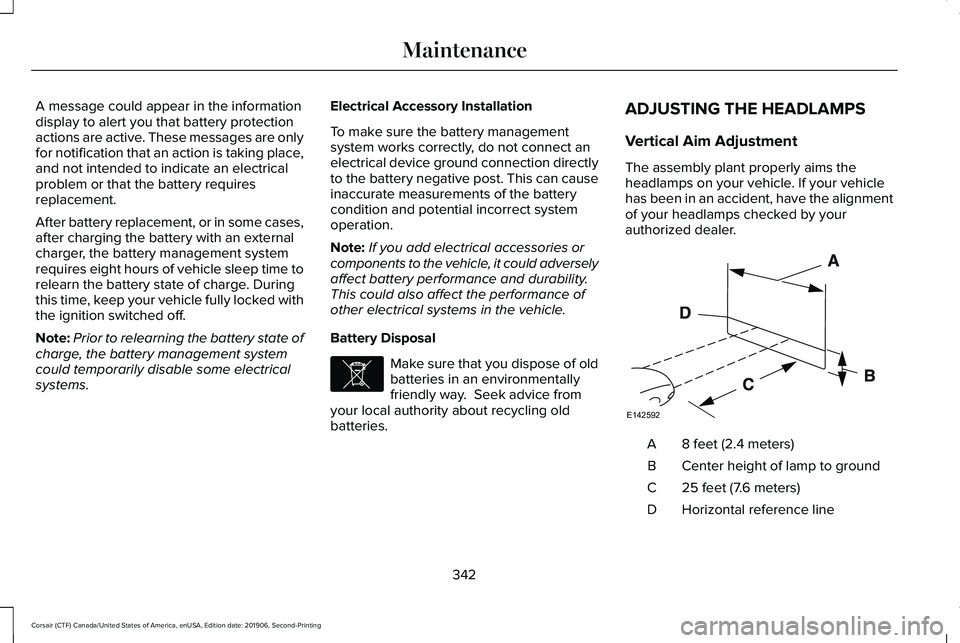
The assembly plant properly aims the
headlamps on your vehicle. If your vehicle
has been in an accident, have the alignment
of your headlamps checked by your
authorized dealer.
8 feet (2.4 meters)
A
Center height of lamp to ground
B
25 feet (7.6 meters)
C
Horizontal reference line
D
342
Corsair (CTF) Canada/United States of America, enUSA, Edition date: 201906, Second-Printing MaintenanceE107998 E142592
Page 347 of 591

State or local regulations on volatile organic
compounds may restrict the use of methanol,
a common windshield washer antifreeze
additive. Washer fluids containing
non-methanol antifreeze agents should be
used only if they provide cold weather
protection without damaging the vehicle
’s
paint finish, wiper blades or washer system.
FUEL FILTER
Your vehicle is equipped with a lifetime fuel
filter that is integrated with the fuel tank.
Regular maintenance or replacement is not
needed.
CHECKING THE WIPER BLADES Run the tip of your fingers over the edge of
the blade to check for roughness.
Clean the wiper blades with washer fluid or
water applied with a soft sponge or cloth.
CHANGING THE WIPER BLADES
Clean the wiper blades and the windshield
to improve wiper performance.
Note:
Do not move the wiper arm when the
ignition is on as it may cause damage to the
wiper motor.
Replace the wiper blades at least annually
for optimum performance. Front Wiper Blades 1. Lift the wiper arm and then press the
wiper blade locking buttons together.
Note: Do not hold the wiper blade when
lifting the wiper arm.
Note: Make sure that the wiper arm does
not spring back against the glass when the
wiper blade is not attached.
2. Slightly rotate the wiper blade.
3. Remove the wiper blade.
4. Install in the reverse order.
Note: Make sure that the wiper blade locks
into place.
344
Corsair (CTF) Canada/United States of America, enUSA, Edition date: 201906, Second-Printing MaintenanceE142463 E129990
1
1 2
Page 352 of 591
•
Do not allow wax to come in contact with
any non-body (low-gloss black) colored
trim. The wax will discolor or stain the
parts over time.
•Roof racks.
• Bumpers.
• Grained door handles.
• Side moldings.
• Mirror housings.
• Windshield cowl area.
• Do not apply wax to glass areas.
• After waxing, your car's paint should feel
smooth, and be free of streaks and
smudges.
CLEANING THE ENGINE
Engines are more efficient when they are
clean because grease and dirt buildup keep
the engine warmer than normal. When washing:
•
Take care when using a power washer
to clean the engine. The high-pressure
fluid could penetrate the sealed parts
and cause damage.
• Do not spray a hot engine with cold water
to avoid cracking the engine block or
other engine components.
• Spray Motorcraft Engine Shampoo and
Degreaser on all parts that require
cleaning and pressure rinse clean. In
Canada, use Motorcraft Engine Shampoo.
Note: If your vehicle has an engine cover
remove the cover before application of
Motorcraft Engine Shampoo and Degreaser.
Immediately rinse away any over spray.
• Never wash or rinse the engine while it
is hot or running; water in the running
engine may cause internal damage.
• Never wash or rinse any ignition coil,
spark plug wire or spark plug well, or the
area in and around these locations.
• Cover the battery, power distribution box,
and air filter assembly to prevent water
damage when cleaning the engine. CLEANING THE WINDOWS AND
WIPER BLADES
Car wash chemicals and environmental
fallout can result in windshield and wiper
blade contamination. Dirty windshield and
wipers will result in poor windshield wiper
operation. Keep the windshield and wiper
blades clean to maintain windshield wiper
performance.
To clean the windshield and wiper blades:
•
Clean the windshield with a non-abrasive
glass cleaner. When cleaning the interior
of the windshield, avoid getting any glass
cleaner on the instrument panel or door
panels. Wipe any glass cleaner off these
surfaces immediately.
• For windshields contaminated with tree
sap, chemicals, wax or bugs, clean the
entire windshield using steel wool (no
greater than 0000 grade) in a circular
motion and rinse with water.
• Clean the wiper blades with isopropyl
rubbing alcohol or windshield washer
concentrate.
349
Corsair (CTF) Canada/United States of America, enUSA, Edition date: 201906, Second-Printing Vehicle Care
Page 382 of 591

WARNING: The jack supplied with
this vehicle is only intended for changing
wheels. Do not use the vehicle jack other
than when you are changing a wheel in an
emergency. WARNING:
Ensure screwthread is
adequately lubricated before use. WARNING:
Check that the vehicle
jack is not damaged or deformed and the
thread is lubricated and clean. WARNING: The jack should be used
on level firm ground wherever possible. WARNING:
Use only the specified
jacking points. If you use other positions,
you may damage the body, steering,
suspension, engine, braking system or the
fuel lines. WARNING:
Switch the ignition off
and apply the park brake fully before lifting
vehicle. WARNING:
Park your vehicle so that
you do not obstruct the flow of traffic or
place yourself in any danger and set up a
warning triangle. WARNING:
Do not get under a
vehicle that is only supported by a vehicle
jack. Note:
The jack does not require
maintenance or additional lubrication over
the service life of your vehicle.
1. Park on a level surface, set the parking brake and activate the hazard flashers.
2. Place the transmission in park (P) and turn the engine off. 3.
Lift and remove the carpeted cargo area
floor behind the rear seats to access the
spare tire and jack.
4. Remove the wing nut that secures the spare tire by turning it counterclockwise.
5. Remove the spare tire and jack kit from the spare tire compartment.
6. Remove the jack and the flat tire retainer
strap from the jack base. 7. Turn the jack hex nut drive screw
counterclockwise to detach the lug
wrench from the jack. This lowers the
jack and releases the mechanical lock.
379
Corsair (CTF) Canada/United States of America, enUSA, Edition date: 201906, Second-Printing Wheels and TiresE166722 E309224
Page 389 of 591
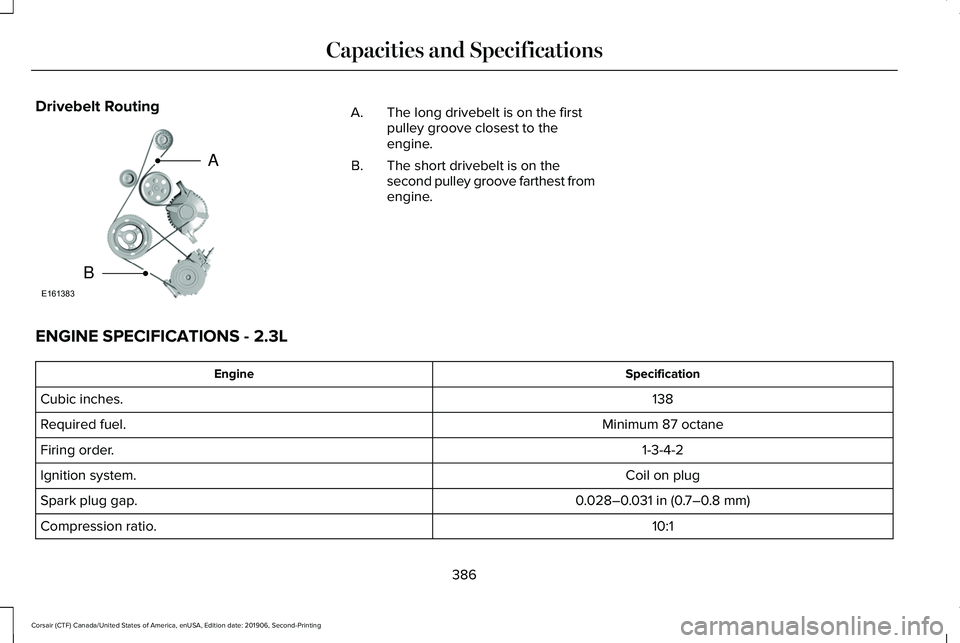
Drivebelt Routing
The long drivebelt is on the first
pulley groove closest to the
engine.
A.
The short drivebelt is on the
second pulley groove farthest from
engine.
B.
ENGINE SPECIFICATIONS - 2.3L Specification
Engine
138
Cubic inches.
Minimum 87 octane
Required fuel.
1-3-4-2
Firing order.
Coil on plug
Ignition system.
0.028–0.031 in (0.7–0.8 mm)
Spark plug gap.
10:1
Compression ratio.
386
Corsair (CTF) Canada/United States of America, enUSA, Edition date: 201906, Second-Printing Capacities and SpecificationsE161383
A
B
Page 417 of 591
CONNECTING THE VEHICLE TO A
MOBILE NETWORK
What Is the Modem
The modem allows you to connect your
vehicle to the Internet to use when you are
on the road.
If you enable the modem using the Lincoln
Way app, you can access the following
services:
•
Locating and remotely starting, locking
and unlocking your vehicle. See the
information in the Lincoln Way app.
• Automatic system updates. Note:
We may need to update operating
system software on your vehicle to keep
connected services updated without prior
notice to you.
Enabling the Modem Using The Lincoln
Way
1. Open the Lincoln Way app on your device and log in.
2. Select your vehicle.
3. Select the option for vehicle details.
4. Select the option to activate your vehicle.
5. Switch the ignition on. 6. Make sure that the name on the screen
matches the name shown in your Lincoln
Way account.
7. Confirm the association of your vehicle with your Lincoln Way account.
Enabling the Modem Using the
Touchscreen Select the settings option on the
feature bar.
1. Select Lincoln Connect .
2. Select
Connectivity Settings.
3. Switch connectivity features on.
414
Corsair (CTF) Canada/United States of America, enUSA, Edition date: 201906, Second-Printing Network ConnectivityE280315