2020 LINCOLN CONTINENTAL manual transmission
[x] Cancel search: manual transmissionPage 79 of 609

Note:
You cannot open the door again
without a fully charged and operational
vehicle battery.
Unlocking the Driver Door with the Key
Blade
If your vehicle has no power and the backup
power system disables, you can manually
unlock the driver door using a key in the
position shown. 1. Remove the key blade from the
transmitter.
2. Insert the key blade into the lock cylinder.
3. Turn the key clockwise to unlock the driver door.
Note: All other doors remain locked. Smart Unlocks for Intelligent Access
Keys
This feature helps to prevent you from
locking your intelligent access key inside
your vehicle
’s passenger compartment or
rear cargo area.
When you electronically lock your vehicle
with any door open, the transmission is in
park (P) and the ignition is off, the system
searches for an intelligent access key inside
your vehicle after you close the last door. If
the system finds a key, all the doors
immediately unlock and the horn sounds
twice, indicating that a key is inside.
You can override the smart unlock feature
and intentionally lock the intelligent access
key inside your vehicle.
To do this, lock your vehicle after you have
closed all the doors by:
• Using the keyless entry keypad.
• Pressing the lock button on another
intelligent access key.
• Touching the locking sensor on the door
window trim with another intelligent
access key in your hand.
76
Continental (CPL) Canada/United States of America, enUSA, Edition date: 201907, Second-Printing Doors and LocksE222424
Page 102 of 609

Note:
If you switch the autolamps and the
autowipers on, the headlamps turn on when
the windshield wipers continuously operate.
INSTRUMENT LIGHTING DIMMER
The instrument lighting dimmer buttons are
on the lighting control. Repeatedly press one of the
buttons to adjust the brightness.
HEADLAMP EXIT DELAY
After you switch the ignition off, you can
switch the headlamps on by pulling the
direction indicator lever toward you. You will
hear a short tone. The headlamps will switch
off automatically after three minutes with any
door open or 30 seconds after the last door
has been closed. You can cancel this feature
by pulling the direction indicator toward you
again or switching the ignition on. DAYTIME RUNNING LAMPS -
VEHICLES WITH: CONFIGURABLE
DAYTIME RUNNING LAMPS WARNING: The daytime running
lamps system does not activate the rear
lamps and may not provide adequate
lighting during low visibility driving
conditions. Make sure you switch the
headlamps on, as appropriate, during all
low visibility conditions. Failure to do so
may result in a crash.
Switch the daytime running lamps on or off
using the information display.
See General
Information (page 117).
The daytime running lamps turn on when:
1. The lamps are on in the information display.
2. You switch the ignition on.
3. The transmission is not in park (P) for vehicles with automatic transmissions or
you release the parking brake for
vehicles with manual transmissions. 4. The lighting control is in the autolamps
position.
5. The headlamps are off.
The other lighting control switch positions
do not turn on the daytime running lamps.
If the daytime running lamps are off in the
information display, the lamps stay off in all
switch positions.
DAYTIME RUNNING LAMPS -
VEHICLES WITH: DAYTIME
RUNNING LAMPS (DRL) WARNING: The daytime running
lamps system does not activate the rear
lamps and may not provide adequate
lighting during low visibility driving
conditions. Make sure you switch the
headlamps on, as appropriate, during all
low visibility conditions. Failure to do so
may result in a crash.
The system turns the lamps on in daylight
conditions.
99
Continental (CPL) Canada/United States of America, enUSA, Edition date: 201907, Second-Printing LightingE291299 E291298
Page 112 of 609

The mirror will dim automatically to reduce
glare when bright lights are detected from
behind your vehicle. It will automatically
return to normal reflection when you select
reverse gear to make sure you have a clear
view when backing up.
SUN VISORS
Rotate the sun visor toward the side window
and extend it rearward for extra shade. Illuminated Vanity Mirror
Lift the cover to switch the lamp on.
SUN SHADES
Note:
Do not try to move the sun shade
manually.
The power rear sun shade covers the rear
window of the vehicle. A control is on the overhead console and on
the rear seat armrest bezel.
Press and release the control to open or
close the sun shade. To stop motion and
return the sun shade to its previous position,
press the control a second time.
The sun shade automatically retracts when
you shift the transmission into reverse (R).
109
Continental (CPL) Canada/United States of America, enUSA, Edition date: 201907, Second-Printing Windows and MirrorsE138666 E162197 E222384
Page 146 of 609

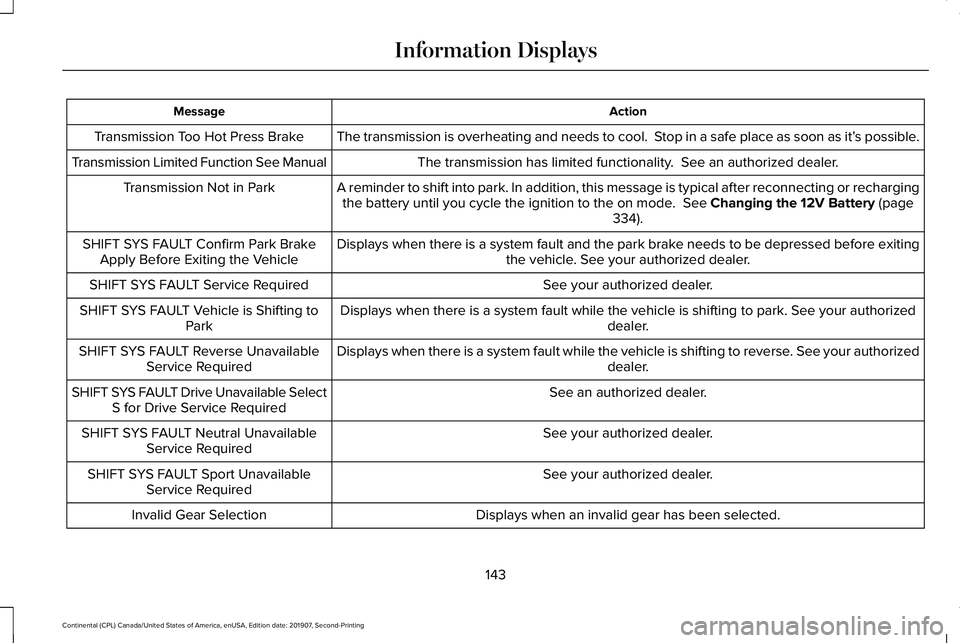
Action
Message
The transmission is overheating and needs to cool. Stop in a safe place as soon as it’ s possible.
Transmission Too Hot Press Brake
The transmission has limited functionality. See an authorized dealer.
Transmission Limited Function See Manual
A reminder to shift into park. In addition, this message is typical afte\
r reconnecting or rechargingthe battery until you cycle the ignition to the on mode. See Changing the 12V Battery (page
334).
Transmission Not in Park
Displays when there is a system fault and the park brake needs to be depressed before exitingthe vehicle. See your authorized dealer.
SHIFT SYS FAULT Confirm Park Brake
Apply Before Exiting the Vehicle
See your authorized dealer.
SHIFT SYS FAULT Service Required
Displays when there is a system fault while the vehicle is shifting to p\
ark. See your authorized dealer.
SHIFT SYS FAULT Vehicle is Shifting to
Park
Displays when there is a system fault while the vehicle is shifting to r\
everse. See your authorized dealer.
SHIFT SYS FAULT Reverse Unavailable
Service Required
See an authorized dealer.
SHIFT SYS FAULT Drive Unavailable Select
S for Drive Service Required
See your authorized dealer.
SHIFT SYS FAULT Neutral Unavailable
Service Required
See your authorized dealer.
SHIFT SYS FAULT Sport Unavailable
Service Required
Displays when an invalid gear has been selected.
Invalid Gear Selection
143
Continental (CPL) Canada/United States of America, enUSA, Edition date: 201907, Second-Printing Information Displays
Page 202 of 609

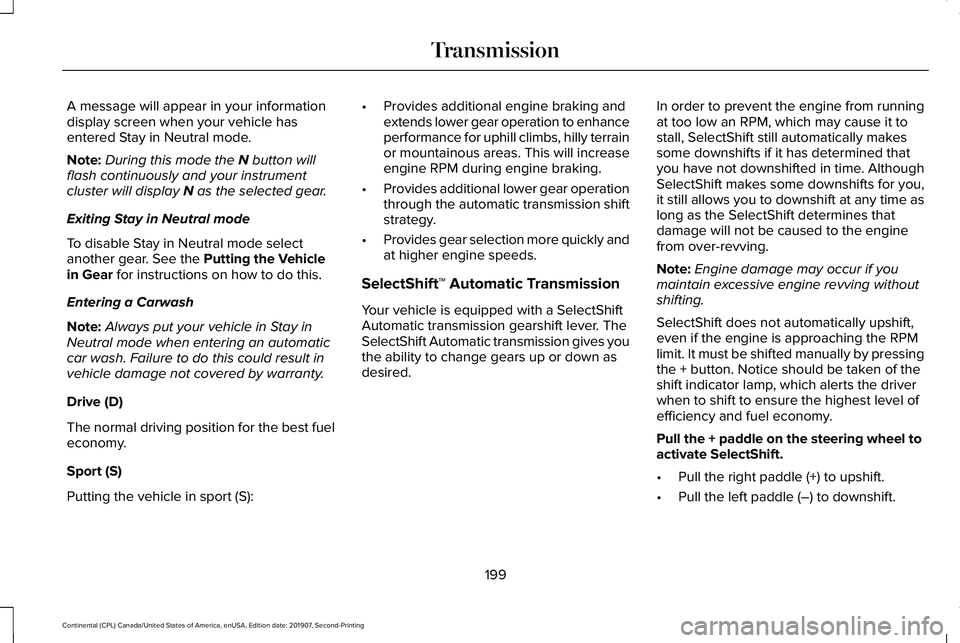
A message will appear in your information
display screen when your vehicle has
entered Stay in Neutral mode.
Note:
During this mode the N button will
flash continuously and your instrument
cluster will display
N as the selected gear.
Exiting Stay in Neutral mode
To disable Stay in Neutral mode select
another gear. See the
Putting the Vehicle
in Gear for instructions on how to do this.
Entering a Carwash
Note: Always put your vehicle in Stay in
Neutral mode when entering an automatic
car wash. Failure to do this could result in
vehicle damage not covered by warranty.
Drive (D)
The normal driving position for the best fuel
economy.
Sport (S)
Putting the vehicle in sport (S): •
Provides additional engine braking and
extends lower gear operation to enhance
performance for uphill climbs, hilly terrain
or mountainous areas. This will increase
engine RPM during engine braking.
• Provides additional lower gear operation
through the automatic transmission shift
strategy.
• Provides gear selection more quickly and
at higher engine speeds.
SelectShift™ Automatic Transmission
Your vehicle is equipped with a SelectShift
Automatic transmission gearshift lever. The
SelectShift Automatic transmission gives you
the ability to change gears up or down as
desired. In order to prevent the engine from running
at too low an RPM, which may cause it to
stall, SelectShift still automatically makes
some downshifts if it has determined that
you have not downshifted in time. Although
SelectShift makes some downshifts for you,
it still allows you to downshift at any time as
long as the SelectShift determines that
damage will not be caused to the engine
from over-revving.
Note:
Engine damage may occur if you
maintain excessive engine revving without
shifting.
SelectShift does not automatically upshift,
even if the engine is approaching the RPM
limit. It must be shifted manually by pressing
the + button. Notice should be taken of the
shift indicator lamp, which alerts the driver
when to shift to ensure the highest level of
efficiency and fuel economy.
Pull the + paddle on the steering wheel to
activate SelectShift.
• Pull the right paddle (+) to upshift.
• Pull the left paddle (–) to downshift.
199
Continental (CPL) Canada/United States of America, enUSA, Edition date: 201907, Second-Printing Transmission
Page 203 of 609

SelectShift in drive (D):
•
Provides a temporary manual mode for
performing more demanding maneuvers
where extra control of gear selection is
required (for example, when towing or
overtaking). This mode will hold a
selected gear for a temporary period of
time dependent on driver inputs (for
example, steering or accelerator pedal
input). SelectShift in sport (S):
•
Provides a permanent manual gear
selection where full control of gear
selection is required.
To exit SelectShift mode, shift the
transmission into drive (D).
Upshift to the recommended shift speeds
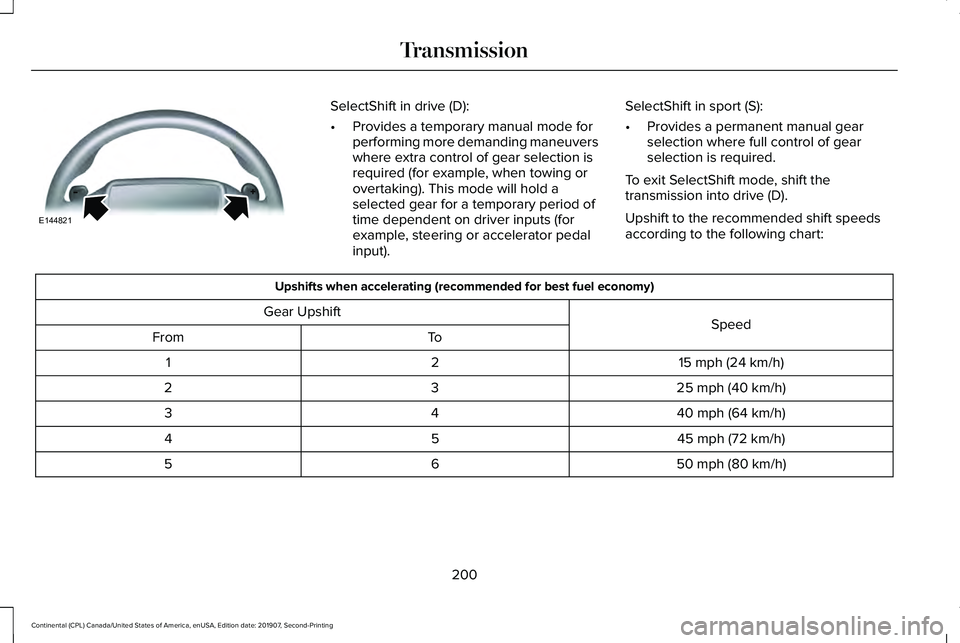
according to the following chart: Upshifts when accelerating (recommended for best fuel economy)
Speed
Gear Upshift
To
From
15 mph (24 km/h)
2
1
25 mph (40 km/h)
3
2
40 mph (64 km/h)
4
3
45 mph (72 km/h)
5
4
50 mph (80 km/h)
6
5
200
Continental (CPL) Canada/United States of America, enUSA, Edition date: 201907, Second-Printing TransmissionE144821
Page 211 of 609

Once through water, always try the brakes.
Wet brakes do not stop the vehicle as
effectively as dry brakes. Drying can be
improved by moving your vehicle slowly
while applying light pressure on the brake
pedal.
Be cautious of sudden changes in vehicle
speed or direction when you are driving in
mud. Even AWD vehicles can lose traction
in slick mud. As when you are driving over
sand, apply the accelerator slowly and avoid
spinning your wheels. If the vehicle does
slide, steer in the direction of the slide until
you regain control of the vehicle.
After driving through mud, clean off residue
stuck to rotating driveshafts and tires. Excess
mud stuck on tires and rotating driveshafts
causes an imbalance that could damage
drive components.
Note:
Driving through deep water may
damage the transmission.
If the front or rear axle is submerged in water,
have the power transfer unit (PTU) or rear
axle serviced by an authorized dealer. Driving on Hilly or Sloping Terrain
Note:
Avoid driving crosswise or turning on
steep slopes or hills. A danger lies in losing
traction, slipping sideways and possibly
rolling over. Whenever driving on a hill,
determine beforehand the route you will use.
Do not drive over the crest of a hill without
seeing what conditions are on the other side.
Do not drive in reverse over a hill without
the aid of an observer.
Although natural obstacles may make it
necessary to travel diagonally up or down a
hill or steep incline, you should always try to
drive straight up or straight down.
When climbing a steep slope or hill, start in
a lower gear rather than downshifting to a
lower gear from a higher gear once the
ascent has started. This reduces strain on
the engine and the possibility of stalling.
If you do stall out, do not try to turnaround
because you might roll over. It is better to
back down to a safe location. Apply just enough power to the wheels to
climb the hill. Too much power will cause the
tires to slip, spin or lose traction, resulting in
loss of vehicle control.
Descend a hill in the same gear you would
use to climb up the hill to avoid excessive
brake application and brake overheating. Do
not descend in neutral; instead, disengage
overdrive or manually shift to a lower gear.
When descending a steep hill, avoid sudden
hard braking as you could lose control. The
front wheels have to be turning in order to
steer the vehicle.
208
Continental (CPL) Canada/United States of America, enUSA, Edition date: 201907, Second-Printing All-Wheel Drive (If Equipped)E143949
Page 217 of 609

Note:
The electric parking brake could
automatically apply when you shift into park
(P). See Transmission (page 197).
Applying the Electric Parking Brake in an
Emergency
Note: Do not apply the electric parking brake
when your vehicle is moving, except in an
emergency. If you repeatedly use the electric
parking brake to slow or stop your vehicle,
you could cause damage to the brake
system.
You can use the electric parking brake to
slow or stop your vehicle in an emergency. Pull the switch upward and hold it.
The red warning lamp illuminates,
a tone sounds and the stoplamps
turn on.
The electric parking brake continues to slow
your vehicle down unless you release the
switch. Manually Releasing the Electric Parking
Brake
Switch the ignition on.
Press and hold the brake pedal.
Push the switch downward.
The red warning lamp turns off.
If it remains illuminated or flashes, the system
has malfunctioned. Have your vehicle
checked as soon as possible.
Pulling Away on a Hill When Towing a
Trailer
Press and hold the brake pedal.
Pull the switch upward and hold it.
Shift into gear. Press the accelerator pedal until engine has
developed sufficient torque to prevent your
vehicle from rolling down the hill. Release the switch and pull away
in a normal manner.
Automatically Releasing the Electric
Parking Brake
Close the driver door.
Shift into gear.
Press the accelerator pedal and pull away in
a normal manner. The red warning lamp turns off.
If it remains illuminated or flashes, the electric
parking brake has not released. Manually
release the parking brake.
214
Continental (CPL) Canada/United States of America, enUSA, Edition date: 201907, Second-Printing BrakesE267156 E270480 E267156 E270480 E267156 E267156 E270480