Page 85 of 609

Stopping the Decklid Movement
Note:
Do not apply sudden excessive force
to the decklid while it is in motion. This could
damage the power decklid and its
components.
You can stop the decklid movement by doing
any of the following:
• Pressing the decklid control button.
• Pressing the remote control button twice.
• Pressing the button on the instrument
panel.
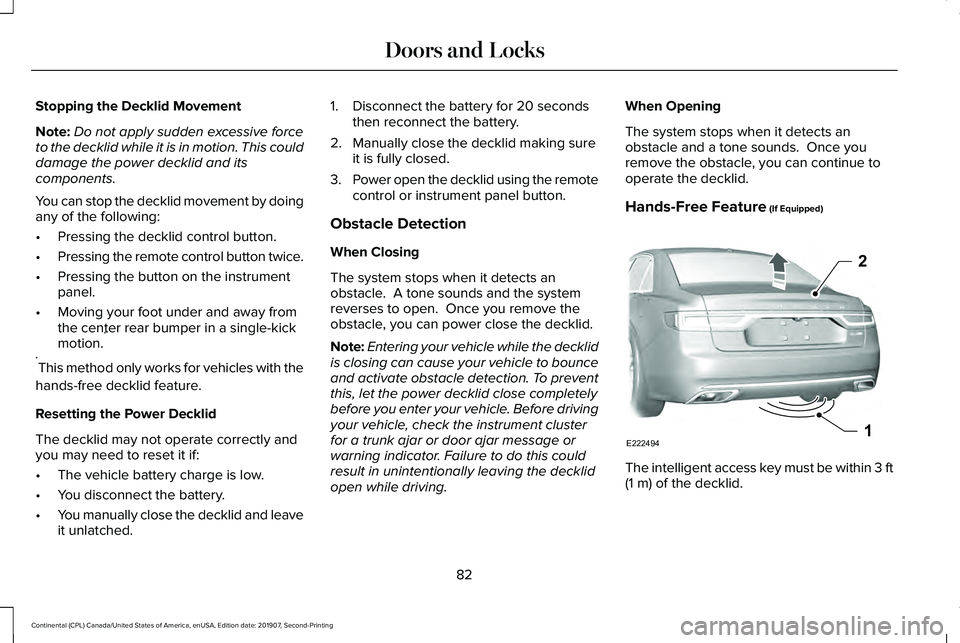
• Moving your foot under and away from
the center rear bumper in a single-kick
motion. *
* This method only works for vehicles with the
hands-free decklid feature.
Resetting the Power Decklid
The decklid may not operate correctly and
you may need to reset it if:
• The vehicle battery charge is low.
• You disconnect the battery.
• You manually close the decklid and leave
it unlatched. 1. Disconnect the battery for 20 seconds
then reconnect the battery.
2. Manually close the decklid making sure it is fully closed.
3. Power open the decklid using the remote
control or instrument panel button.
Obstacle Detection
When Closing
The system stops when it detects an
obstacle. A tone sounds and the system
reverses to open. Once you remove the
obstacle, you can power close the decklid.
Note: Entering your vehicle while the decklid
is closing can cause your vehicle to bounce
and activate obstacle detection. To prevent
this, let the power decklid close completely
before you enter your vehicle. Before driving
your vehicle, check the instrument cluster
for a trunk ajar or door ajar message or
warning indicator. Failure to do this could
result in unintentionally leaving the decklid
open while driving. When Opening
The system stops when it detects an
obstacle and a tone sounds. Once you
remove the obstacle, you can continue to
operate the decklid.
Hands-Free Feature (If Equipped)
The intelligent access key must be within 3 ft
(1 m)
of the decklid.
82
Continental (CPL) Canada/United States of America, enUSA, Edition date: 201907, Second-Printing Doors and LocksE222494
2
1
Page 93 of 609

ADJUSTING THE STEERING WHEEL
WARNING: Do not adjust the steering
wheel when your vehicle is moving.
Note: Make sure that you are sitting in the
correct position. See Sitting in the Correct
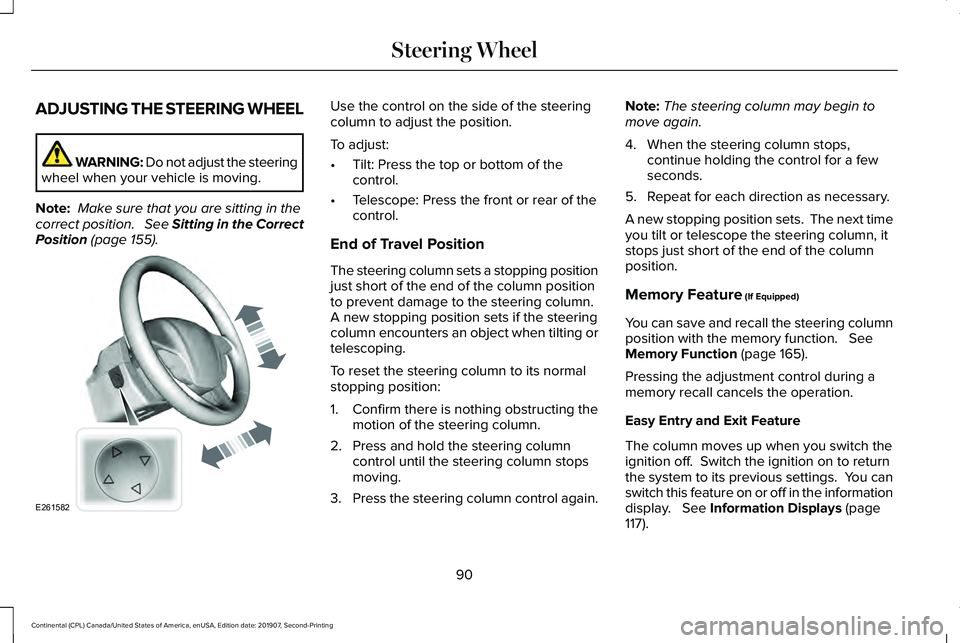
Position (page 155). Use the control on the side of the steering
column to adjust the position.
To adjust:
•
Tilt: Press the top or bottom of the
control.
• Telescope: Press the front or rear of the
control.
End of Travel Position
The steering column sets a stopping position
just short of the end of the column position
to prevent damage to the steering column.
A new stopping position sets if the steering
column encounters an object when tilting or
telescoping.
To reset the steering column to its normal
stopping position:
1. Confirm there is nothing obstructing the motion of the steering column.
2. Press and hold the steering column control until the steering column stops
moving.
3. Press the steering column control again. Note:
The steering column may begin to
move again.
4. When the steering column stops, continue holding the control for a few
seconds.
5. Repeat for each direction as necessary.
A new stopping position sets. The next time
you tilt or telescope the steering column, it
stops just short of the end of the column
position.
Memory Feature
(If Equipped)
You can save and recall the steering column
position with the memory function.
See
Memory Function (page 165).
Pressing the adjustment control during a
memory recall cancels the operation.
Easy Entry and Exit Feature
The column moves up when you switch the
ignition off. Switch the ignition on to return
the system to its previous settings. You can
switch this feature on or off in the information
display.
See Information Displays (page
117).
90
Continental (CPL) Canada/United States of America, enUSA, Edition date: 201907, Second-Printing Steering WheelE261582
Page 108 of 609

POWER WINDOWS
WARNING: Do not leave children
unattended in your vehicle and do not let
them play with the power windows. Failure
to follow this instruction could result in
personal injury. WARNING:
When closing the power
windows, verify they are free of obstruction
and make sure that children and pets are
not in the proximity of the window
openings. Note:
You may hear a pulsing noise when
just one of the windows is open. Lower the
opposite window slightly to reduce this
noise.
Press the switch to open the window.
Lift the switch to close the window.
One-Touch Down
Press the switch fully and release it. Press
again or lift it to stop the window.
One-Touch Up
Lift the switch fully and release it. Press or
lift it again to stop the window.
Resetting One-Touch Up
Start the engine.
1. Lift and hold the window switch until you
fully close the door window. Continue to
hold the switch for a few seconds after
you close the window.
2. Release the window switch.
3. Press and hold the window switch until you fully open the door window. 4. Release the window switch.
5.
Lift and hold the window switch until you
fully close the window.
6. Test for correct window operation by carrying out the one-touch down and
one-touch up features.
Bounce-Back
The window will stop automatically while
closing. It reverses some distance if there
is an obstacle in the way.
Overriding the Bounce-Back Feature WARNING:
When you override the
bounce-back feature the window will not
reverse if it detects an obstacle. Take care
when closing the windows to avoid
personal injury or damage to your vehicle.
Pull up the window switch and hold within a
few seconds of the window reaching the
bounce-back position. The window travels
up with no bounce-back protection. The
window stops if you release the switch
before the window fully closes.
105
Continental (CPL) Canada/United States of America, enUSA, Edition date: 201907, Second-Printing Windows and MirrorsE146043
Page 111 of 609

Loose Mirror
If you manually fold the power-folding
mirrors, they may not work properly even
after you re-position them. You need to reset
them if:
•
The mirrors vibrate when you drive.
• The mirrors feel loose.
• The mirrors do not stay in the folded or
unfolded position.
• One of the mirrors is not in its normal
driving position.
To reset the power-fold feature, use the
power-folding mirror control to fold and
unfold the mirrors. You may hear a loud noise
as you reset the power-folding mirrors. This
sound is normal. Repeat this process as
needed each time you manually fold the
mirrors.
Heated Exterior Mirrors
See Heated Exterior Mirrors (page 153). Memory Mirrors
You can save and recall the mirror positions
through the memory function. See Memory
Function
(page 165).
Auto-Dimming Feature
The driver exterior mirror dims when the
interior auto-dimming mirror turns on.
Signal Indicator Mirrors
The outer portion of the appropriate mirror
housing blinks when you activate the
direction indicator.
Lincoln Welcome Mat
Projection lights, on the bottom of the mirror
housings, project an image onto the ground
a short distance from the vehicle.
360-Degree Camera
(If Equipped)
See
360 Degree Camera (page 238). Blind Spot Monitor
See
Blind Spot Information System (page
257).
INTERIOR MIRROR WARNING:
Do not adjust the mirror
when your vehicle is moving.
Note: Do not clean the housing or glass of
any mirror with harsh abrasives, fuel or other
petroleum or ammonia-based cleaning
products.
You can adjust the interior mirror to your
preference. Some mirrors also have a second
pivot point. This lets you move the mirror
head up or down and from side to side.
Auto-Dimming Mirror
Note: Do not block the sensors on the front
and back of the mirror. Mirror performance
may be affected. A rear center passenger
or raised rear center head restraint may also
block light from reaching the sensor.
108
Continental (CPL) Canada/United States of America, enUSA, Edition date: 201907, Second-Printing Windows and Mirrors
Page 124 of 609
Settings
Select Your Setting
Remote
Unlock
Switch Inhibit
Follow onscreen directions to confirm or modify your settings.
Oil Life Reset
Select Your Setting
Power Decklid
Select Your Setting
Climate
Control
Remote Start
Seats and
Wheel
Duration
System
Follow onscreen directions to confirm or modify your settings.
Tire Monitor
Remote Open
Windows
Remote Close
Courtesy Wipe
Wipers
Rain Sensing
Follow onscreen directions to confirm or modify your settings.
MyKey Status
MyKey
121
Continental (CPL) Canada/United States of America, enUSA, Edition date: 201907, Second-Printing Information Displays
Page 126 of 609
Info/Trip/Fuel
Engine Hours Trip 1
Trip 2
Fuel Economy Tire Pressure
Intelligent AWD None
• Engine Hours - Livery vehicles only. Displays the engine hours and engine idle hours.
• Trip 1
- Displays distance traveled, average fuel economy, and time spent for trip. Press and hold OK to reset.
• Trip 2
information is the same as Trip 1.
• Fuel Economy
- Displays instantaneous and average fuel economy.
• Tire Pressure
- Displays a graphic of current vehicle tire pressures.
• Intelligent AWD
(if equipped) - Displays a graphic of the power distribution between \
the front and rear wheels.
• None
- Displays a blank area.
123
Continental (CPL) Canada/United States of America, enUSA, Edition date: 201907, Second-Printing Information Displays
Page 135 of 609

Action
Message
Indicates that the rear seat interior door release switches and power wi\
ndows are switched off,preventing rear seat occupants from opening the doors or windows.
Child Lock ON
Indicates that the rear seat interior door release switches and power wi\
ndows are switched on.
Child Lock OFF
Displays when the door lock turns off.
Door Unlocked
Displays when the door lock is turned on and you attempt to open the doo\
r.
Doors Locked Unlock Before Opening
Indicates a driver door fault that requires manually opening the door by\
the override lever.Contact an authorized dealer.
Driver Door Fault Use Inside Override
Lever In Map Pocket
Indicates a fault with the electronic door system. Contact an authorized\
dealer.
Door Fault Service Required
Displays the factory keypad code after the keypad has been reset. See Keyless Entry (page
83).
Factory Keypad Code {X X X X X}
Driver Alert Action
Message
Stop and rest as soon as it is safe to do so.
Driver Alert Warning Rest Now
Take a rest soon.
Driver Alert Warning Rest Suggested
132
Continental (CPL) Canada/United States of America, enUSA, Edition date: 201907, Second-Printing Information Displays
Page 149 of 609
Head-Up Display (HUD)
Turns the HUD on and off.
HUD On
Follow onscreen directions to confirm or modify your settings.
Brightness
Follow onscreen directions to confirm or
modify your settings.
Vertical Position
HUD Adjustments
Image Rotation
Turns the distance to empty, time and temperature on and off.
HUD Content
Select Your Setting
Cruise and Lane Control
Note: When you save a memory preset position, your current HUD settings are al\
so saved to that memory preset position. See Memory
Function (page 165).
146
Continental (CPL) Canada/United States of America, enUSA, Edition date: 201907, Second-Printing Information Displays