2020 LEXUS RX350 remove seats
[x] Cancel search: remove seatsPage 38 of 516

381-1. For safe use
WARNING
●Do not attach anything to areas such
as a door, windshield, side windows,
front or rear pillar, roof side rail and
assist grip.
●Do not hang coat hangers or other
hard objects on the coat hooks. All of
these items could become projectiles
and may cause death or serious injury,
should the SRS curtain shield airbags
deploy.
●If a vinyl cover is put on the area where
the SRS knee airbag will deploy, be
sure to remove it.
●Do not use seat accessories which
cover the parts where the SRS side air-
bags and SRS seat cushion airbag
inflate as they may interfere with infla-
tion of the SRS airbags. Such accesso-
ries may prevent the side airbags and
SRS seat cushion airbag from activat-
ing correctly, disable the system or
cause the side airbags and SRS seat
cushion airbag to inflate accidentally,
resulting in death or serious injury.
●Do not strike or appl y significant levels
of force to the area of the SRS airbag
components or the front doors. Doing
so can cause the SRS airbags to mal-
function.
●Do not touch any of the component
parts immediately after the SRS air-
bags have deployed (inflated) as they
may be hot.
●If breathing becomes difficult after the
SRS airbags have deployed, open a
door or window to allow fresh air in, or
leave the vehicle if it is safe to do so.
Wash off any residue as soon as possi-
ble to prevent skin irritation.
●If the areas where the SRS airbags are
stored, such as the steering wheel pad
and front and rear pillar garnishes, are
damaged or cracked, have them
replaced by your Lexus dealer.
●Do not place anything, such as a cush-
ion, on the front passenger’s seat.
Doing so will disperse the passenger’s
weight, which prevents the sensor
from detecting the passenger’s weight
properly. As a result, the SRS front air-
bags for the front passenger may not
deploy in the event of a collision.
■Modification and disposal of SRS air-
bag system components
Do not dispose of your vehicle or per-
form any of the following modifications
without consulting your Lexus dealer.
The SRS airbags may malfunction or
deploy (inflate) accidentally, causing
death or serious injury.
●Installation, remova l, disassembly and
repair of the SRS airbags
●Repairs, modifications, removal or
replacement of the steering wheel,
instrument panel, dashboard, seats or
seat upholstery, front, side and rear pil-
lars, roof side rails, front door panels,
front door trims or front door speakers
●Modifications to the front door panel
(such as making a hole in it)
●Repairs or modifications of the front
fender, front bumper, or side of the
occupant compartment
●Installation of a grille guard (bull bars,
kangaroo bar, etc. ), snow plows,
winches or roof luggage carrier
●Modifications to the vehicle’s suspen-
sion system
Page 41 of 516
411-1. For safe use
1
For safety and security
WARNING
●Do not put weight on the front passen-
ger seat by putting your hands or feet
on the front passenger seat seatback
from the rear passenger seat.
●Do not let a rear passenger lift the
front passenger seat with their feet or
press on the seatback with their legs.
●Do not put objects under the front pas-
senger seat.
●Do not recline the front passenger
seatback so far that it touches a rear
seat. This may cause the “AIR BAG
OFF” indicator light to be illuminated,
which indicates that the SRS airbags
for the front passenger will not activate
in the event of a severe accident. If the
seatback touches the rear seat, return
the seatback to a position where it
does not touch the rear seat. Keep the
front passenger seatback as upright as
possible when the vehicle is moving.
Reclining the seatback excessively
may lessen the effectiveness of the
seat belt system.
●If an adult sits in the front passenger
seat, the “AIR BAG ON” indicator light
is illuminated. If the “AIR BAG OFF”
indicator is illumin ated, ask the passen-
ger to sit up straight, well back in the
seat, feet on the floor, and with the seat
belt worn correctly. If the “AIR BAG
OFF” indicator still remains illumi-
nated, either ask the passenger to
move to the rear seat, or if that is not
possible, move the front passenger
seat fully rearward.
●When it is unavoidable to install a for-
ward-facing child restraint system on
the front passenger seat, install the
child restraint system on the front pas-
senger seat in the proper order.
(
P.46)
●Do not modify or remove the front
seats.
●Do not kick the front passenger seat or
subject it to severe impact. Otherwise,
the SRS warning light may come on to
indicate a malfunction of the front pas-
senger occupant clas sification system.
In this case, contact your Lexus dealer
immediately.
●Child restraint systems installed on the
rear seat should not contact the front
seatbacks.
●Do not use a seat accessory, such as a
cushion and seat cover, that covers the
seat cushion surface.
●Do not modify or replace the uphol-
stery of the front seat.
Page 55 of 516
551-2. Child safety
1
For safety and security
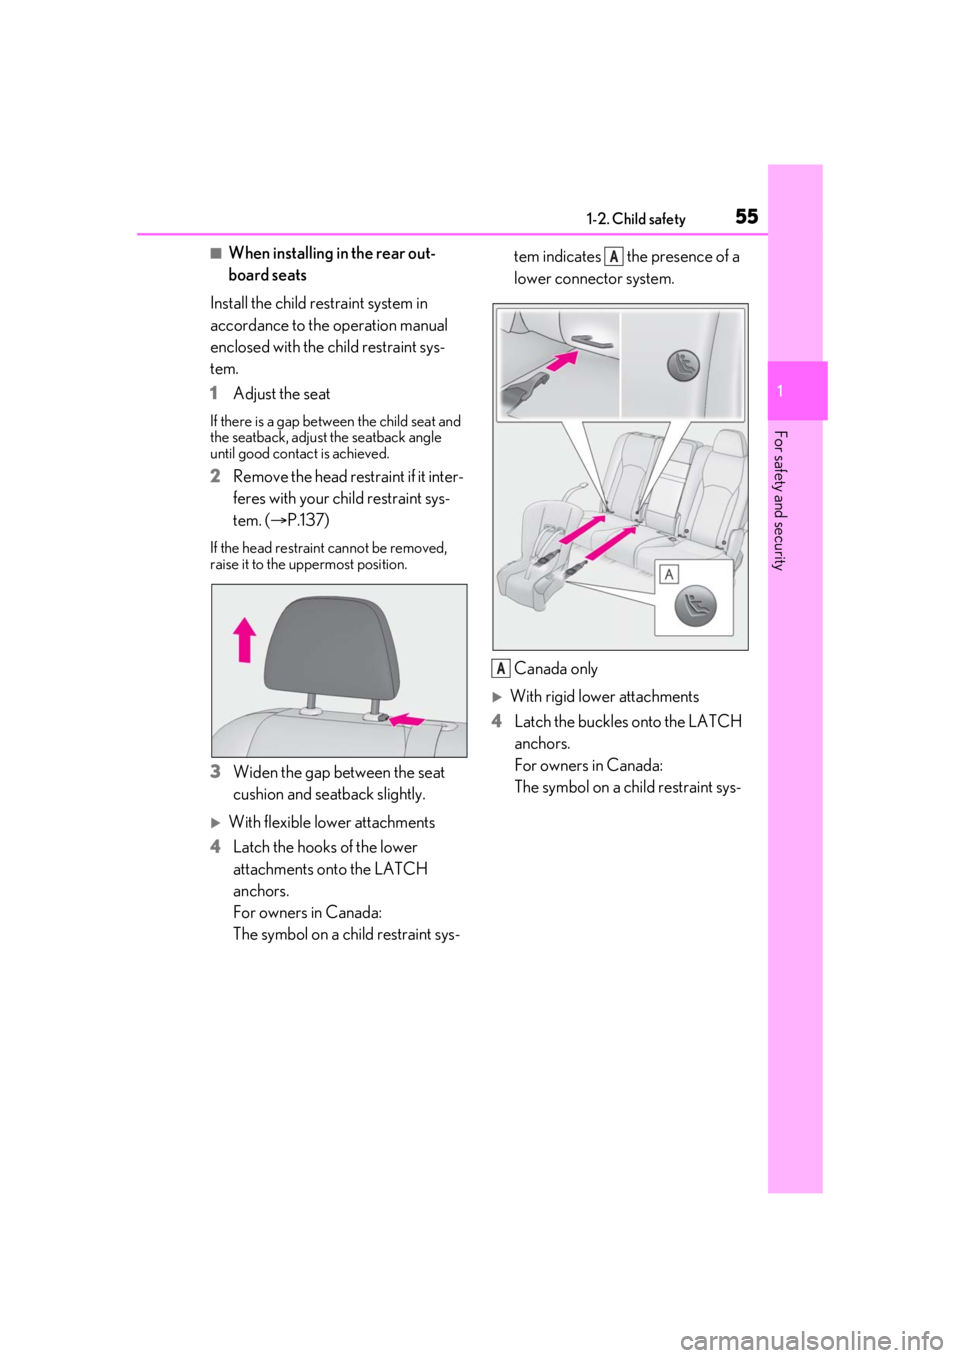
■When installing in the rear out-
board seats
Install the child restraint system in
accordance to the operation manual
enclosed with the child restraint sys-
tem.
1 Adjust the seat
If there is a gap between the child seat and
the seatback, adjust the seatback angle
until good contact is achieved.
2Remove the head restraint if it inter-
feres with your child restraint sys-
tem. ( P.137)
If the head restrain t cannot be removed,
raise it to the uppermost position.
3 Widen the gap between the seat
cushion and seatback slightly.
With flexible lower attachments
4 Latch the hooks of the lower
attachments onto the LATCH
anchors.
For owners in Canada:
The symbol on a child restraint sys- tem indicates the presence of a
lower connector system.
Canada only
With rigid lower attachments
4 Latch the buckles onto the LATCH
anchors.
For owners in Canada:
The symbol on a child restraint sys-
A
A
Page 58 of 516
581-2. Child safety
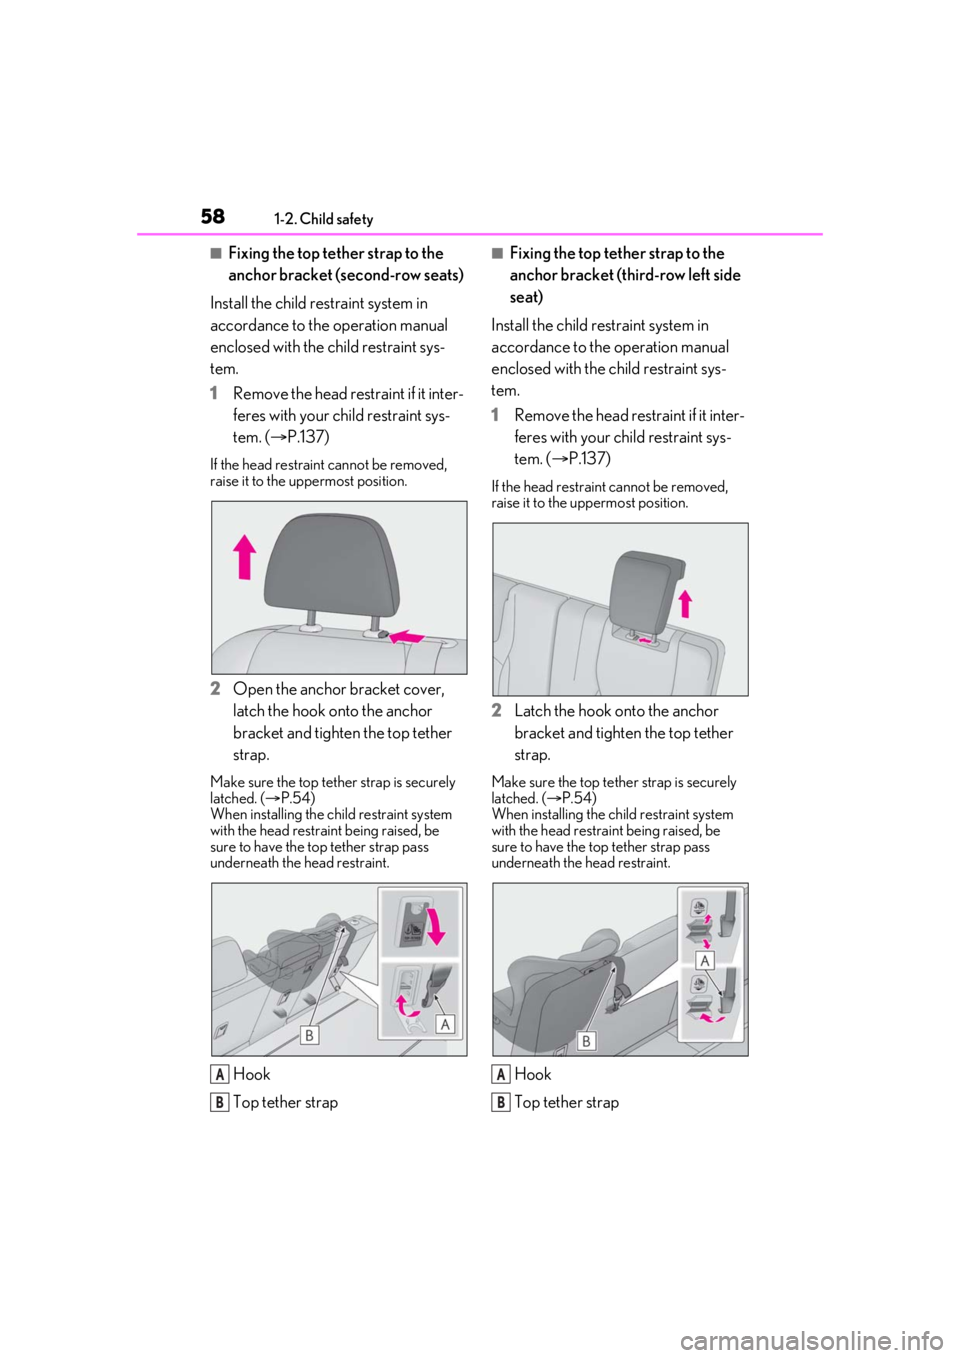
■Fixing the top tether strap to the
anchor bracket (second-row seats)
Install the child restraint system in
accordance to the operation manual
enclosed with the child restraint sys-
tem.
1 Remove the head restraint if it inter-
feres with your child restraint sys-
tem. ( P.137)
If the head restrain t cannot be removed,
raise it to the uppermost position.
2 Open the anchor bracket cover,
latch the hook onto the anchor
bracket and tighten the top tether
strap.
Make sure the top tether strap is securely
latched. ( P.54)
When installing the ch ild restraint system
with the head restraint being raised, be
sure to have the top tether strap pass
underneath the head restraint.
Hook
Top tether strap
■Fixing the top tether strap to the
anchor bracket (third-row left side
seat)
Install the child restraint system in
accordance to the operation manual
enclosed with the child restraint sys-
tem.
1 Remove the head restraint if it inter-
feres with your child restraint sys-
tem. ( P.137)
If the head restraint cannot be removed,
raise it to the uppermost position.
2 Latch the hook onto the anchor
bracket and tighten the top tether
strap.
Make sure the top tether strap is securely
latched. ( P.54)
When installing the ch ild restraint system
with the head restraint being raised, be
sure to have the top tether strap pass
underneath the head restraint.
Hook
Top tether strapA
B
A
B
Page 131 of 516
1313-3. Adjusting the seats
3
Before driving
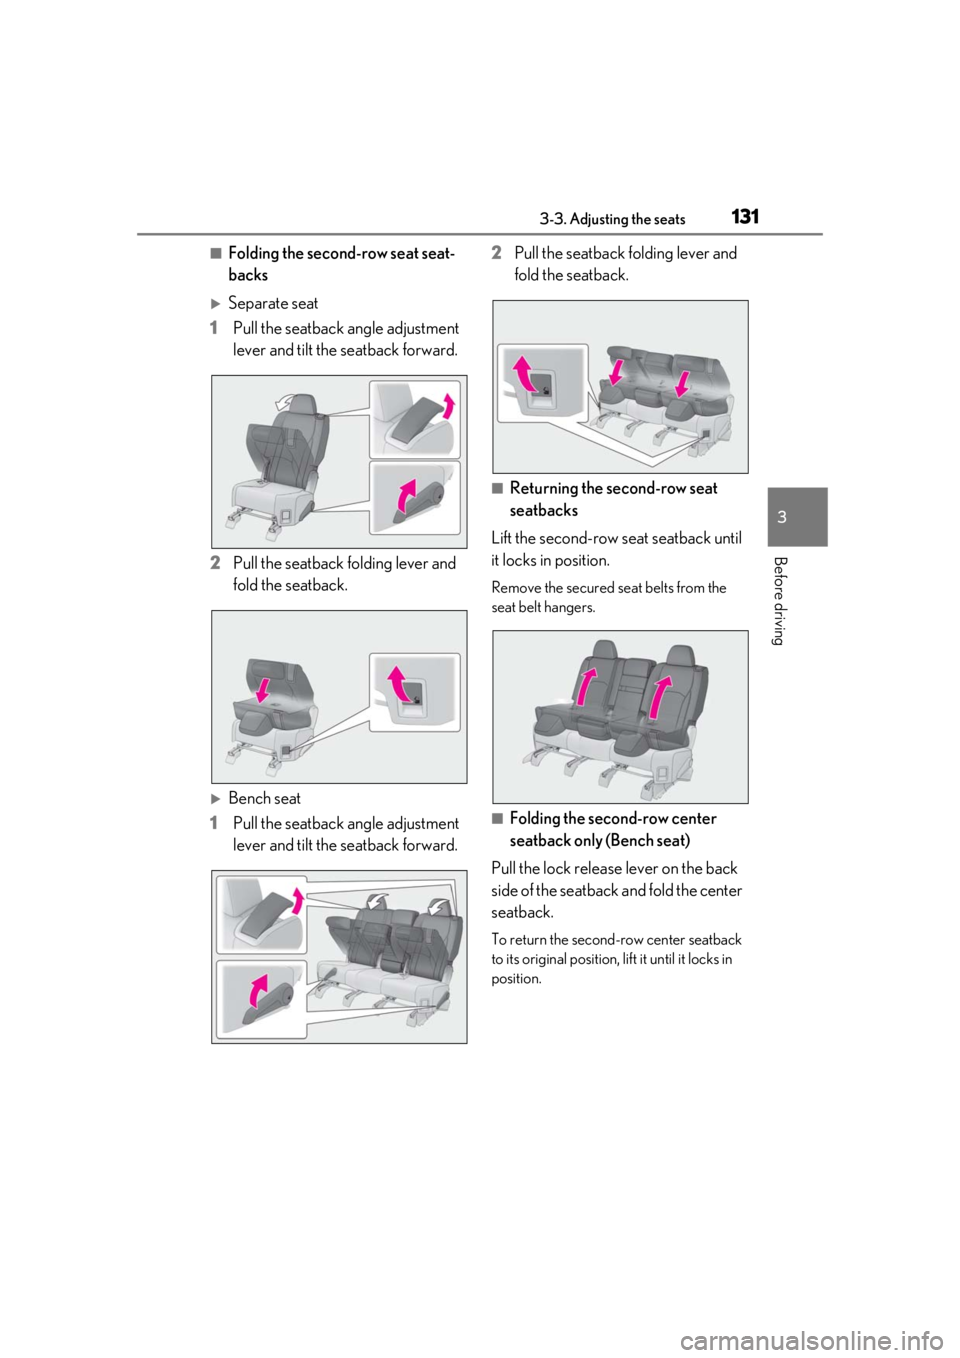
■Folding the second-row seat seat-
backs
Separate seat
1 Pull the seatback angle adjustment
lever and tilt the seatback forward.
2 Pull the seatback folding lever and
fold the seatback.
Bench seat
1 Pull the seatback angle adjustment
lever and tilt the seatback forward. 2
Pull the seatback folding lever and
fold the seatback.
■Returning the second-row seat
seatbacks
Lift the second-row seat seatback until
it locks in position.
Remove the secured se at belts from the
seat belt hangers.
■Folding the second-row center
seatback only (Bench seat)
Pull the lock release lever on the back
side of the seatback and fold the center
seatback.
To return the second-row center seatback
to its original position, lift it until it locks in
position.
Page 132 of 516
1323-3. Adjusting the seats
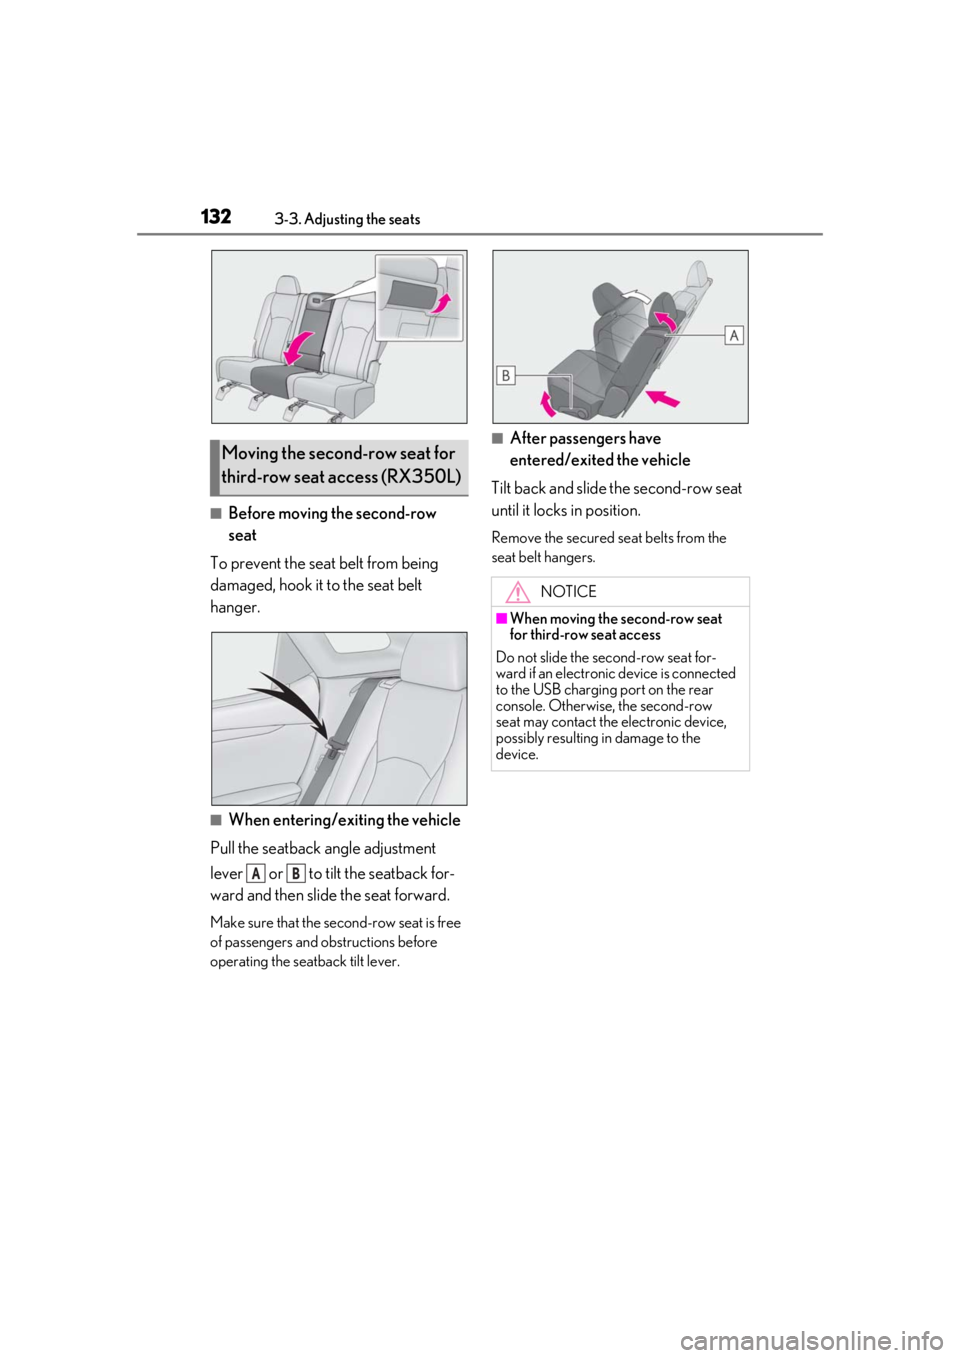
■Before moving the second-row
seat
To prevent the seat belt from being
damaged, hook it to the seat belt
hanger.
■When entering/exiting the vehicle
Pull the seatback angle adjustment
lever or to tilt the seatback for-
ward and then slid e the seat forward.
Make sure that the seco nd-row seat is free
of passengers and ob structions before
operating the seatback tilt lever.
■After passengers have
entered/exited the vehicle
Tilt back and slide the second-row seat
until it locks in position.
Remove the secured se at belts from the
seat belt hangers.
Moving the second-row seat for
third-row seat access (RX350L)
AB
NOTICE
■When moving the second-row seat
for third-row seat access
Do not slide the second-row seat for-
ward if an electronic device is connected
to the USB charging port on the rear
console. Otherwise, the second-row
seat may contact the electronic device,
possibly resulting in damage to the
device.
Page 133 of 516
1333-3. Adjusting the seats
3
Before driving
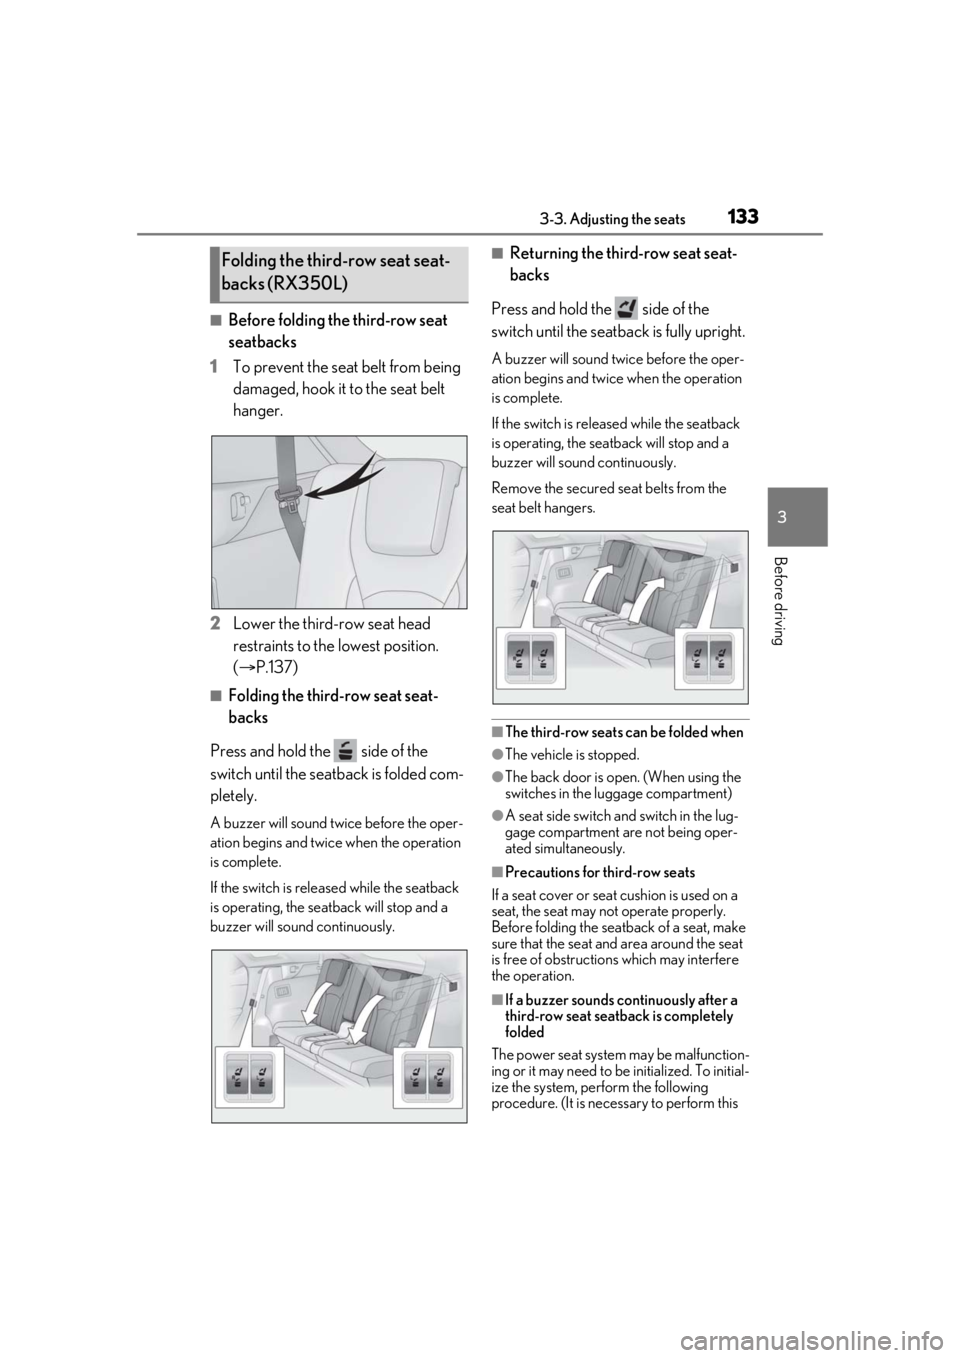
■Before folding the third-row seat
seatbacks
1 To prevent the seat belt from being
damaged, hook it to the seat belt
hanger.
2 Lower the third-row seat head
restraints to the lowest position.
(P.137)
■Folding the third-row seat seat-
backs
Press and hold the side of the
switch until the seatback is folded com-
pletely.
A buzzer will sound twice before the oper-
ation begins and twice when the operation
is complete.
If the switch is releas ed while the seatback
is operating, the seatback will stop and a
buzzer will sound continuously.
■Returning the third-row seat seat-
backs
Press and hold the side of the
switch until the seatback is fully upright.
A buzzer will sound twice before the oper-
ation begins and twice when the operation
is complete.
If the switch is releas ed while the seatback
is operating, the seatback will stop and a
buzzer will sound continuously.
Remove the secured se at belts from the
seat belt hangers.
■The third-row seats can be folded when
●The vehicle is stopped.
●The back door is open. (When using the
switches in the luggage compartment)
●A seat side switch and switch in the lug-
gage compartment are not being oper-
ated simultaneously.
■Precautions for third-row seats
If a seat cover or seat cushion is used on a
seat, the seat may not operate properly.
Before folding the seatback of a seat, make
sure that the seat and area around the seat
is free of obstructio ns which may interfere
the operation.
■If a buzzer sounds co ntinuously after a
third-row seat seatback is completely
folded
The power seat system may be malfunction-
ing or it may need to be initialized. To initial-
ize the system, perform the following
procedure. (It is necessary to perform this
Folding the third-row seat seat-
backs (RX350L)
Page 134 of 516

1343-3. Adjusting the seats
procedure with two people.)
1Check that the seat is free of obstruc-
tions.
2 Press and hold the side switch of
the luggage compartment side switch
for the seat which the buzzer is sound-
ing.
3 Within 10 seconds of the performing
the above step, press the side
switch of the seat side switch 5 times.
4 When a buzzer sounds 3 times, release
the luggage compartment side switch.
5 Press the side switch of the seat
side switch until the seatback is folded
completely.
A buzzer will sound twice when the opera-
tion is complete.
If the buzzer does not stop sounding even
though the above procedure has been per-
formed, have the vehicle inspected by your
Lexus dealer.
*: If equipped
The seat and steering wheel are auto-
matically adjusted to allow the driver to
enter and exit the vehicle easily.
When all of the following have been
performed, the seat and steering
wheel are automatically adjusted to a
position that allows driver to enter and
exit the vehicle easily.
• The shift lever has been shifted to P.
• The engine switch has been turned off.
WARNING
■Precautions for third-row seat
When operating a third-row seat, make
sure to press and hold the switch until the
third-row seat seatba ck is completely
folded/upright. Do not use a third-row
seat in a position other than the com-
pletely upright position, as doing so may
lead to death or serious injury in an acci-
dent. (If the switch is released while the
seatback is still moving, a buzzer will
sound continuously until the seatback is
completely folded/upright.)
NOTICE
■Before returning th e third-row seat
seatbacks to the upright position
If the luggage cover is installed in the lug-
gage compartment, make sure to
remove it before re turning the third-row
seat seatbacks. ( P.323) Otherwise,
the luggage cover may be damaged.
Driving position memory*
This feature automatically adjusts
the driver’s seat (on some models),
steering wheel, outside rear view
mirrors and head-up display (if
equipped) to make entering and
exiting the vehicle easier or to suit
your preferences.
Up to 3 different driving positions
can be recorded.
Each electronic key can be regis-
tered to recall your preferred driv-
ing position.
Power easy access system
(driver’s side only)