Page 307 of 516

3075-3. Using the air conditioning system and defogger
5
Interior features
1Direct air flow to the left or right, up
or down
2 Turn the knob to open or close the
vent
■Center Display
Using the touchpad of the Remote
Touch, select the button on the screen.
This system can also be operated by
the touch screen.
Adjust the rear seats fan speed set-
ting
WARNING
■To prevent the windshield defogger
from operating improperly
Do not place anything on the instrument
panel which may cover the air outlets.
Otherwise, air flow may be obstructed,
preventing the windshield defoggers
from defogging.
Rear automatic air condi-
tioning system (RX350L)
The air outlets and fan speed are
automatically adjusted according
to the temperature setting.
The rear air conditioning system
can be operated using the Center
Display and rear air conditioning
system control panel.
Press the “MENU” button on the
Remote Touch to display the main
menu and move the cursor to
to display the climate control short-
cut buttons. Then, select to dis-
play the rear air conditioning
control screen.
Rear air conditioning control
operation
A
Page 308 of 516

3085-3. Using the air conditioning system and defogger
Select the rear seats air flow mode
: Air flows to the upper body
: Air flows to the upper body and feet
: Air flows to the feet
Adjust the rear seats temperature
setting
Function on/off indicators
When the function is on, the indicator illu-minates on the control screen.
Sub function menu
When the sub function button on the
Remote Touch is pressed, the following
functions can be switched on and off.
“Rear off”: Turn the rear seats fan off
“Rear AUTO”: Set the rear seats automatic
mode on/off (
P.309)
: Disables operation of the rear air
conditioning system using the Rear air con-
ditioning system control panel
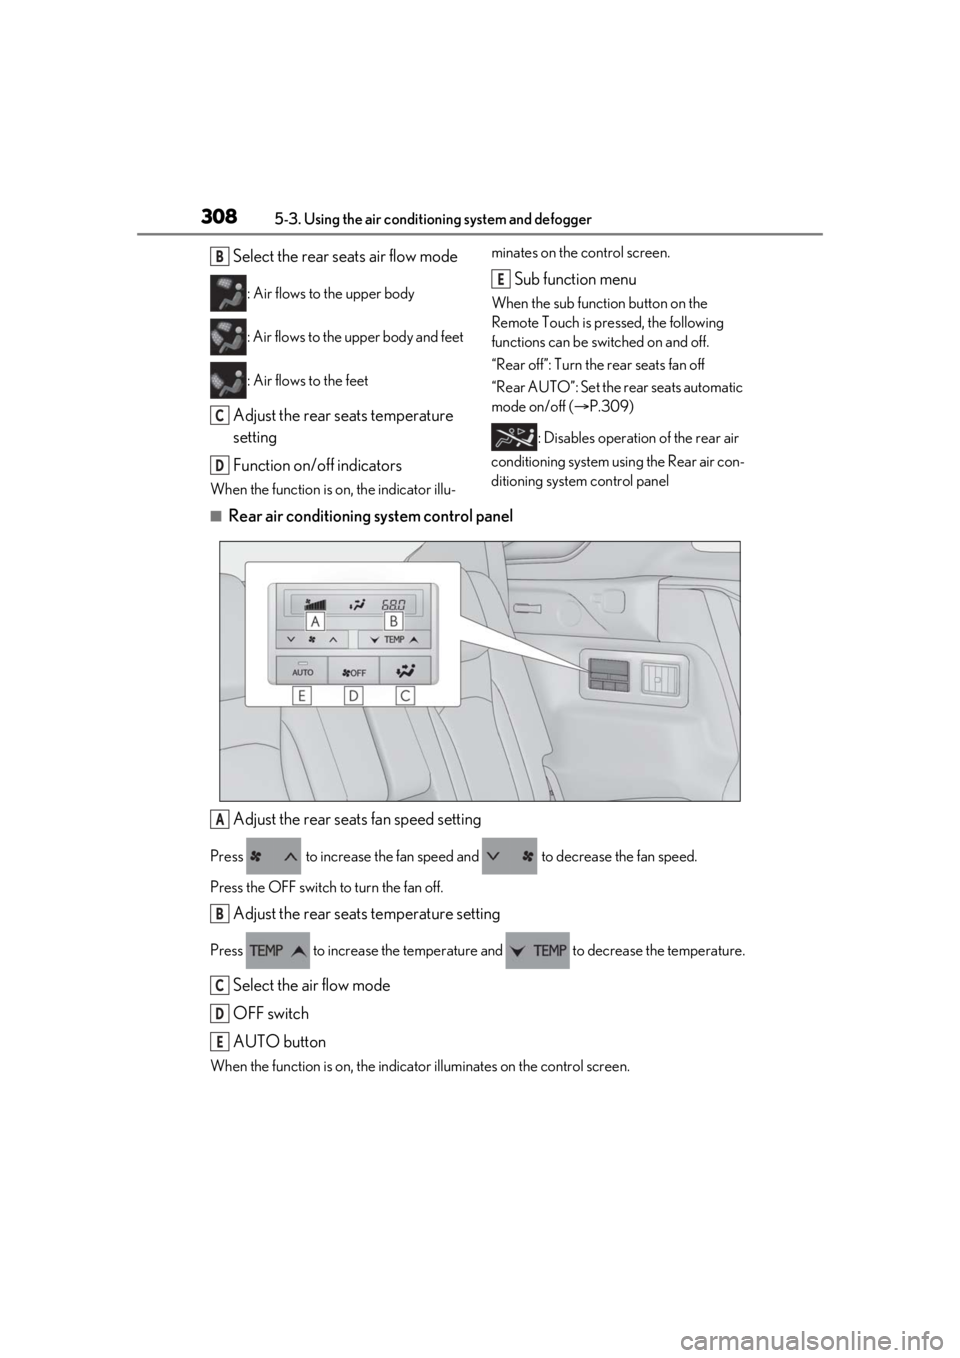
■Rear air conditioning system control panel
Adjust the rear seats fan speed setting
Press to increase the fan speed and to decrease the fan speed.
Press the OFF switch to turn the fan off.
Adjust the rear seats temperature setting
Press to increase the temperature and to decrease the temperature.
Select the air flow mode
OFF switch
AUTO button
When the function is on, the indicat or illuminates on the control screen.
B
C
D
E
A
B
C
D
E
Page 341 of 516
3415-6. Using the other interior features
5
Interior features
■When support is necessary
Visit on the web at www.home-
link.com/lexus or call 1-800-355-3515.
WARNING
■When programming a garage door or
other remote control device
The garage door or other device may
operate, so ensure people and objects
are out of danger to prevent potential
harm.
■Conforming to federal safety stan-
dards
Do not use the HomeLink
® compatible
transceiver with any garage door opener
or device that lacks safety stop and
reverse features as required by federal
safety standards.
This includes any garage door that can-
not detect an interf ering object. A door
or device without these features
increases the risk of death or serious
injury.
■When operating or programming
HomeLink®
Never allow a child to operate or play
with the HomeLink® buttons.
Page 342 of 516

3425-6. Using the other interior features
■Before programming HomeLink®
During programming, it is possible
that garage doors, gates, or other
devices may operate. For this rea-
son, make sure that people and
objects are clear of the garage door
or other devices to prevent injury or
other potential harm.
It is recommended that a new bat-
tery be placed in the remote control
transmitter for more accurate pro-
gramming.
Garage door opener motors manu-
factured after 1995 may be
equipped with rolling code protec-
tion. If this is the case, you may need
a stepladder or other sturdy, safe
device to reach the “Learn” or
“Smart” button on the garage door
opener motor.
■Programming HomeLink®
Steps 1 through 3 must be performed
within 60 seconds, otherwise the indi-
cator light will stop flashing and pro-
gramming will not be able to be
completed.
1 Press and release the HomeLink
®
button you want to program and
check that the HomeLink
® indica-
tor light flashes (orange).
2 Point the remote control transmit-
ter for the device at the rear view
mirror, 1 to 3 in. (25 to 75 mm)
from the HomeLink
® buttons.
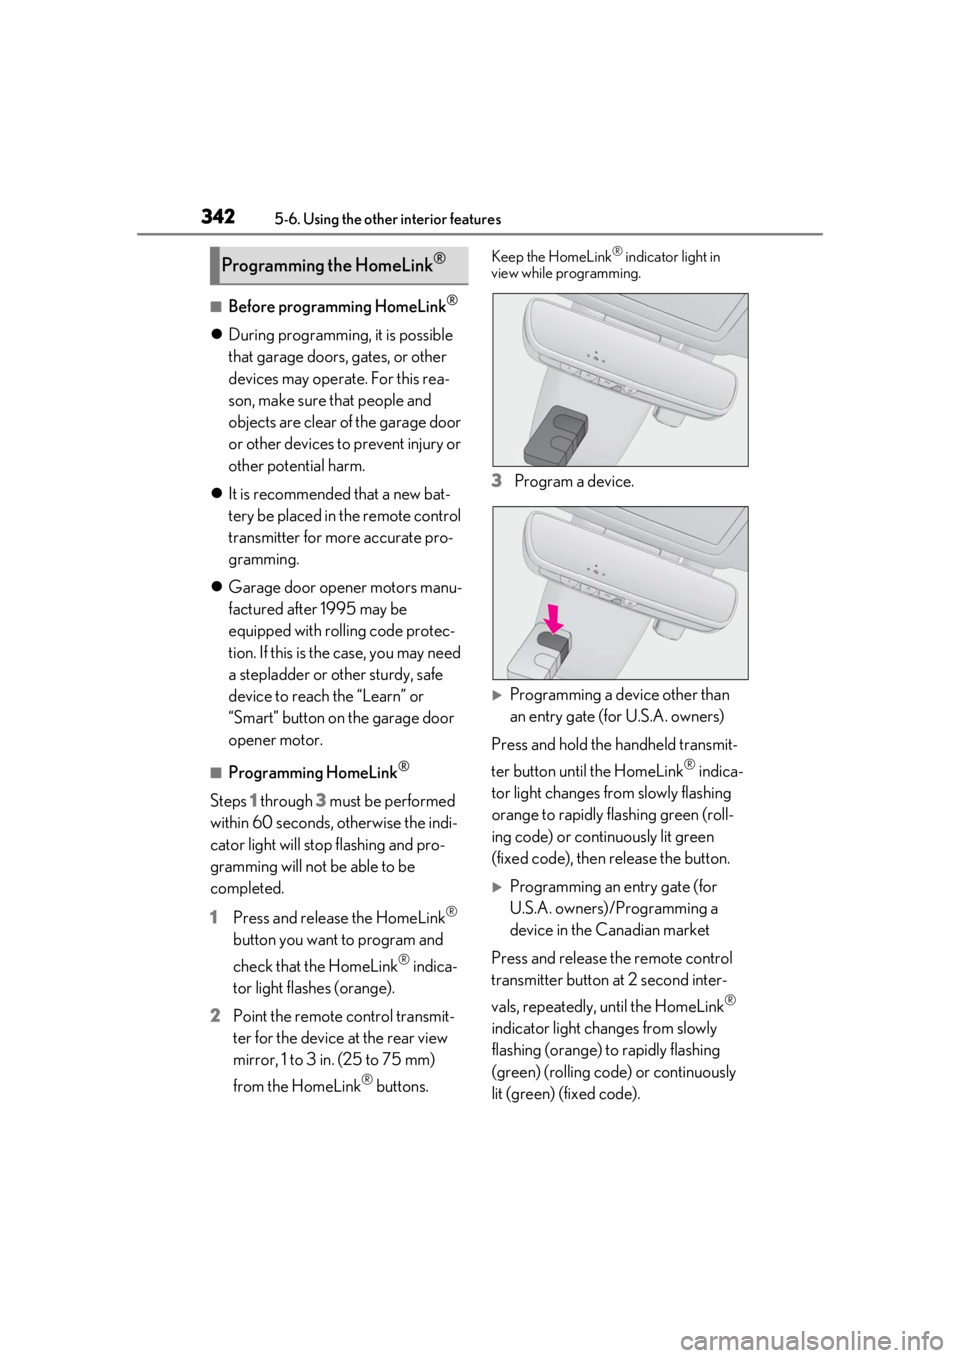
Keep the HomeLink® indicator light in
view while programming.
3 Program a device.
Programming a device other than
an entry gate (for U.S.A. owners)
Press and hold the handheld transmit-
ter button until the HomeLink
® indica-
tor light changes from slowly flashing
orange to rapidly flashing green (roll-
ing code) or continuously lit green
(fixed code), then release the button.
Programming an entry gate (for
U.S.A. owners)/Programming a
device in the Canadian market
Press and release the remote control
transmitter button at 2 second inter-
vals, repeatedly, until the HomeLink
®
indicator light changes from slowly
flashing (orange) to rapidly flashing
(green) (rolling code) or continuously
lit (green) (fixed code).
Programming the HomeLink®
Page 369 of 516

3696-3. Do-it-yourself maintenance
6
Maintenance and care
only newly opened brake fluid.
Check the battery as follows.
■Battery exterior
Make sure that the battery terminals
are not corroded and that there are no
loose connections, cracks, or loose
clamps.
Terminals
Hold-down clamp
■Before recharging
When recharging, the battery produces
hydrogen gas which is flammable and
explosive. Therefore, observe the following
precautions before recharging:
●If recharging with the battery installed on
the vehicle, be sure to disconnect the
ground cable.
●Make sure the power switch on the char-
ger is off when connecting and discon-
necting the charger cables to the battery.
■After recharging/reconnecting the bat-
tery
●The engine may not start. Follow the pro-
cedure below to initialize the system.
1 Shift the shift lever to P.
2 Open and close any of the doors.
3 Restart the engine.
●Unlocking the doors using the smart
access system with pu sh-button start may
not be possible immediately after recon-
necting the battery. If this happens, use
the wireless remote control or the
mechanical key to lo ck/unlock the doors.
●Start the engine with the engine switch in
ACCESSORY mode. The engine may
not start with the engine switch turned off.
However, the engine will operate nor-
mally from the second attempt.
●The engine switch mode is recorded by
the vehicle. If the battery is reconnected,
the vehicle will return the engine switch
mode to the status it was in before the
battery was disconnected. Make sure to
turn off the power before disconnect the
battery. Take extra care when connecting
the battery if the engine switch mode
prior to discharge is unknown.
If the system will not start even after multiple
attempts at all the methods above, contact
your Lexus dealer.
WARNING
■When filling the reservoir
Take care as brake fluid can harm your
hands and eyes and damage painted sur-
faces.
If fluid gets on your hands or in your eyes,
flush the affected area with clean water
immediately.
If you still experience discomfort, see a
doctor.
NOTICE
■If the fluid level is low or high
It is normal for the brake fluid level to go
down slightly as the brake pads wear out
or when the fluid level in the accumulator
is high.
If the reservoir need s frequent refilling,
there may be a serious problem.
Battery
A
B
Page 389 of 516

3896-3. Do-it-yourself maintenance
6
Maintenance and care
■Replacing the rear wiper insert
Have the rear wiper inse rt replaced by your
Lexus dealer.
■Handling of the windshield wiper blades
and inserts
Improper handling of the windshield wiper
blades and inserts may cause them to be
damaged. If it is difficult to follow the wiper
blade and insert replacement procedure
precisely, contact your Lexus dealer.
■If the electronic key battery is depleted
The following symptoms may occur:
●The smart access system with push-but-
ton start and wireless remote control will
not function properly.
●The operationa l range will be reduced.
Flathead screwdriver
Lithium battery CR2032
■Use a CR2032 lithium battery
●Batteries can be purchased at your Lexus
dealer, local electrical appliance shops or
camera stores.
●Replace only with the same or equivalent
type recommended by the manufacturer.
●Dispose of used batteries according to
the local laws.
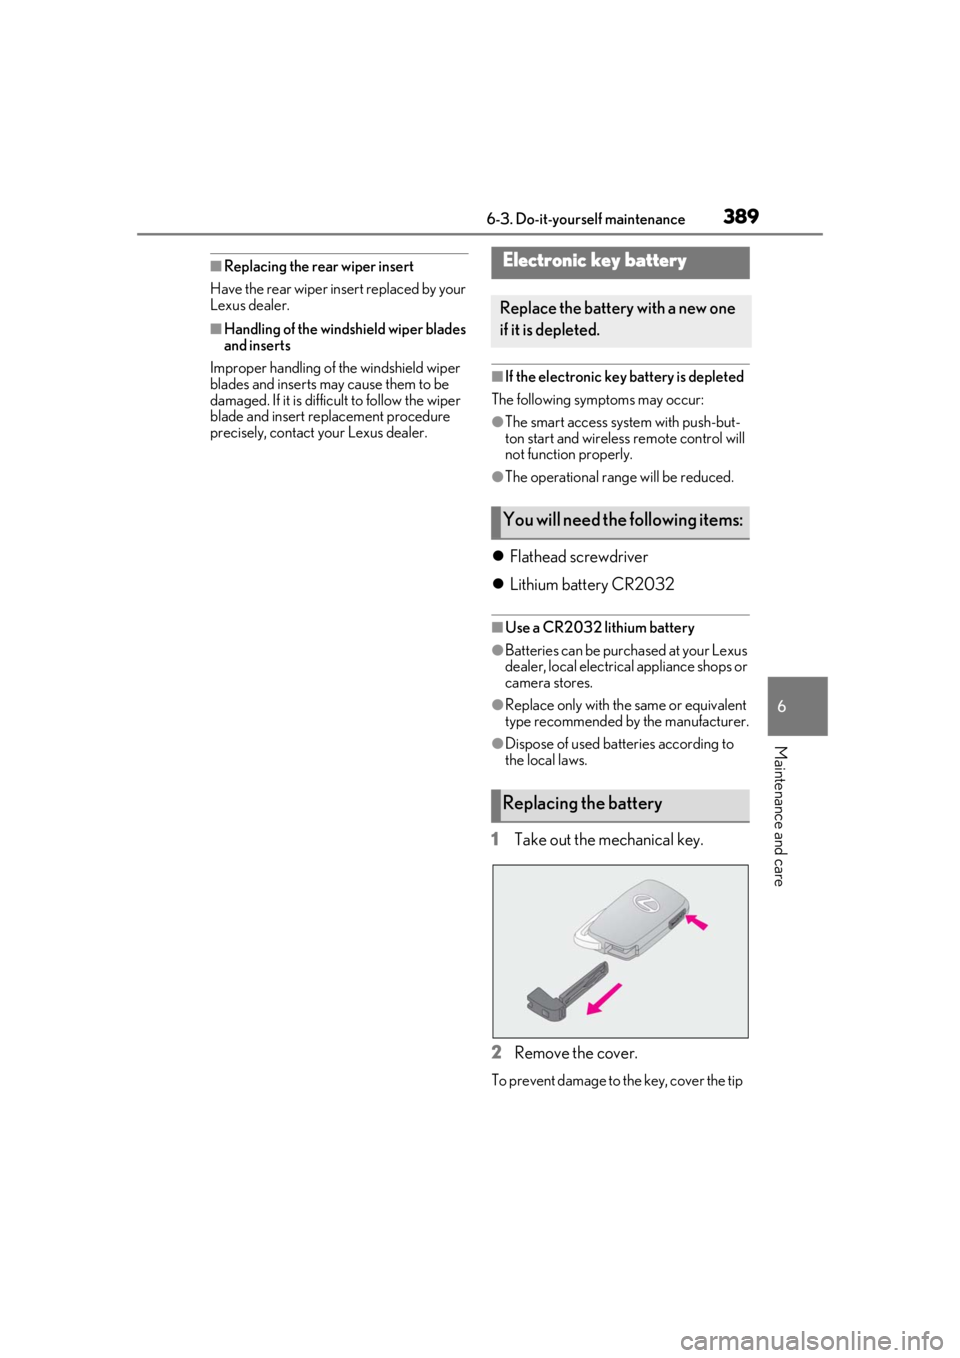
1Take out the mechanical key.
2 Remove the cover.
To prevent damage to the key, cover the tip
Electronic key battery
Replace the battery with a new one
if it is depleted.
You will need the following items:
Replacing the battery
Page 390 of 516
3906-3. Do-it-yourself maintenance
of the flathead screwdriver with a tape.
3Remove the depleted battery.
When removing the cover, the electronic
key module may stick to the cover and the
battery may not be visible. In this case,
remove the electronic key module in order
to remove the battery.
Insert a new battery with the “+” terminal
facing up.
WARNING
■Removed battery and other parts
These parts are small and if swallowed by
a child, they can cause choking. Keep
away from children. Failure to do so
could result in death or serious injury.
NOTICE
■For normal operation after replacing
the battery
Observe the following precautions to
prevent accidents:
●Always work with dry hands.
Moisture may cause the battery to
rust.
●Do not touch or move any other com-
ponent inside the remote control.
●Do not bend either of the battery ter-
minals.
Page 441 of 516

4417-2. Steps to take in an emergency
7
When trouble arises
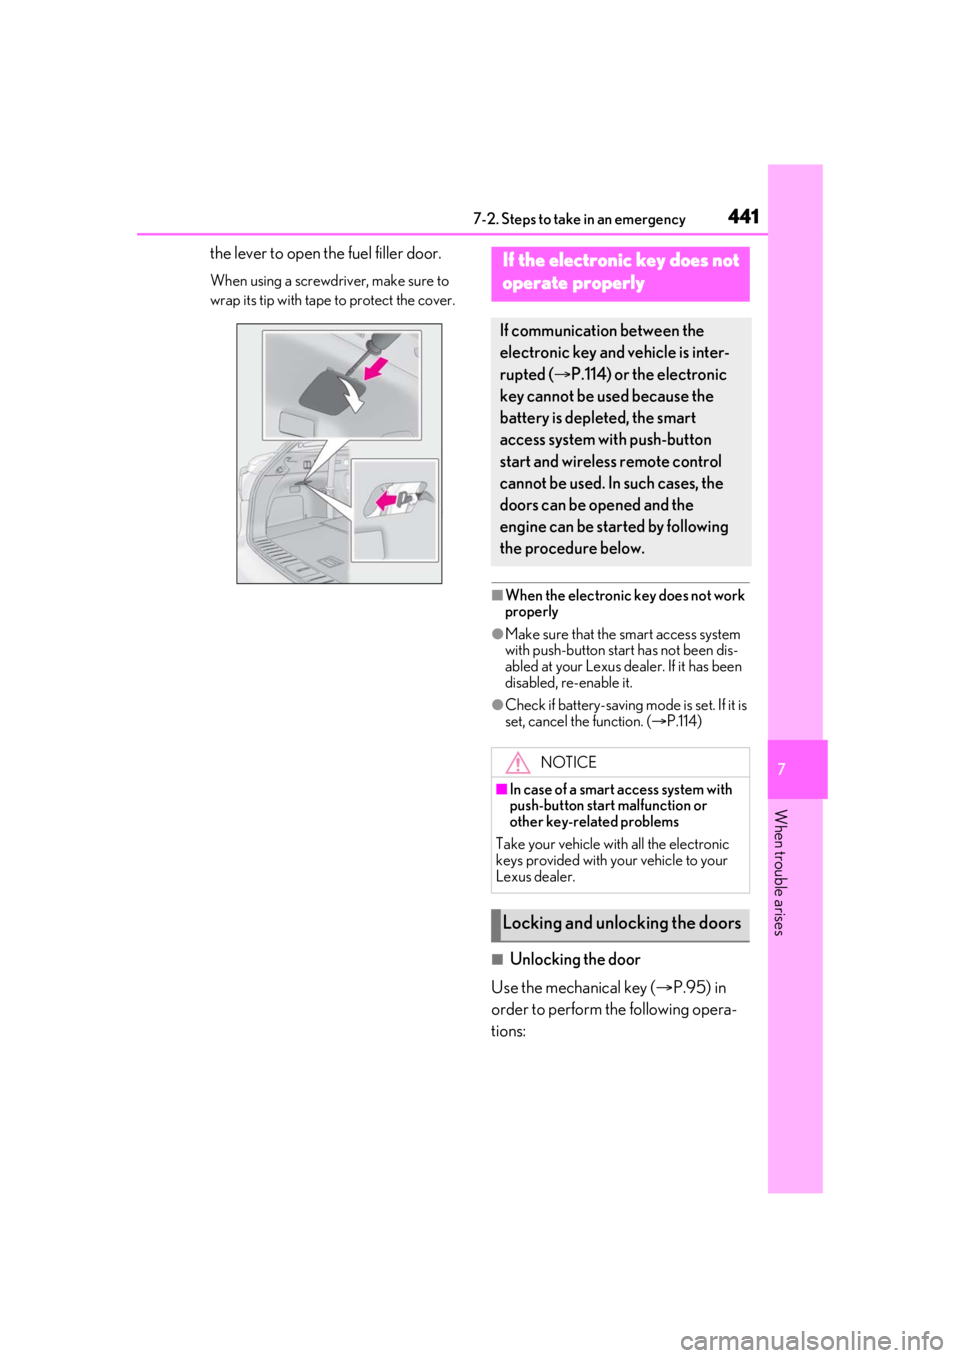
the lever to open the fuel filler door.
When using a screwdriver, make sure to
wrap its tip with tape to protect the cover.
■When the electronic key does not work
properly
●Make sure that the smart access system
with push-button star t has not been dis-
abled at your Lexus dealer. If it has been
disabled, re-enable it.
●Check if battery-saving mo de is set. If it is
set, cancel the function. ( P.114)
■Unlocking the door
Use the mechanical key ( P.95) in
order to perform th e following opera-
tions:
If the electronic key does not
operate properly
If communication between the
electronic key and vehicle is inter-
rupted ( P.114) or the electronic
key cannot be used because the
battery is depleted, the smart
access system with push-button
start and wireless remote control
cannot be used. In such cases, the
doors can be opened and the
engine can be started by following
the procedure below.
NOTICE
■In case of a smart access system with
push-button start malfunction or
other key-rela ted problems
Take your vehicle with all the electronic
keys provided with your vehicle to your
Lexus dealer.
Locking and unlocking the doors