Page 9 of 58

7ALWAYS CHECK THE OWNER’S MANUAL FOR COMPLETE OPER ATING INFORMATION AND SAFET Y WARNINGS *IF EQUIPPED
Service Interval Mode
To enter Service Interval Mode, press the Mode button A,
scroll to User Settings by pressing the OK button B up/down Then press the OK button B again to enter
Then scroll to Service Interval System will display number
of miles remaining until next service is due, as well as the
type of service due
When service is required, the following will be displayed:
Service Required
To reset the Service Interval Mode system, press and hold
the Select/Reset button B for more than 1 second
Press the Mode button A to go back to the previous
mode/item To turn Service In OFF, go to User Settings
Service Interval Setting
To set the service interval in User
Settings mode:
•Press the Mode button A
to cycle to User Settings and
press the Select /Reset button
B to enter
•If Service Interval is OFF, press
the Select /Reset button B to
turn ON
•Press the Select /Reset button
B up/down to select /change
the interval setting
•Press the Select /Reset button
B again to select the interval
To view these videos on your mobile device, snap these QR Codes or visit the listed website
Refer to page 2 for more information
LCD Display Video
LCD Display: Maintenance Video
QR CODES
www.youtube.com/KiaFeatureVideos
(Type B cluster)
-20 mi -5 days
-20 mi -5 daysThese images are for illustration purposes only. Your vehicle's information may be different.
( Type B; buttons located on right side of steering wheel)
A
B
User Settings
To enter the User Settings mode in the LCD
Instrument Cluster Modes, press the Mode
button A when the vehicle is at a standstill
and with the Engine Start /Stop button* in the
ON position and select User Settings by
pressing the OK button B
You can navigate the selections on the display
by pressing the OK button B up/down, and then
selecting the item by pressing the OK button B again
User Settings Mode:
Driving Assistance*• Smart Cruise Control w/ Stop & Go Reaction* • Forward Collision-Avoidance Assist-Pedestrian (FCA-Ped)* • Forward Collision Warning (FCW )*• Driver Attention Warning (DAW )*• Blind-Spot Collision Warning (BCW)* Timing• Blind-Spot Collision Warning (BCW )* Sound• Rear Cross-Traffic Collision Warning (RCCW )*
Door/Liftgate• Automatically Unlock• Two-Press Unlock• Smart Liftgate*
Sound• Parking Distance Warning Volume*• Welcome Sound*
Lights• One-Touch Turn Signal• Headlight Delay*
Convenience• Seat Easy Access*• Welcome Mirror/Light*• Wiper/Lights Display*• Welcome Light*• Auto Rear Wiper*• Gear Position Pop-up*• Icy Road Warning*
Service Interval• Enable Service Interval• Adjust Interval• Reset
Other Features• Fuel Economy Auto Reset• Fuel Economy Unit• Temperature Unit• Tire Pressure Unit*
Language*
Reset
INSTRUMENT CLUSTER
Page 10 of 58

SEDONA FEATURES & FUNCTIONS GUIDE8*IF EQUIPPED
P
R
N D
DRIVE
MODE
+
_
Drive Mode Integrated Control System Video
To view a video on your mobile device, snap this QR Code or visit the listed website
Refer to page 2 for more information
QR CODE
www.youtube.com/KiaFeatureVideos
(Located on Center Panel below Gear Shift)* (Located in Instrument Cluster Type C Cluster shown)
A
C
B
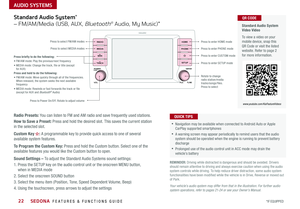
Drive Mode Integrated Control System*
The Drive Mode may be selected depending on the driver’s
preferences and road conditions
To cycle through the different Drive Modes A, press the
DRIVE MODE button B The Instrument Cluster will display
COMFORT or ECO when selected When in Normal mode, it
will not display in the Instrument Cluster
REMINDERS:
•
The system is turned ON and in Normal mode when ignition is in the ON position
•
When ECO mode is selected, the indicator will display and system remains on, even when ignition is cycled
•Steering effort may be slightly increased in Sport mode
Your vehicle’s buttons may differ from those in the illustrations. See your Owner’s Manual for more details.
ECO Mode (Active ECO)*
The Active ECO system is designed to help improve fuel
economy by controlling several vehicle components When
activated, it can help optimize drivetrain operations such
as engine power and transmission to help improve fuel
economy
To turn ON, press the DRIVE MODE button B and scroll
through options until in the ECO mode The green ECO
indicator light C in the instrument cluster will illuminate,
indicating that Active ECO is operating
The Active ECO system will remain on even when the
ignition is cycled
To turn Active ECO OFF, press the DRIVE MODE
button B again and change to another mode
To help improve your fuel economy: •Drive at a moderate speed, accelerating smoothly and at a moderate rate •Keep tires inflated to the recommended pressure •Be sure the wheels are properly aligned
QUICK TIPS
For more information on Active ECO, refer to your Owner’s Manual or contact your local dealership.
INSTRUMENT CLUSTER
Page 11 of 58

9ALWAYS CHECK THE OWNER’S MANUAL FOR COMPLETE OPER ATING INFORMATION AND SAFET Y WARNINGS *IF EQUIPPED †LEGAL DISCL AIMERS ON BACK INSIDE COVER
(Button panel located left of Steering Wheel)
(Outlet located on back of Center Console and the Luggage Zone*)
ABC
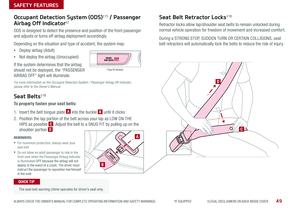
AC Inverter*
The AC Inverter supplies 115V/100W electrical power to operate
accessories or equipment Press AC Inverter button C to activate
Instrument Cluster Control
With parking lights/headlights ON, press button B (+) or (-) to adjust the
brightness of the instrument panel illumination
REMINDER: The Instrument Cluster Control does not adjust brightness on the audio head unit screens Use the display settings in the Setup menu to adjust the brightness on the screen
Electronic Stability Control (ESC)†8
The ESC system is designed to help stabilize the vehicle during certain
cornering maneuvers It is a good idea to keep the ESC turned on for daily
driving whenever possible
Press ESC OFF button A to turn Traction Control OFF/ON Press again to
turn on
To turn OFF both the Traction Control and Stability Control, press and hold
for more than 3 seconds Press again to turn ON
REMINDERS:
•ESC is turned ON by default at vehicle startup If vehicle power is cycled, ESC will turn ON again
•
The ESC Indicator Light in the instrument cluster will illuminate whenever the ESC is in operation
For more information on Electronic Stability Control (ESC) and its specific features and operations, please refer to your Owner’s Manual.
Hill-Start Assist Control (HAC)†8
HAC helps prevent the vehicle from rolling backwards when accelerating
from a stop while on a steep incline HAC automatically activates
whether the ESC is OFF or ON but does NOT activate when the ESC has
malfunctioned
REMINDERS:
•HAC does not operate when the gear shift is in the P (Park) or the N (Neutral) position
•HAC does not replace the need to apply brakes while the vehicle is stopped on an incline
•HAC provides a 2-second delay before the vehicle may start rolling backwards •When HAC is active (e g , during initial acceleration from a stop on an incline), you may notice that the brakes will momentarily remain engaged after you depress the accelerator – this is normal HAC operation
QUICK TIPS
DRIVER'S PANEL
Page 12 of 58

SEDONA FEATURES & FUNCTIONS GUIDE10
Blind-Spot Collision Warning w/ RCCW Video
To view a video on your mobile device, snap this QR Code or visit the listed website
Refer to page 2 for more information
QR CODE
www.youtube.com/KiaFeatureVideos
A
B
D
(Button panel located left of Steering Wheel)
REMINDER: The above images are for illustration purposes only and may not reflect actual operation
Blind-Spot Collision Warning (BCW)*†6
The BCW system uses radar sensors to help alert the driver before changing lanes
The light on the BCW button A will illuminate when turned ON The outside
rearview mirror warning lights will also illuminate for 3 seconds
The system will become active when the vehicle is traveling faster than 18 mph
and will alert the driver if another vehicle is detected by the radar sensor
Blind-Spot Collision Warning (BCW)
1st-stage alert: When another vehicle is detected within the Blind-Spot Collision Warning
(BCW ) / Lane Change Assist (LCA)* system boundary B, or a vehicle is detected within
the LCA boundary B approaches at a high speed, a yellow indicator will illuminate on the
outside rearview mirrors C
2nd-stage alert: When 1st-stage alert is on and the driver activates a turn signal, a
flashing yellow indicator will illuminate on the outside rearview mirrors and the system
will sound an alert
REMINDERS:
•The BCW system will not show a warning if the vehicle speed is only 6 mph above the surrounding vehicles
•If the BCW is turned ON and the ignition is cycled, the BCW system returns to ON
Rear Cross-Traffic Collision Warning (RCCW)*†6
If the RCCW system sensors detect approaching vehicles from the rear left or rear right
side of the vehicle D, the system will sound an audible alert, the yellow-flashing indicators
on the outside rearview mirror will illuminate and a message will appear on the LCD
screen, when these conditions are met:
•The gear shift is moved into Reverse
•The vehicle is moving slower than 6 mph
REMINDERS:
•RCCW can be set to on/off in User Settings from the LCD Instrument Cluster modes
•
The RCCW feature can be turned OFF/ON in User Settings When vehicle power is cycled, RCCW will remain in the previous state
The BCW and RCCW systems are supplemental systems. Do not solely rely on these systems and always pay attention to drive safely.
For more information on the above systems, please refer to the Owner’s Manual.
*IF EQUIPPED †LEGAL DISCL AIMERS ON BACK INSIDE COVER
C
DRIVER'S PANEL
Page 13 of 58

ALWAYS CHECK THE OWNER’S MANUAL FOR COMPLETE OPER ATING INFORMATION AND SAFET Y WARNINGS *IF EQUIPPED †LEGAL DISCL AIMERS ON BACK INSIDE COVER11
Lane Departure Warning Video
To view a video on your mobile device, snap this QR Code or visit the listed website
Refer to page 2 for more information
QR CODE
www.youtube.com/KiaFeatureVideos
When the LDW sensor does not detect the lane traveling in, the lane is not illuminatedWhen the LDW sensor detects the lane traveling in the lane is illuminated
Lane Departure Warning
Lane Departure Warning Lane Departure Warning
Lane Departure Warning
Lane Departure Warning
Lane Departure Warning
Lane Departure Warning
Lane Departure Warning
When the LDW sensor detects the vehicle veering outside of the lane traveling in, the lane the vehicle is crossing will blink (shown in both images at left)
Lane Departure Warning
Lane Departure WarningLane Departure Warning
Lane Departure Warning
Lane Departure Warning
Lane Departure Warning Lane Departure Warning
Lane Departure Warning
(Button panel located left of Steering Wheel)
A
Lane Departure Warning (LDW)*†6
With the Engine Start /Stop button in the ON position, press the LDW
button A to turn system ON
The instrument cluster indicator
will initially illuminate white It will remain white when the vehicle is
traveling slower than 40 mph and the system does not detect the lane
markers When the LDW system detects the lane markers, the LDW
icon will illuminate green
If LDW detects that you are moving outside of your lane, the system
may issue a warning on the LCD screen and an alert may sound
The system will operate under the following conditions:
•The vehicle speed exceeds approximately 40 mph
•The LDW system recognizes the lane the vehicle is traveling in
•The vehicle is between the lane markers
If the LDW button is ON or OFF and ignition is cycled, the system
remains in the previous state
REMINDERS:
• LDW will not issue a warning if the turn signal or hazard signal is activated
• LDW in the current state will stay on when the ignition is cycledLane Departure Warning (LDW) is not a substitute for safe and proper driving. Always drive safely and use caution. LDW may not always alert the driver if the vehicle is driven outside of its lane.
DRIVER'S PANEL
Page 14 of 58
 /
Forward Collision Warning (FCW)*†6
FCA-P")
SEDONA FEATURES & FUNCTIONS GUIDE12*IF EQUIPPED †LEGAL DISCL AIMERS ON BACK INSIDE COVER
Forward Collision-Avoidance Assist-Pedestrian (FCA-Ped) /
Forward Collision Warning (FCW)*†6
FCA-Ped is designed to help alert the driver and, under certain conditions, apply emergency braking when rapidly
approaching a vehicle that is slowing down, braking or stopped Initially, the FCA-Ped provides Forward Collision
Warning (FCW ) when it detects a potential collision with a vehicle in front, emitting an audible warning and visual
alert on the instrument cluster Adjust the alert settings (Early, Normal, Late) in the User Settings
To turn the FCA-Ped / FCW off, go to User Settings again If the system detects that the collision risk has increased,
Forward Collision-Avoidance Assist-Pedestrian (FCA-Ped) automatically applies the brakes to reduce your speed,
potentially helping to reduce the effects of a possible collision FCA-Ped can be turned ON in the User Settings
menu on the Instrument Cluster display
FCA-Ped / FCW will become active when the:
• Engine Start /Stop button is ON
• Vehicle is traveling faster than approximately 5 mph
• Electronic Stability Control (ESC) is ON
REMINDERS:
• The FCA-Ped / FCW will be activated by default when vehicle power is cycled on, even when previously set to off
• The FCA-Ped / FCW will not operate when the vehicle is traveling faster than approximately 50 mph
• If FCA-Ped is operating and the ESC (Electronic Stability Control) is turned off, the FCA-Ped system is automatically turned off
• When FCA-Ped is off, the FCA-Ped warning indicator is on in the Instrument Cluster
Forward Collision-Avoidance Assist-Pedestrian (FCA-Ped) / Forward Collision Warning (FCW)* are not substitutes for safe and proper driving. Always drive safely and use caution. FCA-Ped / FCW may not always alert the driver when the vehicle is approaching another vehicle.
Forward Collision-Avoidance Assist Video
To view a video on your mobile device, snap this QR Code or visit the listed website
Refer to page 2 for more information
QR CODE
www.youtube.com/KiaFeatureVideos
DRIVER'S PANEL
Page 15 of 58

(Button/switch panel located on Driver's Door )")
13ALWAYS CHECK THE OWNER’S MANUAL FOR COMPLETE OPER ATING INFORMATION AND SAFET Y WARNINGS *IF EQUIPPED
(Button located left of Steering Wheel)
(Button/switch panel located on Driver's Door )
A
BC
D
D
EFPower Windows, Window Lock & Central Door Lock
A Pull/Press to operate Front Windows Auto Up/Down*
B Press to Unlock /Lock All Doors
C Press to disable Rear Passenger Windows and Rear Sunroof* passenger controls
REMINDER: When C is pressed, window controls for the Rear Passenger Windows are disabled
Button configuration may vary depending on vehicle model.
Power Folding Outside Mirrors*
Press the L or R buttons D to select the mirror to adjust
Press button arrows E left /right or up/down to adjust mirror position
Toggle button F left /right to unfold/fold the outside rearview mirrors
Toggle button F to center to automatically fold/unfold mirrors when:
•The Smart Key* Lock /Unlock buttons are pressed
•The door outside handle button is pressed
•
•Auto Door Lock /Unlock* will engage when gear shift is moved into or out of the P (Park) position
•To turn Auto Door Lock /Unlock* OFF, go to User Settings* in the LCD Instrument Cluster modes
QUICK TIPS
•
•The mirrors will automatically unfold when the Smart Key* is within close proximity to the vehicle
•To automatically fold mirrors when exiting vehicle, press the LOCK button once on the Smart Key*
QUICK TIPS
Press button again to stop Auto Up/Down function
QUICK TIP
Power/Heated Outside Mirrors*
Mirror heaters automatically turn ON/OFF at the same time
the Rear Window Defroster is turned ON/OFF Rear Window
Defroster button* is located on climate control system panel
Automatic Door Lock/Unlock
When the gear shift is moved into or out of P (Park), all doors
will Lock /Unlock Refer to the User Settings on how to turn
Auto Door Lock /Unlock ON/OFF
Fuel Filler Lid Release Button
Press the Fuel Filler Lid Release button to release the fuel door
REMINDER: To lock position of mirrors, toggle switch to the neutral (center) position
DRIVER'S PANEL
Page 16 of 58

AB
Engine Start/Stop Button & Smart Key Video
T")
SEDONA FEATURES & FUNCTIONS GUIDE14*IF EQUIPPED †LEGAL DISCL AIMERS ON BACK INSIDE COVER
(Button/switch panel located on Driver's Door )
AB
Engine Start/Stop Button & Smart Key Video
To view a video on your mobile device, snap this QR Code or visit the listed website
Refer to page 2 for more information
QR CODE
www.youtube.com/KiaFeatureVideos
Reverse Parking Aid Function*
The left or right mirror buttons A need to be depressed
for the Reverse Parking Aid Function to operate
When the gear shift lever is moved into R (Reverse)
and while the vehicle is moving backwards, the outside
rearview mirrors B will rotate downward to aid in
reverse parking
To turn OFF the function, press the L or R buttons
again.
The outside rearview mirrors will automatically return
to their original positions when:
•The Engine Start /Stop Button is in the OFF position
•The gear shift lever is moved to any position except
R (Reverse)
•
Outside rearview mirror switches are not depressed
REMINDER: When the outside rearview mirror buttons (L or R) A are not depressed, the Reverse Parking Aid Function will not operate and the outside rearview mirrors will not rotate downward
To use electrical accessories:
ACC position •When in the OFF position and without depressing the brake pedal, press the ENGINE START/STOP button once (amber light)
ON position •When already in the ACC position (orange light) and without depressing the brake pedal, press the ENGINE START/STOP button again (reddish orange light) •
When in the OFF position and without depressing the brake pedal, press the ENGINE START/STOP button twice (reddish orange light)
Keeping the vehicle in ACC or the ON position for extended periods of time without turning the engine on may discharge the vehicle’s battery
QUICK TIPS
Engine Start/Stop Button*†9
To start the engine:
1 Depress the brake pedal
2
Press the ENGINE START/STOP button while gear shift is in P (Park)
To turn the engine OFF: Press the ENGINE START/STOP button
To use the ENGINE START/STOP button, you must have the
Smart Key fob inside the vehicle
REMINDERS:
•
In an emergency situation while the vehicle is in motion, you are able to turn the engine off and to the ACC position by pressing the ENGINE START/STOP button for more than 2 seconds or 3 times successively within 3 seconds
•
If Smart Key fob battery is dead, with the lock button facing the ENGINE START/STOP button, hold the fob up against the ENGINE START/STOP button and press to start engine
DRIVER'S PANEL