Page 9 of 28
6
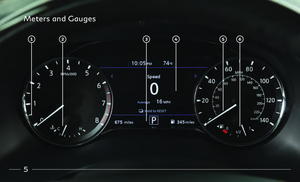
Meters and Gauges
Tachometer
Engine coolant temperature gauge
Shift lever indicator
Vehicle information display
Speedometer
Fuel gauge
Page 10 of 28

7
• To slide the seat forward or backward, push the switch forward
or backward.
• To recline the seatback, push the switch forward or backward.
SEAT LIFTER
• To adjust the angle of the front portion or height of the seat, push the front or rear end of the
switch up or down.
LUMBAR SUPPORT
• Push each side o f the adjusting switch to adjust the seat lumbar area
until the desired position is achieved.
SEAT/STEERING POSITIONING ON EXIT
• The shift le ver must be in P (PARK) position with the
ignition switch in the OFF position.
• The entry/exit function can be activated by pushing SET switch
, located on the driver’s side door, and then the
corresponding seat switch
.
Please see your Owner’s Manual for important safety information, system limitations, and additional operating
and feature information.
Seat AdjustmentsHead Restraint Adjustment
To raise the head restraint: Pull the head restraint up.
To lower the head restraint: Push and hold the lock
knob
and push the head restraint down.
Make sure the head restraint is fully engaged in
position after any adjustment.
Please see your Owner’s Manual for important safety information,
system limitations, and additional operating and feature information.
Page 11 of 28

8
All power windows can be operated through the
main switch on the driver’s door.
Power windows open/close
Disable passengers’ window operation
POWER WINDOW CONVENIENCE OPENING/
CLOSING FEATURE
To unlock the vehicle and open the windows
simultaneously, press and hold the
button on
the Intelligent Key for about 3 seconds after the
door is unlocked.
To stop opening, release the
button .
The window cannot be closed using the Intelligent Key.
Using the mechanical key:
Insert the mechanical key and turn the driver’s door key cylinder
to the rear of the vehicle for longer than 1 second. The door is
unlocked and the window keeps opening while turning the key.
To close the windows, turn the driver’s door key cylinder to the
front of the vehicle for longer than 1 second. The door is locked
and the window keeps closing while turning the key.
Please see your Owner’s Manual for important safety information, system limitations,
and additional operating and feature information.
Windows
You can switch between the conventional rearview mirror
mode and Smart Rear View Mirror mode (camera view
mode) by using the mode select lever
.
• When the Smart R ear View Mirror mode is on,
the settings menu can be selected by pressing the
menu button
.
• Press the adjustment buttons to adjust the
following settings:
• Brightness • Down/Up • Indication
• Language • Rotation • Dimming Mirr or
Please see your Owner’s Manual for important safety information, system
limitations, and additional operating and feature information.
Smart Rear View Mirror
(if so equipped)
Page 12 of 28

9
HomeLink Garage Door Opener
To complete HomeLink programing, you can download the HomeLink app or read the
instructions below.
Before you start programing HomeLink, park outside and within range of your garage.
Then, clear the area around your garage door, place the ignition switch in the ON or
ACC position and locate the remote control transmitter, ensuring a fresh battery is
installed. Please note, a ladder and secondary person may be needed.
To program HomeLink:
1.
P
osition the handheld transceiver within 3 in (76 mm) from the HomeLink surface.
2.
Pr
ess and hold the desired HomeLink
and garage door opener button. Release
both when the indicator
flashes rapidly (if so equipped) or “TRAINED” (if so
equipped) is displayed in the status area
of the mirror.
Before proceeding to the next steps, be sure your garage door is not moving.
• Press the HomeLink button for 2 seconds up to 3 times. If the garage door
responds, training is complete.
If the garage door doesn’t respond:
• Press the “learn” or “set” button on the garage opener until an indicator illuminates. Within 30 seconds, press the
HomeLink button in your vehicle for 2 seconds up to 3 times.
If the garage door doesn’t respond, please see your owner’s manual, go to www.HomeLink.com/infiniti or call
1-800-355-3515.
Please see your Owner’s Manual for important safety information, system limitations, and additional operating and feature information.
Page 13 of 28
10
OFF position
Automatic (AUTO) headlight mode ON position (headlights switch on/
off automatically depending on ambient light conditions/daytime running
light system)
Headlight ON position
Side lights, license plate lights and combination meter lighting ON position
Front fog light switch
Push the headlight switch forward for the high beams.
F
or High Beam Auto-Dimming (Auto position):
• When the vehicle speed is less than 17 mph (27 km/h), the headlight returns to low beam.
• To disable high beam auto-dimming, turn headlight switch to headlight ON position .
Pull the headligh t switch rearward to flash the high beams.
For normal headlight operation, leave the exterior light switch in the AUTO position.
Please see your Owner’s Manual for important safety information, system limitations, and additional operating
and feature information.
Exterior Light Operation
Page 14 of 28
 — Rear wiper operates intermittently.
Low ( ON) — Rear wiper operates at a
continuous low-speed.
Push the le
ver forward")
11
Wiper and Washer Switch
REAR WIPER AND WASHER
Intermittent (INT) — Rear wiper operates intermittently.
Low ( ON) — Rear wiper operates at a
continuous low-speed.
Push the le
ver forward
to activate the rear washer.
RAIN-SENSING AUTOMATIC WIPER SYSTEM
To set the Rain-Sensing Automatic Wiper System:
• Push the le ver down to the AUTO position .
The rain sensor sensitivity level can be adjusted by:
• Turning the knob toward the rear (Low) for low sensitive operation
.
• Turning the knob toward the front (High) for high sensitive operation
.
To turn the Rain-Sensing Automatic Wiper System
off, push the lever to the OFF position.
Please see your Owner’s Manual for important safety information,
system limitations, and additional operating and feature information.
Move the lever up or down to one of
the following positions to operate the
windshield wipers:
MIST
One sw
eep operation
OFF
Wipers ar
e OFF
AUTO
R
ain-sensing automatic wipe
LO
C
ontinuous wipe, slow
HI
C
ontinuous wipe, fast
To adjust the wiper sensitivity for the AUTO
setting, twist the control ring
.
Pull the lever
toward you operate the
windshield washer.
Page 15 of 28

12
Sun Visors
Pull down the sun visor to block glare from the front.
Remove the sun visor from the center mount
by lifting it slightly and swing it to the side to
block glare from the side window.
Draw out the extension sun visor from the
main sun visor to block further glare.
Please see your Owner’s Manual for important safety
information, system limitations, and additional operating and
feature information.
Fuel-filler Door
To open the fuel-filler door, unlock
the vehicle and gently push the rear
side of the fuel-filler door.
Please see your Owner’s Manual for important
safety information, system limitations, and
additional operating and feature information.
Clock Set/Adjustment
To adjust the time and the appearance of
the clock on the display:
1.
Press the MENU button
below the
lower display. Then select the “Settings”
key on the lower display.
2.
Select the
“Clock” key to adjust “On-
Screen Clock”, “Daylight Savings Time”,
“Clock Format (24h)” and “Time Zone”.
Please see your INFINITI InTouch™ Owner’s Manual for
important safety information, system limitations, and
additional operating and feature information.
Page 16 of 28

13
Your vehicle is equipped with two USB ports , located under
the control panel, to which you can connect compatible devices
(cellular phones, iPod
®, other compatible audio devices, USB memory
sticks, etc.).
After connecting your device through one of the USB ports, press
the AUDIO button on the control panel to select audio playback
from the device connected through the USB ports.
A second device can be connected for charging. In order to switch to
the second device for audio playback, both devices will need to be
removed and the second device reconnected first.
There are also USB charging ports located in the second row
on the back of the center console. These ports will charge
compatible devices.
Please see your INFINITI InTouch™ Owner’s Manual for important safety information,
system limitations, and additional operating and feature information.
USB Connection PortConnecting your Cellular Phone
or Device via Bluetooth
®*
Using Bluetooth® technology, you can
connect (pair) your cellular phone with
the in-vehicle system for hands-free use
of your cellular phone.
1.
Pr
ess the MENU button below the
lower display.
2.
Select the
“Settings” key on the
lower display.
3
.
Select the
“Connections” key.
4.
Select the
“Add New” key.
5.
F
ollow the instructions on the
screen. If a PIN appears on the
screen, operate the Bluetooth
®
device to enter/confirm the PIN.
The paired cellular phone will be added to the list on the
“Connections” screen.
FAVORITE HANDS-FREE PHONE
•
Y
ou can register a favorite hands-free phone. The phone device
name selected as a favorite will be marked with a star.
For any Bluetooth
® connectivity issues, reboot your cellular
phone or device.
* Some jurisdictions prohibit the use of cellular telephones while driving.
Please see your INFINITI InTouch™ Owner’s Manual for important safety information, system
limitations, and additional operating and feature information.


 headlight mode ON position (headlights switch on/
off automatically depending on ambient light conditions/daytime running
light system)
Headlight ON position")