Page 9 of 27
6
Meters and Gauges
Engine coolant temperature gauge
Odometer/Twin trip odometer
Vehicle information display
Shift lever indicator
Speedometer
Fuel gauge
Page 10 of 27
7
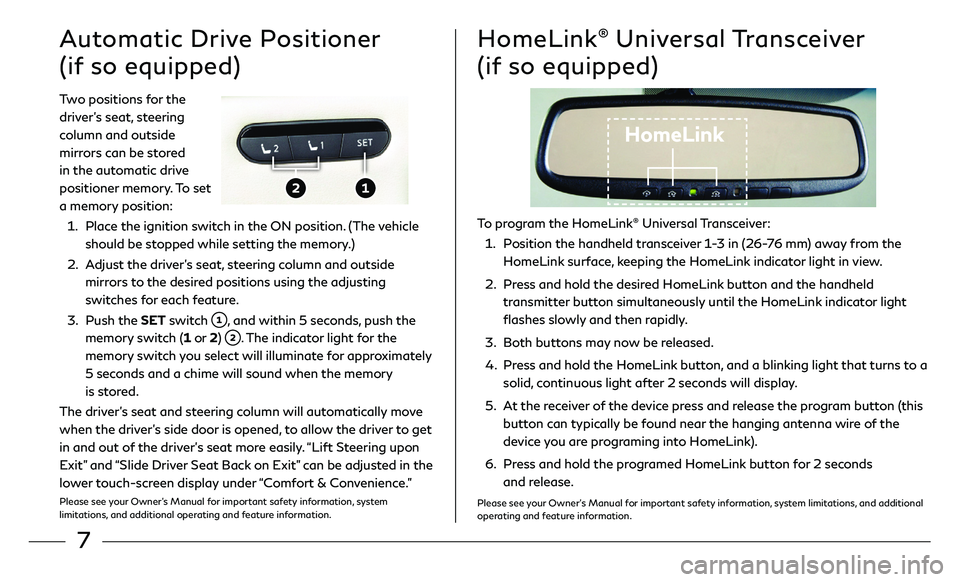
Two positions for the
driver’s seat, steering
column and outside
mirrors can be stored
in the automatic drive
positioner memory. To set
a memory position:
1. Place the ignition switch in the ON position. (The vehicle
should be stopped while setting the memory.)
2. Adjust the driver’s seat, steering column and outside
mirrors to the desired positions using the adjusting
switches for each feature.
3. Push the SET switch , and within 5 seconds, push the
memory switch (1 or 2) . The indicator light for the
memory switch you select will illuminate for approximately
5 seconds and a chime will sound when the memory
is stored.
The driver’s seat and steering column will automatically move
when the driver’s side door is opened, to allow the driver to get
in and out of the driver’s seat more easily. “Lift Steering upon
Exit” and “Slide Driver Seat Back on Exit” can be adjusted in the
lower touch-screen display under “Comfort & Convenience.”
Please see your Owner’s Manual for important safety information, system
limitations, and additional operating and feature information.
Automatic Drive Positioner
(if so equipped)HomeLink® Universal Transceiver
(if so equipped)
HomeLink
To program the HomeLink® Universal Transceiver:
1. Position the handheld transceiver 1-3 in (26-76 mm) away from the
HomeLink surface, keeping the HomeLink indicator light in view.
2. Press and hold the desired HomeLink button and the handheld
transmitter button simultaneously until the HomeLink indicator light
flashes slowly and then rapidly.
3. Both buttons may now be released.
4 . Press and hold the HomeLink button, and a blinking light that turns to a
solid, continuous light after 2 seconds will display.
5. At the receiver of the device press and release the program button (this
button can typically be found near the hanging antenna wire of the
device you are programing into HomeLink).
6. Press and hold the programed HomeLink button for 2 seconds
and release.
Please see your Owner’s Manual for important safety information, system limitations, and additional
operating and feature information.
Page 11 of 27
8
Heater and Air Conditioner (automatic)
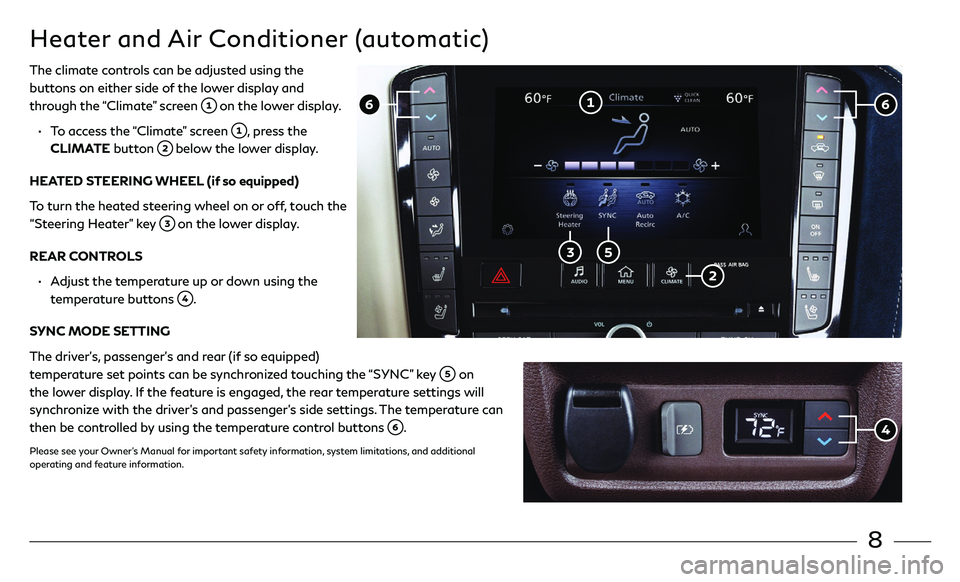
The climate controls can be adjusted using the
buttons on either side of the lower display and
through the “Climate” screen
on the lower display.
• To access the “Climate” screen , press the
CLIMATE button below the lower display.
HEATED STEERING WHEEL (if so equipped)
To turn the heated steering wheel on or off, touch the
“Steering Heater” key
on the lower display.
REAR CONTROLS
• Adjust the temperature up or down using the
temperature buttons
.
SYNC MODE SETTING
The driver’s, passenger’s and rear (if so equipped)
temperature set points can be synchronized touching the “SYNC” key
on
the lower display. If the feature is engaged, the rear temperature settings will
synchronize with the driver’s and passenger’s side settings. The temperature can
then be controlled by using the temperature control buttons
.
Please see your Owner’s Manual for important safety information, system limitations, and additional
operating and feature information.
Page 12 of 27
9
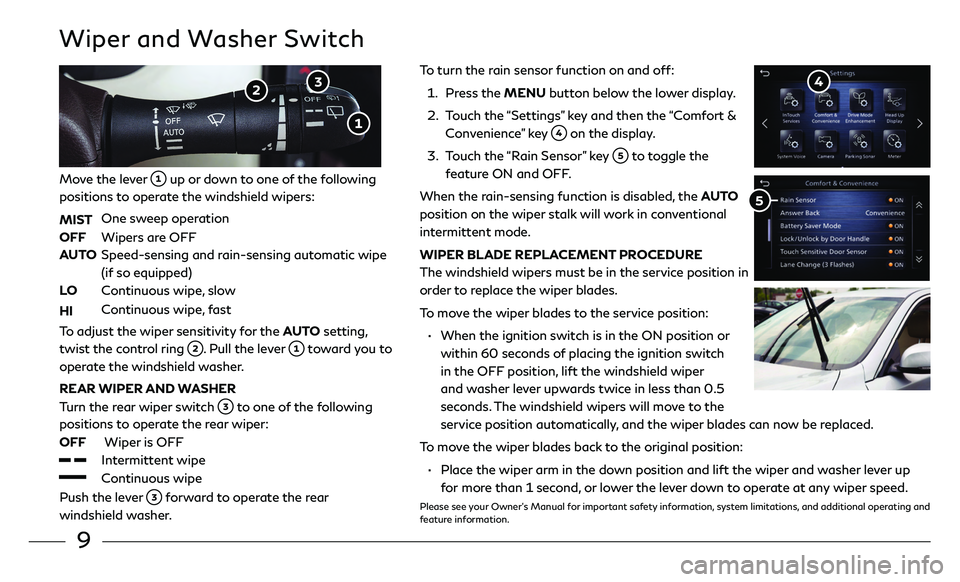
To turn the rain sensor function on and off:
1. Press the MENU button below the lower display.
2. Touch the “Settings” key and then the “Comfort &
Convenience” key on the display.
3. Touch the “Rain Sensor” key to toggle the
feature ON and OFF.
When the rain-sensing function is disabled, the AUTO
position on the wiper stalk will work in conventional
intermittent mode.
WIPER BLADE REPLACEMENT PROCEDURE
The windshield wipers must be in the service position in
order to replace the wiper blades.
To move the wiper blades to the service position:
• When the ignition swit ch is in the ON position or
within 60 seconds of placing the ignition switch
in the OFF position, lift the windshield wiper
and washer lever upwards twice in less than 0.5
seconds. The windshield wipers will move to the
service position automatically, and the wiper blades can now be replaced.
To move the wiper blades back to the original position:
• Place the wiper arm in the down position and lift the wiper and washer lever up
for mor e than 1 second, or lower the lever down to operate at any wiper speed.
Please see your Owner’s Manual for important safety information, system limitations, and additional operating and
feature information.
Wiper and Washer Switch
Move the lever up or down to one of the following
positions to operate the windshield wipers:
MIST
One sweep operation
OFF Wipers ar e OFF
AUTO Speed-sensing and r ain-sensing automatic wipe
(if so equipped)
LO
Continuous wipe, slow
HI Continuous wipe, fast
To adjust the wiper sensitivity for the AUTO setting,
twist the control ring
. Pull the lever toward you to
operate the windshield washer.
REAR WIPER AND WASHER
Turn the rear wiper switch
to one of the following
positions to operate the rear wiper:
OFF
Wiper is OFF
Intermittent wipe
Continuous wipe
Push the lever forward to operate the rear
windshield washer.
Page 13 of 27
10
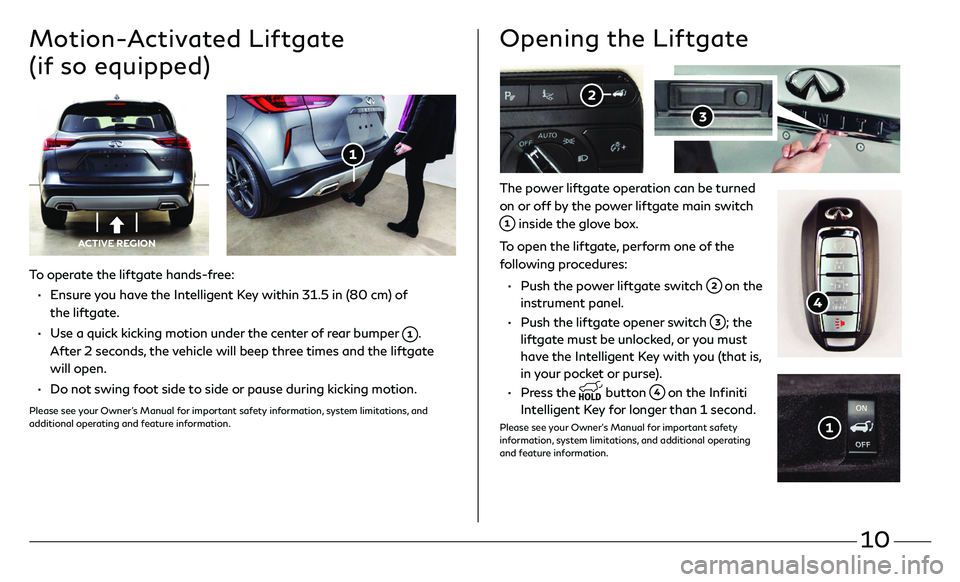
To operate the liftgate hands-free:
• Ensure you have the Intelligent Key within 31.5 in (80 cm) of
the liftgate.
• Use a quick kicking motion under the center of rear bumper .
After 2 seconds, the vehicle will beep three times and the liftgate
will open.
• Do not swing foot side to side or pause during kicking motion.
Please see your Owner’s Manual for important safety information, system limitations, and
additional operating and feature information.
Motion-Activated Liftgate
(if so equipped)
ACTIVE REGION
The power liftgate operation can be turned
on or off by the power liftgate main switch
inside the glove box.
To open the liftgate, perform one of the
following procedures:
• Push the po wer liftgate switch on the
instrument panel.
• Push the lift gate opener switch ; the
liftgate must be unlocked, or you must
have the Intelligent Key with you (that is,
in your pocket or purse).
• Press the button on the Infiniti
Intelligent Key for longer than 1 second.
Please see your Owner’s Manual for important safety
information, system limitations, and additional operating
and feature information.
Opening the Liftgate
Page 14 of 27
11
Your vehicle is equipped with two USB ports, located under the control panel, to which you can
connect compatible devices (cellular phones, iPod®, other compatible audio devices, USB memory
sticks, etc.).
After connecting your device through one of the USB ports, press the MEDIA button on the
control panel to select audio playback from the device connected through the USB ports.
A second device can be connected for charging. In order to switch to the second device for audio
playback, both devices will need to be removed and the second device reconnected first.
There are also USB charging ports located in the first row on the inside of the console box and
in the second row on the back of the center console. These ports will charge compatible devices.
Please see your INFINITI InTouch™ Owner’s Manual for important safety information, system limitations, and additional
operating and feature information.
USB Connection Ports
Page 15 of 27
12
Connecting Your Cellular Phone
or Device via Bluetooth
®*
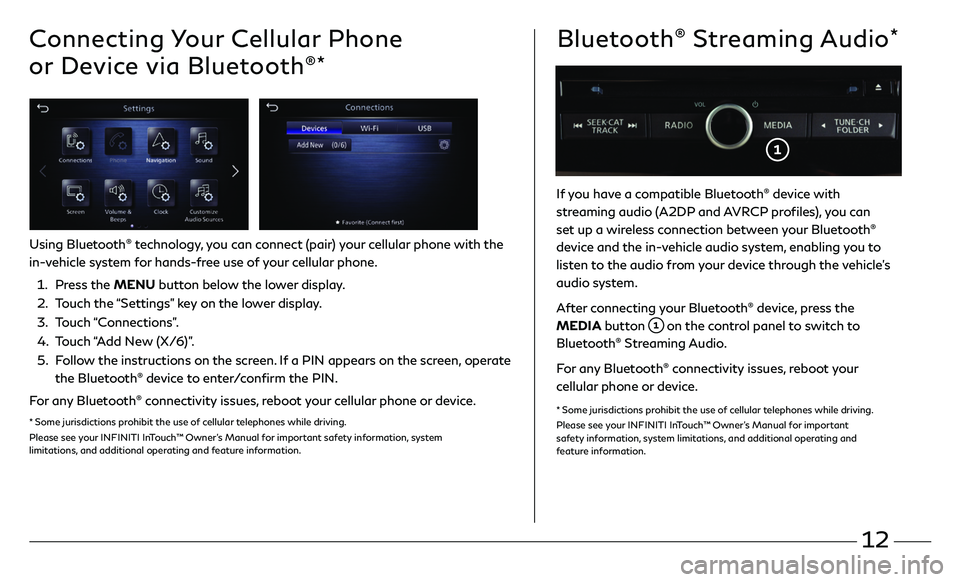
Using Bluetooth® technology, you can connect (pair) your cellular phone with the
in-vehicle system for hands-free use of your cellular phone.
1. Press the MENU button below the lower display.
2. Touch the “Settings” key on the lower display.
3. Touch “Connections”.
4. Touch “Add New (X/6)”.
5. Follow the instructions on the screen. If a PIN appears on the screen, operate
the Bluetooth® device to enter/confirm the PIN.
For any Bluetooth
® connectivity issues, reboot your cellular phone or device.
* Some jurisdictions prohibit the use of cellular telephones while driving.
Please see your INFINITI InTouch™ Owner’s Manual for important safety information, system
limitations, and additional operating and feature information.
If you have a compatible Bluetooth® device with
streaming audio (A2DP and AVRCP profiles), you can
set up a wireless connection between your Bluetooth
®
device and the in-vehicle audio system, enabling you to
listen to the audio from your device through the vehicle’s
audio system.
After connecting your Bluetooth
® device, press the
MEDIA button
on the control panel to switch to
Bluetooth® Streaming Audio.
For any Bluetooth
® connectivity issues, reboot your
cellular phone or device.
* Some jurisdictions prohibit the use of cellular telephones while driving.
Please see your INFINITI InTouch™ Owner’s Manual for important
safety information, system limitations, and additional operating and
feature information.
Bluetooth® Streaming Audio*
Page 16 of 27
13
Apple CarPlay®
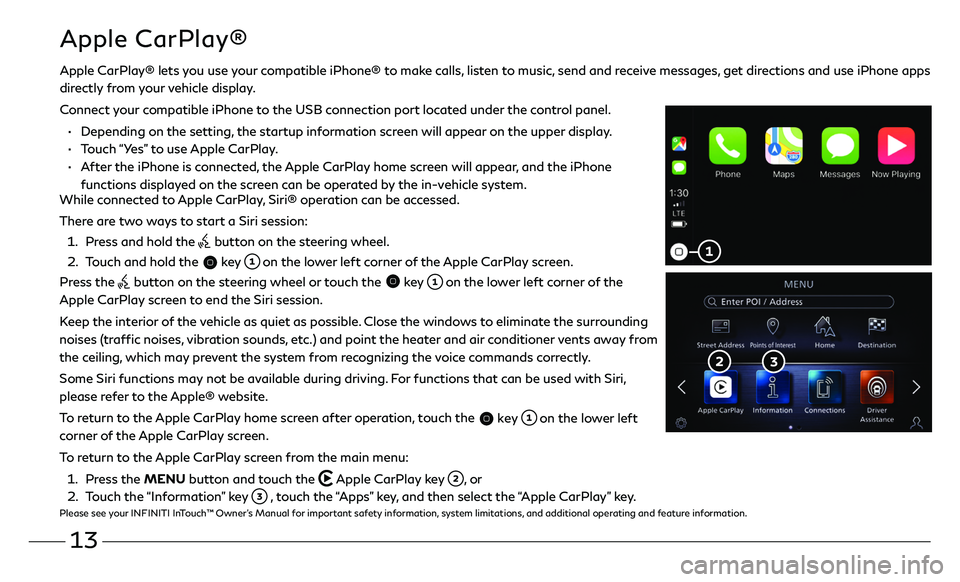
While connected to Apple CarPlay, Siri® operation can be accessed.
There are two ways to start a Siri session:
1. Press and hold the button on the steering wheel.
2. Touch and hold the key on the lower left corner of the Apple CarPlay screen.
Press the
button on the steering wheel or touch the key on the lower left corner of the
Apple CarPlay screen to end the Siri session.
Keep the interior of the vehicle as quiet as possible. Close the windows to eliminate the surrounding
noises (traffic noises, vibration sounds, etc.) and point the heater and air conditioner vents away from
the ceiling, which may prevent the system from recognizing the voice commands correctly.
Some Siri functions may not be available during driving. For functions that can be used with Siri,
please refer to the Apple® website.
To return to the Apple CarPlay home screen after operation, touch the
key on the lower left
corner of the Apple CarPlay screen.
To return to the Apple CarPlay screen from the main menu:
1. Press the MENU button and touch the Apple CarPlay key , or
2. Touch the “Information” key , touch the “Apps” key, and then select the “Apple CarPlay” key.Please see your INFINITI InTouch™ Owner’s Manual for important safety information, system limitations, and additional operating and feature information.
Apple CarPlay® lets you use your compatible iPhone® to make calls, listen to music, send and receive messages, get directions and use iPhone apps
directly from your vehicle display.
Connect your compatible iPhone to the USB connection port located under the control panel.
• Depending on the setting, the startup information screen will appear on the upper display.
• Touch “Yes” to use Apple CarPlay.
• After the iPhone is connected, the Apple CarPlay home screen will appear, and the iPhone
functions displayed on the screen can be operated by the in-vehicle system.