2020 HYUNDAI VELOSTER tailgate
[x] Cancel search: tailgatePage 14 of 480
1-3
Your vehicle at a glance
1
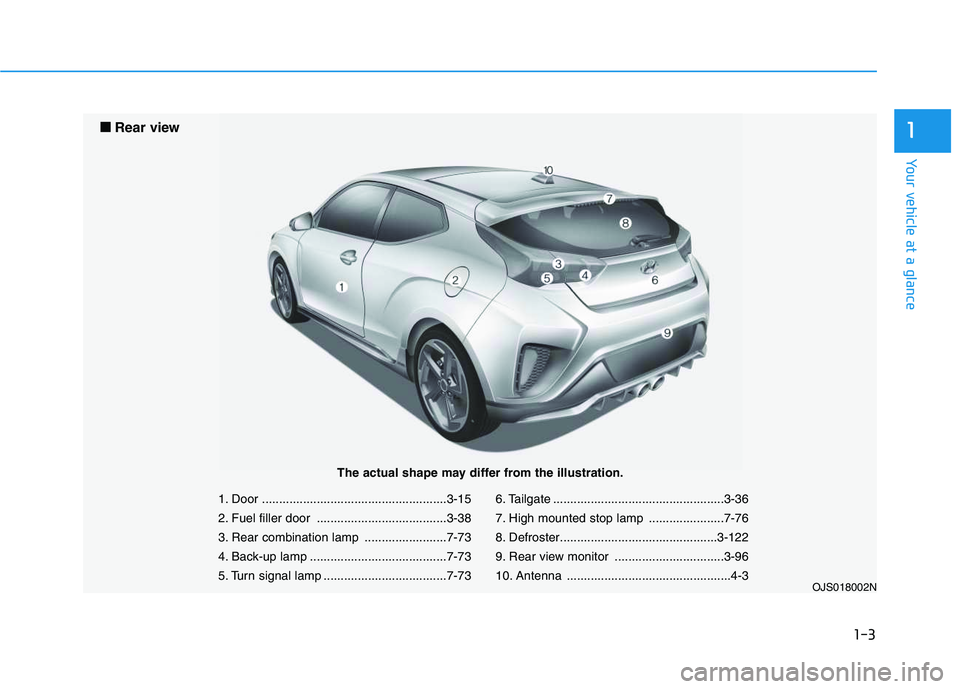
1. Door ......................................................3-15
2. Fuel filler door ......................................3-38
3. Rear combination lamp ........................7-73
4. Back-up lamp ........................................7-73
5. Turn signal lamp ....................................7-736. Tailgate ..................................................3-36
7. High mounted stop lamp ......................7-76
8. Defroster..............................................3-122
9. Rear view monitor ................................3-96
10. Antenna ................................................4-3
OJS018002N
■ ■
Rear view
The actual shape may differ from the illustration.
Page 90 of 480
3-90
Convenient features of your vehicle
Luggage compartment lamp
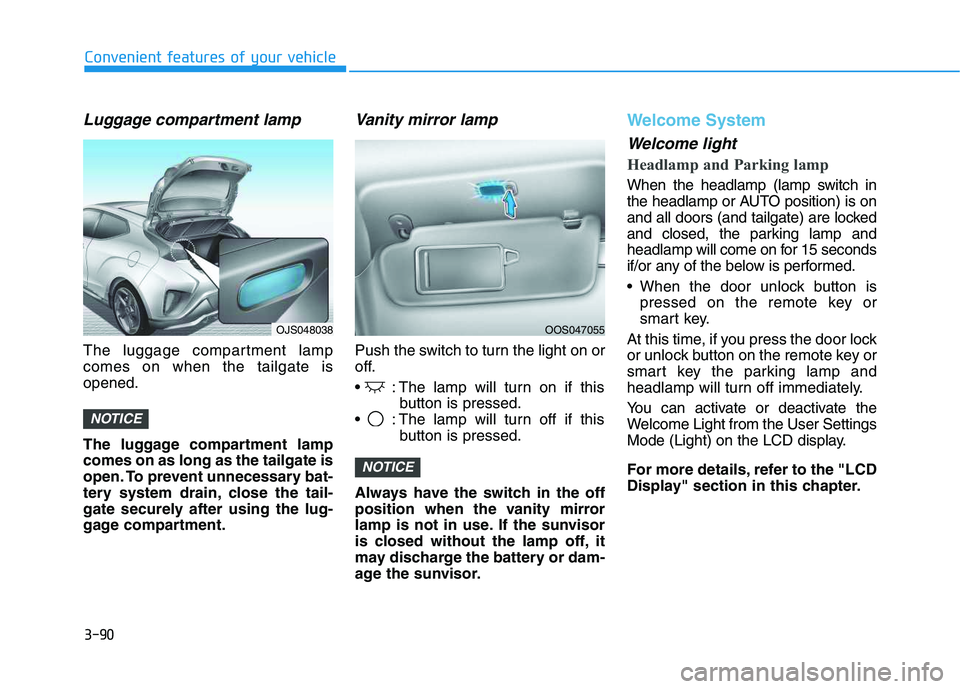
The luggage compartment lamp
comes on when the tailgate is
opened.
The luggage compartment lamp
comes on as long as the tailgate is
open. To prevent unnecessary bat-
tery system drain, close the tail-
gate securely after using the lug-
gage compartment.
Vanity mirror lamp
Push the switch to turn the light on or
off.
: The lamp will turn on if this
button is pressed.
: The lamp will turn off if this
button is pressed.
Always have the switch in the off
position when the vanity mirror
lamp is not in use. If the sunvisor
is closed without the lamp off, it
may discharge the battery or dam-
age the sunvisor.
Welcome System
Welcome light
Headlamp and Parking lamp
When the headlamp (lamp switch in
the headlamp or AUTO position) is on
and all doors (and tailgate) are locked
and closed, the parking lamp and
headlamp will come on for 15 seconds
if/or any of the below is performed.
When the door unlock button is
pressed on the remote key or
smart key.
At this time, if you press the door lock
or unlock button on the remote key or
smart key the parking lamp and
headlamp will turn off immediately.
You can activate or deactivate the
Welcome Light from the User Settings
Mode (Light) on the LCD display.
For more details, refer to the "LCD
Display" section in this chapter.
NOTICE
NOTICE
OJS048038OOS047055
Page 134 of 480
3-134
Cargo Area Cover
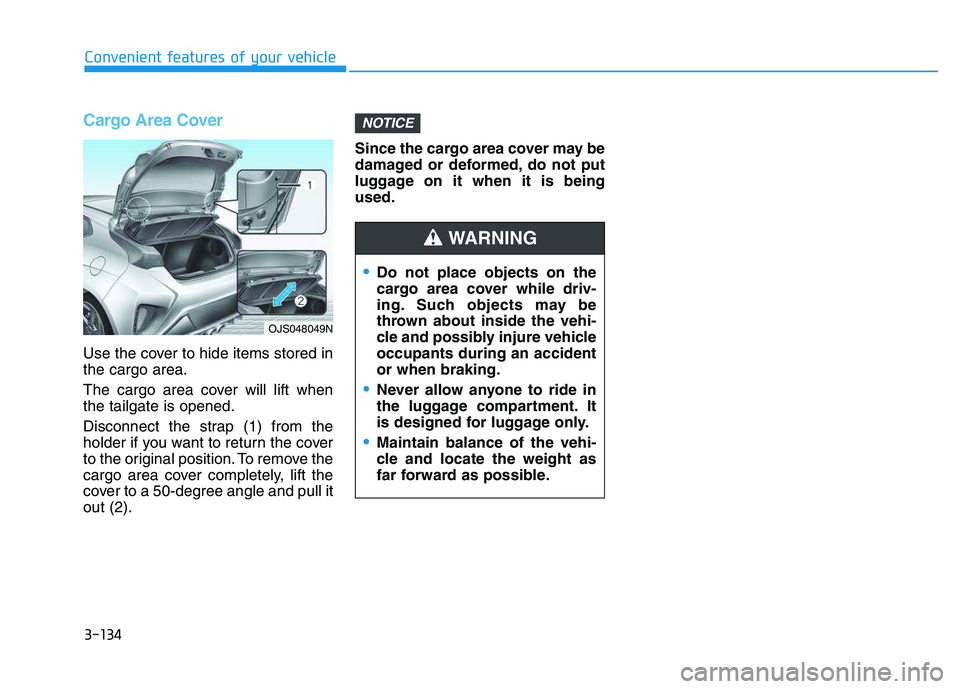
Use the cover to hide items stored in
the cargo area.
The cargo area cover will lift when
the tailgate is opened.
Disconnect the strap (1) from the
holder if you want to return the cover
to the original position. To remove the
cargo area cover completely, lift the
cover to a 50-degree angle and pull it
out (2).Since the cargo area cover may be
damaged or deformed, do not put
luggage on it when it is being
used.
NOTICE
Convenient features of your vehicle
Do not place objects on the
cargo area cover while driv-
ing. Such objects may be
thrown about inside the vehi-
cle and possibly injure vehicle
occupants during an accident
or when braking.
Never allow anyone to ride in
the luggage compartment. It
is designed for luggage only.
Maintain balance of the vehi-
cle and locate the weight as
far forward as possible.
WARNING
OJS048049N
Page 135 of 480
Convenient features of your vehicle
Accessing Your Vehicle .........................................3-3
Remote Key.........................................................................3-3
Smart Key ............................................................................3-7
Immobilizer System .........................................................3-12
Door Locks ............................................................3-15
Operating Door Locks from Outside the Vehicle ....3-15
Operating Door Locks from Inside the Vehicle .......3-16
Automatic Door Lock and Unlock Features .............3-19
Child-Protector Rear Door Locks ...............................3-19
Theft-Alarm System ............................................3-20
Steering Wheel .....................................................3-21
Electric Power Steering (EPS) .....................................3-21
Tilt Steering / Telescope Steering ..............................3-22
Horn ....................................................................................3-22
Heated Steering Wheel ..................................................3-23
Mirrors ...................................................................3-23
Inside Rearview Mirror ..................................................3-23
Side View Mirrors ...........................................................3-25
Windows ................................................................3-27
Power Windows ...............................................................3-28
Wide Sunroof........................................................3-31
Sunroof opening and closing .......................................3-32
Sliding the sunroof .........................................................3-32
Tilting the sunroof ..........................................................3-32
Sunshade ...........................................................................3-33Resetting the sunroof ....................................................3-33
Sunroof Open Warning ..................................................3-34
Exterior Features .................................................3-35
Hood ...................................................................................3-35
Tailgate...............................................................................3-36
Fuel Filler Door ................................................................3-38
Instrument Cluster ...............................................3-41
Instrument Cluster Control............................................3-42
Gauges and Meters ........................................................3-43
Transmission shift indicator .........................................3-46
Warning and Indicator Lights .......................................3-47
LCD Display Messages ...................................................3-58
LCD Display ...........................................................3-63
LCD Display Control ........................................................3-63
LCD Display Modes .........................................................3-64
Trip Computer .......................................................3-74
Head Up Display (HUD) .......................................3-78
Lighting..................................................................3-81
Exterior Lights .................................................................3-81
Interior Lights...................................................................3-88
Welcome System .............................................................3-90
3
Page 137 of 480
3-3
Convenient features of your vehicle
Remote Key (if equipped)
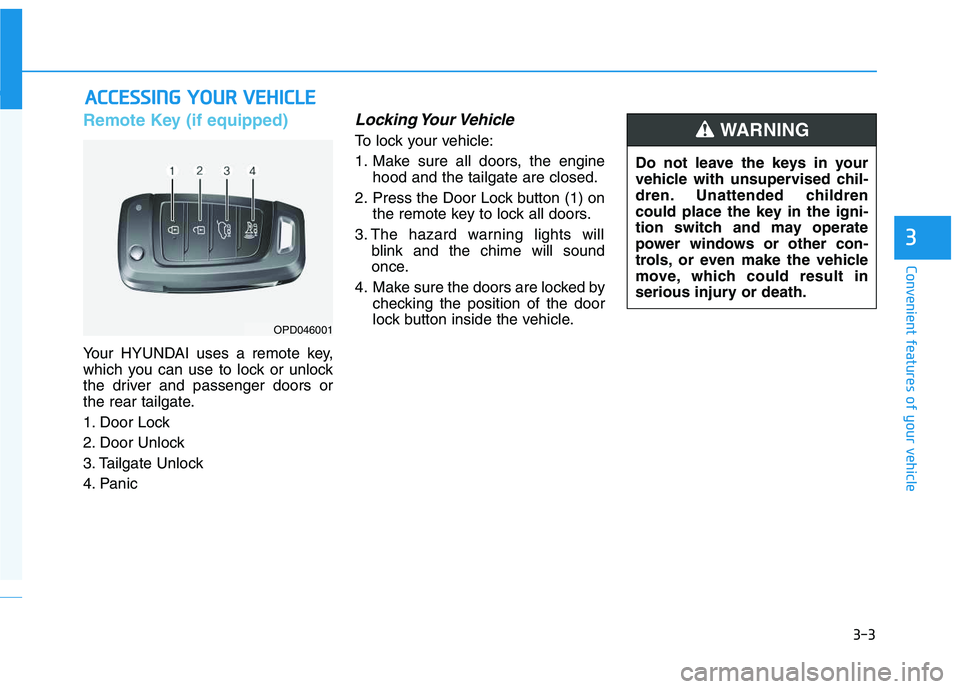
Your HYUNDAI uses a remote key,
which you can use to lock or unlock
the driver and passenger doors or
the rear tailgate.
1. Door Lock
2. Door Unlock
3. Tailgate Unlock
4. Panic
Locking Your Vehicle
To lock your vehicle:
1. Make sure all doors, the engine
hood and the tailgate are closed.
2. Press the Door Lock button (1) on
the remote key to lock all doors.
3. The hazard warning lights will
blink and the chime will sound
once.
4. Make sure the doors are locked by
checking the position of the door
lock button inside the vehicle.
A AC
CC
CE
ES
SS
SI
IN
NG
G
Y
YO
OU
UR
R
V
VE
EH
HI
IC
CL
LE
E
3
OPD046001
Do not leave the keys in your
vehicle with unsupervised chil-
dren. Unattended children
could place the key in the igni-
tion switch and may operate
power windows or other con-
trols, or even make the vehicle
move, which could result in
serious injury or death.
WARNING
Page 138 of 480
3-4
Unlocking your vehicle
To unlock your vehicle :
1. Press the Door Unlock button (2)
on the remote key.
2. The driver's door will unlock. The
hazard warning lights will blink two
times.
Two press unlock setting:
If you press the Door Unlock but-
ton on the remote key again with-
in four seconds, then all the doors
will unlock.
Two press unlock setting can be
changed according to owner's pref-
erence in the cluster User Settings
mode or with the remote key.
• User settings mode method:
Select or deselect the 'Two Press
Unlock' feature in the User
Settings mode on the cluster LCD
display (User Settings ➞Door ➞
Two Press Unlock).
Press and hold both Door Lock (1)
and Door Unlock (2) buttons at the
same time until the hazard warn-
ing lights blink.Now all doors will unlock when the
Door Unlock button is pressed one
time. To change the setting back,
repeat this procedure.
Information
After unlocking the doors, the doors
will automatically relock after 30 sec-
onds unless a door is opened.
Tailgate unlocking
To unlock the tailgate :
1. Press and hold the Tailgate
Unlock button (3) on the remote
key for more than one second.
2. The hazard warning lights will
blink two times and the tailgate will
be unlocked.
Once the tailgate is opened and then
closed, the tailgate will lock automat-
ically.
Information
The word "HOLD" is written on the
button to inform you that you must
press and hold the button for more
than one second.
Panic button (if equipped)
Press and hold the Panic button (4)
for more than one second. The horn
sounds and hazard warning lights
flash for about 30 seconds.
To cancel the panic mode, press any
button on the remote key.
Start-up
For information, refer to the "Key
Ignition Switch" section in chapter 5.
To prevent damaging the remote
key:
• Keep the remote key away from
water or any liquid and fire.
Internal circuits may malfunc-
tion if the inside of the remote
key gets damp (from liquids or
moisture) or if it is heated. This
can exclude the remote key from
being covered under warranty.
Avoid dropping or throwing the
remote key.
Protect the remote key from
extreme temperatures.
NOTICE
i
i
Convenient features of your vehicle
Page 141 of 480
3-7
Convenient features of your vehicle
Smart Key (if equipped)
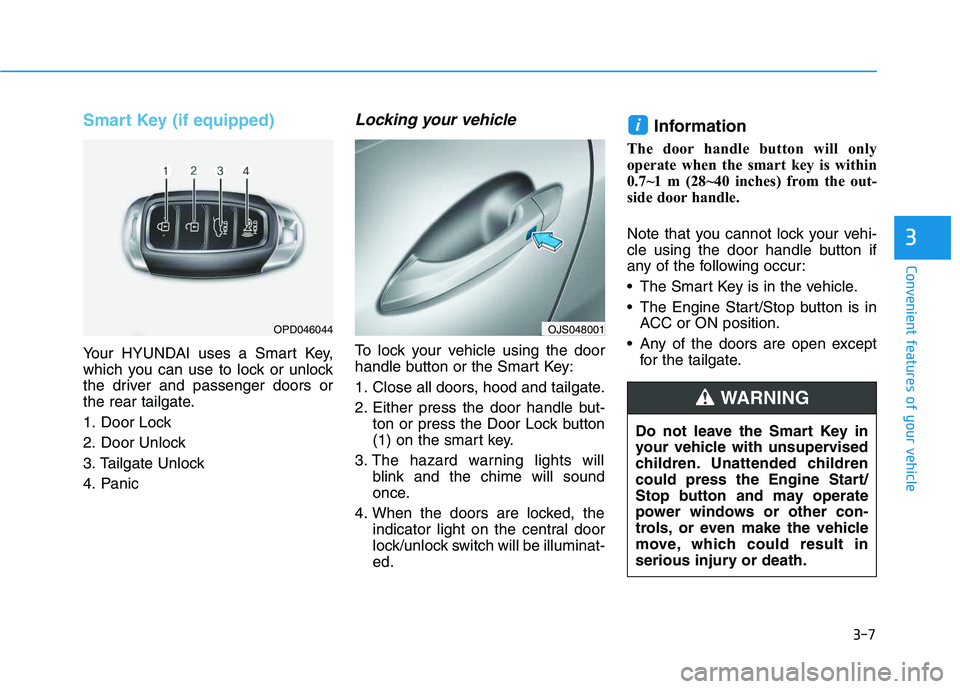
Your HYUNDAI uses a Smart Key,
which you can use to lock or unlock
the driver and passenger doors or
the rear tailgate.
1. Door Lock
2. Door Unlock
3. Tailgate Unlock
4. Panic
Locking your vehicle
To lock your vehicle using the door
handle button or the Smart Key:
1. Close all doors, hood and tailgate.
2. Either press the door handle but-
ton or press the Door Lock button
(1) on the smart key.
3. The hazard warning lights will
blink and the chime will sound
once.
4. When the doors are locked, the
indicator light on the central door
lock/unlock switch will be illuminat-
ed.
Information
The door handle button will only
operate when the smart key is within
0.7~1 m (28~40 inches) from the out-
side door handle.
Note that you cannot lock your vehi-
cle using the door handle button if
any of the following occur:
The Smart Key is in the vehicle.
The Engine Start/Stop button is in
ACC or ON position.
Any of the doors are open except
for the tailgate.
i
3
OPD046044
Do not leave the Smart Key in
your vehicle with unsupervised
children. Unattended children
could press the Engine Start/
Stop button and may operate
power windows or other con-
trols, or even make the vehicle
move, which could result in
serious injury or death.
WARNING
OJS048001
Page 143 of 480
3-9
Convenient features of your vehicle
Opening the tailgate
To unlock and open the tailgate:
1. Make sure you have the smart key
in your possession.
2. Press either the tailgate handle
release button on the vehicle or
press and hold the Tailgate Unlock
button on the smart key for more
than one second. The hazard
warning lights will blink two times
and the tailgate latch will unlock.
The tailgate must be operated
manually to open the tailgate.
Once the tailgate latch is
unlocked, pull upward on the tail-
gate handle to fully open the tail-
gate.
3. Once the tailgate is opened and
then closed, the tailgate will lock
automatically.Information
• The tailgate handle button will only
operate when the smart key is with-
in 0.7 m (28 inches) from the tailgate
handle.
• The Tailgate Unlock button (3) will
only unlock the tailgate. It will not
release the latch and open the tail-
gate automatically. If the Tailgate
Unlock button is used, someone
must still press the tailgate handle
button to open the tailgate.
Panic button
Press and hold the Panic button (4)
for more than one second. The horn
sounds and hazard warning lights
blink for about 30 seconds. To cancel
the panic mode, press any button on
the Smart Key.
Start-up
You can start the vehicle without
inserting the key.
For information, refer to the
"Engine Start/Stop Button" sec-
tion in chapter 5.
To prevent damaging the smart key:
Keep the smart key in a cool, dry
place to avoid damage or mal-
function. Exposure to moisture
or high temperature may cause
the internal circuit of the smart
key to malfunction which may
not be covered under warranty.
Avoid dropping or throwing the
smart key.
Protect the smart key from
extreme temperatures.
NOTICE
i
NOTICE
3