2020 HYUNDAI VELOSTER ignition
[x] Cancel search: ignitionPage 210 of 480
3-76
Convenient features of your vehicle
To reset the information, press and
hold the OK button when viewing the
Accumulated driving info. The trip
distance, the average fuel economy,
and total driving time will reset simul-
taneously.
The accumulated driving information
will continue to be counted while the
engine is still running (for example,
when the vehicle is in traffic or
stopped at a stop light).
Information
The vehicle must be driven for a min-
imum of 300 meters (0.19 miles) since
the last ignition key cycle before the
average fuel economy will be recalcu-
lated.
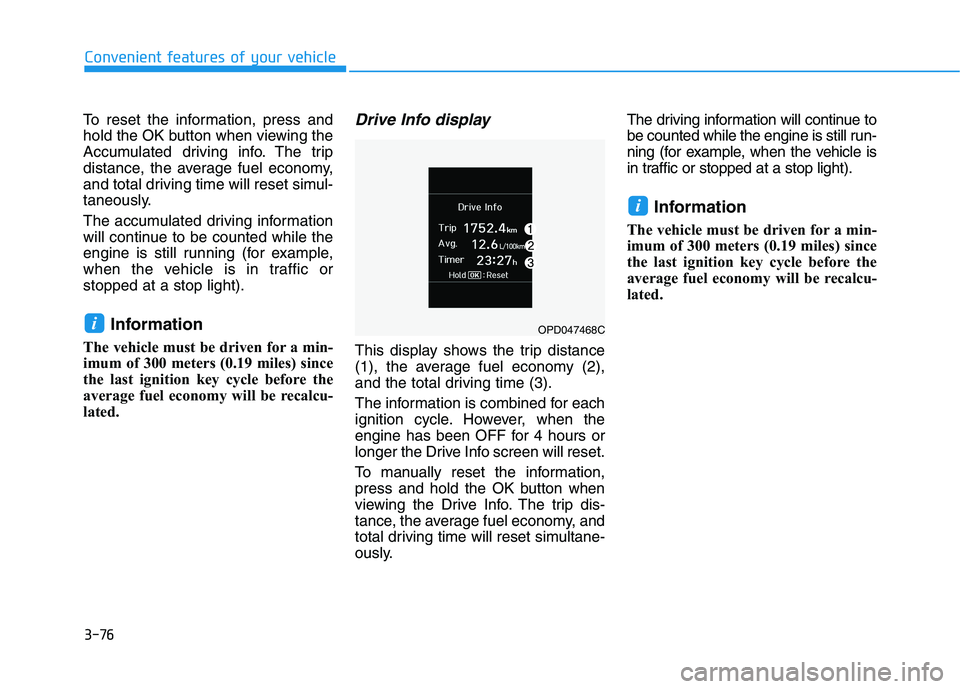
Drive Info display
This display shows the trip distance
(1), the average fuel economy (2),
and the total driving time (3).
The information is combined for each
ignition cycle. However, when the
engine has been OFF for 4 hours or
longer the Drive Info screen will reset.
To manually reset the information,
press and hold the OK button when
viewing the Drive Info. The trip dis-
tance, the average fuel economy, and
total driving time will reset simultane-
ously.The driving information will continue to
be counted while the engine is still run-
ning (for example, when the vehicle is
in traffic or stopped at a stop light).
Information
The vehicle must be driven for a min-
imum of 300 meters (0.19 miles) since
the last ignition key cycle before the
average fuel economy will be recalcu-
lated.
i
iOPD047468C
Page 213 of 480
3-79
Convenient features of your vehicle
3
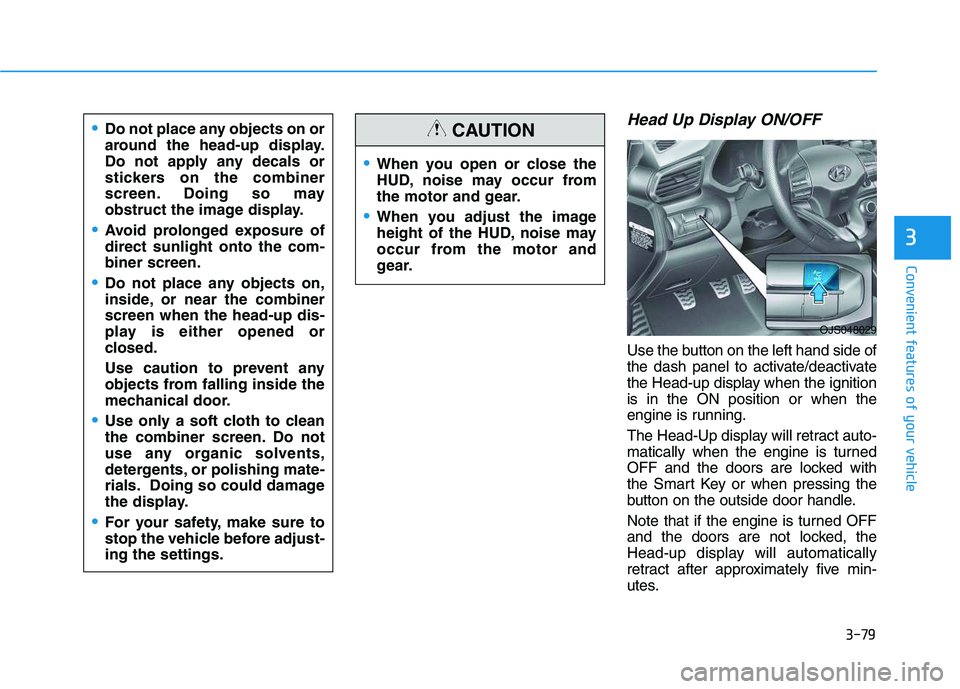
Head Up Display ON/OFF
Use the button on the left hand side of
the dash panel to activate/deactivate
the Head-up display when the ignition
is in the ON position or when the
engine is running.
The Head-Up display will retract auto-
matically when the engine is turned
OFF and the doors are locked with
the Smart Key or when pressing the
button on the outside door handle.
Note that if the engine is turned OFF
and the doors are not locked, the
Head-up display will automatically
retract after approximately five min-
utes.
When you open or close the
HUD, noise may occur from
the motor and gear.
When you adjust the image
height of the HUD, noise may
occur from the motor and
gear.
CAUTIONDo not place any objects on or
around the head-up display.
Do not apply any decals or
stickers on the combiner
screen. Doing so may
obstruct the image display.
Avoid prolonged exposure of
direct sunlight onto the com-
biner screen.
Do not place any objects on,
inside, or near the combiner
screen when the head-up dis-
play is either opened or
closed.
Use caution to prevent any
objects from falling inside the
mechanical door.
Use only a soft cloth to clean
the combiner screen. Do not
use any organic solvents,
detergents, or polishing mate-
rials. Doing so could damage
the display.
For your safety, make sure to
stop the vehicle before adjust-
ing the settings.
OJS048029
Page 219 of 480
Driving your vehicle
5
Before driving.........................................................5-4
Before Entering the Vehicle ...........................................5-4
Before Starting ..................................................................5-4
Ignition switch ........................................................5-6
Key Ignition Switch ...........................................................5-6
Engine Start/Stop Button................................................5-9
Manual Transmission ...........................................5-18
Manual Transmission Operation ..................................5-18
Good Driving Practices ..................................................5-20
Automatic Transmission ......................................5-22
Automatic Transmission Operation .............................5-22
Good Driving Practices ..................................................5-27
Dual Clutch Transmission ....................................5-29
Dual Clutch Transmission Operation ..........................5-29
LCD display for transmission temperature
and warning message ....................................................5-31
Good Driving Practices ..................................................5-38
Braking System ....................................................5-40
Power Brakes ...................................................................5-40
Disc Brakes Wear Indicator ..........................................5-41
Parking Brake...................................................................5-41
Anti-lock Brake System (ABS) ....................................5-43
Electronic Stability Control (ESC)................................5-45
Vehicle Stability Management (VSM).........................5-47Hill-Start Assist Control (HAC) ....................................5-48
Good Braking Practices .................................................5-49
Drive Mode Integrated Control System ............5-51
DRIVE MODE (with Automatic Transmission/
Dual Clutch Transmission) .............................................5-51
SPORT MODE (with Manual Transmission) ..............5-55
Blind-Spot Collision Warning (BCW) System...5-56
BCW (Blind-Spot Collision Warning) ..........................5-57
RCCW (Rear Cross-Traffic Collision Warning) .........5-59
Blind Spot Collision Warning - Sensor Location .....5-61
Limitations of the System .............................................5-62
Forward Collision-Avoidance Assist (FCA)
System (Camera) ..................................................5-64
System Setting and Activation.....................................5-64
FCA Warning Message and System Control ............5-66
FCA Sensor .......................................................................5-68
System Malfunction .......................................................5-69
Limitations of the System .............................................5-71
Forward Collision-Avoidance Assist (FCA)
System (Fusion Sensor) ......................................5-76
System Setting and Activation.....................................5-76
FCA Warning Message and System Control ............5-78
FCA Sensor .......................................................................5-80
System Malfunction .......................................................5-81
Limitations of the System .............................................5-83
Page 222 of 480
5-4
Driving your vehicle
Before Entering the Vehicle
• Be sure all windows, outside mir-
ror(s), and outside lights are clean
and unobstructed.
Remove frost, snow, or ice.
Visually check the tires for uneven
wear and damage.
Check under the vehicle for any
sign of leaks.
Be sure there are no obstacles
behind you if you intend to back up.
Before Starting
Make sure the hood, the tailgate,
and the doors are securely closed
and locked.
Adjust the position of the seat and
steering wheel.
Adjust the inside and outside
rearview mirrors.
Verify all the lights work.
Fasten your seatbelt. Check that all
passengers have fastened their
seatbelts.
Check the gauges and indicators in
the instrument panel and the mes-
sages on the instrument display
when the ignition switch is in the
ON position.
Check that any items you are car-
rying are stored properly or fas-
tened down securely.
B BE
EF
FO
OR
RE
E
D
DR
RI
IV
VI
IN
NG
G
To reduce the risk of SERIOUS
INJURY or DEATH, take the fol-
lowing precautions:
•ALWAYS wear your seat belt.
All passengers must be prop-
erly belted whenever the vehi-
cle is moving. For more
details, refer to "Seat Belts" in
chapter 2.
Always drive defensively.
Assume other drivers or pedes-
trians may be careless and
make mistakes.
Stay focused on the task of
driving. Driver distraction can
cause accidents.
Leave plenty of space between
you and the vehicle in front of
you.
WARNING
Page 224 of 480
5-6
Key Ignition Switch
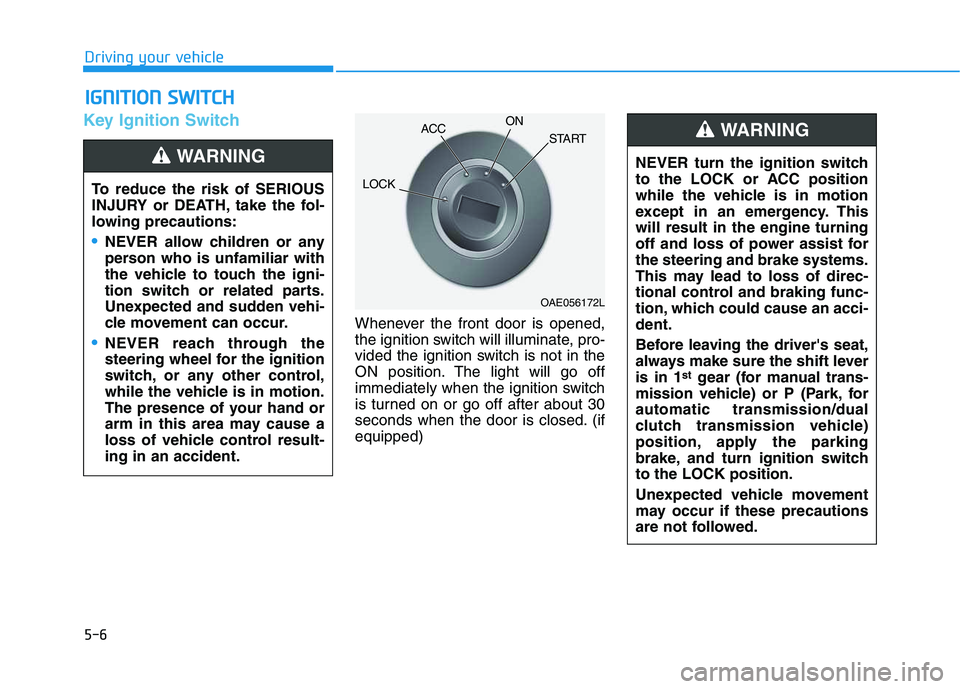
Whenever the front door is opened,
the ignition switch will illuminate, pro-
vided the ignition switch is not in the
ON position. The light will go off
immediately when the ignition switch
is turned on or go off after about 30
seconds when the door is closed. (if
equipped)
I IG
GN
NI
IT
TI
IO
ON
N
S
SW
WI
IT
TC
CH
H
Driving your vehicle
To reduce the risk of SERIOUS
INJURY or DEATH, take the fol-
lowing precautions:
NEVER allow children or any
person who is unfamiliar with
the vehicle to touch the igni-
tion switch or related parts.
Unexpected and sudden vehi-
cle movement can occur.
NEVER reach through the
steering wheel for the ignition
switch, or any other control,
while the vehicle is in motion.
The presence of your hand or
arm in this area may cause a
loss of vehicle control result-
ing in an accident.
WARNING NEVER turn the ignition switch
to the LOCK or ACC position
while the vehicle is in motion
except in an emergency. This
will result in the engine turning
off and loss of power assist for
the steering and brake systems.
This may lead to loss of direc-
tional control and braking func-
tion, which could cause an acci-
dent.
Before leaving the driver's seat,
always make sure the shift lever
is in 1
stgear (for manual trans-
mission vehicle) or P (Park, for
automatic transmission/dual
clutch transmission vehicle)
position, apply the parking
brake, and turn ignition switch
to the LOCK position.
Unexpected vehicle movement
may occur if these precautions
are not followed.
WARNING
OAE056172L
LOCKACCON
START
Page 225 of 480
5-7
Driving your vehicle
5
Key ignition switch positions
Switch
PositionActionNotice
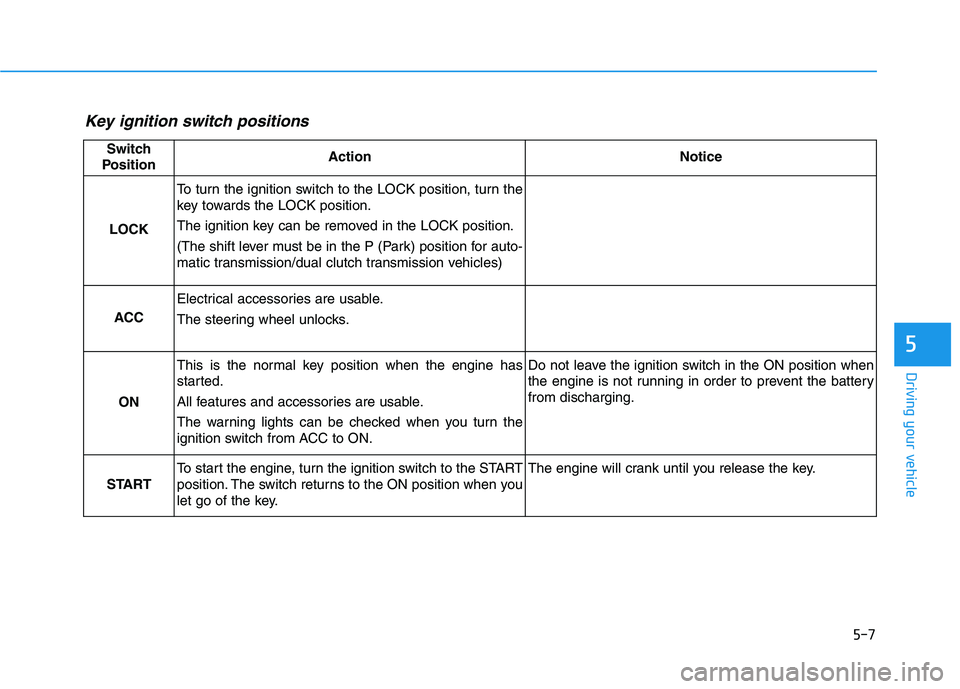
LOCK
To turn the ignition switch to the LOCK position, turn the
key towards the LOCK position.
The ignition key can be removed in the LOCK position.
(The shift lever must be in the P (Park) position for auto-
matic transmission/dual clutch transmission vehicles)
ACC
Electrical accessories are usable.
The steering wheel unlocks.
ON
This is the normal key position when the engine has
started.
All features and accessories are usable.
The warning lights can be checked when you turn the
ignition switch from ACC to ON.Do not leave the ignition switch in the ON position when
the engine is not running in order to prevent the battery
from discharging.
START
To start the engine, turn the ignition switch to the START
position. The switch returns to the ON position when you
let go of the key.The engine will crank until you release the key.
Page 226 of 480
5-8
Starting the engine Vehicle with manual transmission:
1. Make sure the parking brake is
applied.
2. Make sure the shift lever is in neu-
tral.
3. Depress the clutch and brake ped-
als.
4. Turn the ignition switch to the
START position. Hold the key
(maximum of 10 seconds) until the
engine starts and release it.
Information
Depress the brake pedal and clutch
pedal until the engine starts.
Vehicle with automatic transmission/
dual clutch transmission:
1. Make sure the parking brake is
applied.
2. Make sure the shift lever is in P
(Park).
3. Depress the brake pedal.
4. Turn the ignition switch to the
START position. Hold the key
(maximum of 10 seconds) until the
engine starts and release it.
Information
• It is best to maintain a moderate
engine speed until the vehicle engine
comes up to normal operating tem-
perature. Avoid harsh or abrupt
acceleration or deceleration while
the engine is still cold.
• Whether the engine is cold or warm,
always start the vehicle with your
foot on the brake pedal. Do not
depress the accelerator while start-
ing the vehicle. Do not rev the
engine while warming it up.
To prevent damage to the vehicle:
Do not hold the ignition key in
the START position for more
than 10 seconds. Wait 5 to 10
seconds before trying again.
Do not push or tow your vehicle
to start the engine.
NOTICE
i
i
Driving your vehicle
Always wear appropriate shoes
when operating your vehicle.
Unsuitable shoes, such as high
heels, ski boots, sandals, flip-
flops, etc., may interfere with
your ability to use the brake and
accelerator pedals.
WARNING
Page 236 of 480
5-18
Manual Transmission
Operation
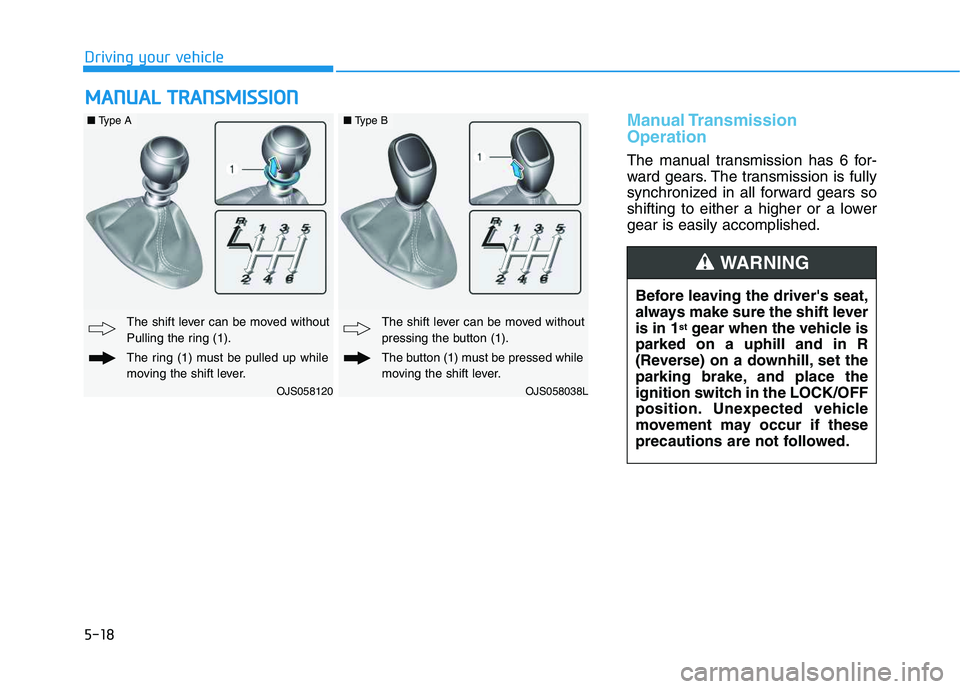
The manual transmission has 6 for-
ward gears. The transmission is fully
synchronized in all forward gears so
shifting to either a higher or a lower
gear is easily accomplished.
M MA
AN
NU
UA
AL
L
T
TR
RA
AN
NS
SM
MI
IS
SS
SI
IO
ON
N
Driving your vehicle
Before leaving the driver's seat,
always make sure the shift lever
is in 1
stgear when the vehicle is
parked on a uphill and in R
(Reverse) on a downhill, set the
parking brake, and place the
ignition switch in the LOCK/OFF
position. Unexpected vehicle
movement may occur if these
precautions are not followed.
WARNING
OJS058120
The shift lever can be moved without
Pulling the ring (1).
The ring (1) must be pulled up while
moving the shift lever.
OJS058038L
The shift lever can be moved without
pressing the button (1).
The button (1) must be pressed while
moving the shift lever.
■Type A■Type B