Page 574 of 637
7-58
Maintenance
Compact spare tyre replace-
ment (if equipped)
A compact spare tyre has a shorter
tread life than a regular size tyre.
Replace it when you can see the
tread wear indicator bars on the tyre.
The replacement compact spare tyre
should be the same size and design
tyre as the one provided with your
new vehicle and should be mounted
on the same compact spare tyre
wheel. The compact spare tyre is not
designed to be mounted on a regular
size wheel, and the compact spare
tyre wheel is not designed for mount-
ing a regular size tyre. The use of any other tyre size
or type may seriously affect
ride, handling, ground clear-
ance, stopping distance, body
to tyre clearance, snow tyre
clearance, and speedometer
reliability.
When replacing tyres (or
unwheels), it is recommended
to replace the two front or two
rear tyres (or wheels) as a
pair.
Replacing just one tyre can
seriously affect your vehicle's
handling.
The ABS works by comparing
the speed of the wheels. Tyre
size can affect wheel speed.
When replacing tyres, all 4
tyres must use the same size
originally supplied with the
vehicle. Using tyres of a dif-
ferent size can cause the ABS
(Anti-lock Brake System) and
ESC (Electronic Stability
Control) (if equipped) to work
irregularly.Driving on worn-out tyres is
very hazardous and will
reduce braking effectiveness,
steering accuracy, and trac-
tion.
Your vehicle is equipped with
tyres designed to provide for
safe ride and handling capa-
bility. Do not use a size and
type of tyre and wheel that is
different from the one that is
originally installed on your
vehicle. It can affect the safety
and performance of your vehi-
cle, which could lead to han-
dling failure or rollover and
serious injury. When replacing
the tyres, be sure to equip all
four tyres with the tyre and
wheel of the same size, type,
tread, brand and load-carrying
capacity.
WARNING
Page 594 of 637
7-78
Maintenance
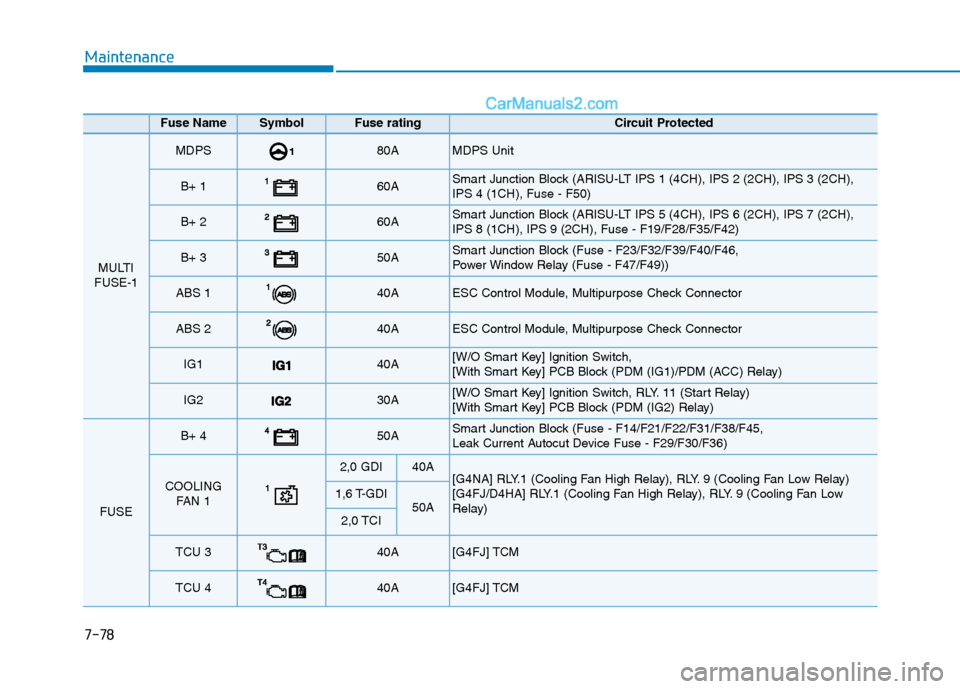
Fuse Name SymbolFuse ratingCircuit Protected
MULTI
FUSE-1
MDPS 80A MDPS Unit
B+ 1 60A Smart Junction Block (ARISU-LT IPS 1 (4CH), IPS 2 (2CH), IPS 3 (2CH),
IPS 4 (1CH), Fuse - F50)
B+ 2 60A Smart Junction Block (ARISU-LT IPS 5 (4CH), IPS 6 (2CH), IPS 7 (2CH),
IPS 8 (1CH), IPS 9 (2CH), Fuse - F19/F28/F35/F42)
B+ 3 50A Smart Junction Block (Fuse - F23/F32/F39/F40/F46,
Power Window Relay (Fuse - F47/F49))
ABS 1 40A ESC Control Module, Multipurpose Check Connector
ABS 2 40A ESC Control Module, Multipurpose Check Connector
IG1 40A [W/O Smart Key] Ignition Switch,
[With Smart Key] PCB Block (PDM (IG1)/PDM (ACC) Relay)
IG2 30A [W/O Smart Key] Ignition Switch, RLY. 11 (Start Relay)
[With Smart Key] PCB Block (PDM (IG2) Relay)
FUSE
B+ 4 50A Smart Junction Block (Fuse - F14/F21/F22/F31/F38/F45,
Leak Current Autocut Device Fuse - F29/F30/F36)
COOLING
FAN 1
2,0 GDI40A [G4NA] RLY.1 (Cooling Fan High Relay), RLY. 9 (Cooling Fan Low Relay)
[G4FJ/D4HA] RLY.1 (Cooling Fan High Relay), RLY. 9 (Cooling Fan Low
Relay)1,6 T-GDI50A 2,0 TCI
TCU 3 40A [G4FJ] TCM
TCU 4 40A [G4FJ] TCM
Page 597 of 637
7-81
7
Maintenance
Fuse Name SymbolFuse ratingCircuit Protected
FUSE
ECU 220A [G4NA] Ignition Coil #1/#2/#3/#4, Condenser
[G4FJ] Ignition Coil #1/#2/#3/#4
[D4HA] ECM
ECU 515A [G4FJ] ECM
[D4HA] TCM
ECU 415A [G4FJ] PCM/ECM
[G4NA/D4HA] ECM
SENSOR 310A [G4NA] Injector #1/#2/#3/#4
[G4FJ] ECM
[D4HA] Mass Air Flow Sensor, Oil Pump Solenoid Valve
DEICER15A E/R Junction Block (RLY. 8 - Front Deicer Relay)
FUEL PUMP 120A E/R Junction Block (RLY. 14)
MODULE 17.5A [D4HA] Glow Relay Unit, Fuel Filter Warning Sensor
B/A HORN10A E/R Junction Block (RLY. 7 - B/A Horn Relay)
ABS 310A ESC Control Module
Page 602 of 637
7-86
Maintenance
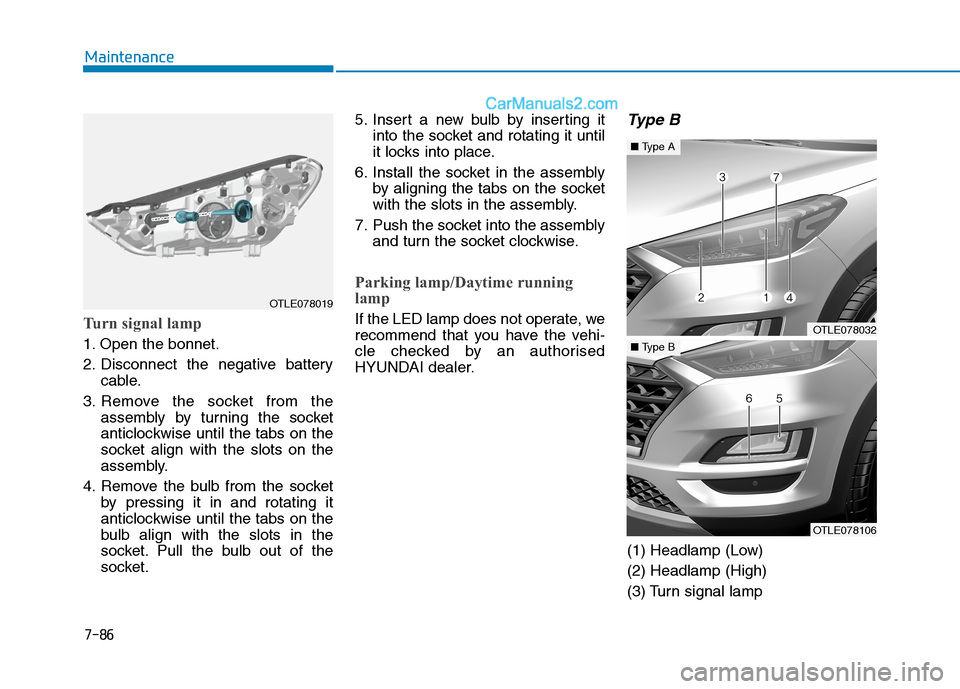
Turn signal lamp
1. Open the bonnet.
2. Disconnect the negative battery
cable.
3. Remove the socket from the
assembly by turning the socket
anticlockwise until the tabs on the
socket align with the slots on the
assembly.
4. Remove the bulb from the socket
by pressing it in and rotating it
anticlockwise until the tabs on the
bulb align with the slots in the
socket. Pull the bulb out of the
socket.5. Insert a new bulb by inserting it
into the socket and rotating it until
it locks into place.
6. Install the socket in the assembly
by aligning the tabs on the socket
with the slots in the assembly.
7. Push the socket into the assembly
and turn the socket clockwise.
Parking lamp/Daytime running
lamp
If the LED lamp does not operate, we
recommend that you have the vehi-
cle checked by an authorised
HYUNDAI dealer.
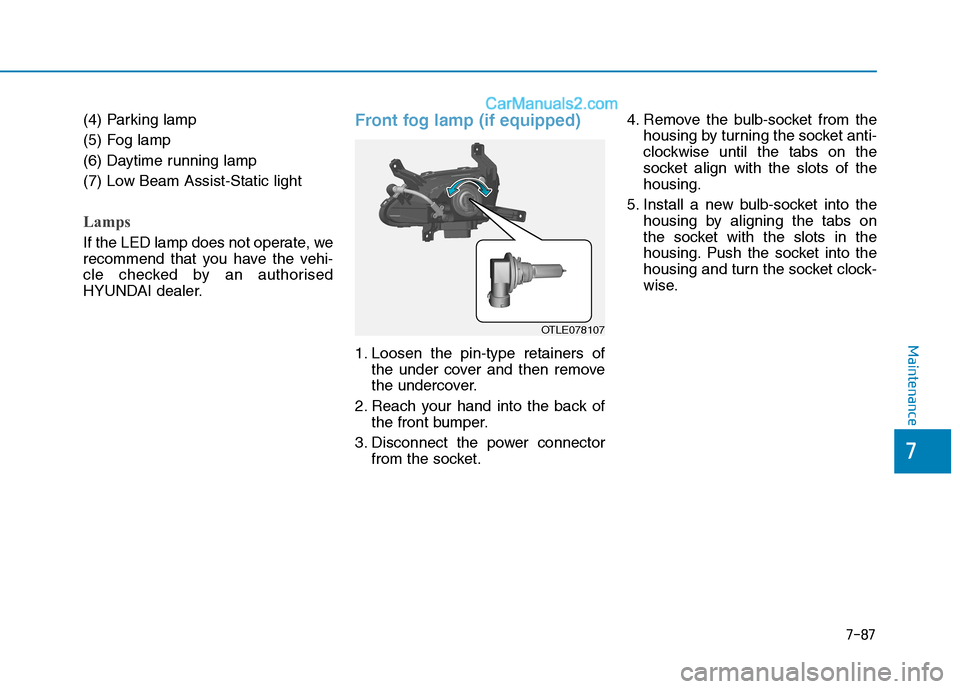
Type B
(1) Headlamp (Low)
(2) Headlamp (High)
(3) Turn signal lamp
OTLE078019
OTLE078032
■Type A
OTLE078106
■Type B
Page 603 of 637
7-87
7
Maintenance
(4) Parking lamp
(5) Fog lamp
(6) Daytime running lamp
(7) Low Beam Assist-Static light
Lamps
If the LED lamp does not operate, we
recommend that you have the vehi-
cle checked by an authorised
HYUNDAI dealer.
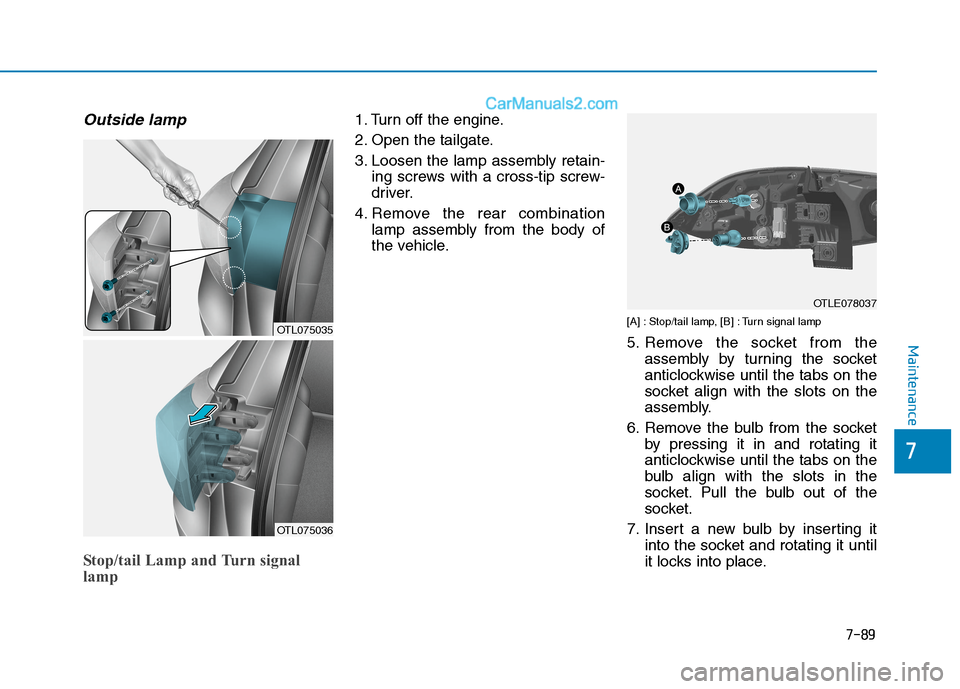
Front fog lamp (if equipped)
1. Loosen the pin-type retainers of
the under cover and then remove
the undercover.
2. Reach your hand into the back of
the front bumper.
3. Disconnect the power connector
from the socket.4. Remove the bulb-socket from the
housing by turning the socket anti-
clockwise until the tabs on the
socket align with the slots of the
housing.
5. Install a new bulb-socket into the
housing by aligning the tabs on
the socket with the slots in the
housing. Push the socket into the
housing and turn the socket clock-
wise.
OTLE078107
Page 605 of 637
7-89
7
Maintenance
Outside lamp
Stop/tail Lamp and Turn signal
lamp
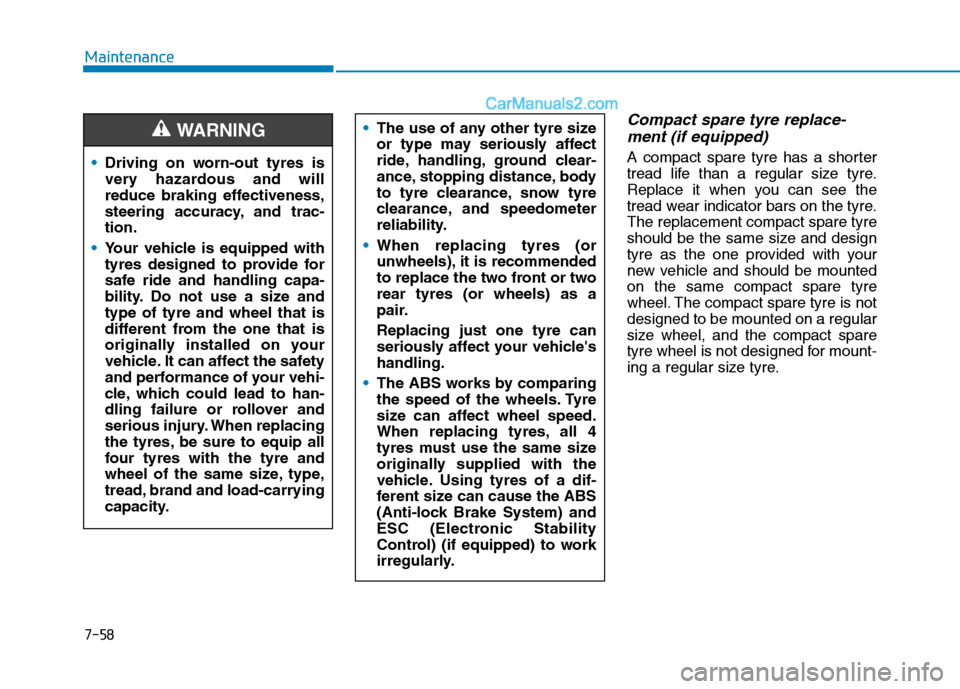
1. Turn off the engine.
2. Open the tailgate.
3. Loosen the lamp assembly retain-
ing screws with a cross-tip screw-
driver.
4. Remove the rear combination
lamp assembly from the body of
the vehicle.
[A] : Stop/tail lamp, [B] : Turn signal lamp
5. Remove the socket from the
assembly by turning the socket
anticlockwise until the tabs on the
socket align with the slots on the
assembly.
6. Remove the bulb from the socket
by pressing it in and rotating it
anticlockwise until the tabs on the
bulb align with the slots in the
socket. Pull the bulb out of the
socket.
7. Insert a new bulb by inserting it
into the socket and rotating it until
it locks into place.OTL075035
OTL075036
OTLE078037
Page 606 of 637
7-90
Maintenance
8. Install the socket in the assembly
by aligning the tabs on the socket
with the slots in the assembly.
Push the socket into the assembly
and turn the socket clockwise.
9. Reinstall the lamp assembly to the
body of the vehicle.
Stop/Tail lamp, Tail lamp
(Type B, LED)
If the LED lamp does not operate, we
recommend that you have the vehi-
cle checked by an authorised
HYUNDAI dealer.
Inside lamp
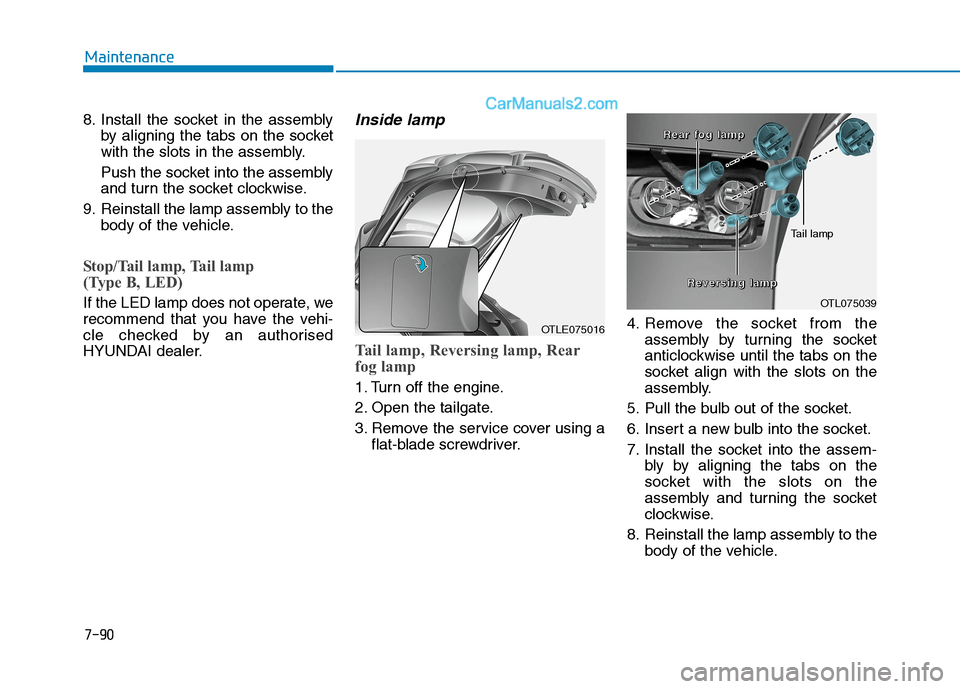
Tail lamp, Reversing lamp, Rear
fog lamp
1. Turn off the engine.
2. Open the tailgate.
3. Remove the service cover using a
flat-blade screwdriver.4. Remove the socket from the
assembly by turning the socket
anticlockwise until the tabs on the
socket align with the slots on the
assembly.
5. Pull the bulb out of the socket.
6. Insert a new bulb into the socket.
7. Install the socket into the assem-
bly by aligning the tabs on the
socket with the slots on the
assembly and turning the socket
clockwise.
8. Reinstall the lamp assembly to the
body of the vehicle.
OTLE075016
OTL075039
Tail lamp
R R R R
e e e e
v v v v
e e e e
r r r r
s s s s
i i i i
n n n n
g g g g
l l l l
a a a a
m m m m
p p p p
R
R R R
e e e e
a a a a
r r r r
f f f f
o o o o
g g g g
l l l l
a a a a
m m m m
p p p p
Page 607 of 637
7-91
7
Maintenance
Tail lamp, Rear fog lamp
(Type B, LED)
If the LED lamp does not operate, we
recommend that you have the vehi-
cle checked by an authorised
HYUNDAI dealer.
Rear fog lamp (if equipped)
1. Remove the socket from the
assembly by turning the socket
anticlockwise until the tabs on the
socket align with the slots on the
assembly.
2. Remove the bulb from the socket
by pressing it in and rotating it
anticlockwise until the tabs on the
bulb align with the slots in the
socket. Pull the bulb out of the
socket.
3. Insert a new bulb in the socket.
4. Reinstall the light assembly to the
body of the vehicle.
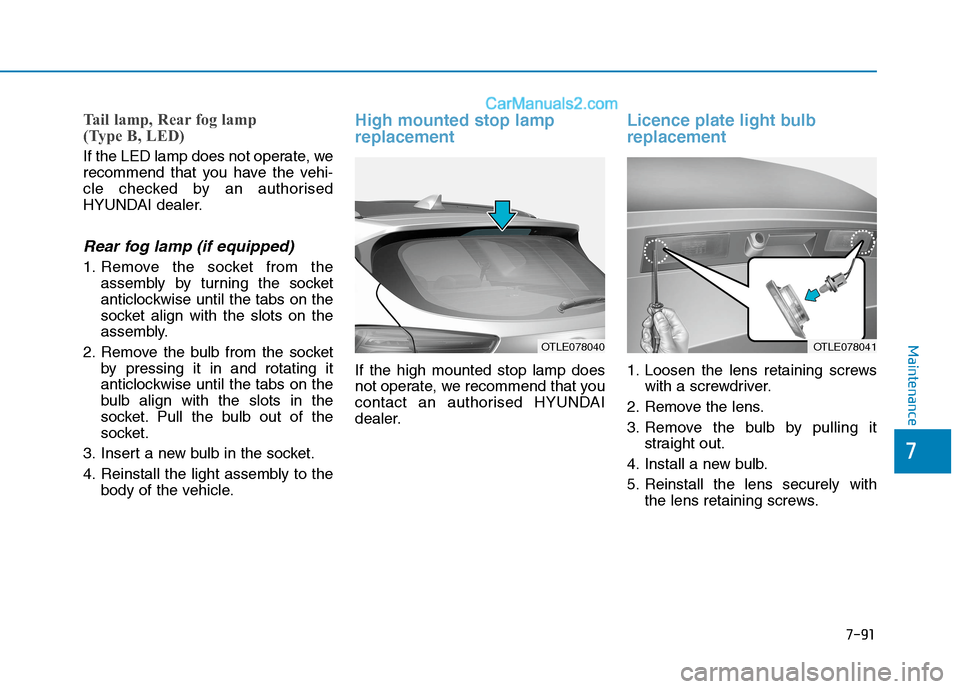
High mounted stop lamp
replacement
If the high mounted stop lamp does
not operate, we recommend that you
contact an authorised HYUNDAI
dealer.
Licence plate light bulb
replacement
1. Loosen the lens retaining screws
with a screwdriver.
2. Remove the lens.
3. Remove the bulb by pulling it
straight out.
4. Install a new bulb.
5. Reinstall the lens securely with
the lens retaining screws.
OTLE078040OTLE078041
![Hyundai Tucson 2020 Owners Manual - RHD (UK, Australia) 7-81
7
Maintenance
Fuse Name SymbolFuse ratingCircuit Protected
FUSE
ECU 220A [G4NA] Ignition Coil #1/#2/#3/#4, Condenser
[G4FJ] Ignition Coil #1/#2/#3/#4
[D4HA] ECM
ECU 515A [G4FJ] ECM
[D4HA] TCM](/manual-img/35/19693/w960_19693-596.png "Hyundai Tucson 2020 Owners Manual - RHD (UK, Australia) 7-81
7
Maintenance
Fuse Name SymbolFuse ratingCircuit Protected
FUSE
ECU 220A [G4NA] Ignition Coil #1/#2/#3/#4, Condenser
[G4FJ] Ignition Coil #1/#2/#3/#4
[D4HA] ECM
ECU 515A [G4FJ] ECM
[D4HA] TCM")