2020 Hyundai Sonata display
[x] Cancel search: displayPage 169 of 537

05
5-39
ODN8A059019ODN8A059019
The Driver Position Memory System is
provided to store and recall the following
memory settings with a simple button
operation.
- Driver’s seat position (Power seat)
- Side view mirror position
- Instrument panel illumination intensity
- Head Up Display (HUD) position and brightness (if equipped)
WARNING
Never attempt to operate the driver
position memory system while the
vehicle is moving.
This could result in loss of control, and
an accident causing death, serious
injury, or property damage.
Information
• If the battery is disconnected, the
memory settings will be erased.
• If the Driver Position Memory System
does not operate normally, have the
system checked by an authorized
HYUNDAI dealer.
Storing Positions into Memory
1. Shift to P (Park) while the ignition
switch is in the ON position.
2. Adjust the driver’s seat position, side view mirror position, instrument panel
illumination intensity and head-up
display height/brightness to positions
comfortable for the driver.
3. Press the SET button. The system will beep once and notify you “Press
button to save settings” on the cluster
LCD display.
4. Press one of the memory buttons (1 or 2) within 4 seconds. The system
will beep twice when the memory has
been successfully stored.
5. “Settings 1 (or 2) saved” will appear on the cluster LCD display.
DRIVER POSITION MEMORY SYSTEM (IF EQUIPPED)
Page 170 of 537

Convenient Features5-40
Recalling Positions from Memory
1. Shift to P (Park) while the ignition switch is in the ON position.
2. Press the desired memory button (1 or 2). The system will beep once,
and then the driver’s seat position,
side view mirror position, instrument
panel illumination intensity and
head-up display height/brightness
will automatically adjust to the stored
positions.
3. “Settings 1 (or 2) applied” will appear on the cluster LCD display.
If your vehicle is equipped with
additional navigation, please refer to the
infotainment system manual separately
supplied.
Information
• While recalling the “1” memory
position, pressing the SET or 1 button
temporarily stops the adjustment of
the recalled memory position. Pressing
the 2 button recalls the “2” memory
position.
• While recalling the “2” memory
position, pressing the SET or 2 button
temporarily stops the adjustment of
the recalled memory position. Pressing
the 1 button recalls the “1” memory
position.
• While recalling the stored positions,
pressing one of the control buttons
for the driver’s seat, side view mirror,
instrument panel illumination or head-
up display will cause the movement of
that component to stop and move in
the direction that the control button is
pressed.
Resetting the Driver’s Seat
Memory System
Take the following procedures to reset
the driver’s seat memory system, when it
does not operate properly.
To reset the driver’s seat memory
system
1. Place the ignition switch to the ON
position, shift to P (Park), and open
the driver’s door.
2. Operate the control switch to set the driver’s seat and seatback to the
foremost position.
3. Simultaneously press the SET button and push forward the seat movement
switch over 2 seconds.
While resetting the driver’s seat
memory system
1. It starts with the notification sound.
2. The driver’s seat and seatback is adjusted to the rearward position with
the notification sound.
3. The driver’s seat and seatback is re-adjusted to the default position
(central position) with the notification
sound.
However, in the following cases, the
resetting procedure and the notification
sound may stop.
- The memory button is pressed.
- The control switch is operated.
- The gear is shifted out of P (Park) .
- The driving speed exceeds 2 mph (3 km/h).
- The driver’s door is closed.
Page 171 of 537

05
5-41
NOTICE
• Reattempt to do the resetting procedure again, when the resetting
procedure incompletely stops or the
notification sound do not stop.
• Make sure that there is no obstacle around the driver’s seat in advance
of resetting the driver’s seat memory
system.
Easy Access Function
The system will move the driver’s seat
automatically as follows:
• It will move the driver’s seat rearward when the Engine Start/Stop button is
pressed to the OFF position.
• It will move the driver’s seat forward when the Engine Start/Stop button is
pressed to the ACC or START position.
You can activate or deactivate the Easy
Access Function from the User Settings
mode in the cluster LCD display.
‘Convenience → Seat Easy Access →
Off/Normal/Extended’.
For more information, refer to “LCD
Display” in chapter 4.If your vehicle is
equipped with additional navigation,
please refer to the infotainment system
manual separately supplied.
CAUTION
Driver should be cautious when using
this function to assure no injury to
passenger or child on the back seat.
In case of emergency the driver has to
stop movement of front seat (when easy
access feature is activated) by pressing
SET button or any of the driver seat
control switches.
Page 193 of 537
05
5-63
Resetting the Sunroof
ODN8A059039ODN8A059039
The sunroof may need to be reset if the
following conditions occur:
• The battery is discharged or disconnected or the sunroof fuse has
been replaced or disconnected
• The sunroof control lever is not operating correctly
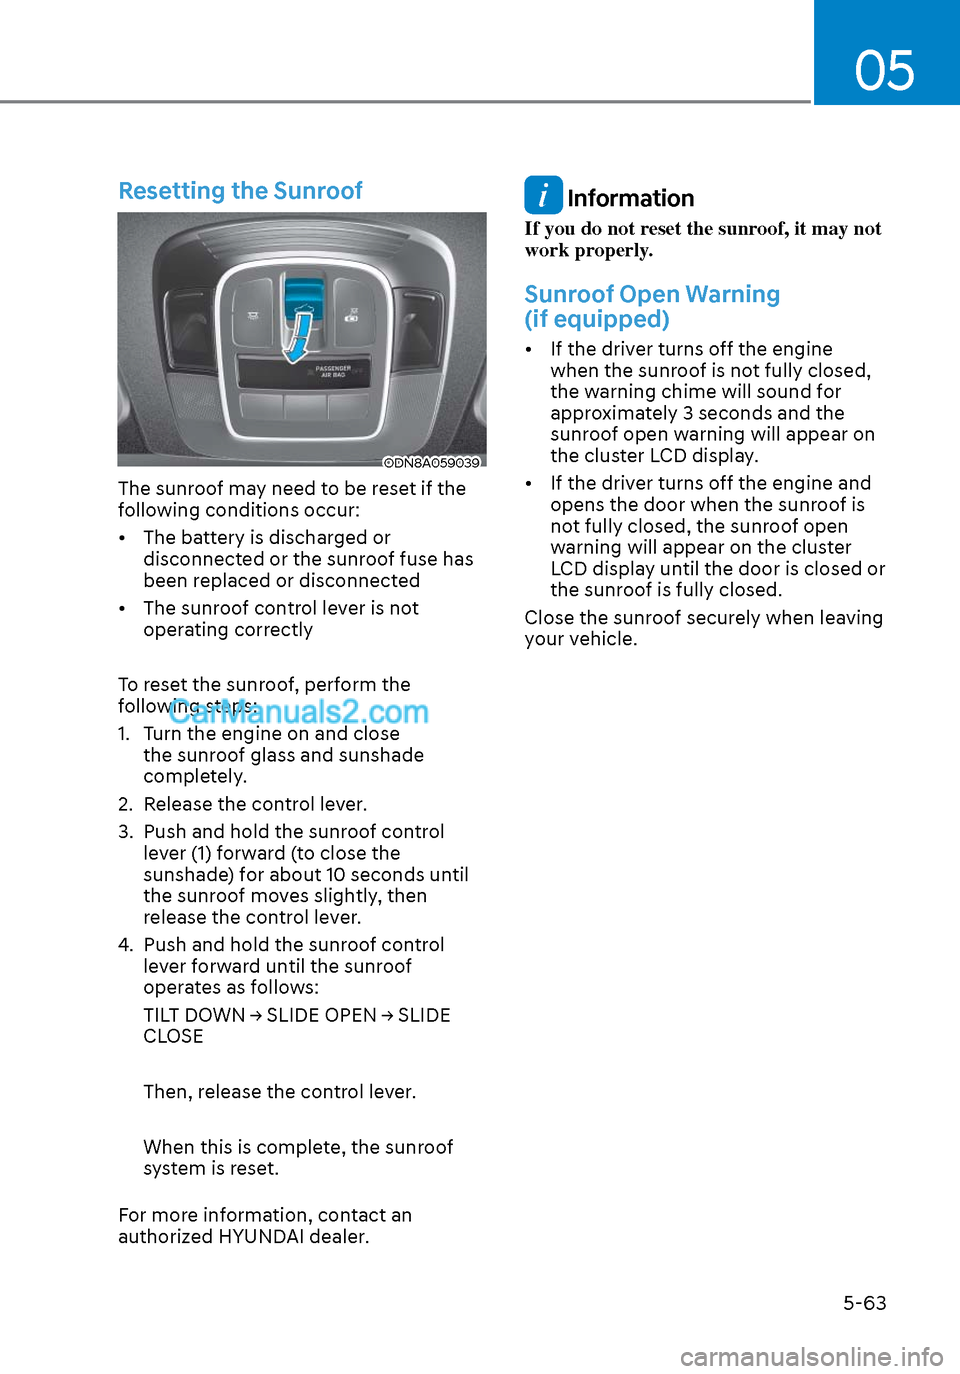
To reset the sunroof, perform the
following steps:
1. Turn the engine on and close the sunroof glass and sunshade
completely.
2. Release the control lever.
3. Push and hold the sunroof control lever (1) forward (to close the
sunshade) for about 10 seconds until
the sunroof moves slightly, then
release the control lever.
4. Push and hold the sunroof control lever forward until the sunroof
operates as follows:
TILT DOWN → SLIDE OPEN → SLIDE
CLOSE
Then, release the control lever.
When this is complete, the sunroof
system is reset.
For more information, contact an
authorized HYUNDAI dealer.
Information
If you do not reset the sunroof, it may not
work properly.
Sunroof Open Warning
(if equipped)
• If the driver turns off the engine when the sunroof is not fully closed,
the warning chime will sound for
approximately 3 seconds and the
sunroof open warning will appear on
the cluster LCD display.
• If the driver turns off the engine and opens the door when the sunroof is
not fully closed, the sunroof open
warning will appear on the cluster
LCD display until the door is closed or
the sunroof is fully closed.
Close the sunroof securely when leaving
your vehicle.
Page 194 of 537
Convenient Features5-64
EXTERIOR FEATURES
Hood
Opening the hood
ODN8A059040ODN8A059040
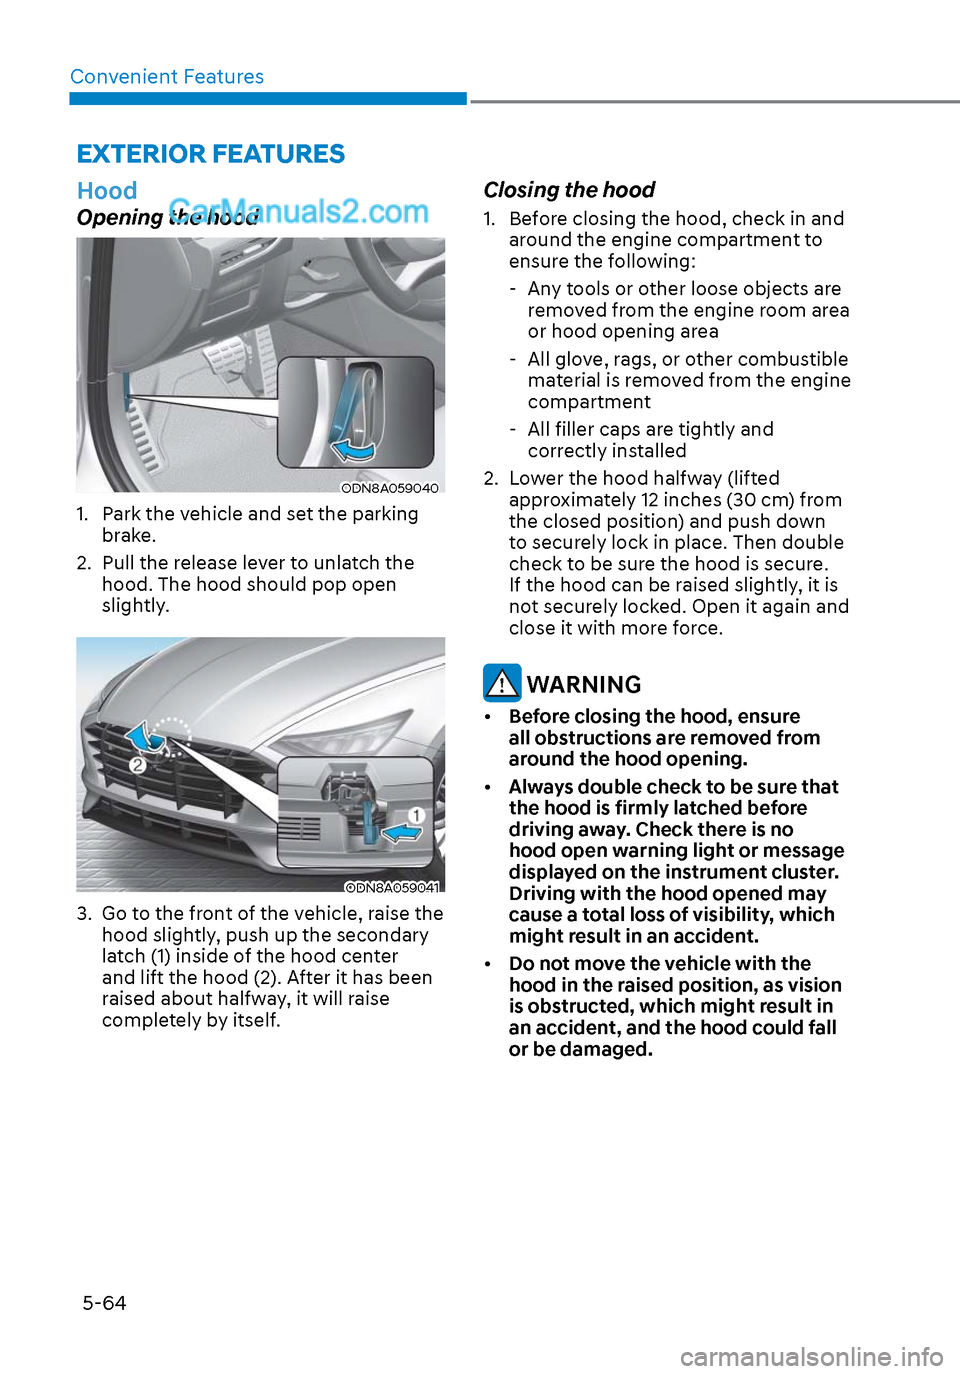
1. Park the vehicle and set the parking brake.
2. Pull the release lever to unlatch the hood. The hood should pop open
slightly.
ODN8A059041ODN8A059041
3. Go to the front of the vehicle, raise the hood slightly, push up the secondary
latch (1) inside of the hood center
and lift the hood (2). After it has been
raised about halfway, it will raise
completely by itself.
Closing the hood
1. Before closing the hood, check in and around the engine compartment to
ensure the following:
- Any tools or other loose objects are removed from the engine room area
or hood opening area
- All glove, rags, or other combustible material is removed from the engine
compartment
- All filler caps are tightly and
correctly installed
2. Lower the hood halfway (lifted approximately 12 inches (30 cm) from
the closed position) and push down
to securely lock in place. Then double
check to be sure the hood is secure.
If the hood can be raised slightly, it is
not securely locked. Open it again and
close it with more force.
WARNING
• Before closing the hood, ensure
all obstructions are removed from
around the hood opening.
• Always double check to be sure that
the hood is firmly latched before
driving away. Check there is no
hood open warning light or message
displayed on the instrument cluster.
Driving with the hood opened may
cause a total loss of visibility, which
might result in an accident.
• Do not move the vehicle with the
hood in the raised position, as vision
is obstructed, which might result in
an accident, and the hood could fall
or be damaged.
Page 197 of 537
05
5-67
How to use the Smart Trunk with
Auto Open
The trunk can be opened with no-touch
activation satisfying all the conditions
below.
• After 15 seconds when all doors are closed and locked
• Positioned in the detecting area for more than 3 seconds.
Information
• The Smart Trunk with Auto Open does not operate when:
- The smart key is detected within 15 seconds after the doors are closed and
locked, and is continuously detected.
- The smart key is detected within 15 seconds after the doors are closed
and locked, and within 60 inches
(1.5 m) from the front door handles.
(for vehicles equipped with Welcome
Light)
- A door is not locked or closed.
- The smart key is in the vehicle.
1. Setting
To activate the Smart Trunk with Auto
Open, go to User Settings Mode and
select Smart Trunk on the LCD display.
For more information, refer to the “LCD
Display” section in this chapter. If your
vehicle is equipped with additional
navigation, please refer to the
infotainment system manual separately
supplied.
ODN8A059047ODN8A059047
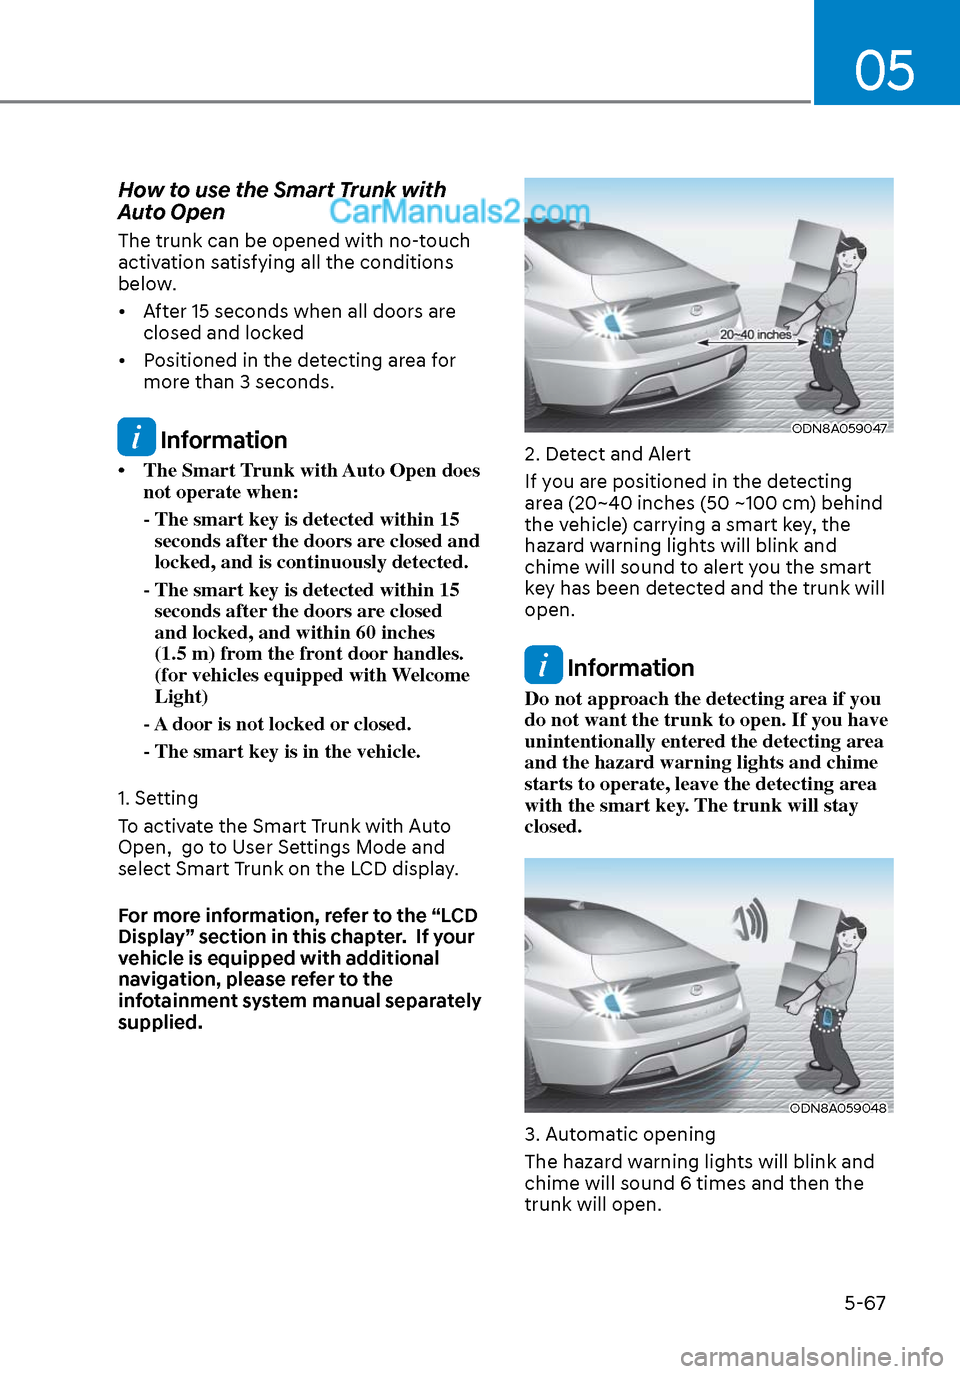
2. Detect and Alert
If you are positioned in the detecting
area (20~40 inches (50 ~100 cm) behind
the vehicle) carrying a smart key, the
hazard warning lights will blink and
chime will sound to alert you the smart
key has been detected and the trunk will
open.
Information
Do not approach the detecting area if you
do not want the trunk to open. If you have
unintentionally entered the detecting area
and the hazard warning lights and chime
starts to operate, leave the detecting area
with the smart key. The trunk will stay
closed.
ODN8A059048ODN8A059048
3. Automatic opening
The hazard warning lights will blink and
chime will sound 6 times and then the
trunk will open.
Page 202 of 537
Convenient Features5-72
HEAD UP DISPLAY (HUD) (IF EQUIPPED)
ODN8A059054ODN8A059054
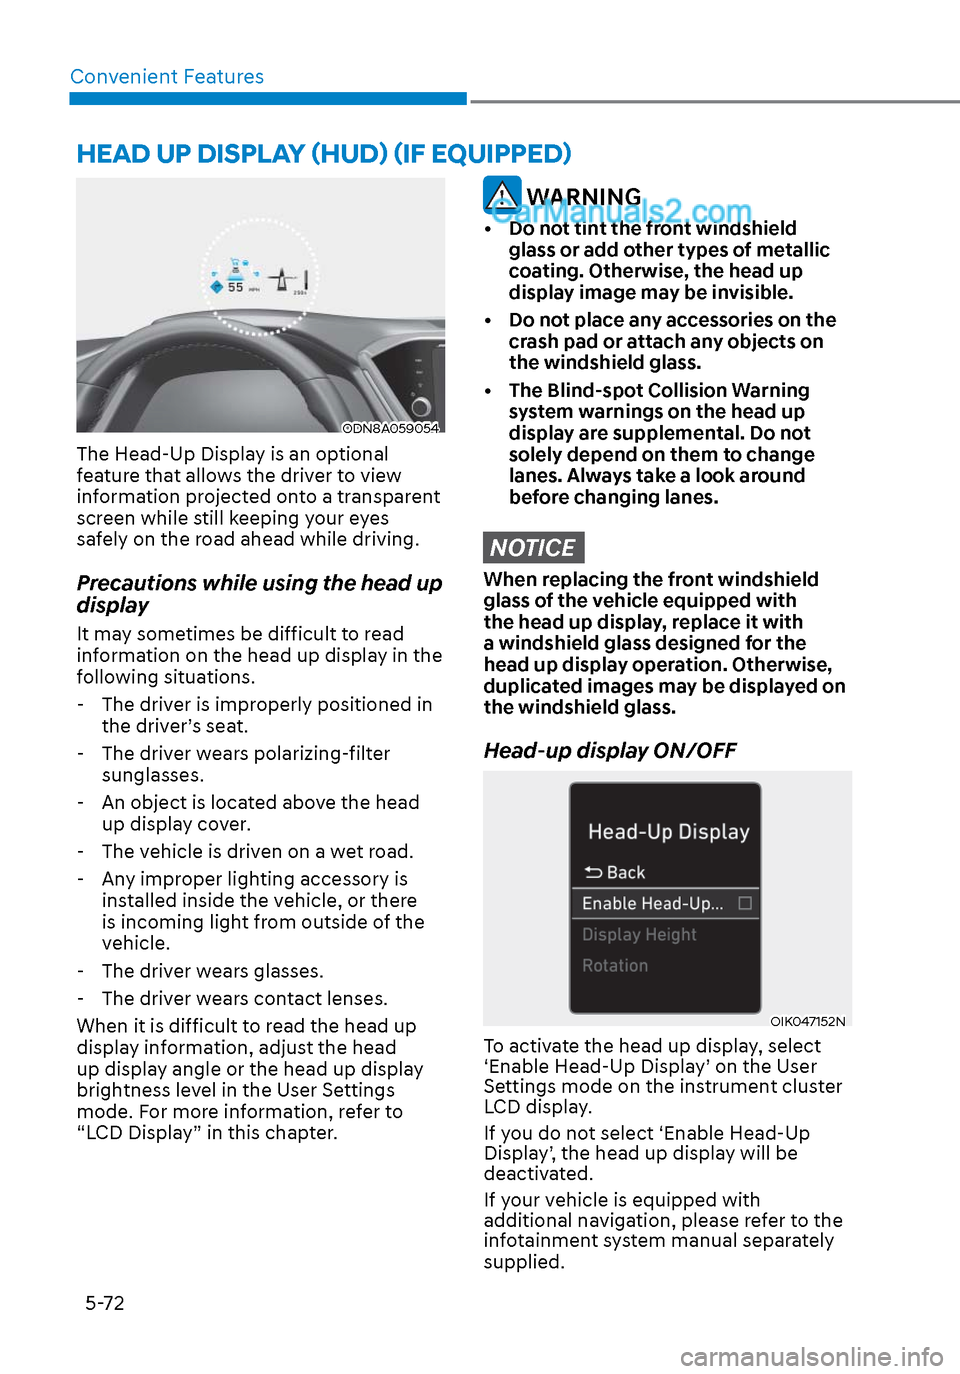
The Head-Up Display is an optional
feature that allows the driver to view
information projected onto a transparent
screen while still keeping your eyes
safely on the road ahead while driving.
Precautions while using the head up
display
It may sometimes be difficult to read
information on the head up display in the
following situations.
- The driver is improperly positioned in the driver’s seat.
- The driver wears polarizing-filter sunglasses.
- An object is located above the head up display cover.
- The vehicle is driven on a wet road.
- Any improper lighting accessory is installed inside the vehicle, or there
is incoming light from outside of the
vehicle.
- The driver wears glasses.
- The driver wears contact lenses.
When it is difficult to read the head up
display information, adjust the head
up display angle or the head up display
brightness level in the User Settings
mode. For more information, refer to
“LCD Display” in this chapter.
WARNING
• Do not tint the front windshield glass or add other types of metallic
coating. Otherwise, the head up
display image may be invisible.
• Do not place any accessories on the crash pad or attach any objects on
the windshield glass.
• The Blind-spot Collision Warning system warnings on the head up
display are supplemental. Do not
solely depend on them to change
lanes. Always take a look around
before changing lanes.
NOTICE
When replacing the front windshield
glass of the vehicle equipped with
the head up display, replace it with
a windshield glass designed for the
head up display operation. Otherwise,
duplicated images may be displayed on
the windshield glass.
Head-up display ON/OFF
OIK047152NOIK047152N
To activate the head up display, select
‘Enable Head-Up Display’ on the User
Settings mode on the instrument cluster
LCD display.
If you do not select ‘Enable Head-Up
Display’, the head up display will be
deactivated.
If your vehicle is equipped with
additional navigation, please refer to the
infotainment system manual separately
supplied.
Page 203 of 537
05
5-73
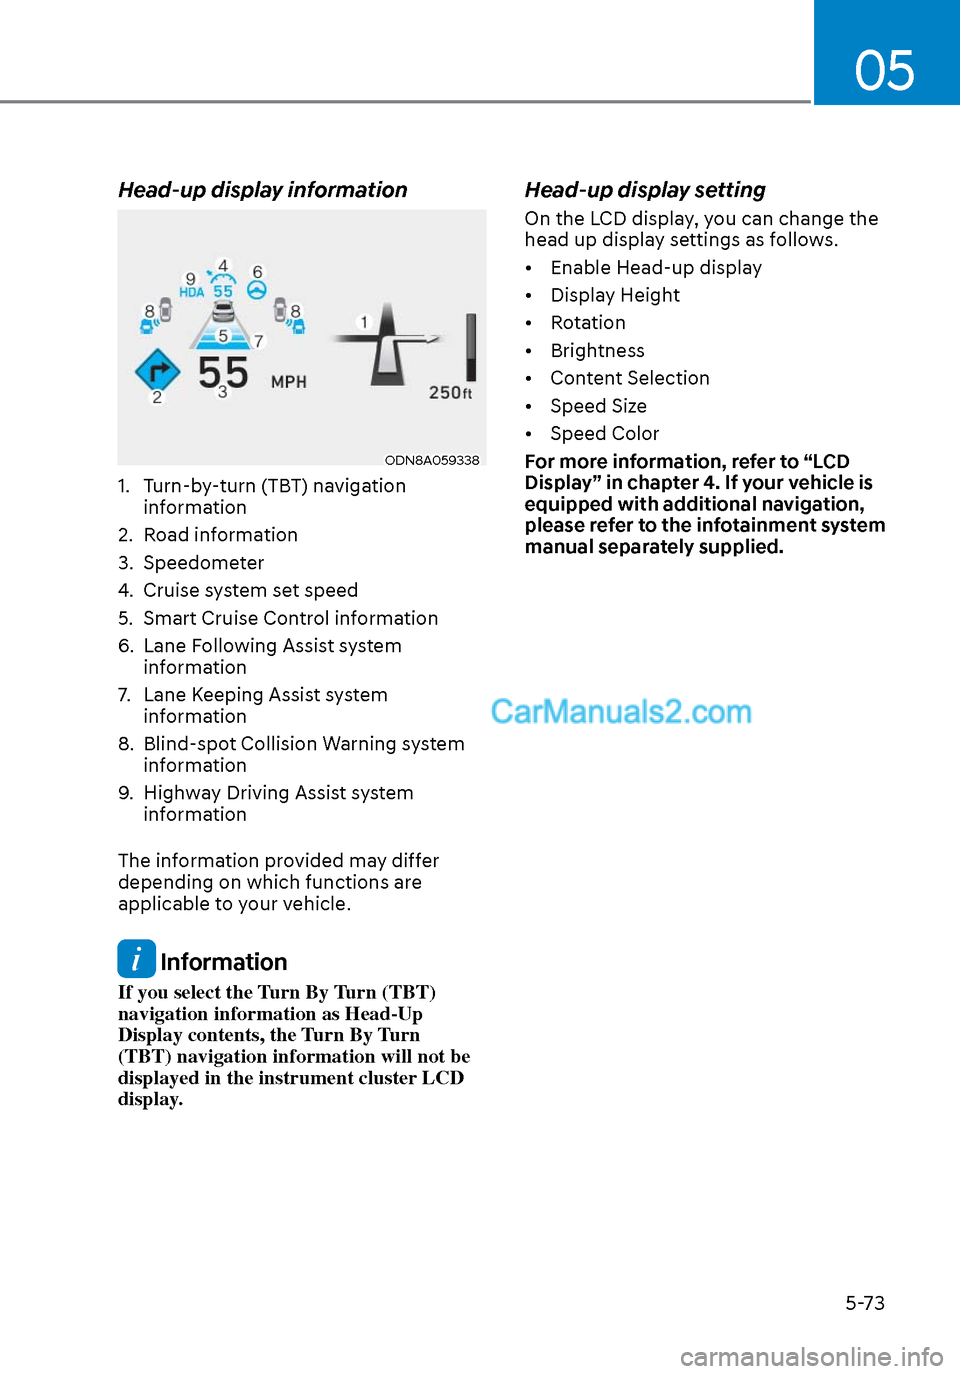
Head-up display information
ODN8A059338ODN8A059338
1. Turn-by-turn (TBT) navigation information
2. Road information
3. Speedometer
4. Cruise system set speed
5. Smart Cruise Control information
6. Lane Following Assist system information
7. Lane Keeping Assist system information
8. Blind-spot Collision Warning system information
9. Highway Driving Assist system information
The information provided may differ
depending on which functions are
applicable to your vehicle.
Information
If you select the Turn By Turn (TBT)
navigation information as Head-Up
Display contents, the Turn By Turn
(TBT) navigation information will not be
displayed in the instrument cluster LCD
display.
Head-up display setting
On the LCD display, you can change the
head up display settings as follows.
• Enable Head-up display
• Display Height
• Rotation
• Brightness
• Content Selection
• Speed Size
• Speed Color
For more information, refer to “LCD
Display” in chapter 4. If your vehicle is
equipped with additional navigation,
please refer to the infotainment system
manual separately supplied.