2020 Hyundai Sonata Head light
[x] Cancel search: Head lightPage 132 of 537

5
Head Up Display (HUD) ........................................................................\
...... 5-72
Lighting ...............................................................\
.......................................... 5-74
Exterior Lights ........................................................................\
.................................5-74
Interior Lights ........................................................................\
.................................5-80
Welcome System ........................................................................\
........................... 5-83
Wipers and Washers ........................................................................\
............5-84Windshield Wipers ........................................................................\
......................... 5-84
Windshield Washers ........................................................................\
....................... 5-85
Rear View Monitor (RVM) ........................................................................\
...5-86Rear View Monitor with Parking Guidance ...........................................................5-86
Rear View Monitor - Top View ........................................................................\
.......5-86
Surround View Monitor (SVM) ...................................................................5-88
Reverse Parking Collision-Avoidance Assist ..............................................5-89
System Setting and Operation ........................................................................\
......5-89
Warning and System Control ........................................................................\
.........5-90
Detecting Sensor ........................................................................\
............................ 5-92
System Malfunction ........................................................................\
....................... 5-93
Limitations of the System ........................................................................\
.............. 5-93
Reverse Parking Distance Warning (PDW) ................................................ 5-95Operation of Reverse Parking Distance Warning System .................................... 5-95
To Turn Off Reverse Parking Distance Warning System ..................................... 5-97
Non-Operational Conditions of Reverse Parking Distance Warning System ..... 5-97
Reverse Parking Distance Warning System Precautions .....................................5-98
Forward/Reverse Parking Distance Warning (PDW) ................................5-99Operation of Forward/Reverse Parking Distance Warning System .................. 5-100
Non-Operational Conditions of Forward/Reverse Parking Distance Warning
System .....................................................................\
...............................................5-102
Forward/Reverse Parking Distance Warning System Precautions ....................5-103
Remote Smart Parking Assist (RSPA) ....................................................... 5-104Operating Condition ........................................................................\
.....................5-105
How Remote Smart Parking Assist System Works ............................................. 5-108
Additional Instructions ........................................................................\
...................5-113
Display Operation Status ........................................................................\
.............. 5-114
How the Remote Moving Forward/Backward System Works .............................5-115
Manual Climate Control System ............................................................... 5-118Heating and Air Conditioning ........................................................................\
....... 5-119
System Operation ........................................................................\
.......................... 5-124
System Maintenance ........................................................................\
.................... 5-125
Page 177 of 537
05
5-47
Electrochromic Mirror (ECM)
(if equipped)
ODN8059023LODN8059023L
The electric rearview mirror automatically
controls the glare from the headlamp of
the vehicle behind you in nighttime or low
light driving conditions.
When the engine is running, the glare is
automatically controlled by the sensor
mounted in the rearview mirror. The
sensor detects the light level around the
vehicle, and automatically adjusts to
control the headlamp glare from vehicles
behind you.
Whenever the shift button is placed in R
(Reverse), the mirror will automatically
go to the brightest setting in order to
improve the driver’s view behind the
vehicle.
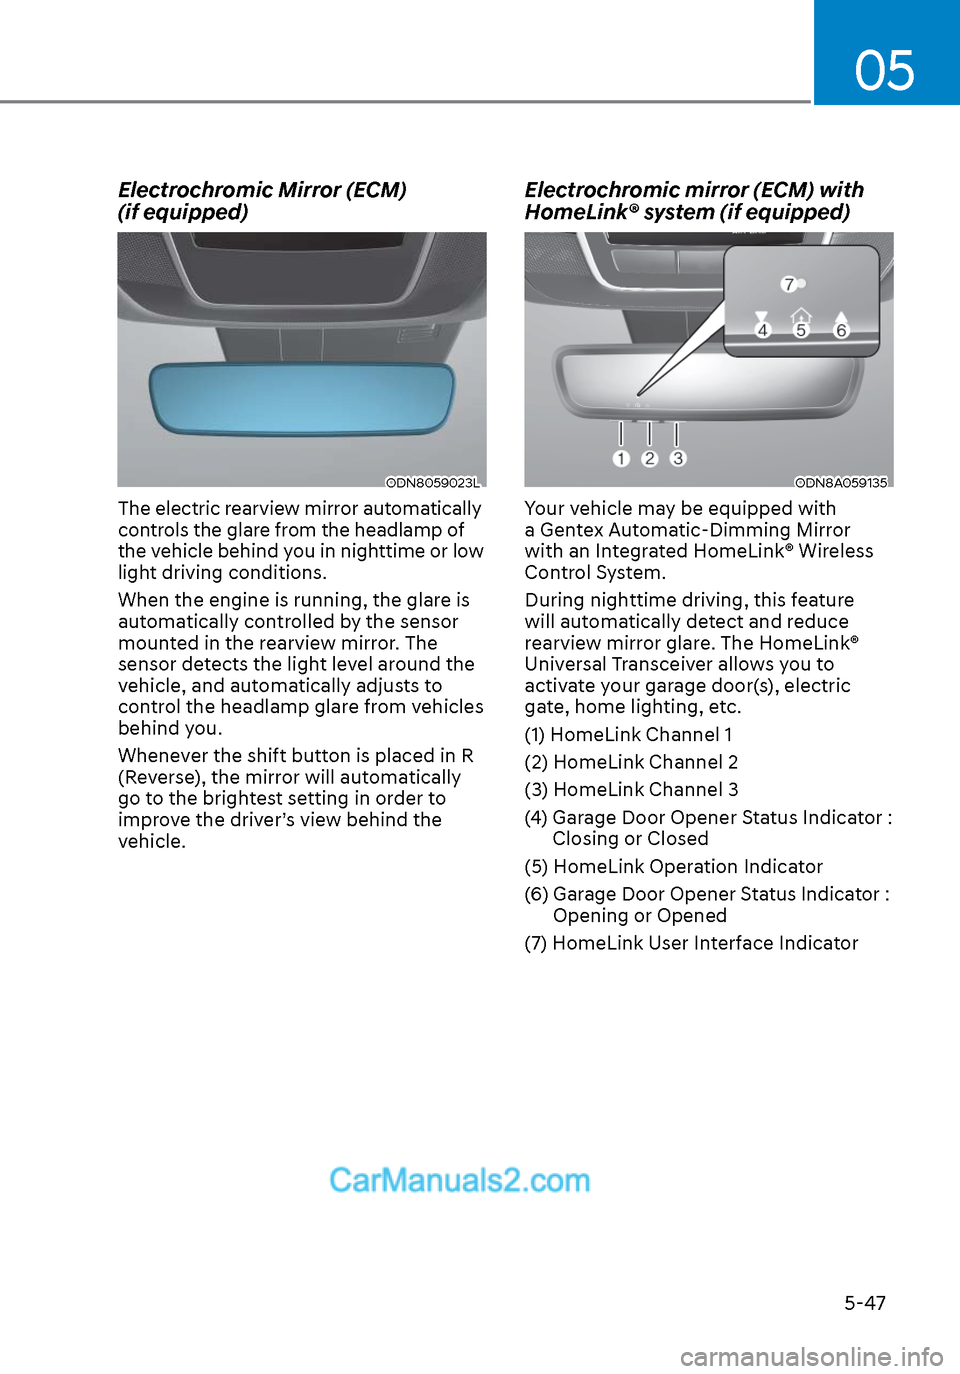
Electrochromic mirror (ECM) with
HomeLink® system (if equipped)
ODN8A059135ODN8A059135
Your vehicle may be equipped with
a Gentex Automatic-Dimming Mirror
with an Integrated HomeLink® Wireless
Control System.
During nighttime driving, this feature
will automatically detect and reduce
rearview mirror glare. The HomeLink®
Universal Transceiver allows you to
activate your garage door(s), electric
gate, home lighting, etc.
(1) HomeLink Channel 1
(2) HomeLink Channel 2
(3) HomeLink Channel 3
(4) Garage Door Opener Status Indicator : Closing or Closed
(5) HomeLink Operation Indicator
(6) Garage Door Opener Status Indicator : Opening or Opened
(7) HomeLink User Interface Indicator
Page 187 of 537
05
5-57
Power Windows
The ignition switch must be in the
ON position to be able to raise or
lower the windows. Each door has a
Power Window switch to control that
door’s window. The driver has a Power
Window Lock switch which can block
the operation of passenger windows.
The power windows will operate for
approximately 30 seconds after the
ignition switch is placed in the ACC or
LOCK/OFF position. However, if the front
doors are opened, the Power Windows
will not operate even within the 30
second period.
WARNING
To avoid serious injury or death, do not
extend your head, arms or body outside
the windows while driving.
Information
• In cold and wet climates, power
windows may not work properly due to
freezing conditions.
• While driving with the rear windows
down or with the sunroof (if equipped)
opened (or partially opened), your
vehicle may demonstrate a wind
buffeting or pulsation noise. This
noise is normal and can be reduced
or eliminated by taking the following
actions. If the noise occurs with one
or both of the rear windows down,
partially lower both front windows
approximately one inch. If you
experience the noise with the sunroof
open, slightly close the sunroof.
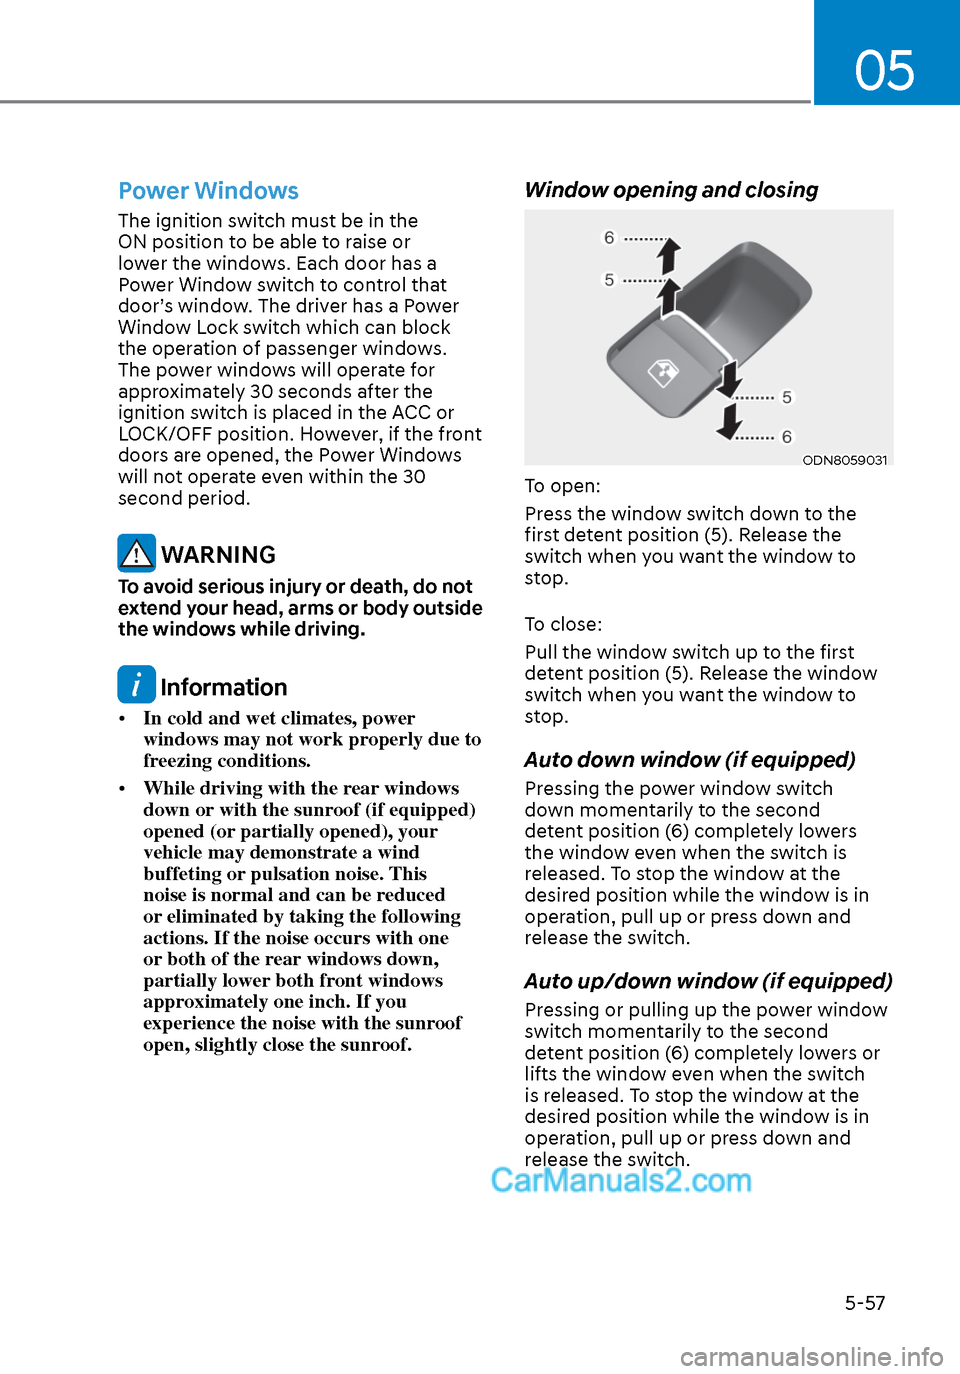
Window opening and closing
ODN8059031ODN8059031
To open:
Press the window switch down to the
first detent position (5). Release the
switch when you want the window to
stop.
To close:
Pull the window switch up to the first
detent position (5). Release the window
switch when you want the window to
stop.
Auto down window (if equipped)
Pressing the power window switch
down momentarily to the second
detent position (6) completely lowers
the window even when the switch is
released. To stop the window at the
desired position while the window is in
operation, pull up or press down and
release the switch.
Auto up/down window (if equipped)
Pressing or pulling up the power window
switch momentarily to the second
detent position (6) completely lowers or
lifts the window even when the switch
is released. To stop the window at the
desired position while the window is in
operation, pull up or press down and
release the switch.
Page 202 of 537
Convenient Features5-72
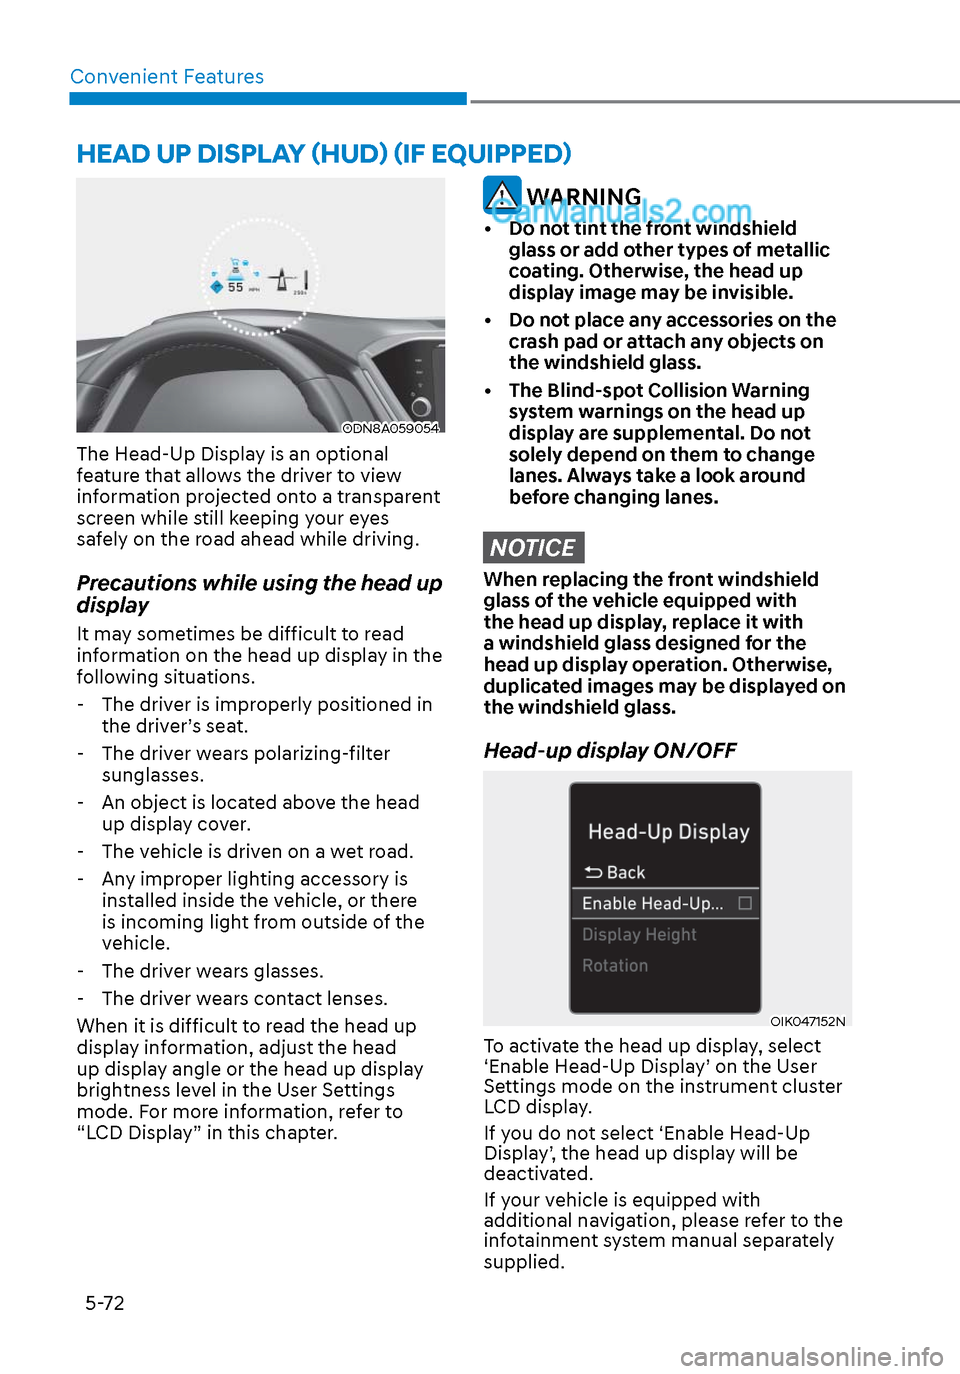
HEAD UP DISPLAY (HUD) (IF EQUIPPED)
ODN8A059054ODN8A059054
The Head-Up Display is an optional
feature that allows the driver to view
information projected onto a transparent
screen while still keeping your eyes
safely on the road ahead while driving.
Precautions while using the head up
display
It may sometimes be difficult to read
information on the head up display in the
following situations.
- The driver is improperly positioned in the driver’s seat.
- The driver wears polarizing-filter sunglasses.
- An object is located above the head up display cover.
- The vehicle is driven on a wet road.
- Any improper lighting accessory is installed inside the vehicle, or there
is incoming light from outside of the
vehicle.
- The driver wears glasses.
- The driver wears contact lenses.
When it is difficult to read the head up
display information, adjust the head
up display angle or the head up display
brightness level in the User Settings
mode. For more information, refer to
“LCD Display” in this chapter.
WARNING
• Do not tint the front windshield glass or add other types of metallic
coating. Otherwise, the head up
display image may be invisible.
• Do not place any accessories on the crash pad or attach any objects on
the windshield glass.
• The Blind-spot Collision Warning system warnings on the head up
display are supplemental. Do not
solely depend on them to change
lanes. Always take a look around
before changing lanes.
NOTICE
When replacing the front windshield
glass of the vehicle equipped with
the head up display, replace it with
a windshield glass designed for the
head up display operation. Otherwise,
duplicated images may be displayed on
the windshield glass.
Head-up display ON/OFF
OIK047152NOIK047152N
To activate the head up display, select
‘Enable Head-Up Display’ on the User
Settings mode on the instrument cluster
LCD display.
If you do not select ‘Enable Head-Up
Display’, the head up display will be
deactivated.
If your vehicle is equipped with
additional navigation, please refer to the
infotainment system manual separately
supplied.
Page 204 of 537
Convenient Features5-74
LIGHTING
Exterior Lights
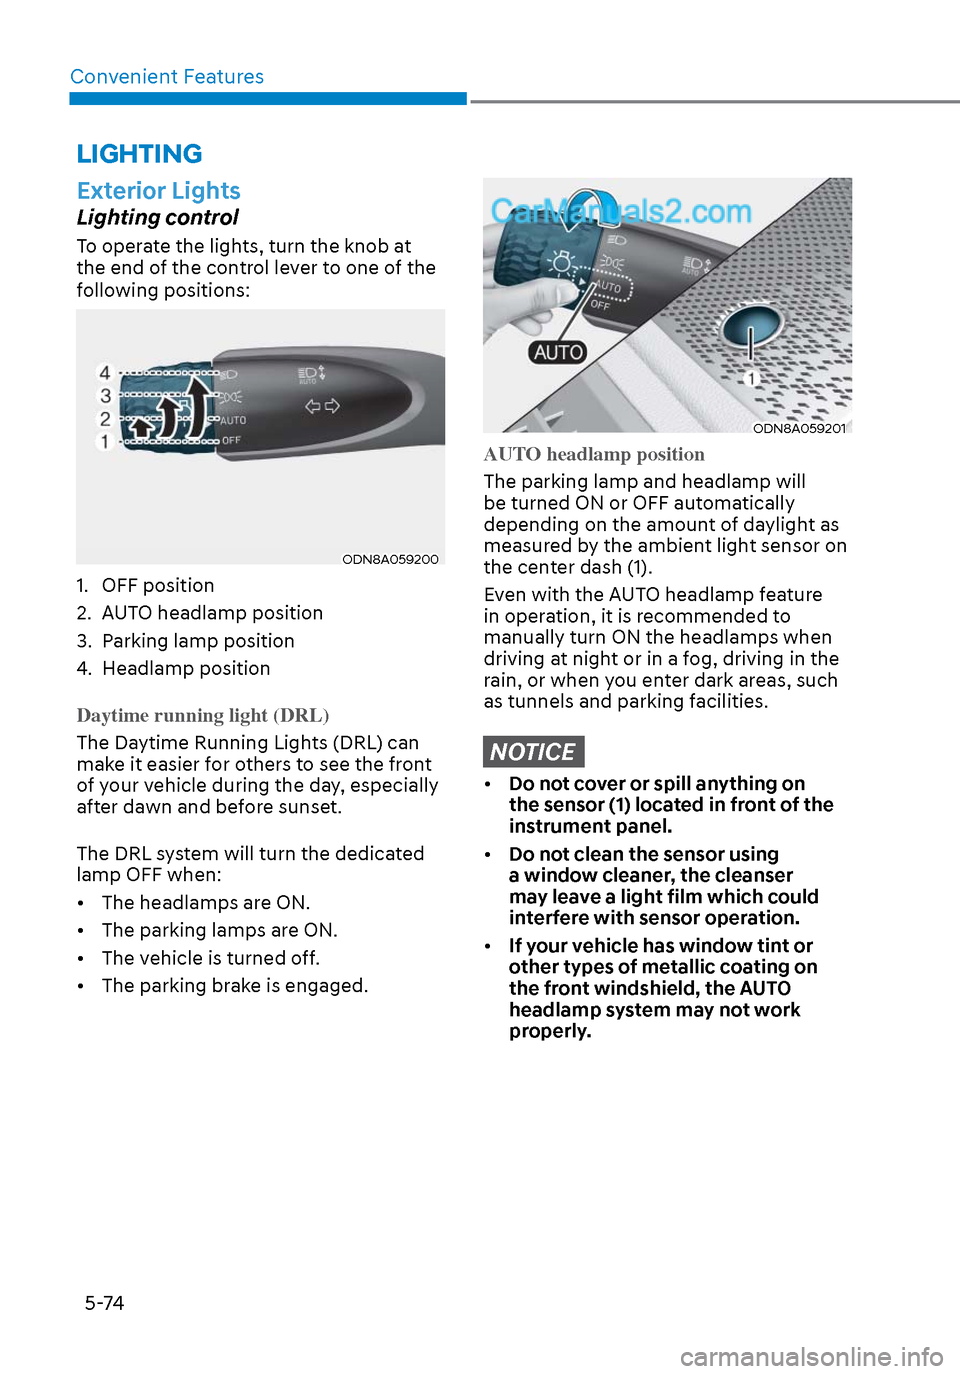
Lighting control
To operate the lights, turn the knob at
the end of the control lever to one of the
following positions:
ODN8A059200ODN8A059200
1. OFF position
2. AUTO headlamp position
3. Parking lamp position
4. Headlamp position
Daytime running light (DRL)
The Daytime Running Lights (DRL) can
mak
e it easier for others to see the front
of your vehicle during the day, especially
after dawn and before sunset.
The DRL system will turn the dedicated
lamp OFF when:
• The headlamps are ON.
• The parking lamps are ON.
• The vehicle is turned off.
• The parking brake is engaged.
ODN8A059201ODN8A059201
AUTO headlamp position
The parking lamp and headlamp will
be turned ON or OFF aut
omatically
depending on the amount of daylight as
measured by the ambient light sensor on
the center dash (1).
Even with the AUTO headlamp feature
in operation, it is recommended to
manually turn ON the headlamps when
driving at night or in a fog, driving in the
rain, or when you enter dark areas, such
as tunnels and parking facilities.
NOTICE
• Do not cover or spill anything on
the sensor (1) located in front of the
instrument panel.
• Do not clean the sensor using
a window cleaner, the cleanser
may leave a light film which could
interfere with sensor operation.
• If your vehicle has window tint or
other types of metallic coating on
the front windshield, the AUTO
headlamp system may not work
properly.
Page 205 of 537
05
5-75
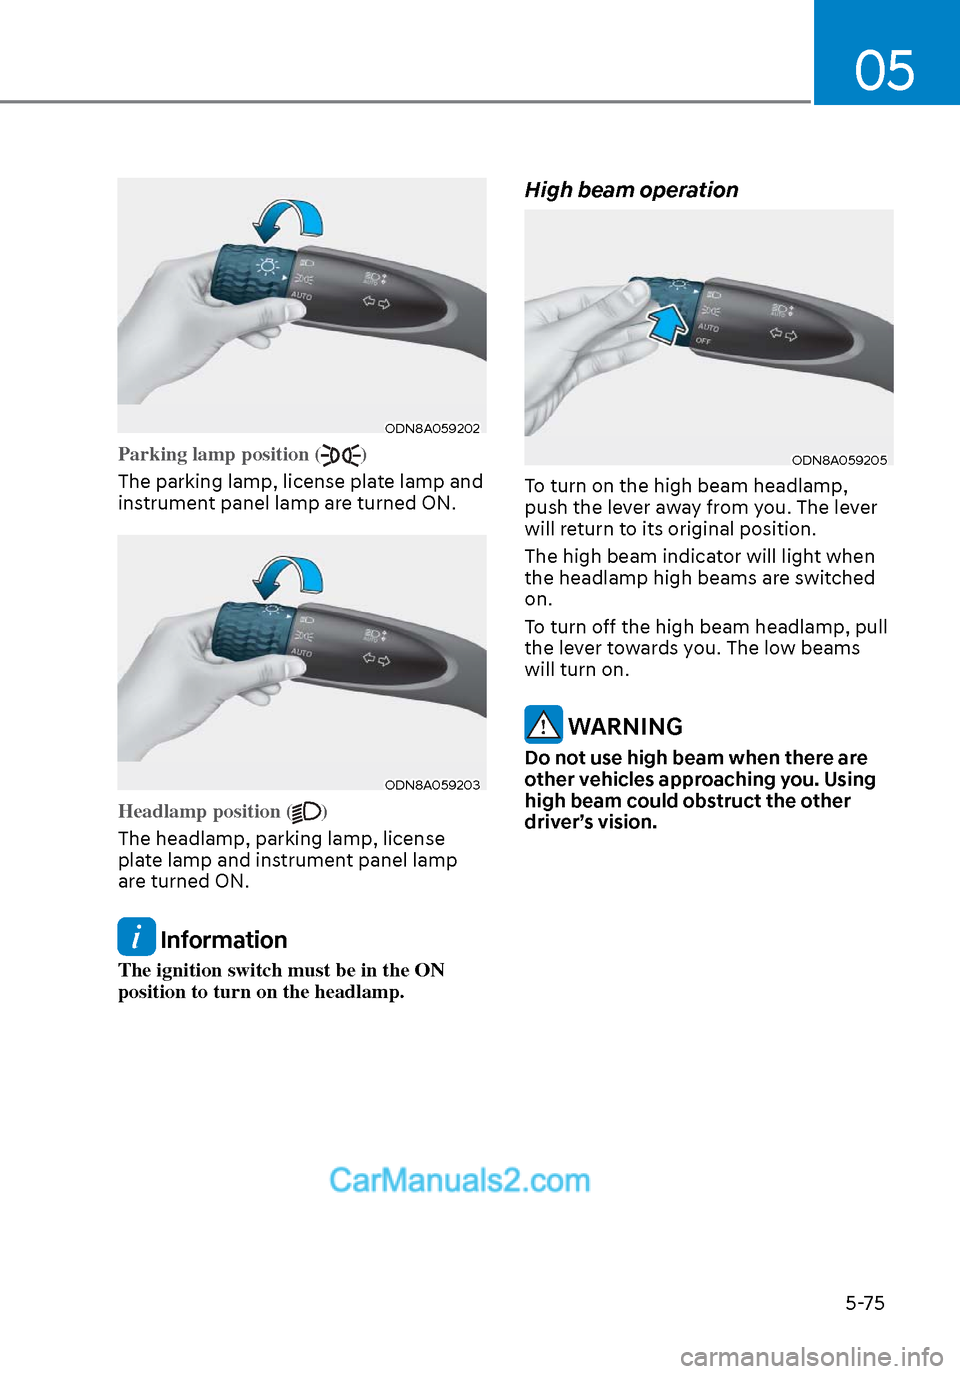
ODN8A059202ODN8A059202
Parking lamp position ()
The parking lamp, license plate lamp and
ins
trument panel lamp are turned ON.
ODN8A059203ODN8A059203
Headlamp position ()
The headlamp, parking lamp, license
pla
te lamp and instrument panel lamp
are turned ON.
Information
The ignition switch must be in the ON
position to turn on the headlamp.
High beam operation
ODN8A059205ODN8A059205
To turn on the high beam headlamp,
push the lever away from you. The lever
will return to its original position.
The high beam indicator will light when
the headlamp high beams are switched
on.
To turn off the high beam headlamp, pull
the lever towards you. The low beams
will turn on.
WARNING
Do not use high beam when there are
other vehicles approaching you. Using
high beam could obstruct the other
driver’s vision.
Page 206 of 537
Convenient Features5-76
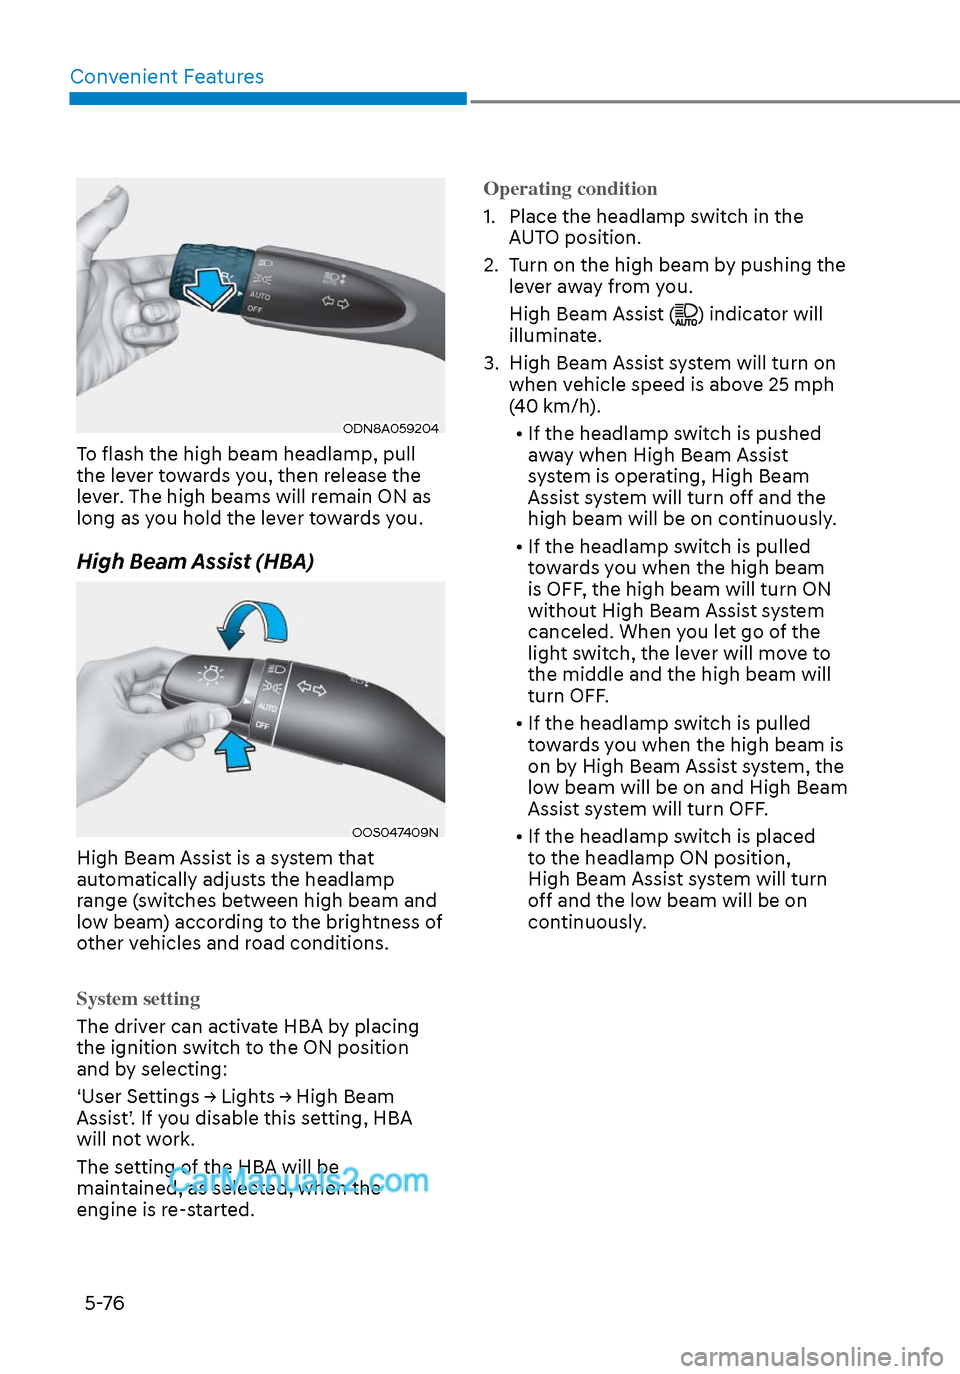
ODN8A059204ODN8A059204
To flash the high beam headlamp, pull
the lever towards you, then release the
lever. The high beams will remain ON as
long as you hold the lever towards you.
High Beam Assist (HBA)
OOS047409NOOS047409N
High Beam Assist is a system that
automatically adjusts the headlamp
range (switches between high beam and
low beam) according to the brightness of
other vehicles and road conditions.
System setting
The driver can activate HBA by placing
the ignition s
witch to the ON position
and by selecting:
‘User Settings → Lights → High Beam
Assist’. If you disable this setting, HBA
will not work.
The setting of the HBA will be
maintained, as selected, when the
engine is re-started. Operating condition
1. Place the headlamp switch in the
A
UTO position.
2. Turn on the high beam by pushing the lever away from you.
High Beam Assist (
) indicator will
illuminate.
3. High Beam Assist system will turn on when vehicle speed is above 25 mph
(40 km/h).
• If the headlamp switch is pushed away when High Beam Assist
system is operating, High Beam
Assist system will turn off and the
high beam will be on continuously.
• If the headlamp switch is pulled towards you when the high beam
is OFF, the high beam will turn ON
without High Beam Assist system
canceled. When you let go of the
light switch, the lever will move to
the middle and the high beam will
turn OFF.
• If the headlamp switch is pulled towards you when the high beam is
on by High Beam Assist system, the
low beam will be on and High Beam
Assist system will turn OFF.
• If the headlamp switch is placed to the headlamp ON position,
High Beam Assist system will turn
off and the low beam will be on
continuously.
Page 207 of 537
05
5-77
When High Beam Assist system is
operating, the high beam switches to low
beam if any of the following conditions
occur: - When the headlamp of an on-coming vehicle is detected.
- When the tail lamp of a vehicle in front
is detected.
- When the headlamp or tail lamp of a motorcycle or a bicycle is detected.
- When the surrounding ambient light is bright enough that high beams are not
required.
- When streetlights or other lights are
detected.
- When the headlamp switch is not in the AUTO position.
- When High Beam Assist system is off.
- When vehicle speed is below 15 mph (24 km/h).
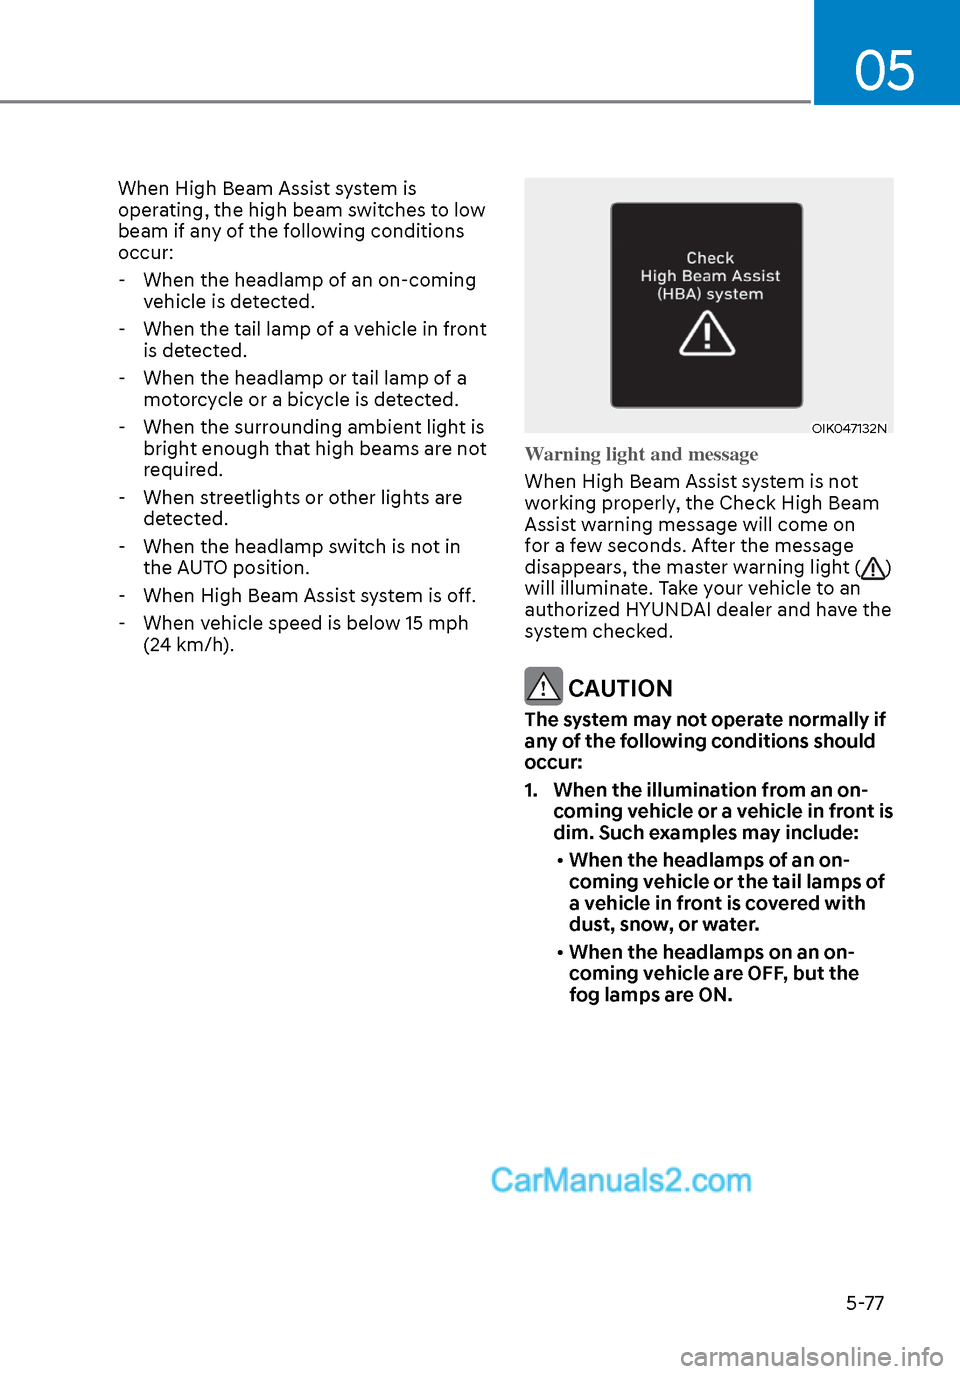
OIK047132NOIK047132N
Warning light and message
When High Beam Assist system is not
w
orking properly, the Check High Beam
Assist warning message will come on
for a few seconds. After the message
disappears, the master warning light (
)
will illuminate. Take your vehicle to an
authorized HYUNDAI dealer and have the
system checked.
CAUTION
The system may not operate normally if
any of the following conditions should
occur:
1. When the illumination from an on- coming vehicle or a vehicle in front is
dim. Such examples may include:
• When the headlamps of an on-
coming vehicle or the tail lamps of
a vehicle in front is covered with
dust, snow, or water.
• When the headlamps on an on-
coming vehicle are OFF, but the
fog lamps are ON.